Page 4 - GENERAL INFORMATION; Warning. No liability is held for damage caused by:; SAFET Y REGULATIONS; Intended Use
• 24 • GENERAL INFORMATION The cof ee machine is suitable for preparing espresso cof ee using either cof ee beans or ground cof ee and is equipped with a device to dispense steam and hot water. The structure of the ma-chine has been designed for domestic use only and is not suitable for continuous p...
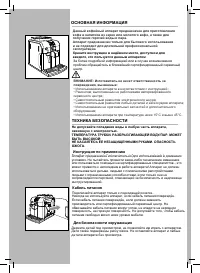
Page 5 - Danger of Burns; Storing the Machine - Cleaning
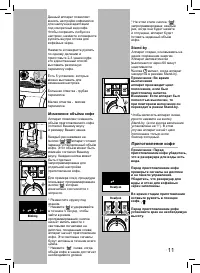
• 25 • E ng lis h Danger of Burns Never direct the steam/hot water wand towards yourself or others: Danger of scalding! Al- ways use the handles or knobs provided. Machine Location - Suitable Location for Operation and Maintenance For best use, it is recommended to:• Choose a safe, level surface, wh...
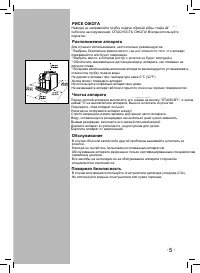
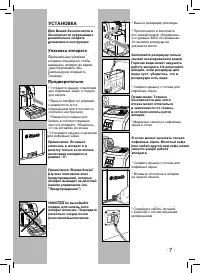
Page 7 - INSTALLATION; Machine Packaging
• 27 • E ng lis h INSTALLATION For your safety and the safety of others, carefully follow the instruc-tions provided in the “Safety Regu-lations” section. Machine Packaging The original packaging has been designed and constructed to protect the machine during transport. We recommend keeping the pack...
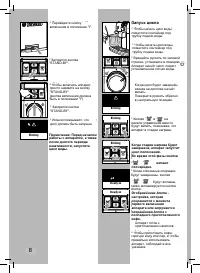
Page 8 - Circuit Priming; and
• 28 • • 28 • • Switch the power button to “I” to turn the machine on. Circuit Priming • To prime the water circuit, place a container under the steam wand (Pannarello, if supplied). • Make sure the selector switch is in the “ ” position; if this is not the case, set it to that position. • To turn t...
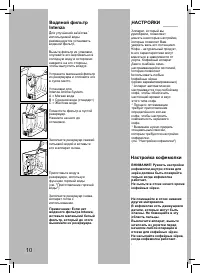
Page 10 - ADJUSTMENTS; Saeco Adapting System; Coff ee Grinder Adjustment; IntОnгК
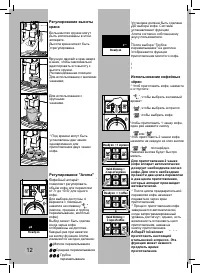
• 30 • • 30 • ADJUSTMENTS The machine that you have bought allows for certain adjustments that will permit you to use it to its full potential. Saeco Adapting System Coffee is a natural product and its cha-racteristics may change according to its origin, blend and roast. The Saeco cof ee machine is ...
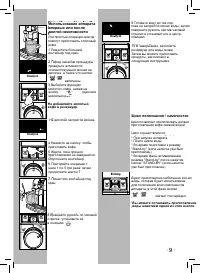
Page 11 - COFFEE BREWING; the water tank contains water.; Adjusting the Coff ee Length; И е е е ъё к фе
• 31 • E ng lis h At this point the button “ ” is program- med; each time it is pressed and released, the machine will brew the same amount of cof ee that was just programmed. Stand-by The machine is designed for energy sa-ving. The machine automatically turns of after 60 minutes of inactivity. The“...
Page 13 - Using Pre-ground Coff ee; • If no pre-ground cof ee is poured; DISPENSING HOT
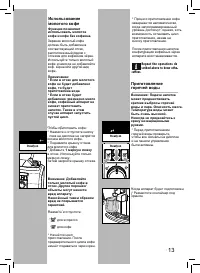
• 33 • E ng lis h Using Pre-ground Coff ee This func tion allows using pre-ground and decaf eina- ted cof ee. Pre-ground coffee must be poured into the appropriate compartment positioned next to the cof ee bean hopper. Only use ground cof ee for espresso machines and never cof ee beans or instant cof...
Page 14 - PREPARING A CAPPUC
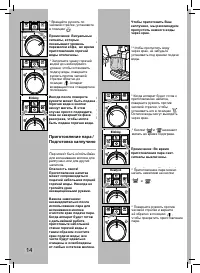
• 34 • • 34 • • Turn the selector switch clockwise to set it to the “ ” position. Note: The lights that indica-te the aroma are off when dispensing hot water. ned and free of any milk residue. To prepare your cappuccino, we recommend discharging the water in the steam wand. • To discharge the water ...
Page 15 - CLEANING AND MAIN; cold milk straight from the fridge.
• 35 • E ng lis h • Immerse the steam wand (Pannarello, if supplied) in the milk to be heated. • Turn the selec tor switch counter- clockwise to set it to the “ ” position. Rotate the container and move it gently up and down to obtain uniform foam. • After dispensing steam for the desired time, turn...
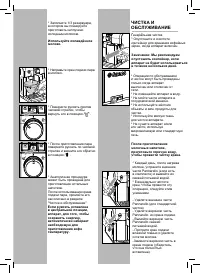
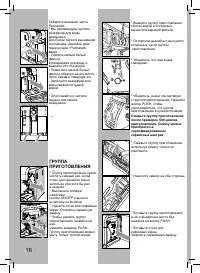
Page 16 - Brew Group
• 36 • • 36 • Reassemble the external part of the Pannarello. • We recommend cleaning the water tank daily. For an easier removal of the water tank, move the steam wand / Pannarello upwards: - Remove the small white i lter in the water tank and wash it under running drinking water. - Reposition the ...
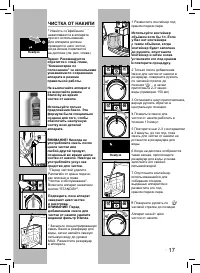
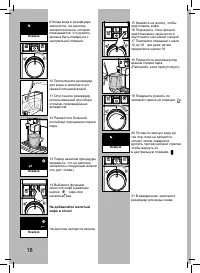
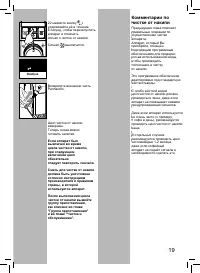
Page 17 - DESCALING; the descaling process.
• 37 • E ng lis h DESCALING Limescale normally builds up with the use of the appliance. The machine must be descaled when the icon appears on the display. Important note: It is recom-mended to refer to the next section, “Remarks on Descaling”, for some tips about keeping the machine in perfect worki...
Page 19 - Remarks on Descaling
• 39 • E ng lis h Remarks on Descaling The previous section explains the correct operations to per form to descale the machine. The machine you have purchased is equip-ped with advanced software to check the quantity of used water in order to provide reliable information about the right time to carr...
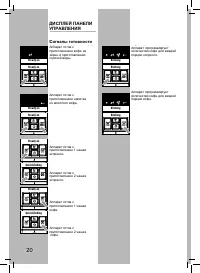
Page 20 - Ready Signals
• 40 • • 40 • CONTROL PANEL DISPLAY Ready Signals • The machine is ready for brewing cof ee from bean and hot water dispensing. • The machine is ready for pre-ground cof ee brewing. • The machine is programming the amount of cof ee to be brewed for each espresso cof ee. • The machine is programming ...
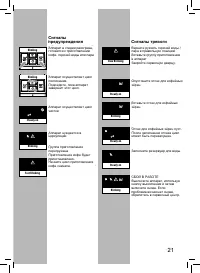
Page 21 - Warning Signals
• 41 • E ng lis h • The machine is performing the rinse cycle. Wait until the machine stops the opera- tion. • The machine needs a descaling cycle. • The machine needs water circuit priming. Warning Signals • The machine is warming up to brew cof ee and dispense hot water or steam. • No cof ee beans...
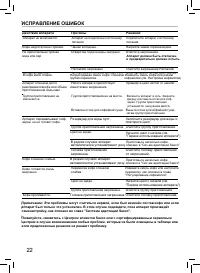
Page 22 - TROUBLESHOOTING
• 42 • Machine Actions Causes Solutions The machine does not turn on. Th e m a c h i n e i s n o t co n n e c te d to t h e p owe r source. Connect the machine to the power source. The cof ee is not hot enough. The cups are cold. Warm the cups with hot water. No hot water or steam is dispensed. The ...
Page 23 - TECHNICAL SPECIFICATIONS; S A E C O I N T E R N AT I O N A L G R O U P S . P. A
• 43 • E ng lis h TECHNICAL SPECIFICATIONS The manufacturer reserves the right to make changes to the technical specii cations of the product. Nominal Voltage - Power Rating - Power Supply . . . . . . . . . . . . . . . . . . . . . . . . . . . . . . . . . . . . . . . . . . . . . . . . . . . . . . . S...