Page 3 - Summary
4 5 EN Summary SAFETY INSTRUCTIONS ...............................................................................6 TROUBLESHOOTING .....................................................................................9 USING YOUR APPLIANCE ...............................................................
Page 4 - READ ALL INSTRUCTIONS BEFORE USING
6 7 EN IMPORTANT SAFETY INSTRUCTIONS When using your appliance, basic safety precautions should always be followed, including the following: 1. Use appliance only for its intended use. 2. To protect against a risk of electric shock, do not immerse the appliance in water or other liquids. 3. The appl...
Page 5 - SAVE THESE INSTRUCTIONS; TROUBLESHOOTING
8 9 - Before rinsing the boiler/rinsing the anti-calc collector (depending on the model), wait until the appliance is completely cold and has been unplugged for at least 2 hours before unscrewing the boiler rinse cap/ the scale collector cover. - Warning: if the boiler cap or the boiler rinse cap (d...
Page 7 - USING YOUR APPLIANCE
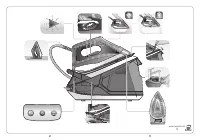
12 13 USING YOUR APPLIANCE 1.1 Getting started • Plug in your steam generator. • Unlock your steam generator. Compact Steam Pro is equipped with a lock system to hold the iron onto the base for easy transport and storage. • Completely unwind the power cord and take the water cord out of its storage ...
Page 8 - water tank; CLICK
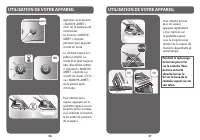
14 15 USING YOUR APPLIANCE • To obtain even more steam, press the steam trigger under the handle three times in quick succession for automatic sequential steam. x3 During ironing, do not leave the iron on the soleplate. It is safe to leave the iron on the base of the steam generator or on the heel. ...
Page 10 - steaming
18 19 USING YOUR APPLIANCE • When you press the "ECO" button again to remove the mode, the temperature and steam increase again. 1.5 Vertical steaming wool - laine wool - laine silk - soie silk - soie synth. - synth. synth. - synth. USING YOUR APPLIANCE As steam is very hot: never attempt to...
Page 11 - MAINTENANCE AND STORAGE; generator
20 21 1.6 Auto-off • The steam generator is fitted with an «AUTO- OFF» monitoring system, which is activated automatically after approximately 8 minutes without use. The «ON-OFF» button flashes to indicate that the appliance is on standby. • To reactivate the steam generator, press the «ON-OFF» butt...
Page 13 - Preparation
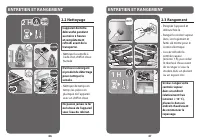
24 25 2.3 Storage • Switch off and unplug the appliance. • Store the steam cord in its slide storage place and do the same for the electrical cord. • Leave the steam generator to cool (around 1h) then empty the water tank before putting it away if you are storing it in a cupboard or a confined space...
Page 14 - PLEASE RETAIN THIS INSTRUCTION; E N • R O W E N TA I N T E R N AT I O N A L L I M I T E D G U A R A N T E E
26 27 organic waste, mineral or chemical elements that can cause spitting, brown staining or premature wear of the appliance. • Do not fill the water tank from the cartridge compartment. • Empty the water tank after every use. Do not store the steam generator with water in the water tank. Semi-autom...
Page 15 - Synthèse; FRANÇAIS; CONSIGNES DE SECURITE; LISEZ L'INTÉGRALITÉ DES CONSIGNES
28 29 FR Synthèse CONSIGNES DE SÉCURITÉ ........................................................................ 29 DÉPANNAGE ................................................................................................. 32 UTILISATION DE VOTRE APPAREIL ..............................................
Page 17 - DÉPANNAGE
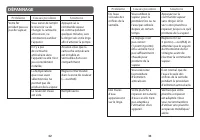
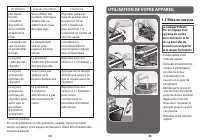
32 33 DÉPANNAGE Problème Causes possibles Solutions Votre fer produit peu ou pas de vapeur. Vous venez de remplir le réservoir ou de changer la cartouche anticalcaire, ou commencez à utiliser l'appareil. Appuyez sur la commande vapeur en continu pendant quelques minutes, sans la diriger vers votre l...
Page 18 - UTILISATION DE VOTRE APPAREIL
34 35 UTILISATION DE VOTRE APPAREIL 1.1 Mise en service • Branchez votre centrale vapeur. • Déverrouillez votre centrale vapeur. Le Compact Steam Pro est équipé d'un système de verrou pour maintenir le fer sur sa base afin de pouvoir le transporter et le ranger facilement. • Déroulez entièrement le ...
Page 22 - vertical; automatique
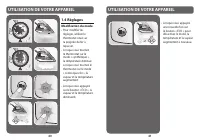
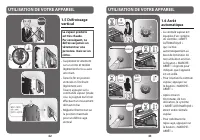
42 43 1.5 Défroissage vertical wool - laine wool - laine silk - soie silk - soie synth. - synth. synth. - synth. UTILISATION DE VOTRE APPAREIL La vapeur produite est très chaude. Par conséquent, ne défroissez jamais un vêtement sur une personne, mais sur un cintre. • Tenez le fer en position vertica...
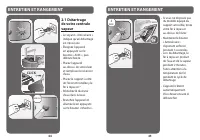
Page 23 - de votre centrale; ENTRETIEN ET RANGEMENT
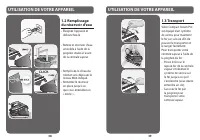
44 45 • Placez l'appareil au-dessus de votre évier et remplissez le réservoir d'eau. • Placez le support à côté de l'évier et installez-y le fer à repasser.* • Réinsérez le réservoir d'eau dans la base. • Branchez l'appareil et allumez-le en appuyant sur le bouton « Marche ». CLICK ENTRETIEN ET RANG...
Page 25 - Préparation
48 49 • Lors de l'utilisation, votre pompe électrique injecte de l'eau dans la semelle du fer à repasser. Cela produit un léger bruit qui est normal. • Consignes de sécurité concernant la cartouche anticalcaire et le collecteur (selon modèle) : - Ne pas ingérer - Avant de rincer le collecteur (selon...
Page 26 - VEUILLEZ CONSERVER CE MANUEL; FR• GARANTIE INTERNATIONALE LIMITÉE - ROWENTA
50 51 VEUILLEZ CONSERVER CE MANUEL D'INSTRUCTIONS À TITRE DE RÉFÉRENCE. FAISONS DE LA PROTECTION DE L'ENVIRONMENT NOTRE PRIORITÉ ! Votre appareil contient des matériaux précieux qui peuvent être récupérés ou recyclés. Déposez-le dans un centre de collecte des déchets municipal. FR• GARANTIE INTERNAT...
Page 27 - Resumen; MEDIDAS DE SEGURIDAD; LEA TODAS LAS INSTRUCCIONES ANTES DE USAR
52 53 ES Resumen MEDIDAS DE SEGURIDAD ....................................................................... 53 RESOLUCIÓN DE PROBLEMAS ............................................................... 56 CÓMO USAR SU APARATO ....................................................................... 59 ...
Page 29 - RESOLUCIÓN DE PROBLEMAS
56 57 RESOLUCIÓN DE PROBLEMAS Problema Posibles causas Soluciones La plancha produce poco o nada de vapor. Acaba de llenar el depósito o cambiar el cartucho anticalcificación, o acaba de empezar a usarlo. Presione el botón de control de vapor de forma continua durante unos minutos; asegúrese de apun...
Page 30 - CÓMO USAR SU APARATO
58 59 CÓMO USAR SU APARATO 1.1 Introducción • Conecte su generador de vapor. • Desbloquee el generador de vapor. La Compact Steam Pro está equipada con un sistema de bloqueo para sostener la plancha sobre la base, a fin de facilitar el transporte y almacenamiento. • Desenrolle por completo el cable ...
Page 32 - depósito del agua
62 63 1.2 Cómo llenar el depósito del agua CLICK • Llénelo con agua de red sin exceder el nivel MAX. • Vuelva a insertarlo en su carcasa hasta que escuche un sonido de “clic”. • Retire el depósito del agua extraíble con la aleta situada en la parte delantera del generador de vapor. • Apague el apara...
Page 34 - posición vertical; automático
66 67 1.5 Vaporización en posición vertical wool - laine wool - laine silk - soie silk - soie synth. - synth. synth. - synth. CÓMO USAR SU APARATO Debido a que el vapor es muy caliente, nunca intente eliminar las arrugas de una prenda mientras la usa. Antes de hacerlo, siempre cuelgue las prendas en...
Page 35 - descalcificar el; MANTENIMIENTO Y ALMACENAMIENTO
68 69 • Coloque la unidad sobre un lavabo y llene el depósito del agua. • Coloque la base cerca del lavabo y sitúe la plancha en la parte superior*. • Vuelva a colocar el depósito del agua en la base. • Conecte la unidad y presione el botón “On” (Encendido) para encenderla. CLICK MANTENIMIENTO Y ALM...
Page 36 - Almacenamiento
70 71 MANTENIMIENTO Y ALMACENAMIENTO 2H NO NO 2.2 Limpieza El aparato debe desconectarse durante al menos 2 horas y debe enfriarse por completo antes de limpiarse. No utilice detergentes ni productos descalcificadores para limpiar la placa base de la plancha. Nunca sostenga la plancha ni la base deb...
Page 38 - ES • GARANTÍA LIMITADA INTERNACIONAL DE ROWENTA
74 75 CONSERVE ESTE FOLLETO DE INSTRUCCIONES PARA CONSULTARLO EN OTRO MOMENTO La protección del medioambiente es prioridad. Su aparato contiene materiales valiosos que se pueden recuperar o reciclar. Asegúrese de dejarlo en un centro local de eliminación de desechos. ES • GARANTÍA LIMITADA INTERNACI...