Page 2 - GENERAL SAFETY RULES; PERSONAL SAFETY; TOOL USE AND CARE; SERVICE
2 – English GENERAL SAFETY RULES DANGER: READ AND UNDERSTAND TOOL LABELS AND MANUAL. Failure to follow warnings could result in DEATH or SERIOUS INJURY. SAVE THESE INSTRUCTIONSWORK AREA Keep your work area clean and well lit. Cluttered benches and dark areas invite accidents. Do not operate power to...
Page 3 - SPECIFIC SAFETY RULES; OPERATION
3 – English Know your pneumatic tool. Read operator’s manual carefully. Learn its applications and limitations, as well as the specific potential hazards related to this tool. Fol-lowing this rule will reduce the risk of electric shock, fire, or serious injury. Always wear eye protection with side s...
Page 4 - AIR SUPPLY AND CONNECTIONS; LOADING TOOL; SAVE THESE INSTRUCTIONS
4 – English SPECIFIC SAFETY RULES Keep face and body parts away from back of the tool cap when working in restricted areas. Sudden recoil can result in impact to the body, especially when nailing into hard or dense material. During normal use the tool will recoil immediately after driving a fastener...
Page 5 - SYMBOLS; CALIFORNIA PROPOSITION 65
5 – English SYMBOLS NOTICE: The following signal words and meanings are intended to explain the levels of risk associated with this product. Indicates an imminently hazardous situation, which, if not avoided, will result in death or serious injury. Indicates a potentially hazardous situation, which,...
Page 6 - GLOSSARY OF TERMS
6 – English GLOSSARY OF TERMS Activate (operating controls) To move an operating control so that it is in a position that allows the tool to be actuated or that satisifes one requirement for the tool to be actuated. Actuate (tool) To cause movement of the tool component(s) intended to drive a fasten...
Page 7 - FEATURES
7 – English KNOW YOUR FRAMING NAILER See Figure 1, page 15. The safe use of this product requires an understanding of the information on the tool and in this operator’s manual as well as a knowledge of the project you are attempting. Before use of this product, familiarize yourself with all operatin...
Page 8 - APPLICATIONS
8 – English ASSEMBLY DANGER: Do not use oxygen, combustible gases, or bottled gases as a power source for this tool. The tool will explode and cause death or serious injury. WARNING: Do not allow familiarity with tools to make you careless. Remember that a careless fraction of a second is sufficient...
Page 9 - PREPARING THE TOOL FOR USE; ADJUSTING THE EXHAUST
9 – English OPERATION PREPARING THE TOOL FOR USE See Figure 2, page 15. Under normal use conditions, the tool should be lubricated before connecting the tool to an air supply. Add 30 drops of oil into the swivel connector to lubricate the tool before its first use. After the initial lubrication, mai...
Page 10 - USING THE SELECTABLE TRIGGER; SINGLE SEQUENTIAL ACTUATION MODE
10 – English OPERATION Connect the tool to the air supply. With the nose of the tool pointed away from you, feed a strip of nails into the magazine. Be sure the nails are pointed downward and at the angle shown. WARNING: Keep the tool pointed away from yourself and others when loading nails. Failure...
Page 11 - SETTING THE AIR PRESSURE
11 – English OPERATION WARNING: During normal use the tool will recoil immediately after driving a fastener. This is a normal function of the tool. Do not attempt to prevent the recoil by holding the nailer against the work. Restriction to the recoil can result in a second fastener being driven from...
Page 12 - MAINTENANCE; LUBRICATION; COLD WEATHER OPERATION
12 – English MAINTENANCE LUBRICATION Frequent, but not excessive, lubrication is required for best performance. Oil for pneumatic fastening tools added through the air line connection will lubricate the internal parts. Do not use detergent oil or additives as these oils will cause accelerated wear t...
Page 13 - REQUIRED DAILY CHECKLIST; ACCESSORIES
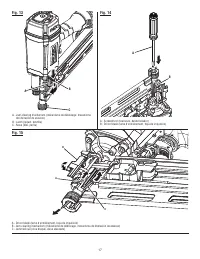
13 – English MAINTENANCE REQUIRED DAILY CHECKLIST See Figures 8 and 9, page 16. Disconnect the air supply from the tool and remove all fasteners. Check all screws, nuts, bolts, and pins on the tool. If any of these are loose, they must be tightened with the ap-propriate size wrench. Press the workpi...
Page 14 - PROBLEM
14 – English TROUBLESHOOTING NOTE: FIGURES (ILLUSTRATIONS) START ON PAGE 15 AFTER FRENCH AND SPANISH LANGUAGE SECTIONS. PROBLEM POSSIBLE CAUSE SOLUTION Air leak near the top of the tool or in the trigger area Inadequate lubricationLoose screwsWorn or damaged O-rings or seals Lubricate toolTighten sc...
Page 15 - RÈGLES DE SÉCURITÉ GÉNÉRALES; CONSERVER CES INSTRUCTIONS; LIEU DE TRAVAIL
2 – Français RÈGLES DE SÉCURITÉ GÉNÉRALES DANGER : LIRE ET VEILLER À BIEN COMPRENDRE LES AUTOCOLLANTS APPOSÉS SUR L’OUTIL ET LE MANUEL. Le non respect de cet avertissement pourrait entraîner des BLESSURES GRAVES ou MORTELLES. CONSERVER CES INSTRUCTIONS LIEU DE TRAVAIL Garder le lieu de travail propr...
Page 16 - RÈGLES DE SÉCURITÉ PARTICULIÈRES; UTILISATION
3 – Français Apprendre à connaître l’outil. Lire attentivement le manuel d’utilisation. Apprendre les applications et les limites de l’outil, ainsi que les risques spécifiques relatifs à son utilisation. Le respect de cette règle réduira les risques d’incendie, de choc électrique et de blessures. To...
Page 17 - ALIMENTATION ET CONNEXIONS; CHARGEMENT DE L’OUTIL
4 – Français RÈGLES DE SÉCURITÉ PARTICULIÈRES Lors du travail dans des endroits confinés, garder le visage et le corps à l’écart de l’arrière de l’outil. Un recul brusque peut projeter la cloueuse contre le corps, en particulier lors du clouage de matériaux denses. Durant l’utilisation normale de l’...
Page 18 - SYMBOLES; SYMBOLE; PROPOSITION 65 DE L'ÉTAT DE CALIFORNIE
5 – Français SYMBOLES Certains des symboles ci-dessous peuvent être utilisés sur l’outil. Veiller à les étudier et à apprendre leur signification. Une interprétation correcte de ces symboles permettra d’utiliser l’outil plus efficacement et de réduire les risques. SYMBOL NAME DESIGNATION/EXPLANATION...
Page 19 - GLOSSAIRE
6 – Français GLOSSAIRE Activer (commandes de l’outil) Mettre une commande sur une position déclenchant ou permettant de déclencher l’outil Actionner (outil) Causer le mouvement des pièces conçues pour chasser le clou. Système de déclenchement Gâchette, déclencheur par contact et / ou autre commande ...
Page 20 - HEX GRIP; CARACTÉRISTIQUES
7 – Français APPRENDRE À CONNAÎTRE LA CLOUEUSE Voir la figure 1, page 15. La sécurité d’utilisation de ce produit exige la compréhension des informations apposées sur l’outil et contenues dans ce manuel d’utilisation, ainsi que la connaissance du travail à exécuter. Avant d’utiliser ce produit, se f...
Page 21 - ASSEMBLAGE
8 – Français DANGER : N e p a s u t i l i s e r d e l ’ o x y g è n e o u d e s g a z combustibles ou en bouteille pour alimenter l’outil. L’outil exploserait, causant des blessures graves ou mortelles. AVERTISSEMENT : Ne pas laisser la familiarité avec les outils faire oublier la prudence. Ne pas o...
Page 22 - PRÉPARATION DE L’OUTIL POUR LE; COUSSINET DE PROTECTION
9 – Français UTILISATION PRÉPARATION DE L’OUTIL POUR LE TRAVAIL Voir la figure 2, page 15. Dans des conditions d’utilisation normales, l’outil doit être lubrifié avant d’être raccordé à l’alimentation pneumatique. Ajouter 30 gouttes d’huile dans le connecteur pivotant pour lubrifier l’outil avant la...
Page 23 - UTILISATION DE LA GÂCHETTE À SÉLECTEUR; DÉCLENCHEMENT PAR SÉQUENCE UNIQUE; DÉCLENCHEMENT PAR CONTACT
10 – Français UTILISATION Raccorder l’outil à la source d’air. a t te de l outil tant diri e l cart de soi, ins rer une bande de clous dans le magasin. S’assurer que les clous sont à l’angle indiqué, leur pointe dirigée vers le bas. AVERTISSEMENT : Veiller à ne pointer l’outil ni vers soi, ni vers d...
Page 24 - SÛRETÉ DE DÉCLENCHEMENT À VIDE; RÉGLAGE DE LA PRESSION D’AIR; DÉBLOCAGE D’UN CLOU
11 – Français UTILISATION AVERTISSEMENT : Durant l’utilisation normale de l’outil, un recul se produit lorsqu’un clou est planté. Ce recul est normal. Ne pas essayer de l’empêcher en maintenant l’outil contre la pièce à clouer. Cela pourrait causer l’éjection d’un second clou. Tenir la poignée ferme...
Page 25 - ENTRETIEN; LUBRIFICATION
12 – Français ENTRETIEN LUBRIFICATION Une lubrification fréquente, mais pas excessive, est nécessaire pour obtenir un fonctionnement optimal. De l’huile pour outils pneumatiques, placée dans le connecteur de flexible d’air, lubrifiera les pièces internes. Ne pas utiliser une huile détergente ou un a...
Page 26 - LISTE DE CONTRÔLE QUOTIDIEN; ACCESSOIRES
13 – Français LISTE DE CONTRÔLE QUOTIDIEN Voir les figures 8 et 9, page 16. Débrancher l’alimentation d’air de l’outil et retirer toutes les agrafes. Vérifier toutes les vis et tiges, et tous les écrous et boulons de l’outil. Resserrer au besoin toute pièce à l’aide d’une clé de dimension appropriée...
Page 27 - PROBLÈME; Ce produit est accompagné d’une politique de satisfaction de 90
14 – Français DÉPANNAGE FIGURES (ILLUSTRATIONS) COMMENÇANT SUR 15 DE PAGE APRÈS LA SECTION ESPAGNOL. PROBLÈME CAUSE POSSIBLE SOLUTION Fuite d’air dans le haut de l’outil ou près de la gâchette Lubrification insuffisanteVis desserréesJoints ou joints toriques usés Lubrifier l’outilSerrer les visInsta...
Page 28 - REGLAS DE SEGURIDAD GENERALES; GUARDE ESTAS INSTRUCCIONES; EMPLEO Y CUIDADO DE LA HERRAMIENTA
2 – Español REGLAS DE SEGURIDAD GENERALES PELIGRO : LEA Y COMPRENDA LAS ETIQUETAS DE LAS HERRAMIENTAS Y EL MANUAL. La inobservancia de los avisos de advertencia podría causar la MUERTE o LESIONES SERIAS. GUARDE ESTAS INSTRUCCIONES REA DE TRA A O Mantenga limpia y bien iluminada el área de trabajo. U...
Page 29 - REGLAS DE SEGURIDAD ESPECÍFICAS; FUNCIONAMIENTO
3 – Español Familiarícese con su herramienta eléctrica. Lea cuidadosamente el manual del operador. Aprenda sus usos y limitaciones, así como los posibles peligros específicos de esta herramienta. Con el cumplimiento de esta regla se reduce el riesgo de una descarga eléctrica, incendio o lesión seria...
Page 30 - SUMINISTRO DE AIRE Y CONEXIONES; CÓMO CARGAR LA HERRAMIENTA; GUARDE ESTAS INSTRUCCIONES.
4 – Español REGLAS DE SEGURIDAD ESPECÍFICAS Mantenga las manos y el resto del cuerpo lejos del área de la herramienta por donde se dispara el sujetador. El disparador de contacto puede rebotar después de la retracción normal al introducirse un sujetador (clavo o grapa, según sea el caso), debido a l...
Page 31 - OLOS; OLO
5 – Español S OLOS Es posible que se empleen en esta herramienta algunos de los siguientes símbolos. Le suplicamos estudiarlos y aprender su significado. Una correcta interpretación de estos símbolos le permitirá utilizar mejor y de manera más segura la herramienta. S OL NAME DESIGNATION/EXPLANATION...
Page 32 - GLOSARIO DE TÉRMINOS
6 – Español GLOSARIO DE TÉRMINOS Activar (los controles de accionamiento) Es mover un control de accionamiento de manera que quede en una posición en la cual se accione la herramienta o cumpla con un requisito necesario para accionar la misma. Accionar (la herramienta) Es producir el movimiento de l...
Page 33 - CARACTERÍSTICAS
7 – Español CARACTERÍSTICAS ESPECIFICACIONES DEL PRODUCTO Presión de funcionamiento ......................... De 70 a 120 psiCapacidad del alimentador .................... De 60 a 70 clavosDiámetro del tallo mínima .................................. 0,113 pulg.Consumo de aire ..........................
Page 34 - USOS
8 – Español ARMADO PELIGRO: No utilice oxígeno, gases combustibles ni gases embotellados como fuente de energía para esta herramienta. La herramienta explotará y causará la muerte o lesiones serias. ADVERTENCIA: No permita que su familarización con las herramientas lo vuelva descuidado. Tenga presen...
Page 35 - PREPARACIÓN DE LA HERRAMIENTA PARA; ALMOHADILLA PROTECTORA
9 – Español FUNCIONAMIENTO ADVERTENCIA: Siempre póngase protección ocular. La protección ocular no les queda a todos los operadores de la misma forma. Asegúrese de que la protección ocular escogida disponga de protectores laterales u ofrezca protección contra desechos disparados provenientes tanto d...
Page 36 - UTILIZACIÓN DEL GATILLO DE MODO; MODO DE ACCIONAMIENTO SECUENCIAL; MODO DE ACCIONAMIENTO POR CONTACTO
10 – Español FUNCIONAMIENTO OPERACIÓN DE CARGA DE LOS CLAVOS EN LA HERRAMIENTA Vea las figuras 6 y 7, página 15. ADVERTENCIA: El mecanismo de impulsión de la herramienta puede funcionar un ciclo al conectarse ésta al suministro de aire. Conecte siempre la herramienta a un suministro de aire presuriz...
Page 37 - SEGURO DE DISPARO EN SECO; O RETIRAR UN SU ETADOR ATORADO
11 – Español FUNCIONAMIENTO ADVERTENCIA: Durante el uso normal de la herramienta, ésta se retrae de inmediato después de introducir un sujetador. Así es el funcionamiento normal de la herramienta. No intente impedir la retracción presionando la clavadora contra la pieza de trabajo. Toda restricción ...
Page 38 - MANTENIMIENTO; AVISO; PRESI N OLU EN DEL SU INISTRO DE
12 – Español MANTENIMIENTO UTILIZACIÓN DE LA HERRAMIENTA EN TIEMPO FRÍO Para utilizar la herramienta en tiempo frío, cerca de la temperatura de congelación y abajo de la misma, puede congelarse la humedad presente en el conducto de aire y puede impedir el funcionamiento de la herramienta. Recomendam...
Page 39 - ACCESORIOS
13 – Español Con el elemento de contacto con la pieza de trabajo presionado, oprima el gatillo. El gatillo debe moverse suavemente, sin atascarse. Seleccione el modo de accionamiento secuencial sencillo ( ). Mientras la herramienta no esté cargada, conecte el suministro de aire adecuado (70 psi) a l...
Page 40 - SOLUCI N DE PRO LE AS; PRO LE
14 – Español SOLUCI N DE PRO LE AS PRO LE POSSI LE CAUSE SOLUTION Fuga de aire cerca de la parte superior de la herramienta o junto al gatillo Lubricación inadecuadaJuntas tóricas o sellos gastados o dañados Lubrique la herramientaInstale el juego de mantenimiento general Fuga de aire cerca de la pa...
Page 44 - OPERATOR’S MANUAL; CLOUEUSE DE CHARPENTIER À TÊTE RONDE
Customer Service Information: For parts or service, contact your nearest RIDGID authorized service center. Be sure to provide all relevant information when you call or visit. For the location of the au-thorized service center nearest you, please call 1-866-539-1710 or visit us online at www.ridgid.c...


 Ridgid R09891B
User Manual
Ridgid R09891B
User Manual
 Ridgid R09891B-AC87004
User Manual
Ridgid R09891B-AC87004
User Manual
 Ridgid R09891B-AC93044SBN
User Manual
Ridgid R09891B-AC93044SBN
User Manual
 Ridgid R09891B-R09892B
User Manual
Ridgid R09891B-R09892B
User Manual
 Ridgid R09891B-R09897B
User Manual
Ridgid R09891B-R09897B
User Manual
 Ridgid R09891B-R8657B
User Manual
Ridgid R09891B-R8657B
User Manual
 Ridgid R09891K
User Manual
Ridgid R09891K
User Manual
 Ridgid R09891K-R09892B
User Manual
Ridgid R09891K-R09892B
User Manual
 Ridgid R09892B-AC8400802
User Manual
Ridgid R09892B-AC8400802
User Manual
 Ridgid R09892B-AC87004
User Manual
Ridgid R09892B-AC87004
User Manual
 Ridgid R09892B-AC9302
User Manual
Ridgid R09892B-AC9302
User Manual
 Ridgid R09892K
User Manual
Ridgid R09892K
User Manual
 Ridgid R09893B
User Manual
Ridgid R09893B
User Manual
 Ridgid R09894B
User Manual
Ridgid R09894B
User Manual
 Ridgid R09894B-AC102EM21N
User Manual
Ridgid R09894B-AC102EM21N
User Manual
 Ridgid R09894B-AC840060
User Manual
Ridgid R09894B-AC840060
User Manual
 Ridgid R09894B-AC87004
User Manual
Ridgid R09894B-AC87004
User Manual
 Ridgid R09894B-R09891B
User Manual
Ridgid R09894B-R09891B
User Manual
 Ridgid R09894B-R86240B
User Manual
Ridgid R09894B-R86240B
User Manual
 Ridgid R09894B-R86344B
User Manual
Ridgid R09894B-R86344B
User Manual