Page 2 - GENERAL POWER TOOL SAFETY WARNINGS; WORK AREA SAFETY; ELECTRICAL SAFETY; PERSONAL SAFETY; POWER TOOL USE AND CARE
2 – English GENERAL POWER TOOL SAFETY WARNINGS DANGER: Read all safety warnings, instructions, illus-trations and specifications provided with this power tool. Failure to follow all instructions listed below may result in electric shock, fire and/or serious injury. Save all warnings and instructions...
Page 3 - BATTERY TOOL USE AND CARE
3 – English GENERAL POWER TOOL SAFETY WARNINGS Store idle power tools out of the reach of children and do not allow persons unfamiliar with the power tool or these instructions to operate the power tool. Power tools are dangerous in the hands of untrained users. Maintain power tools and accessor...
Page 4 - NAILER SAFETY WARNINGS
4 – English Always assume that the tool contains nails. Careless handling of the nailer can result in unexpected firing of nails and personal injury . Do not point the tool towards yourself or anyone nearby. Unexpected triggering will discharge the nail causing an injury. Do not actuate the to...
Page 5 - OPERATION; LOADING TOOL
5 – English NAILER SAFETY WARNINGS products, or any strong solvents to clean your tool. Fol-lowing this rule will reduce the risk of loss of control and deterioration of the enclosure plastic. OPERATION Do not use tool if trigger does not actuate properly. Any tool that cannot be controlled with t...
Page 6 - NOTICE; SYMBOLS
6 – English Some of the following symbols may be used on this tool. Please study them and learn their meaning. Proper interpreta-tion of these symbols will allow you to operate the tool better and safer. SYMBOL NAME DESIGNATION/EXPLANATION Safety Alert Indicates a potential personal injury hazard Re...
Page 7 - GLOSSARY OF TERMS; FEATURES; PRODUCT SPECIFICATIONS
7 – English GLOSSARY OF TERMS Activate (operating controls) To move an operating control so that it is in a position that allows the tool to be actuated or that satisifes one require-ment for the tool to be actuated. Actuate (tool) To cause movement of the tool component(s) intended to drive a faste...
Page 8 - KNOW YOUR FRAMING NAILER
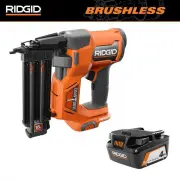
8 – English FEATURES ASSEMBLY WARNING: Do not use this product if it is not completely as-sembled or if any parts appear to be missing or damaged. Use of a product that is not properly and completely assembled or with damaged or missing parts could result in serious personal injury. WARNING: Do not ...
Page 9 - APPLICATIONS; INSTALLING BELT HOOK; LOADING THE TOOL WITH NAILS
9 – English WARNING: Do not allow familiarity with tools to make you careless. Remember that a careless fraction of a second is sufficient to inflict severe injury. WARNING: Always wear eye protection with side shields marked to comply with ANSI Z87.1. Failure to do so could result in objects being ...
Page 10 - USING THE MODE SELECTOR SWITCH; FULL SEQUENTIAL ACTUATION MODE
10 – English OPERATION WARNING: Keep the tool pointed away from yourself and oth-ers when loading nails. Failure to do so could result in possible serious personal injury. Slide the pusher all the way to the rear of the magazine. Release the pusher and allow it to push the nails up to the driving...
Page 11 - REFILLING THE AIR PRESSURE TANK
11 – English OPERATION WARNING: During normal use the tool will recoil immedi-ately after driving a fastener. This is a normal function of the tool. Do not attempt to prevent the recoil by holding the nailer against the work. Re-striction to the recoil can result in a second fastener being driven fr...
Page 12 - CLEARING A JAMMED FASTENER; MAINTENANCE; GENERAL MAINTENANCE
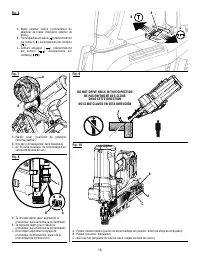
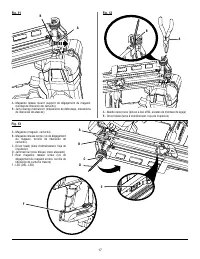
12 – English OPERATION Press down on the nail stop tab near the end of the magazine and slide the nails over the tab. Remove the nail strip from the tool. CLEARING A JAMMED FASTENER See Figures 11 - 13, page 17. WARNING: Remove the battery pack and remove nails from the tool before clearing a ja...
Page 13 - REQUIRED DAILY CHECKLIST
13 – English MAINTENANCE • With the workpiece contact still depressed, release the trigger. The driver must return to its up position. Remove the battery pack and remove all fasteners. Select the contact actuation mode ( ). Place the battery pack in the tool. Begin inspection: • With the wor...
Page 14 - TROUBLESHOOTING; ILLUSTRATIONS START ON PAGE 15
14 – English TROUBLESHOOTING ILLUSTRATIONS START ON PAGE 15 AFTER FRENCH AND SPANISH LANGUAGE SECTIONS. PROBLEM POSSIBLE CAUSE SOLUTION Tool does nothing or operates sluggishly Inadequate air pressure supply Inadequate lubrication Worn or damaged O-ring seals or bumper Exposure to low temperatures E...
Page 15 - SÉCURITÉ DU LIEU DE TRAVAIL; SÉCURITÉ ÉLECTRIQUE; SÉCURITÉ PERSONNELLE
2 – Français AVERTISSEMENTS DE SÉCURITÉ GÉNÉRALES RELATIVES AUX OUTILS ÉLECTRIQUES DANGER : Li r e l es aver t i ssement s d e sécurité, l es instructions et les précisions et consulter les illustrations fournis avec cet outil électrique. Le fait de ne pas se conformer à l’ensemble des consignes pré...
Page 16 - UTILISATION ET ENTRETIEN DE LA PILE
3 – Français AVERTISSEMENTS DE SÉCURITÉ GÉNÉRALES RELATIVES AUX OUTILS ÉLECTRIQUES Ne pas utiliser l’outil sur une échelle ou un support instable. Une bonne tenue et un bon équilibre permettent de mieux contrôler l’outil en cas de situation imprévue. UTILISATION ET ENTRETIEN DES OUTILS ÉLECTRIQUES...
Page 17 - AVERTISSEMENTS DE SÉCURITÉ RELATIFS CLOUEUSE
4 – Français AVERTISSEMENTS DE SÉCURITÉ RELATIFS CLOUEUSE Toujours présumer que l’outil contient des attaches. La manipulation inadéquate de la cloueuse peut provoquer un tir accidentel d’attaches et causer des blessures. Ne pas pointer l’outil vers soi ou d’autres personnes. L’actionnement acci...
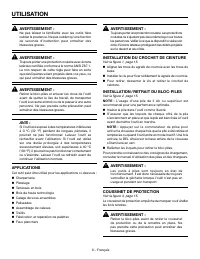
Page 18 - UTILISATION
5 – Français AVERTISSEMENTS DE SÉCURITÉ RELATIFS CLOUEUSE Ne jamais oublier qu’un usage incorrect ou abusif de cet outil peut mettre l’opérateur et les autres personnes présentes en danger. Ne jamais bloquer la gâchette ou le contact de la cloususe en position de déclenchement avec du ruban ad...
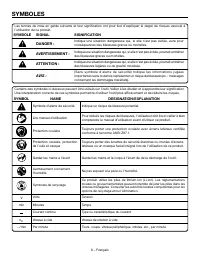
Page 19 - SYMBOLES
6 – Français SYMBOLES Certains des symboles ci-dessous peuvent être utilisés sur l’outil. Veiller à les étudier et à apprendre leur signification. Une interprétation correcte de ces symboles permettra d’utiliser l’outil plus efficacement et de réduire les risques. SYMBOL NAME DESIGNATION/EXPLANATION...
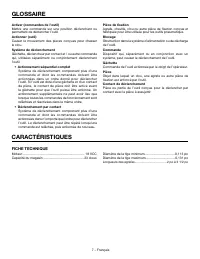
Page 20 - GLOSSAIRE; CARACTÉRISTIQUES; FICHE TECHNIQUE
7 – Français GLOSSAIRE Activer (commandes de l’outil) Mettre une commande sur une position déclenchant ou permettant de déclencher l’outil Actionner (outil) Causer le mouvement des pièces conçues pour chasser le clou. Système de déclenchement Gâchette, déclencheur par contact et / ou autre commande ...
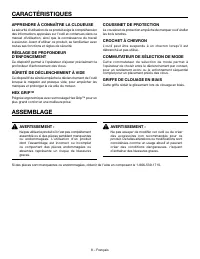
Page 22 - INSTALLATION DU CROCHET DE CEINTURE
9 – Français AVERTISSEMENT : Ne pas laisser la familiarité avec les outils faire oublier la prudence. Ne pas oublier qu’une fraction de seconde d’inattention peut entraîner des blessures graves. AVERTISSEMENT : Toujours porter une protection oculaire avec écrans latéraux certifiée conforme à la norm...
Page 23 - CHARGEMENT DES CLOUS; ACTIONNEMENT SÉQUENTIEL COMPLET
10 – Français UTILISATION Le coussinet de protection de la cloueuse peut être retiré en l’ouvrant et en l’écartant du côté de la griffe de clouage en biais. Pour remettre le coussinet en place, l’engager sur les pointes de la griffe. Un compartiment de rangement du coussinet est prévu sur le magasin...
Page 24 - SÛRETÉ DE DÉCLENCHEMENT À VIDE
11 – Français UTILISATION Appuyer sur la gâchette et la maintenir enfoncée. Appuyer l’outil contre la pièce à clouer pour actionner le dispositif de déclenchement par contact et planter un clou. N e p a s e m p ê c h e r l e re c u l d e l ’ o u t i l l o r s q u e l e c l o u est planté. Touj...
Page 25 - RETRAIT DE CLOUS DE L’OUTIL; DÉBLOCAGE D’UN CLOU
12 – Français UTILISATION RETRAIT DE CLOUS DE L’OUTIL Voir la figure 10, page 16. Retirer le bloc-piles. Pour retirer une bande de clous de l’outil, appuyer sur le bouton de libération du poussoir et la guider vers le haut du magasin. Une fois dégagé, le piston remonte. NOTE : Toujours garder l...
Page 26 - ENTRETIEN; ENTRETIEN GÉNÉRAL
13 – Français ENTRETIEN Choisir le mode de déclenchement unique ( ). Brancher l’outil non chargé à une alimentation d’air appropriée (70 psi). Commencer l’inspection : • Appuyer sur le commutateur de prise pour activer la cloueuse. • Désengager le dispositif de verrouillage de tir à vide et ap...
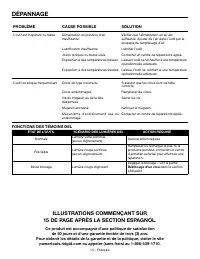
Page 27 - DÉPANNAGE; ILLUSTRATIONS COMMENÇANT SUR; PROBLÈME; Ce produit est accompagné d’une politique de satisfaction
14 – Français DÉPANNAGE ILLUSTRATIONS COMMENÇANT SUR 15 DE PAGE APRÈS LA SECTION ESPAGNOL. PROBLÈME CAUSE POSSIBLE SOLUTION L’outil est inopérant ou faible Alimentation en pression d’air insuffisante Lubrification insuffisante Joints toriques ou butoir usés Exposition à des températures basses Expos...
Page 28 - ÁREA DE TRABAJO; SEGURIDAD ELÉCTRICA
2 – Español ADVERTENCIAS DE SEGURIDAD PARA HERRAMIENTAS ELÉCTRICAS PELIGRO : Lea todas las advertencias, instrucciones, ilustraciones y especificaciones proporcionadas con esta herramienta eléctrica. No seguir las instrucciones indicadas a continuación puede provocar descargas eléctricas, incendios ...
Page 29 - EMPLEO Y CUIDADO DE LA HERRAMIENTA
3 – Español ADVERTENCIAS DE SEGURIDAD PARA HERRAMIENTAS ELÉCTRICAS Una acción descuidada puede causar lesiones graves en una fracción de segundo. No vista ropas holgadas ni joyas. Recójase el cabello si está largo. Las ropas holgadas y las joyas, así como el cabello largo, pueden resultar atraídas...
Page 30 - ADVERTENCIAS DE SEGURIDAD PARA CLAVADORA
4 – Español ADVERTENCIAS DE SEGURIDAD PARA CLAVADORA S i e m p r e s u p o n g a q u e l a h e r r a m i e n t a c o n t i e n e sujetadores (clavos o grapas, según sea el caso). El manejo descuidado de la clavadora puede hacer que se accione el gatillo inesperadamente y que se disparen sujetadore...
Page 31 - FUNCIONAMIENTO; CÓMO CARGAR LA HERRAMIENTA; GUARDE ESTAS INSTRUCCIONES
5 – Español ADVERTENCIAS DE SEGURIDAD PARA CLAVADORA Nunca sujete con prensa o cinta adhesiva el gatillo ni el disparador de contacto en la posición de accionamiento. Nunca deje desatendida ninguna herramienta con la batería instalada. No utilice esta herramienta si no tiene una etiqueta de ...
Page 32 - SÍMBOLOS; SYMBOL
6 – Español Las siguientes palabras de señalización y sus significados tienen el objeto de explicar los niveles de riesgo relacionados con este producto. SÍMBOLO SEÑAL SIGNIFICADO PELIGRO: Indica una situación peligrosa, la cual, si no se evita, causará la muerte o lesiones serias. ADVERTENCIA: Indi...
Page 33 - GLOSARIO DE TÉRMINOS; ESPECIFICACIONES DEL PRODUCTO
7 – Español GLOSARIO DE TÉRMINOS Activar (los controles de accionamiento) Es mover un control de accionamiento de manera que quede en una posición en la cual se accione la herramienta o cumpla con un requisito necesario para accionar la misma. Accionar (la herramienta) Es producir el movimiento de l...
Page 34 - FAMILIARÍCESE CON LA CLAVADORA DE; CARACTERÍSTICAS
8 – Español FAMILIARÍCESE CON LA CLAVADORA DE ENTRAMAR Para usar este producto con la debida seguridad se debe comprender la información indicada en la herramienta misma y en este manual, y se debe comprender también el trabajo que intenta realizar. Antes de usar este producto, familiarícese con tod...
Page 35 - USOS; INSTALACIÓN DE HOOK DEL CINTURÓN
9 – Español ADVERTENCIA: No permita que su familarización con las herramientas lo vuelva descuidado.Tenga presente que un descuido de un instante es suficiente para causar una lesión seria. ADVERTENCIA: Siempre póngase protección ocular con la marca de cumplimiento de la norma ANSI Z87.1. La inobser...
Page 36 - ALMOHADILLA PROTECTORA
10 – Español FUNCIONAMIENTO ALMOHADILLA PROTECTORA Vea la figura 3, página 15. La almohadilla protectora montada en la punta de la herramienta evita dañar y marcar las maderas suaves con la herramienta. ADVERTENCIA: Quite el paquete de baterías y retire los clavos de la herramienta antes de desmonta...
Page 37 - SEGURO DE DISPARO EN SECO
11 – Español FUNCIONAMIENTO Cargar la herramienta con clavos y instale el paquete de baterías. Sujete firmemente la herramienta para mantener el control. Coloque la punta de la herramienta en la superficie de trabajo. Oprima la herramienta contra la superficie de trabajo para oprimir el dispar...
Page 38 - CÓMO CLAVAR CLAVOS EN ÁNGULO; CÓMO RETIRAR UN SUJETADOR ATORADO
12 – Español FUNCIONAMIENTO Después de cada ajuste introduzca un clavo de prueba hasta lograr la profundidad deseada. NOTA: Fije la profundidad de penetración en el valor más bajo que le permita cumplir con sus objetivos. CÓMO CLAVAR CLAVOS EN ÁNGULO Vea la figura 9, página 16. Cuando clava clavos...
Page 39 - MANTENIMIENTO; MANTENIMIENTO GENERAL
13 – Español MANTENIMIENTO Mientras la herramienta no esté cargada, conecte el suministro de aire adecuado (70 psi) a la herramienta. Comience a inspeccionar: • Presione el interruptor de la empuñadura para activar la clavadora. • Sin oprimir el gatillo, desenganche el seguro de disparo en seco ...
Page 40 - SOLUCIÓN DE PROBLEMAS; PROBLEM; y una garantía limitada de tres años.
14 – Español SOLUCIÓN DE PROBLEMAS PROBLEM POSSIBLE CAUSE SOLUTION La herramienta no hace nada o funciona con lentitud S u m i n i s t ro d e p re s i ó n d e a i re inadecuado Lubricación inadecuada Juntas tóricas o tope gastados o dañados Exposición a bajas temperaturas Exposición a altas temperat...
Page 44 - OPERATOR’S MANUAL; CLOUEUSE DE CHARPENTIER À TÊTE RONDE DE 18 VOLT; Información sobre servicio al consumidor:
OPERATOR’S MANUAL MANUEL D’UTILISATIONMANUAL DEL OPERADOR18 V FULL ROUND HEAD FRAMING NAILER CLOUEUSE DE CHARPENTIER À TÊTE RONDE DE 18 VOLT CLAVADORA DE ENTRAMAR DE 18 VOLTIOS PARA CLAVOS DE CABEZA REDONDA NORMAL R09894 998000219 3-10-21 (REV:03) ONE WORLD TECHNOLOGIES, INC. P.O. Box 1427Anderson, ...


 Ridgid R09891B
User Manual
Ridgid R09891B
User Manual
 Ridgid R09891B-AC87004
User Manual
Ridgid R09891B-AC87004
User Manual
 Ridgid R09891B-AC93044SBN
User Manual
Ridgid R09891B-AC93044SBN
User Manual
 Ridgid R09891B-R09892B
User Manual
Ridgid R09891B-R09892B
User Manual
 Ridgid R09891B-R09897B
User Manual
Ridgid R09891B-R09897B
User Manual
 Ridgid R09891B-R8657B
User Manual
Ridgid R09891B-R8657B
User Manual
 Ridgid R09891K
User Manual
Ridgid R09891K
User Manual
 Ridgid R09891K-R09892B
User Manual
Ridgid R09891K-R09892B
User Manual
 Ridgid R09892B-AC8400802
User Manual
Ridgid R09892B-AC8400802
User Manual
 Ridgid R09892B-AC87004
User Manual
Ridgid R09892B-AC87004
User Manual
 Ridgid R09892B-AC9302
User Manual
Ridgid R09892B-AC9302
User Manual
 Ridgid R09892K
User Manual
Ridgid R09892K
User Manual
 Ridgid R09893B
User Manual
Ridgid R09893B
User Manual
 Ridgid R09894B-AC102EM21N
User Manual
Ridgid R09894B-AC102EM21N
User Manual
 Ridgid R09894B-AC840060
User Manual
Ridgid R09894B-AC840060
User Manual
 Ridgid R09894B-AC87004
User Manual
Ridgid R09894B-AC87004
User Manual
 Ridgid R09894B-R09891B
User Manual
Ridgid R09894B-R09891B
User Manual
 Ridgid R09894B-R86240B
User Manual
Ridgid R09894B-R86240B
User Manual
 Ridgid R09894B-R86344B
User Manual
Ridgid R09894B-R86344B
User Manual
 Ridgid R09894KN
User Manual
Ridgid R09894KN
User Manual