Page 3 - Contents
1 EN Contents 1 Important safety instructions 3 2 Your phone 4 What is in the box 4 Over view of the phone 5 Over view of the base station 6 3 Get started 7 Connect the base station 7 Install the supplied batteries 8 dependent) 8 Change the remote access PIN code (for D166) 9 Charge the handset 9 Ch...
Page 4 - 3 Technical data; 5 Frequently asked questions
2 EN Auto clock 28 5HJLVWHUDGGLWLRQDOKDQGVHWV 8QUHJLVWHUWKHKDQGVHWV 5HVWRUHGHIDXOWVHWWLQJV 13 Technical data 30 14 Notice 31 Declaration of conformity 31 8VH*$3VWDQGDUGFRPSOLDQFH Compliance with EMF 31 Disposal of your old product and batter y 31 15 Frequently asked questions 33 16 Appendix 35 Text ...
Page 6 - Your phone; What is in the box
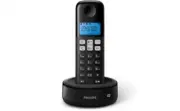
4 EN 2 Your phone Congratulations on your purchase and welcome to Philips! offers, register your product at www.philips. com/welcome. What is in the box Handset** Base station (D161) Base station (D166) Charger** Power adapter** Line cord* 2 x AAA rechargeable batteries** Guarantee Shor t user manua...
Page 9 - Get started; Connect the base station
7 EN 3 Get started Caution • Make sure that you have read the safety instructions in the 'Impor tant safety instructions' section before you connect and install your handset. Connect the base station Warning • 5LVNRISURGXFWGDPDJH(QVXUHWKDWWKHSRZHUVXSSO\ YROWDJHFRUUHVSRQGVWRWKHYROWDJHSULQWHGRQWKHEDFN...
Page 10 - Install the supplied batteries; Set the country/language; Set the date and time
8 EN Install the supplied batteries Caution • 5LVNRIH[SORVLRQ.HHSEDWWHULHVDZD\IURPKHDW VXQVKLQHRUÀUH1HYHUGLVFDUGEDWWHULHVLQÀUH • Use only the supplied batteries. • 5LVNRIGHFUHDVHGEDWWHU \OLIH1HYHUPL[GLIIHUHQW brands or types of batteries. Note • &KDUJHWKHEDWWHULHVIRUKRXUVEHIRUHÀUVWXVH • If the h...
Page 13 - Calls; Make a call; Normal call; Answer a call; Turn off the ringer of an incoming call; End a call
11 EN 4 Calls Note • When the power fails, the phone cannot access HPHUJHQF\VHU YLFHV Tip • &KHFNWKHVLJQDOVWUHQJWKEHIRUH\RXPDNHDFDOORU when you are in a call VHH&KHFNWKHVLJQDOVWUHQJWK RQSDJH 10). Make a call <RXFDQPDNHDFDOOLQWKHVHZD\V • 1RUPDOFDOO • 3UHGLDOFDOO You can also make a call fr...
Page 15 - Make a call to another; While you are on the phone; Make a conference call; During an external call
13 EN 5 Intercom and conference calls An intercom call is a call to another handset that shares the same base station. A conference call involves a conversation between you, another handset user and the outside callers. Make a call to another handset Note • ,IWKHEDVHVWDWLRQRQO\KDVUHJLVWHUHGKDQGVHWVS...
Page 16 - During the conference call
14 EN During the conference call 1 3UHVVDQGKROG to put the internal call RQKROGDQGJREDFNWRWKHH[WHUQDOFDOO » The internal call is put on hold. 2 3UHVVDQGKROG DJDLQWRSXWWKHH[WHUQDO FDOORQKROGDQGJREDFNWRWKHLQWHUQDOFDOO » The external call is put on hold. 3 3UHVV MENU/OK WRJREDFNWRWKH conference call. N...
Page 17 - Enter text and numbers
15 EN 6 Text and numbers You can enter text and numbers for handset name, phonebook records, and other menu items. Enter text and numbers 1 3UHVVRQFHRUVHYHUDOWLPHVRQWKH alphanumeric key to enter the selected character. 2 3UHVV REDIAL/C to delete a character. 3UHVVDQGKROG REDIAL/C to delete all FKDUD...
Page 18 - Phonebook; View the phonebook; Search a record; Scroll the contact list; Call from the phonebook
16 EN 7 Phonebook This phone has a phonebook that stores up to 50 records. You can access the phonebook from the handset. Each record can have a name up WRFKDUDFWHUVORQJDQGDQXPEHUXSWR GLJLWVORQJ <RXKDYHXSWRGLUHFWDFFHVVPHPRULHV.H\V DQG'HSHQGLQJRQ\RXUFRXQWU \NH\V and 2 are preset to the voice mail ...
Page 19 - Edit a record
17 EN 4 Enter the number, then press MENU/OK WRFRQÀUP » Your new record is saved. Tip • 3UHVVDQGKROG # to inser t a pause. • 3UHVVRQFHRUVHYHUDOWLPHVRQWKHDOSKDQXPHULFNH\WR enter the selected character. • 3UHVV REDIAL/C WRGHOHWHWKHFKDUDFWHU3UHVV or WRPRYHWKHFXUVRUOHIWDQGULJKW Edit a record 1 3UHVV MEN...
Page 20 - Call log
18 EN 8 Call log 7KHFDOOORJVWRUHVWKHFDOOKLVWRU \RIDOOPLVVHG RUUHFHLYHGFDOOV7KHLQFRPLQJFDOOKLVWRU \ includes the name and number of the caller, call time and date. This feature is available if you KDYHUHJLVWHUHGWRWKHFDOOHU,'VHU YLFHZLWK your ser vice provider. Your phone can store up to 20 call recor...
Page 22 - Redial list
20 EN 9 Redial list The redial list stores the call histor y of dialed calls. It includes the names and/or numbers you have called. This phone can store up to 10 redial records. View the redial records 3UHVV REDIAL/C . Redial a call 1 3UHVV REDIAL/C . 2 Select a record, then press . » The number is ...
Page 23 - 0 Phone settings; Sound settings; Set the handset's ringtone volume; Set the handset's ringtone; Name the handset
21 EN 10 Phone settings <RXFDQFXVWRPL]HWKHVHWWLQJVWRPDNHLW\RXU own phone. Sound settings Set the handset's ringtone volume <RXFDQVHOHFWDPRQJULQJWRQHYROXPHOHYHOV or [OFF] . 1 3UHVV MENU/OK . 2 Select [PHONE SETUP] > [SOUNDS] > [RING VOLUME] , then press MENU/OK WRFRQÀUP 3 Select a volume ...
Page 26 - Listen to the announcement; Restore the default announcement; Incoming messages; Listen to the incoming message
24 EN 6 3UHVV MENU/OK WRVWRSUHFRUGLQJRUWKH UHFRUGLQJVWRSVDIWHUPLQXWHV Note • Make sure that you speak close to the microphone when you record an announcement. Listen to the announcement 1 3UHVV / or MENU/OK > [ANSW MACHINE] > MENU/OK . 2 Select [ANNOUNCEMENT] , then press MENU/OK WRFRQÀUP 3 Se...
Page 27 - Delete all old incoming messages; Set the ring delay; Remote access; Activate/deactivate the remote access
25 EN Delete all old incoming messages 1 3UHVV / or MENU/OK > [ANSW MACHINE] > MENU/OK . 2 Select [DELETE ALL] , then press MENU/ OK WRFRQÀUP » $FRQÀUPDWLRQUHTXHVWLVGLVSOD\HGRQ the handset. 3 3UHVV MENU/OK WRFRQÀUP » $OOROGPHVVDJHVDUHSHUPDQHQWO\ deleted. Note • <RXFDQGHOHWHWKHUHDGPHVVDJHVRQ...
Page 29 - Auto conference; Activate/Deactivate auto conference; Network type; Select the recall duration
27 EN 12 Services The phone suppor ts a number of features that KHOS\RXKDQGOHDQGPDQDJHWKHFDOOV Auto conference To join an external call with another handset, press . Activate/Deactivate auto conference 1 3UHVV MENU/OK . 2 Select [SERVICES] > [CONFERENCE] , then press MENU/OK WRFRQÀUP 3 Select [AU...
Page 30 - Dial mode; Set the dial mode; Auto clock; Register additional handsets
28 EN 2 Select [SERVICES] > [RECALL TIME] , then press MENU/OK WRFRQÀUP 3 Select an option, then press MENU/OK to FRQÀUP » 7KHVHWWLQJLVVDYHG Dial mode Note • This feature only applies to models that suppor t both tone and pulse dial. 'LDOPRGHLVWKHWHOHSKRQHVLJQDOXVHGLQ\RXU FRXQWU \7KHSKRQHVXSSRU W...
Page 31 - Unregister the handsets; Restore default settings
EN Note • ,IWKH3,1LVLQFRUUHFWRUQREDVHLVIRXQGZLWKLQD FHU WDLQSHULRGDQRWLÀFDWLRQPHVVDJHZLOOEHGLVSOD\HG on your handset. • ,IUHJLVWUDWLRQIDLOVXQSOXJWKHSRZHUDGDSWHUIURPWKH EDVHVWDWLRQDQGSOXJLWEDFN:DLWIRUVHFRQGVDQG WKHQUHSHDWWKHUHJLVWUDWLRQSURFHGXUH • 7KHSUHVHW3,1LV1RFKDQJHFDQEHPDGHRQLW Unregister the ha...