Page 2 - Contents
2 EN Contents 1 Important 3 2 Your Micro System 4 Introduction 4 What's in the box 4 Over view of the main unit 5 Over view of the remote control 6 3 Get started 8 Placement 8 Prepare FM antenna 8 Prepare the remote control 8 Connect power 8 Turn on 9 Set clock 9 Store FM radio stations automaticall...
Page 3 - Important
3 EN 1 Important Warning • Never remove the casing of this micro system. • Never lubricate any par t of this system. • Never place this system on other electrical equipment. • Never look into the laser beam inside this system. • Keep this system away from direct sunlight, naked flames or heat. • Mak...
Page 4 - Introduction
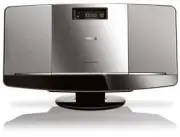
4 EN 2 Your Micro System Congratulations on your purchase, and welcome to Philips! To fully benefit from the suppor t that Philips offers, register your product at www.philips.com/welcome. Introduction With this micro system, you can: • enjoy audio from discs, Bluetooth-enabled devices, USB devices,...
Page 5 - Overview of the main unit; a b c d e f g
5 EN Overview of the main unit a • Turn the system on. • Switch to standby mode. a b c d e f g h i j k l mn b SOURCE • Select a source: CD, Bluetooth, FM tuner, USB, or MP3 LINK.
Page 6 - Overview of the remote
6 EN c / • Skip to the previous or next track. • Search within a track or disc. • Tune to FM radio stations. • Adjust time. d • Confirm a selection. • Select mono or stereo broadcast. • Star t or pause play. e • Stop play or erase a program. f VOLUME + / - • Adjust volume. g • Open or close the disk...
Page 8 - Get started; Placement; Mount on a wall; Prepare FM antenna; Prepare the remote control
8 EN 3 Get started Caution • Use of controls or adjustments or performance of procedures other than herein may result in hazardous radiation exposure or other unsafe operation. Always follow the instructions in this chapter in sequence. Placement You can place the system on a flat surface or mount i...
Page 9 - Turn on; Switch to standby mode; Set clock; Store FM radio stations
9 EN Turn on Press . » The system switches to the last selected source. Tip • To select another source, press SOURCE repeatedly or the source selection buttons on the remote control. Switch to standby mode Press to switch the system to standby mode. » The clock (if set) appears on the display panel....
Page 10 - Play disc; Play from a USB storage
10 EN 2 Press and hold for 3 seconds to star t full scan. » The system automatically stores FM radio stations with sufficient signal strength. » The first preset station is broadcast automatically. Tip • To exit storing mode, press or . 4 Play Play disc 1 Press to open the disc tray. 2 Inser t a dis...
Page 11 - Play from Bluetooth-enabled; Play options; Control play
11 EN 1 Inser t the USB storage device into the socket. 2 Press USB on the remote control to select the USB source. » Play star ts automatically. If not, press . Play from Bluetooth-enabled devices Note • The effective operating range between the system and the paired device is approximately 10 mete...
Page 12 - Program tracks; Display different information
12 EN REPEAT / SHUFFLE [ ] : Play the current track repeatedly. [ ] (for MP3/ WMA only): play all tracks in this album repeatedly. [ ]: play all tracks repeatedly. [ ]: play all tracks randomly. To return to normal play, press REPEAT / SHUFFLE repeatedly until the repeat or shuffle icons disappear. ...
Page 14 - Select stereo/mono broadcast; Other features; Set the alarm timer
14 EN Select stereo/mono broadcast Note • Stereo broadcast is the default setting for tuner mode. • For stations with weak signals: to improve the reception, change to monaural sound. In FM tuner mode, press to switch between mono and stereo broadcast. 6 Other features Set the alarm timer This syste...
Page 15 - Set the sleep timer; Play from an external device; Listen through the headphone
15 EN Tip • If CD or USB is selected as alarm source, yet there is no disc inser ted or no USB connected, the system switches to the tuner source automatically. Set the sleep timer Note • Make sure that you have set the clock correctly. When the system is turned on, press SLEEP repeatedly to select ...
Page 16 - Amplifier; USB playability information
16 EN 7 Product information Note • Product information is subject to change without prior notice. Specifications Amplifier Maximum Output Power 15 W Frequency Response 63 -14000 Hz, -3 dB Signal to Noise Ratio > 57 dBA Total Harmonic Distor tion <1% MP3 Link Input 650 mV RMS Disc Disc Diameter...
Page 17 - Supported MP3 disc formats
17 EN Unsupported formats: • Empty albums: an empty album is an album that does not contain MP3/WMA files, and is not be shown in the display. • Unsuppor ted file formats are skipped. For example, Word documents (.doc) or MP3 files with extension .dlf are ignored and not played. • AAC, WAV, PCM audi...
Page 18 - Troubleshooting; About Bluetooth device
18 EN 8 Troubleshooting Warning • Never remove the casing of this device. To keep the warranty valid, never tr y to repair the system yourself. If you encounter problems when using this device, check the following points before requesting ser vice. If the problem remains unsolved, go to the Philips ...
Page 20 - Notice
20 EN 9 Notice Any changes or modifications made to this device that are not expressly approved by Philips Consumer Lifestyle may void the user’s authority to operate the equipment. This product complies with the radio interference requirements of the European Community. Your product is designed and...