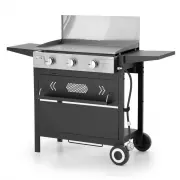
Page 2 - ENJOY YOUR CAPTIVA DESIGNS; Leave these instructions with the consumer.; Table of Contents
2 Safety Information Warnings Preparation Assembly Instructions Troubleshooting First-time Operation Care and Maintenance 2 14 15 16-17 7 3-5 6 7-8 Operation Instructions 9-13 Warranty Product Specifications 18 18 ENJOY YOUR CAPTIVA DESIGNS Package Contents If you smell gas:1. Shut off gas to the ap...
Page 3 - Warnings; IMPORTANT SAFETY
3 Warnings PROP 65 WARNING: This product can expose you to chemicals including Chromium (hexavalent compounds), which are known to the State of California to cause cancer and birth defects or other reproductive harm.For more information visit www.P65Warnings.ca.gov. IMPORTANT SAFETY Please read this...
Page 4 - FUEL CONCERNS & EXPLOSION HAZARDS
Warnings 4 This gas grill must be installed in accordance with all local codes. If installation is planned in an area with no local codes, your gas grill must be installed in accord with the National Fuel Gas Code with the National Fuel Gas Code ANSI Z223.1, and storage and handling of CSA B149. 2 p...
Page 5 - IF YOU SMELL GAS; GENERAL WARNINGS
5 Warnings IF YOU SMELL GAS 1. Shut off gas to the grill. 2. Extinguish any open flames. 3. If the odor persists, immediately call your local gas supplier or fire department. BEWARE OF SPIDERS BURNER TUBES MUST BE INSPECTED AND CLEANED BEFORE EACH USE. GENERAL WARNINGS • All gas grills get hot durin...
Page 6 - Item; Part list; Package Contents
6 ENJOY YOUR CAPTIVA DESIGNS Item Qty. Name 1 1 Lid Handle 2 1 Griddle Body Assembly 3 1 Cooking Griddle 4 1 Oil Cup Item Qty. Name 5 1 Regulator 6 1 Adapter Hose 7 2 M6*14 Screw 8 4 Foot Part list Package Contents 2 3 4 5 6 8 7 1
Page 7 - Preparation; Estimated Assembly Time:; Tools Required for Assembly and Leak Testing (not included):; Assembly Instructions
7 Preparation Before beginning assembly of product, make sure all parts are present. Compare parts with package contents list on previous page and hardware contents below. If any part is missing or damaged, do not attempt to assemble the product. Contact customer service for replacement parts. Estim...
Page 9 - Operation Instructions; CONNECT THE LPG CYLINDER
Operation Instructions 9 WARNING: WARNING: All instructions and safeguards on this page must be followed to prevent fire, damage and/or injury. ENJOY YOUR CAPTIVA DESIGNS Insert the regulator and LPG cylinder into the gas line of the appliance. Turn the collar of the regulator clockwise to secure it...
Page 11 - CONNECT THE ADAPTER HOSE INSTRUCTIONS; CONNECTING THE LP TANK
Operation Instructions 11 The propane gas supply cylinder to be used must be constructed and marked in accordance with the specifications for LP gas Cylinders of the U.S. Department of Transportation(D.O.T) or the National Standard of Canada, CAN/CSA-B339, Cylinders, Spheres and Tubes for Transporta...
Page 13 - CHECKING FOR LEAKS
Operation Instructions 13 CHECKING FOR LEAKS After all connection are made, check all connections and fittings on the LP gas tank valve, gas hose gas hose and regulator for leaks with a water and soap solution. To prevent fire or explosion while testing for a leak:• Always perform leak test prior to...
Page 14 - Troubleshooting; Problem
Troubleshooting 14 ENJOY YOUR CAPTIVA DESIGNS Problem Possible Cause Solution If the above solutions do not solve your problem, or you need to replace the accessories,please contact our Customer Service. There is a smell of gas Leak in the gas system Close the cylinder valve immediately.Prevent any ...
Page 15 - First-time Operation; Lighting the Appliance
First-time Operation 15 Prior to using your Captiva Designs gas grill, verify that all of the following is true: • The burner tube is free of any debris or obstruction.• The proper gas type, gas connection, and regulator settings have been installed.• You’ve checked for gas leaks.• Minimum clearance...
Page 16 - Care and Maintenance; Cooking Griddle; Recommended Cleaning Supplies
Care and Maintenance 16 Cooking Griddle The griddle should be handled with care not to chip. CAUTION: Ensure the grill is cool before cleaning and conducting maintenance and with the gas supply turned off at the LP-Gas Cylinder. Recommended Cleaning Supplies Mild liquid dish soap, warm water, nylon ...
Page 17 - Burner Assembly; Other Care and Maintenance
Care and Maintenance 17 Burner Assembly Removing The Burner Assembly 1. Make sure all control knobs are in the OFF position, the LP gas supply valve has been closed, and the gas hose is disconnected from the gas supply. 2. Open lid and remove cooking griddle, clip for burner and burners. 3. Slide th...