Panasonic NNSE792S - Manuals
User Manual Panasonic NNSE792S


Summary
1 1. This trim kit can be installed into a cabinet.The cabinet opening must have the following internal dimensions as shown in fi g 1 , p 4 . A vent is required at the rear of the cabinet. It should travel the full height of the cabinet and the cabinet should not be obstructed. Minimum dimension of ...
2 Step 1. Unpacking list Tools Needed • Measuring tape• Pencil• Driver• Ø2 drill Parts Supplied PART QUANTITY Trim Frame 1 Left Duct 1 Rail 2 Bracket 4 Catch 4 Tape 2 Screw 12 Strike 4 IP4319_F0313BE90QP_27_120827.indd Sec1:2 IP4319_F0313BE90QP_27_120827.indd Sec1:2 2012-8-27 13:17:14 2012-8-27 13:1...
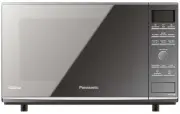
3 Step 2. Feature diagram Installed Image Trim kit Dimensions Width 596 mm Height 410 mm Depth 20 mm (Thickness) IP4319_F0313BE90QP_27_120827.indd Sec1:3 IP4319_F0313BE90QP_27_120827.indd Sec1:3 2012-8-27 13:17:14 2012-8-27 13:17:14
Panasonic Microwaves Manuals
-
 Panasonic NE-1054F
User Manual
Panasonic NE-1054F
User Manual
-
Panasonic NE-1054F
Manual
-
 Panasonic NN-CD58JSQPQ
User Manual
Panasonic NN-CD58JSQPQ
User Manual
-
 Panasonic NN-CD87KS
User Manual
Panasonic NN-CD87KS
User Manual
-
Panasonic NN-CD87KS
Manual
-
 Panasonic NN-CD87KSQPQ
User Manual
Panasonic NN-CD87KSQPQ
User Manual
-
 Panasonic NNCD997S
User Manual
Panasonic NNCD997S
User Manual
-
 Panasonic NNCF770M
User Manual
Panasonic NNCF770M
User Manual
-
 Panasonic NN-CF770M
User Manual
Panasonic NN-CF770M
User Manual
-
 Panasonic NN-CF874BQPQ
User Manual
Panasonic NN-CF874BQPQ
User Manual
-
 Panasonic NN-CS894SQPQ
User Manual
Panasonic NN-CS894SQPQ
User Manual
-
 Panasonic NN-CS89LBQPQ
User Manual
Panasonic NN-CS89LBQPQ
User Manual
-
 Panasonic NN-CT56MBQPQ
User Manual
Panasonic NN-CT56MBQPQ
User Manual
-
 Panasonic NNDS592B
User Manual
Panasonic NNDS592B
User Manual
-
 Panasonic NN-DS596BQPQ
User Manual
Panasonic NN-DS596BQPQ
User Manual
-
 Panasonic NN-DS59NBQPQ
User Manual
Panasonic NN-DS59NBQPQ
User Manual
-
 Panasonic NNGD682S
User Manual
Panasonic NNGD682S
User Manual
-
 Panasonic NN-GM230
User Manual
Panasonic NN-GM230
User Manual
-
 Panasonic NN-GM231W
User Manual
Panasonic NN-GM231W
User Manual
-
 Panasonic NN-GM342W
User Manual
Panasonic NN-GM342W
User Manual