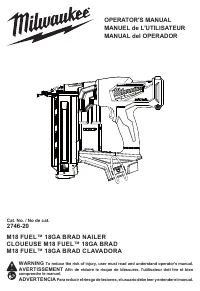
Page 2 - WARNING
2 GENERAL POWER TOOL SAFETY WARNINGS WARNING Read all safety warnings, instruc- tions, illustrations and specifica- tions provided with this power tool. Failure to follow all instructions listed below may result in electric shock, fire and/or serious injury. Save all warnings and in- structions for ...
Page 3 - SYMBOLOGY; SPECIFICATIONS
3 • Follow all charging instructions and do not charge the battery pack or tool outside the temperature range specified in the instructions. Charging im- properly or at temperatures outside the specified range may damage the battery and increase the risk of fire. SERVICE • Have your power tool servi...
Page 4 - Removing/Inserting the Battery; Installing/Removing Fastener Strips; OPERATION; Power/Actuation Selection
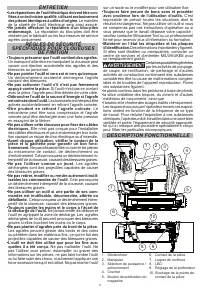
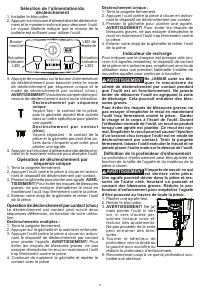
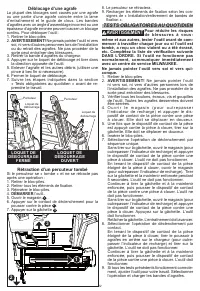
4 FUNCTIONAL DESCRIPTION 10 1. Trigger 2. Handle 3. Power/Actuation selection 4. Hook 5. Pusher release button 6. Workpiece contact 7. Jam latch 8. Depth adjustment 9. LED 10. Workpiece contact tip storage 1 2 3 4 5 8 9 7 6 ASSEMBLY WARNING Recharge only with the charger specified for the battery. F...
Page 5 - Setting the Depth of Drive; Clearing a Jammed Fastener; JAM LATCH
5 3. Press and hold the MODE button to toggle between single sequential actuation mode and contact (bump) actuation mode. WARNING! Understand actuation process before use. Single Sequential Actuation - The workpiece contact and then the trigger must be activated in a specific sequence to drive a fas...
Page 6 - Retracting a Dropped Striker; REQUIRED DAILY TESTING; MAINTENANCE; Maintaining Tool; Cleaning; ACCESSORIES
6 Retracting a Dropped Striker If the striker becomes "dropped" and does not retract after an operation: 1. Remove battery pack. 2. Remove all fasteners. 3. Reinsert battery pack. 4. Turn tool ON . 5. Open the magazine. 6. Press the workpiece contact bracket against a work - piece 2 . 7. Pul...
Page 7 - AVERTISSEMENT; Lire toutes les consignes
7 SERVICE - UNITED STATES 1-800-SAWDUST (1.800.729.3878) Monday-Friday, 7:00 AM - 6:30 PM CST or visit www.milwaukeetool.com Contact Corporate After Sales Service Technical Support with technical, service/repair, or warranty questions. Email: [email protected] B e c o m e a H e a v y D u t y C l u b...
Page 9 - • Ne pas actionner l’outil s’il n’est pas fermement; DESCRIPTION FONCTIONNELLE
9 ENTRETIEN • Les réparations de l’outil électrique doivent être con - fiées à un technicien qualifié, utilisant exclusivement des pièces identiques à celles d’origine. Le maintien de la sûreté de l’outil électrique sera ainsi assuré. • Ne jamais effectuer la réparation d’un bloc-piles endommagé. La...
Page 10 - Insertion et retrait de la pile; Installation et retrait des bandes d’agrafes; MANIEMENT
10 SPECIFICATIONS Volts .............................................................. 18 CD Type de batterie ........................................... M18™ Type de chargeur ........................................ M18™ Température ambiante de fonctionnement recommandée ........... -18°C à 50°C (0...
Page 11 - Indicateur de recharge
11 Sélection de l’alimentation/du déclenchement 1. Installer le bloc-piles. 2. Appuyer sur le bouton d’alimentation/de déclenche - ment et le maintenir enfoncé pour démarrer l’outil. Le voyant Batterie indique que le niveau de la batterie est suffisant pour utiliser l’outil. Bouton marche LED de bat...
Page 12 - DÉMARRER; TESTS OBLIGATOIRES AU QUOTIDIEN; même et aux autres, tester l’outil avant de com-
12 Déblocage d’une agrafe La plupart des blocages sont causés par une agrafe ou une partie d’une agrafe coincée entre la lame d’entraînement et le guide de clous. Les bandes d’agrafes avec un angle d’assemblage incorrect ou une épaisseur d’agrafe erronée peuvent causer un blocage continu. Pour déblo...
Page 13 - Entretien de l’outil; Nettoyage; L’utilisation d’autres ac-
13 10. Définir la profondeur d’enfoncement conformé - ment à la section « Définition de la profondeur d’enfoncement ». 11.Si tous les tests fonctionnent correctement, l’outil est prêt à être utilisé. Répéter ces tests tous les jours avant l’utilisation ou si l’outil est tombé, a reçu un choc violent...
Page 14 - ADVERTENCIA
14 Exceptions Cette garantie ne s’applique pas dans les situations suivantes : a) Si le produit a été utilisé pour une fin autre que celle indiquée dans le guide de l’utilisateur final ou le manuel d’instructions. b) Si les conditions d’utilisations ne sont pas habituelles. c) Si le produit a été mo...
Page 16 - ESPECIFICACIONES; ENSAMBLAJE; Extracción/inserción de la batería; Instalación/extracción de tiras de sujetadores
16 están presentes, comuníquese con un centro de servicio MILWAUKEE para obtener un reemplazo gratuito. • ADVERTENCIA Algunos polvos generados por el lijado eléctrico, aserrado, pulido, taladrado y otras actividades de construcción contienen químicos identificados como causantes de cáncer, defectos ...
Page 17 - OPERACION; Encendido/selección de accionamiento; Operación de accionamiento secuencial
17 Para extraer la tira de sujetadores: 1. Extraiga la batería. 2. ADVERTENCIA! Siempre apunte la herramienta le- jos de usted y otros durante la instalación de sujeta - dores. De no hacerlo, podrían producirse lesiones. 3. Presione el botón de liberación del empujador y deslice el cartucho abierto....
Page 18 - Indicador de recarga; Ajuste de la profundidad de inserción; Para despejar un sujetador atascado; PRUEBAS DIARIAS REQUERIDAS
18 4. Quite el dedo del gatillo y retire la herramienta de la pieza de trabajo. Indicador de recarga Para indicar que el cartucho está casi vacío de sujetadores (quedan aproximadamente 4 o 5), el contacto de la pieza de trabajo no comprimirá, evi - tando la operación bajo la presión normal. Instale ...
Page 19 - MANTENIMIENTO; Mantenimiento de las herramientas; Limpieza; ACCESORIOS; SOPORTE DE SERVICIO - MEXICO
19 Siempre apunte la herramienta lejos de usted y otros. 1. Extraiga la batería. 2. ADVERTENCIA! Siempre apunte la herramienta lejos de usted y otros durante la instalación de sujetadores. De no hacerlo, podrían producirse lesiones. 3. Revise todos los tornillos, pernos, tuercas y clavijas de la her...
Page 20 - MILWAUKEE TOOL
portátil de gasolina, herramientas de mano, palanca y cadena de mano de polipasto - eléctricas, indumentaria calefactada M12™, producto reacondicionado y productos de prueba y medición. Existen garantías por separado y distintas disponibles para estos productos. **El periodo de garantía para los rad...