Page 2 - Page 2; Read This Manual; CAUTION
Page 2 Read This Manual Inside you’ll find many helpful hints on how to use and maintain your appliance properly. Just a little preventive care on your part can save you a great deal of time and money over the life of your appliance. You’ll find many answers to common problems in the troubleshoo...
Page 3 - Page 3; IMPORTANT INSTRUCTIONS; WARNING; a) Do not operate any fan with a damaged cord or plug. Discard fan or
Page 3 IMPORTANT INSTRUCTIONS 1. This appliance has a polarized plug (one blade is wider than the other). To reduce the risk of electric shock, this plug is intended to fit in a polarized outlet only one way. If the plug does not fit fully in the outlet, reverse the plug. If it still does not fi...
Page 4 - ASSEMBLY
Page 4 This electric fan is pre-assembled in factory. 1. Never insert fingers, pencils, or any other object through the grillewhen fan is running. 2. Disconnect fan when moving from one location to another. 3. Be sure fan is on a stable surface when operating to avoid overturning. 4. DO NOT use ...
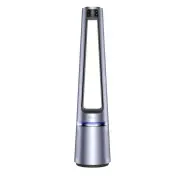
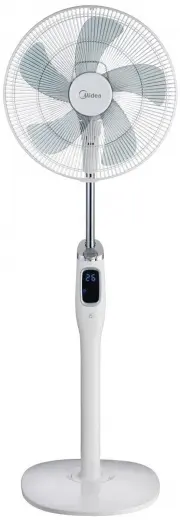
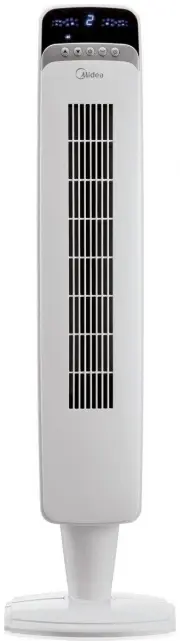
Page 5 - Page 5; PARTS AND FEATURES; Description; NOTICE
Page 5 PARTS AND FEATURES NO. Description NO. Description 1 Operation panel 6 Power cord 2 Display icon panel 7 Power cord plug 3 Airflow outlet 8 Air inlet grille 4 Ambient light of belt 9 Pre-filter 5 Base 10 HEPA filter NOTICE Pictures in the manual are for reference only. 1 2 3 4 5 6 7 8 8 9...
Page 6 - Page 6; INSTALLATION INSTRUCTIONS; Installation Steps; Remove the air inlet
Page 6 INSTALLATION INSTRUCTIONS Installation Steps 1. Remove the air inlet grille. 2. Remove the pre-filter by pressing the raised part on both sides and pull outwards. 3. Remove the protective film of the filter. 4. Install the HEPA filter. 5. Install the pre-filter by aligning the slots in po...
Page 7 - Page 7; OPERATION INSTRUCTIONS; Control area
Page 7 OPERATION INSTRUCTIONS Control area Display area Button Function Description “- 澝 +” Startup/Standby. Set wind speed/timing. Multi-angle oscillating switch of 30°,60°, 120° and 0°. In the startup mode, press this button for cyclic switch between normal wind (12 gears, indicator light is o...
Page 8 - Page 8; Additional Features and Maintenance; Forced shutdown; of the product and 30 degrees of the deviation angle.
Page 8 OPERATION INSTRUCTIONS (cont.) Additional Features and Maintenance Re m ote Control Description Forced shutdown There is no operation during the running of the fan, after 12 hours of continuous operation, the fan will be forced to shut down automatically. Intelligent memory When the fan i...
Page 9 - Page 9; Inserting and Replacing Batteries; Battery; x AAA batteries are not include.
Page 9 Inserting and Replacing Batteries Filter Replace m ent 1. Do not dispose of batteries in fire, batteries may explode or leak. 2. Do not mix old and new batteries. 3. Do not mix alkaline, standard (carbon-zinc) or rechargeable (nickel-cadmium) batteries. 4. Non-rechargeable batteries are n...
Page 11 - Grasp plug and remove from the
Page 11 USER SERVICING INSTRUCTIONS CLEANING 1. Grasp plug and remove from the receptacle or other outlet device. Do not unplug by pulling on cord. 2. Open fuse cover. Slide open fuse access cover on top of attachment plug towards blades. 1. Always remove the plug from the power socket. 2. Wipe ...
Page 12 - SERVICE AND SUPPORT; For questions or comments, please write to:; NOTE: PROOF OF PURCHASE IS REQUIRED FOR ALL
Page 12 SERVICE AND SUPPORT In the event of a warranty claim or if service is required for this fan, please contact us at the following: Toll Free: 1-866-646-4332 For questions or comments, please write to: Midea America Corp 5 Sylvan Way, Suite 100 Parsippany, NJ 07054 Phone: 866 646 4332 For y...
Page 14 - OWNER’S MANUAL; Lea Este Manual; ATENCIÓN; CUIDADO
Page 14 OWNER’S MANUAL PRECAUCIONES DE SEGURIDAD ............ 14 INSTRUCCIONES IMPORTANTES ............ 15 REGLAS DE USO SEGURO ........................ 16 MONTAJE ....................................................... 16 ESPECIFICACIONES .................................... 16 PIEZAS Y CARACTE...
Page 15 - INSTRUCCIONES IMPORTANTES; Nunca deje el ventilador funcionando sin supervisión.
Page 15 INSTRUCCIONES IMPORTANTES 1. Este dispositivo posee un enchufe polarizado (una de las clavijas es más ancha que la otra). Para reducir el riesgo de choque eléctrico, este enchufe fue diseñado para encajar de una sola manera en un tomacorriente polarizado. Si la clavija no entra completam...
Page 16 - REGLAS DE USO SEGURO; Ese ventilador eléctrico es pre ensamblado en fábrica.; MONTAJE
Page 16 1. Nunca inserte los dedos, lápices o ningún otro tipo de objeto a travésde la rejilla cuando el ventilador esté funcionando. 2. Desconecte el ventilador cuando lo traslade de un lugar a otro. 3. Asegúrese de que el ventilador se encuentre sobre una superficie estable cuando esté en func...
Page 17 - PIEZAS Y CARACTERÍSTICAS; Descripción; NOTA
Page 17 PIEZAS Y CARACTERÍSTICAS NO. Descripción NO. Descripción 1 Panel de operación 6 Cable de alimentación 2 Panel de visualización 7 Enchufe del cable de alimentación 3 Salida de aire 8 Rejilla de entrada de aire 4 Luz Ambiental tipo cinturón 9 Pre-filtro 5 Base 10 Filtro HEPA NOTA Las imáge...
Page 18 - INSTRUCCIONES DE INSTALACIÓN; Pasos de Instalación; Retire la rejilla de
Page 18 INSTRUCCIONES DE INSTALACIÓN Pasos de Instalación 1. Retire la rejilla de entrada de aire. 2. Retire el pre-filtro. Presione la parte levantada en ambos costados y tire hacia afuera, y retire el pre-filtro. 3. Retire la película protectora del filtro. 4. Instale el filtro HEPA. 5. Instal...
Page 19 - INSTRUCCIONES DE OPERACIÓN; Área de control
Page 19 INSTRUCCIONES DE OPERACIÓN Área de control Área de visualización AIRE Saludable AIRE INTELIGENTE RESTABLECER LUZ TEMPORIZADOR MODALIDAD OSCILACIÓN (Presione 3s, para restablecer filtro) Botón Descripción “- 澝 +” Iniciar/Espera Ajuste velocidad/tiempo de aire En la modalidad de inicio, pr...
Page 20 - Apagado forzado
Page 20 INSTRUCCIONES DE OPERACIÓN (cont.) Funciones Adicionales y Manteni m iento Descripción del Control Re m oto Apagado forzado No se realizan operaciones durante el funcionamiento Después de 12 horas de operación continua el dispositivo se apagará. Memoria inteligente El ventilador se inici...
Page 21 - • Use baterías de manganeso o
Page 21 Inserción y Sustitución de Baterías Sustitución del Filtro 1. No elimine las baterías arrojándolas al fuego, pues podrían estallar o tener filtraciones. 2. No mezcle baterías antiguas con nuevas. 3. No mezcle baterías alcalinas, estándar (carbón-zinc) o recargables (níquel-cadmio). 4. La...
Page 22 - Li; Desenchufe el cable de
Page 22 Li m pieza de Pre-filtro 1. Desenchufe el cable de alimentación. 2. Saque el filtro. 3. Retire el polvo con una aspiradora. 4. Instale la unidad en sentido contrario y enchufe el cable de alimentación a un tomacorrientes. INSTRUCCIONES DE OPERACIÓN (cont.) 1 2 3 4
Page 23 - Desconecte la unidad del suministro
Page 23 INSTRUCCIONES DE MANTENIMIENTO LIMPIEZA 1. Desconecte la unidad del suministro eléctrico. No desconecte el aparato tirando del cable. 2. Abra la cubierta del fusible. Deslice hacia afuera la cubierta que está en el enchufe del aparato. 1. Asegúrese de desconectar la unidad del suministro...
Page 24 - OBSERVACIÓN: LA BOLETA DE LA COMPRA SERÁ
Page 24 En caso de reclamos de garantía o si se necesita servicio para este calentador, por favor, póngase en contacto con nosotros a los siguientes números: Número de teléfono gratuito : 1-866-646-4332 Para preguntas o comentarios, por favor escriba a : Midea America Corp 5 Sylvan Way, Suite 10...