Page 2 - (large recommended for full range speakers); Paramètres de gestion des graves du processeur A/V :
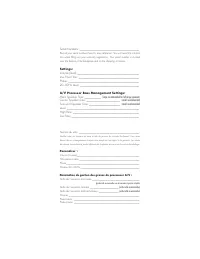
Serial Numbers: _________________________________________ Record your serial numbers here for easy reference. You will need this informa-tion when filling out your warranty registration. Your serial number is located near the bottom of the backplate and on the shipping container. Settings: Volume (l...
Page 5 - Connecting the Subwoofer and Setting Controls . . 9; Before Connecting the; Frequently Asked Questions and Troubleshooting 22; Avant de raccorder le; Configuration de l’Anthem Room Correction (ARC
C ontents | t able des matières Overview of Controls and Connections . . . . . . . . . 2 Controls . . . . . . . . . . . . . . . . . . . . . . . . . . . . . . . . . . .2 Audio Signal Connections . . . . . . . . . . . . . . . . . . . . . . .3 Wireless Audio Signal Connection . . . . . . . . . . . . . ...
Page 7 - ntroduCtion
7 Congratulations! You have invested in one of the world's pre-mier subwoofers. MartinLogan D ynamo subwoofers represent the extension of an intensive, dedicated team research program directed toward establishing a world class line of reference subwoofers using lead-ing-edge technology, without comp...
Page 10 - EU COMPLIANCE INFORMATION; INFORMATION SUR LA CONFORMITÉ POUR L’UE; 规格
EU COMPLIANCE INFORMATION Hereby, SVI Holdings (US), Inc.’s declares that this D ynamo 600X, D ynamo 800X, D ynamo 1100X, or D ynamo 1600X ments and other relevant provisions of the following EU Compliance Directive Information. • Conforms to European Union Low Voltage Directive 2014/35/EU; • Europe...
Page 13 - Step 3: Signal Connection
front of the room. Before deciding on a permanent corner placement, experiment with other positions. Locations away from corners often prove more effective in providing ideal low-frequency performance and blend with the main speakers. Please see the Placement section for details. Step 3: Signal Conn...
Page 14 - Důležité bezpečnostní pokyny
我们深知,您已迫不及待想感受下这款全新的扬声器了。所以我们为您编写了以下内容,便于您更加简易迅速地进行安装。一旦您着手操作时,请花点时间仔细阅读本章节,并深入了解随产品附上的用户手册中的信息。它能教您如何使这款最精确的低音扬声器系统发挥最佳的性能。 如果您在设置或操作扬声器时遇到任何问题,请参考用户手册中关于室内声学,摆位或操作的相关信息。如果遇到持续未能解决的问题,请联系经授权的MartinLogan经销商,他们会向您提供适当的技术分析来减少问题。 我们深知,您已迫不及待想感受这款全新的扬声器了。所以我们为您编写了以下内容,便于您更简易迅速地进行安装。一旦您着手操作时,请花点时间仔细阅读本章...
Page 15 - Krok 3: Připojení signálu
jsou noviny, ubrusy, záclony apod .; 18 Na přístroji nesmí být umístěny žádné zdroje otevřeného plamene, jako jsou svíčky; 19 Použití přístrojů v tropickém podnebí20 Toto zařízení je elektrický spotřebič třídy II nebo dvojité izolace21 Jako odpojovací zařízení se používá síťová zástrčka nebo spo - j...
Page 16 - Vigtige sikkerhedsinstruktioner
Sikkerhedsanvisning og kort vejledning i ibrugtagning. (Dansk/Danish) Vigtige sikkerhedsinstruktioner 1 Læs disse instruktioner. 2 Opbevar disse instruktioner. 3 Overhold alle advarsler. 4 Følg alle instruktioner. 5 Brug ikke dette apparat i nærheden af vand. 6 Rengør kun med tør klud. 7 Bloker ikke...
Page 18 - Stap 3: Signaalverbinding
De bliksemflits met pijlpuntsymbool, binnen een gelijkzijdige driehoek, is bedoeld om de gebruiker te waarschuwen voor de aanwezigheid van niet-geïsoleerde "gevaarlijke span-ning" in de behuizing van het product die voldoende groot kan zijn om een risico van een elektrische schok te vormen. ...
Page 23 - Schritt 6: Anhören und genießen
Sollten Sie auf ein Problem stoßen, das nicht gelöst werden kann, wenden Sie sich bitte an Ihren autorisierten MartinLogan-Händler. Dieser wird die entsprechende technische Analyse vornehmen, um Abhilfe zu schaffen. Schritt 1: Auspacken Nehmen Sie Ihren neuen Subwoofer aus der Verpackung heraus. Bew...
Page 24 - Βήμα 1ο: Αποσυσκευασία
19 Η χρήση συσκευών σε τροπικά κλίματα20 Α υ τ ό ς ο ε ξοπ λ ι σ μ ό ς ε ί ν α ι μ ι α η λ ε κ τ ρ ι κ ή σ υ σ κ ε υ ή κατηγορίας ΙΙ ή διπλής μόνωσης 21 Το βύσμα δικτύου ή ο συζευκτήρας συσκευής χρησιμοποιείται ως συσκευή αποσύνδεσης, η συσκευή αποσύνδεσης παραμένει άμεσα λειτουργική. Το θαυμαστικό ...
Page 25 - Fontos biztonsági utasítások
Βήμα 5β: Ρύθμιση των χειριστηρίων (χρησιμοποιώντας τις εισόδους αριστερά / δεξιά) • Ρύθμιση ελέγχου: Ρυθμίστε το διακόπτη σε 'App'. • Λειτουργία τροφοδοσίας: Ρυθμίστε το διακόπτη σε 'Αυτόματο'. • Κατεβάστε την εφαρμογή ελέγχου MartinLogan Sub Control (από το Google Play ή το Apple App Store). • Χρησ...
Page 26 - Importanti istruzioni di sicurezza
don a hálózati tápkábelt, miközben a villásdugót az elektro-mos csatlakozó aljzathoz csatlakoztatta! • Ne tegyen gyertyát, vagy más, nyílt lángot használó eszközt a készülékre! • Ne tegyen folyadékot se pohárban, se vázában, se más edényben a készülék tetejére! • Ne tegye ki a hangsugárzót csepegő, ...
Page 29 - 중요 안전 지침
注意事項 本製品を元の販売国以外で使用しないでください。電圧要件は国によって異なります。 不適切な電圧は、修理に潜在的に高価になる損傷を引き起こ す 可 能 性 が あ り ま す 。 サ ブ ウ ー フ ァ ー は 、 販 売目的の国で使用するために、正しい電源を使用してMartinLogan正規販売代理店に出荷されます。 認定代理店のリストは、www.martinlogan.comまたは[email protected]に電子メールでアクセスできます。 注意事項 • 内部には危険な高電圧がかかっています。カバーを取り外さないで下さい。 • 修理は資格を持った技術者に依頼して下さい。 ...
Page 31 - Ważne instrukcje bezpieczeństwa
• 레벨: 1시로 세팅하세요 (똑바로 오른쪽) • 서브우퍼 통합을 조절하기 위해서 프로세서/리시버의 베이스 매니지먼트 시스템을 사용하세요. Step 5b: 컨트롤 세팅 (좌/우 입력장치 사용) • 컨트롤 세팅: ‘App’으로 스위치를 돌리세요. • 파워 모드: ‘Auto’로 스위치를 돌리세요. • 마틴로건 서브 컨트롤 어플을 다운로드하세요. (구글 플레이나 애플 앱 스토어 사용) • 어플을 사용하며 아래 사항을 따라하세요. o 볼륨(레벨): 10dB 로 세팅하고 사운드가 깊고 저음이 길어질때 까지 볼륨을 올리세요. o 위상: 90°...
Page 34 - Важные инструкции по безопасности
(Ligação à Corrente de Sector) deste manual para mais pormenores. Passo 5a: Configurar os controlos (utilizando a entrada LFE) • Configurar o controlo: Coloque o interruptor na posição “Local”.• Modo Ligar/desligar: Coloque o interruptor na posição “Auto”.• Nível: Coloque na posição dos ponteiros da...
Page 39 - คํา�แนะนํา�เพื่อคว�มปลอดภัยที่สํา�คัญ
13 雷雨期間或長時間不使用時,請拔下本設備的插頭。14 將所有維修工作交給合格的維修人員。如果設備受到任何損壞, 如電源線或插頭損壞,液體濺落或物體掉入設備,設備受到雨淋或潮濕,不能正常工作,則需要進行維修,或者已經被丟棄。 15 儀器不得暴露在滴水或濺水的環境中,充滿液體的物體如花瓶不 得放在儀器上。 16 保持設備周圍至少20-30cm的距離,以保證通風良好;17 不應通過用報紙,桌布,窗簾等物品蓋住通風口來阻止通風。18 設備上不應放置明火等火源,例如蠟燭。19 在熱帶氣候中使用儀器20 本設備屬二類或雙重絕緣電器21 電源插頭或電器耦合器用作斷開裝置,斷開裝置應保持可操作性。 等邊三...
Page 41 - ขั้นตอนที่ 5b: ก�รตั้งค่� โดยใช้ช่องต่อข�เข้� Left/Right Input; ขั้นตอนที่ 6: เชิญรับฟังและเพลิดเพลินกับเสียงอันไพเร�ะ
• ใช้ ระบบควบคุมเบสของโปรเซสเซอร์(Processor) หรือ รีซีฟเวอร์(Receiver) ปรับแต่งเสียงเบสให้เข้ากัน ขั้นตอนที่ 5b: ก�รตั้งค่� โดยใช้ช่องต่อข�เข้� Left/Right Input • ปรับสวิทซ์ไปที่ App • ปรับสวิทซ์ไปที่ Auto • ดาวโหลด Martinlogan Sub Control app (จาก Google Play หรือ Apple App Store) • ใช้ App ปรับแต่...
Page 42 - Adım 1: Ambalajın açılması; Adım 2: Konumlandırma
sunulmaktadır. Hoparlörünüzü, çalışır duruma getirdikten sonra, el kitabında verilen tüm bilgileri dikkatle okuyunuz. El kitabı, son derece hassas olan bu bas hoparlöründen mümkün olan en mükemmel performansı nasıl elde edebileceğinizi gösteren bilgileri içerir. MartinLogan derin baslı hoparlörünüzü...
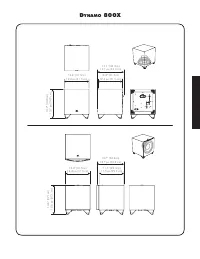
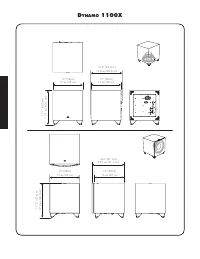
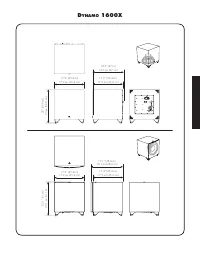
Page 44 - Dynamo
Dynamo 600X 16.3” (41.5cm) 16,3 po (41,5 cm ) 14.9” (37.8cm) 14,9 po (37,8 cm) 14.2” (36cm) 14,2 po (36 cm) 14.5” (36.7cm) 14,5 po (36,7 cm)
Page 53 - u s e r ’ s m a n u a l
D y n a m o 6 0 0 X D y n a m o 8 0 0 X D y n a m o 1 1 0 0 X D y n a m o 1 6 0 0 X u s e r ’ s m a n u a l ®
Page 54 - Controls; Setting Control; Please note: To fully release control of; Level; ARC is discussed in detail later in this manual.; verview; English
2 Controls Setting Control The Setting Control switch adjusts how level (volume) and settings of the subwoofer are controlled. • App: When this switch is set to "App" all of the subwoofer's control functions (except for Power Mode) are controlled via the subwoofer control app. Please note: T...
Page 55 - Audio Signal Connections; Found on; note, on the 600X the Right In also serves as the LFE In.
3 The ARC Mobile app can use a Bluetooth connection to the subwoofer. Use of your subwoofer's built-in USB Input is not required to run Anthem Room Correction. For those who desire to run ARC using a computer, the USB Input allows connection of your subwoofer to a computer via a Micro USB connection...
Page 56 - the 600X, Right In also serves as LFE In.; using the 600X for LFE In, set the Low Pass Filter to Bypass).; Connect from the Sub Out; This set of; Wireless Audio Signal Connection; AC Power Connection
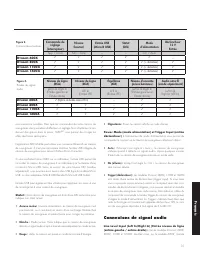
4 Line Level Input (LFE In) Found on D ynamo 800X, 1100X, and 1600X. Please note, on the 600X, Right In also serves as LFE In. Connect from the Sub Out on your A/V processor. Crossover settings for LFE In are controlled through your A/V processor. The subwoofer's setting for the Low-Pass Filter is n...
Page 57 - The Logo Button
5 o verview of the s ubwoofer C ontrol a pp D ynamo 600X, 800X, 1100X, and 1600X feature an advanced app based control system (available for iOS and Android) that connects to your subwoofer using a mobile device and Bluetooth connection. Visit MartinLogan.com for details on downloading MartinLogan's...
Page 58 - The volume (level) control allows you to adjust the; Settings: Low Pass Filter; subwoofers offer exceptional performance in both 2-chan-; offer the ability to con-
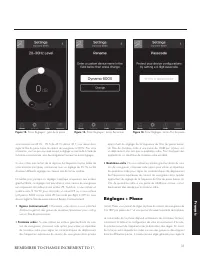
6 Figure 11. Settings: Listening Modes screen Settings: Volume • Volume: The volume (level) control allows you to adjust the loudness of your subwoofer from -40dB to 12dB. For most applications a setting between -14dB and 0dB is adequate. Setting the level too high will cause the bass to seem bloate...
Page 60 - Settings: Listening Modes; Settings: Room Correction
8 In a system where phase and polarity are properly set, the main speakers and subwoofer should work together and sound as if there is more total bass in the system. If your main speakers and subwoofers are out of phase their sound waves will cancel each other and total bass output in the system wil...
Page 61 - do; Recommended Control Settings:
9 Before Connecting the d ynamo MartinLogan developed the D ynamo subwoofer for easy setup and system integration. Before beginning to connect your subwoofer, please review the controls discussed in the last section. An under-standing of these will help speed you along. All signal connections are do...
Page 62 - SWT-X Wireless System used with any subwoofer:; SWT-X Wireless System used with any
10 Multi-Channel Mode This setup is recommended if you will use your subwoofer in a dedicated home theater or other multi-channel system. When a signal is connected to the subwoofer’s LFE In, the setting for the Low-Pass Filter control is not used. Your processor handles most of the bass management....
Page 63 - Use the bass management section of your receiver/proces-
11 English + Speaker Level Input – Left In + Speaker Level Input – Right In Line Level Input LFE In Dynamo Subwoofer LFE Out Receiver/Processor Figure 16. Signal connection for multi-channel mode. + Speaker Level Input – Left In + Speaker Level Input – Right In Line Level Input LFE In Dynamo Subwoof...
Page 64 - Channel Mode; do not
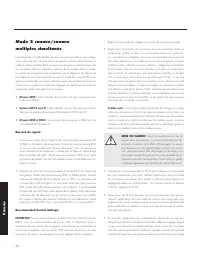
12 Simultaneous 2-Channel/Multi- Channel Mode The advantage of this dual mode is that you are able to achieve an optimum setup for stereo listening and still allow for multi-channel (movie) mode listening. When listening to stereo source mate-rial the system achieves optimum music integration. In th...
Page 66 - Using Speaker Level Inputs; This connection method is not compat-
14 Using Speaker Level Inputs This connection method is recommended if your subwoofer will be used in a 2-channel only system with full-range front loudspeakers. To connect using Speaker Level Inputs the speaker cable sshould be terminated using banana style plugs. The Low-Pass Filter is applied to ...
Page 67 - SWT-X Wireless System; SWT-X Status LEDs and Power
15 English SWT-X Wireless System Found on D ynamo 600X, 800X, 1100X, and 1600X. The SWT-X Subwoofer Wireless transmitter/receiver system is sold separately and available from your local dealer. The SWT-X wireless system can be used to establish either a left/right line level connection or a LFE line...
Page 68 - laCement; Subwoofer Position
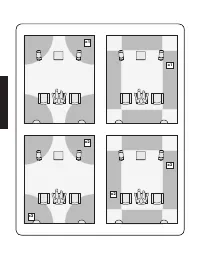
16 p laCement Subwoofer Position Generally, subwoofers have the most output when placed in the corner of a room. However, this can also exaggerate the subwoofers output making blending difficult. We recommend start-ing by placing the subwoofer in a corner. If, after the full range of tuning techniqu...
Page 69 - Changing Woofer Orientation; When configured in the front-firing orientation a
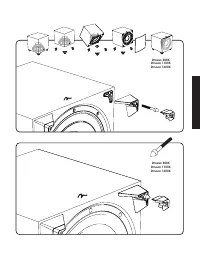
17 Changing Woofer Orientation D ynamo 800X, 1100X, and 1600X Please note: When configured in the front-firing orientation a right angle adaptor is required if using an XLR connection. When installing the subwoofer in a cabinet it is recommended that the subwoofer be converted to a front-firing conf...
Page 70 - Your Room; Standing Waves; Solid Footing; Spike Installation Instructions:; Carefully lay the subwoofer on its side to gain access to the
18 r oom a CoustiCs Your Room This is an area that requires both a little background to understand and some time and experimentation to attain the best performance from your system. Your room is actually a component and an impor-tant part of your system. This component is a large variable and can dr...
Page 71 - Front Left and Front Right
19 h ome t heater It had long been the practice of stereo buffs to connect their televi-sion to a stereo system. The advantage was the use of the larger speakers and more powerful amplifier of the stereo system. Even though the sound was greatly improved, it was still mono and lim-ited by the broadc...
Page 72 - About ARC; Use of your subwoofer's built-in USB Input is not required
20 a nthem r oom C orreCtion (arC™) s etup About ARC Your subwoofer includes Anthem Room Correction technology for optimizing low-frequency output within your room. Your subwoof-er's ARC system employs a mobile device connected via Bluetooth or computer and a microphone connected via USB cables. ARC...
Page 73 - If you own a MartinLogan PBK (Perfect Bass Kit) or Anthem
21 Mobile's queues for microphone connection instructions. • When taking ARC measurements the microphone should be at locations approximately where your ears will be. • If using an external microphone when taking ARC measure- ments, the microphone should point up, towards the ceiling. • If using a m...
Page 74 - Frequently Asked Questions; Troubleshooting; requently
22 Frequently Asked Questions How do I clean my subwoofer? Use a dust free cloth or a soft brush to clean your subwoofer. Is it safe to set things on my subwoofer? While your subwoofer is designed with a durable, stain-resistant surface, we advise you not to set anything on your subwoofer—especially...
Page 75 - Muddy Bass; Control App Troubleshooting; Control App not discovering subwoofer; ARC Troubleshooting; ARC Mobile not discovering subwoofer
23 English • Check all interconnecting cables.• Check that the subwoofer is connected to the sub out (or other appropriate output) on the receiver/processor/amplifier. • Check that subwoofer output is enabled in the receiver/proces- sor's setup menu. • Make sure the sub's level control is not turned...
Page 76 - The appointed MartinLogan distributor for any given country is; eneral
24 Warranty and Registration Your subwoofer is provided with an automatic Limited 90 Day Warranty coverage. You have the option, at no additional charge, to receive Limited 3-Year Warranty coverage. To obtain the Limited 3-Year Warranty coverage you need to register your product with MartinLogan. Fo...
Page 78 - peCifiCations; Located on subwoofer backplate
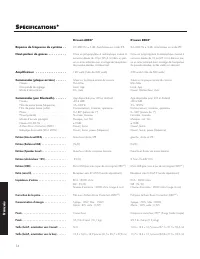
26 s peCifiCations * System Frequency Response . . . . Woofer . . . . . . . . . . . . . . . . . . . Amplifier . . . . . . . . . . . . . . . . . . Controls (backplate) . . . . . . . . . . Level . . . . . . . . . . . . . . . . . . . . . . Setting Control . . . . . . . . . . . . . . . Power Mode . . . ...
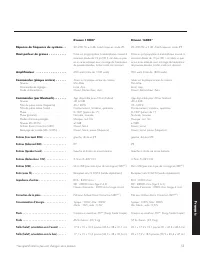
Page 79 - * Specifications are subject to change without notice.
27 System Frequency Response . . . . Woofer . . . . . . . . . . . . . . . . . . . Amplifier . . . . . . . . . . . . . . . . . . Controls (backplate) . . . . . . . . . . Level . . . . . . . . . . . . . . . . . . . . . . Setting Control . . . . . . . . . . . . . . . Power Mode . . . . . . . . . . . . ...
Page 81 - m a n u e l d e l ’ u t i l i s a t e u r
D y n a m o 6 0 0 X D y n a m o 8 0 0 X D y n a m o 1 1 0 0 X D y n a m o 1 6 0 0 X m a n u e l d e l ’ u t i l i s a t e u r ®
Page 82 - Français; Commandes; Commande de réglage :
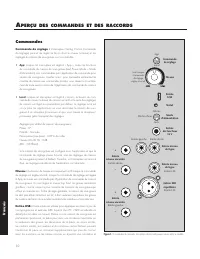
30 a perçu des Commandes et des raCCords Français Figure 1. Commandes de raccords. Les options de raccord peuvent varier selon le modèle. Commandes Commande de réglage : L’interrupteur Setting Control (commande de réglage) permet de régler la façon dont le niveau (volume) et les réglages du caisson ...
Page 83 - Connexions de signal audio; LFE In
31 une résonance nuisibles. Bien que les commandes de votre caisson de sous-graves vous permettent d’effectuer un réglage fin et d’optimiser le ren-dement des graves dans la pièce, l’ARC MC vous permet de corriger les effets des limites de la pièce. L’application ARC Mobile peut utiliser une connexi...
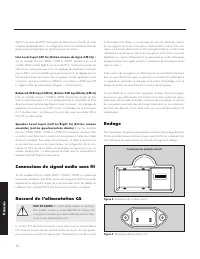
Page 84 - Connexions de signal audio sans fil; Raccord de l’alimentation CA; Rodage
32 Right In sert aussi de LFE In. Se à partir de Main-Out ou Pre-Out sur votre récepteur/préamplificateur. La configuration de la commande du Filtre de passe basse est appliquée au signal reçu par ces entrées. Line Level Input (LFE In) (Entrée niveau de ligne (LFE In)) : Sur les modèles D ynamo 800X...
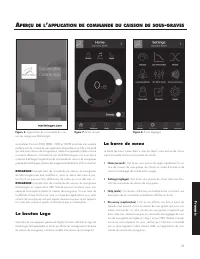
Page 85 - Le bouton Logo
33 a perçu de l ’ appliCation de Commande du Caisson de sous - graves Les modèles D ynamo 600X, 800X, 1100X et 1600X sont dotés d’un système perfectionné de commande par application (disponible pour iOS et Android) qui relie votre caisson de sous-graves à l’aide d'un appareil mobile et d’une connexi...
Page 86 - Réglages : Filtre de passe basse
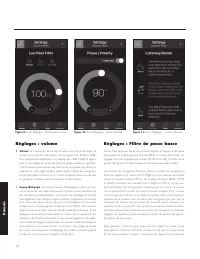
34 Figure 11. Écran Réglages : modes d’écoute Réglages : volume • Volume: La commande de volume (niveau) vous permet de régler la puissance sonore de votre caisson de sous-graves de -40dB à 12dB. Pour la plupart des applications, un réglage de -14dB à 0dB est appro-prié. Si vous réglez le niveau tro...
Page 87 - REMEMBER TO CHANGE INCREMENT TO 1°.
35 votre enceinte est 43 Hz. 70 % de 43 Hz donne 30,1; vous devez donc régler le filtre de passe basse du caisson de sous-graves à 30 Hz. Pour votre information, une fois que vous avez essayé le réglage recommandé à l’aide de la formule susmentionnée, vous devez également essayer les autres réglages...
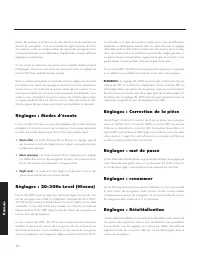
Page 88 - Réglages : Modes d’écoute; Réglages : Correction de la pièce
36 phase. Par exemple, si la pièce a une crête dans la zone du répartiteur du caisson de sous-graves, il est recommandé de régler la phase de façon à ce que les sorties acoustiques réelles du caisson de sous-graves et les enceintes principales soient déphasées. Expérimentez, essayez différents régla...
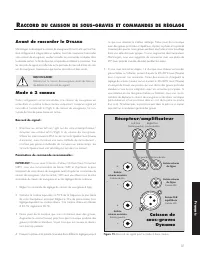
Page 89 - Mode à 2 canaux; Paramètres de commande recommandés :; Caisson de
37 Avant de raccorder le d ynamo MartinLogan a développé le caisson de sous-graves D ynamo afin qu’il soit fac- ile à configurer et à intégrer dans un système. Avant de commencer à raccorder votre caisson de sous-graves, veuillez consulter les commandes analysées dans la dernière section. Le fait de...
Page 90 - Mode canaux multiples
38 Mode canaux multiples Cette configuration est recommandée si vous utilisez votre caisson de sous-grave dans un cinéma maison ou un système à canaux multiples. Lorsqu’un signal est branché au LFE In du caisson de sous-graves, la com-mande de Filtre de passe basse n’est pas active. Le processeur gè...
Page 94 - Utilisation de l’entrée Speaker
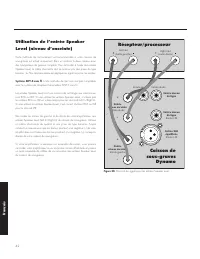
42 Utilisation de l’entrée Speaker Level (niveau d’enceinte) Cette méthode de raccordement est recommandée si votre caisson de sous-graves est utilisé uniquement dans un système à deux canaux avec des haut-parleurs de gamme complète. Pour raccorder à l’aide des entrées Speaker Level, le câble d’ence...
Page 95 - Système SWT-X sans fil; DEL de statut SWT-X et alimentation
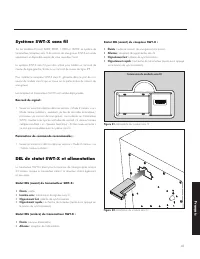
43 Système SWT-X sans fil Sur les modèles D ynamo 600X, 800X, 1100X et 1600X. Le système de transmetteur/récepteur sans fil de caisson de sous-graves SWT-X est vendu séparément et disponible auprès de votre revendeur local. Le système SWT-X sans fil peut être utilisé pour établir un raccord de nivea...
Page 96 - Position d’écoute; Demandez à votre revendeur; Installation dans un boîtier; Partie avant du boîtier
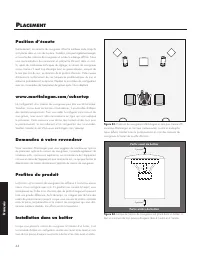
44 p laCement Position d’écoute Généralement, les caissons de sous-graves offrent la meilleure sortie lorsqu’ils sont placés dans un coin de la pièce. Toutefois, cela peut également exagér-er la sortie des caissons de sous-graves et rendre le mélange difficile. Nous vous recommandons de commencer en...
Page 97 - Modifier l’orientation du haut-parleur
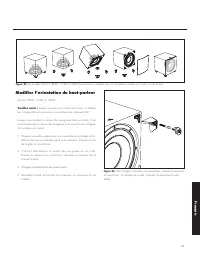
45 Modifier l’orientation du haut-parleur D ynamo 800X, 1100X, et 1600X Veuillez noter : lorsque le caisson est orienté vers l'avant, un adapta- teur à angle droit est nécessaire si vous utilisez une connexion XLR. Lorsque vous installez le caisson de sous-graves dans un boîtier, il est recommandé q...
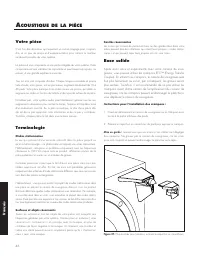
Page 98 - Votre pièce; Ondes stationnaires; Base solide; Instructions pour l’installation des crampons :
46 a Coustique de la pièCe Votre pièce C’est l’un des domaines qui requièrent un certain bagage pour compren-dre, et un peu de temps et d’expérimentation pour obtenir le meilleur rendement possible de votre système. La pièce est une composante et une partie intégrale de votre système. Cette composan...
Page 99 - Avant gauche et avant droite
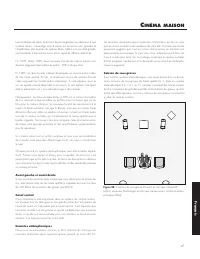
47 C inéma maison Les maniaques de stéréo branchent depuis longtemps leur télévision à leur système stéréo. L’avantage était d’utiliser les enceintes plus grandes et l’amplificateur plus puissant du système stéréo. Même si le son était grande-ment amélioré, il était encore mono et son signal de diff...
Page 100 - mC; À propos de l’ARC; il n’est pas nécessaire d’utiliser l’entrée USB intégrée
48 C onfiguration de l ’a nthem r oom C orreCtion (arC mC ) À propos de l’ARC Votre caisson de sous-graves est doté de la technologie Anthem Room Correction pour optimiser la sortie des basses fréquences dans votre pièce. Le système ARC de votre caisson de sous-graves utilise un dispositif mobile co...
Page 102 - Foire aux questions; Comment nettoyer mon caisson de sous-graves?; oire
50 Foire aux questions Comment nettoyer mon caisson de sous-graves? Utilisez un linge propre ou une brosse molle pour nettoyer votre caisson de sous-graves. Est-il sécuritaire de placer des choses sur mon caisson de sous-graves? Bien que votre caisson de sous-graves soit conçu avec une surface durab...
Page 103 - Dépannage; Pas de son; Dépannage de l’application de; Le mot de passe personnalisé ne fonctionne pas; Dépannage de l’ARC; ARC Mobile ne repère pas le caisson de sous-graves
51 caissons de sous-graves, y compris le lancement de l’ARC pour le ou les caissons de sous-graves, qu’il est temps de lancer le système de correction de la pièce pleine gamme de votre processeur afin d’aider à équilibrer le rendement général du système dans la pièce. Dépannage Pas de son • Vérifiez...
Page 104 - Installation du logiciel ARC (pour ordinateur)
52 à droite sur « Ordinateur » dans le menu Démarrer et choisissez « Propriétés »). Dans la liste de périphériques, trouvez « Son, vidéo et commandes de jeu » et étendez la liste des appareils disponibles. Cliquez à droit sur le microphone défectueux et choisissez désinstaller. Avec le câble USB du ...
Page 105 - enseignements
53 Garantie et inscription Votre caisson de sous-graves est vendu avec une garantie limitée automatique de 90 jours. Vous avez la possibilité d’obtenir, sans frais sup-plémentaires, une garantie limitée de trois ans. Pour obtenir la garantie limitée de 3 ans, vous devez inscrire votre produit chez M...
Page 106 - péCifiCations
54 s péCifiCations * Réponse de fréquence du système . . Haut-parleur de graves . . . . . . . . . . Amplificateur . . . . . . . . . . . . . . . . . Commandes (plaque arrière) . . . . . . Niveau . . . . . . . . . . . . . . . . . . . . . . . .Commande de réglage . . . . . . . . . . . . .Mode d’aliment...
Page 107 - *Les spécifications peuvent changer sans préavis.
55 Réponse de fréquence du système . . Haut-parleur de graves . . . . . . . . . . Amplificateur . . . . . . . . . . . . . . . . . Commandes (plaque arrière) . . . . . . Niveau . . . . . . . . . . . . . . . . . . . . . . . .Commande de réglage . . . . . . . . . . . . .Mode d’alimentation . . . . . . ...