Page 2 - TABLE OF CONTENTS
TABLE OF CONTENTS This manual may contain images or content different from the model you purchased.This manual is subject to revision by the manufacturer. SAFETY INSTRUCTIONS .............................................................. 3 IMPORTANT SAFETY INSTRUCTIONS .................................
Page 3 - SAFETY INSTRUCTIONS; risks or damage from unsafe or incorrect operation of the; IMPORTANT SAFETY INSTRUCTIONS; with reduced physical, sensory or mental capabilities, or lack of
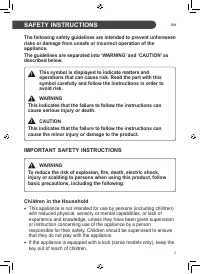
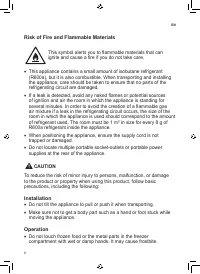
3 EN SAFETY INSTRUCTIONS The following safety guidelines are intended to prevent unforeseen risks or damage from unsafe or incorrect operation of the appliance. The guidelines are separated into ‘WARNING’ and ‘CAUTION’ as described below. This symbol is displayed to indicate matters and operations t...
Page 4 - Installation
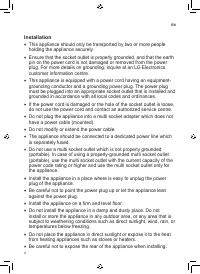
4 EN Installation • This appliance should only be transported by two or more people holding the appliance securely. • Ensure that the socket outlet is properly grounded, and that the earth pin on the power cord is not damaged or removed from the power plug. For more details on grounding, inquire at ...
Page 5 - Operation
5 EN • Be careful not to let the appliance door fall during assembly or disassembly. • Be careful not to pinch, crush, or damage the power cable during assembly or disassembly of the appliance door. • Do not connect a plug adapter or other accessories to the power plug. Operation • Do not use the ap...
Page 6 - Maintenance
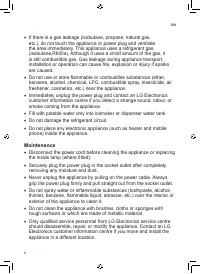
6 EN • If there is a gas leakage (isobutane, propane, natural gas, etc.), do not touch the appliance or power plug and ventilate the area immediately. This appliance uses a refrigerant gas (isobutane,R600a). Although it uses a small amount of the gas, it is still combustible gas. Gas leakage during ...
Page 10 - INSTALLATION; Compartments
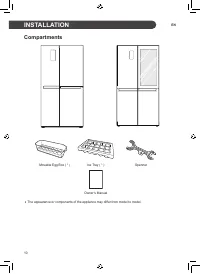
10 EN INSTALLATION Compartments Movable Egg Box ( * ) Ice Tray ( * ) Spanner Owner’s Manual • The appearance or components of the appliance may differ from model to model.
Page 12 - Removing the Door; WARNING; Refitting the Door
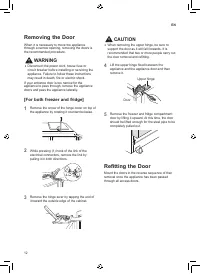
12 EN Removing the Door When it is necessary to move the appliance through a narrow opening, removing the doors is the recommended procedure. WARNING • Disconnect the power cord, house fuse or circuit breaker before installing or servicing the appliance. Failure to follow these instructions may resu...
Page 14 - Connecting the Appliance; Moving the Appliance
14 EN Connecting the Appliance After installing the appliance, connect the power plug into a socket outlet. NOTE • After connecting the power supply cord (or plug) to the outlet, wait 2 or 3 hours before you put food into the appliance. If you add food before the appliance has cooled completely, you...
Page 15 - OPERATION; Parts and Functions; Exterior
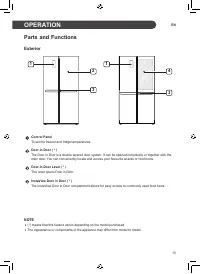
15 EN OPERATION Parts and Functions Exterior 1 2 3 1 3 4 Control Panel To set the freezer and fridge temperatures. Door-in-Door ( * ) The Door in Door is a double layered door system. It can be opened individually or together with the main door. You can conveniently locate and access your favourite ...
Page 16 - Interior
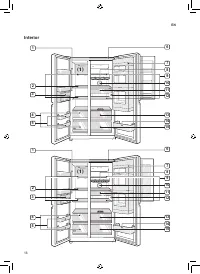
16 EN Interior 2 4 6 1 (1) 3 5 9 8 10 1112 13 15 14 7 2 4 6 1 (1) 3 5 9 8 10 1112 13 15 14 7
Page 17 - CAUTION
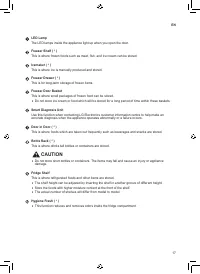
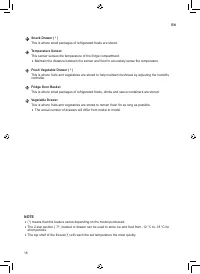
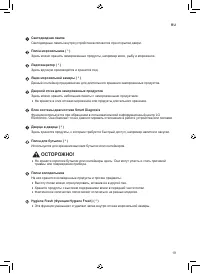
17 EN LED Lamp The LED lamps inside the appliance light up when you open the door. Freezer Shelf ( * ) This is where frozen foods such as meat, fish, and ice cream can be stored. Icemaker ( * ) This is where ice is manually produced and stored. Freezer Drawer ( * ) This is for long-term storage of f...
Page 19 - Notes for Operation; Suggestion for Energy Saving
19 EN Notes for Operation • Users should keep in mind that frost can form. If the door is not closed completely, if the humidity is high during the summer, or if the freezer door is opened frequently. • Ensure there is sufficient space between food stored on the shelf or door basket to allow the doo...
Page 21 - Using Control Panel; Units and Functions
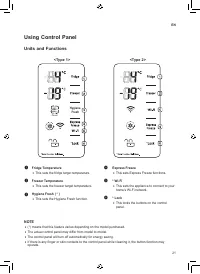
21 EN Using Control Panel Units and Functions <Type 1> <Type 2> Power Hygiene Fresh NOTE • (*) means that this feature varies depending on the model purchased. • The actual control panel may differ from model to model. • The control panel will turn off automatically for energy saving. • ...
Page 22 - Setting the Temperature; Setting Hygiene Fresh; Setting Express Freeze; Setting and Resetting Lock
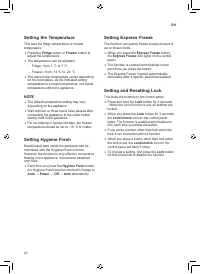
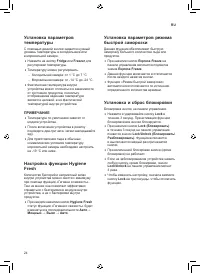
22 EN Setting the Temperature This sets the fridge temperature or freezer temperature. • Press the Fridge button or Freeze r button to adjust the temperature. • The temperature can be adjusted. − Fridge : from 1 °C to 7 °C − Freezer : from -14 °C to -24 °C • The actual inner temperature varies depen...
Page 23 - Making Ice; Taking Out Ice
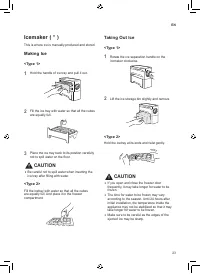
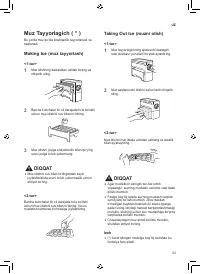
23 EN Icemaker ( * ) This is where ice is manually produced and stored. Making Ice <Type 1> 1 Hold the handle of ice tray and pull it out. 2 Fill the ice tray with water so that all the cubes are equally full. 3 Place the ice tray back to its position carefully not to spill water on the floor....
Page 24 - Cleaning the Ice Tray
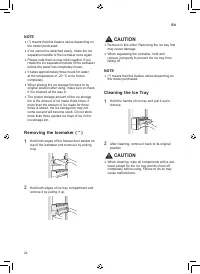
24 EN NOTE • (*) means that this feature varies depending on the model purchased. • If ice cannot be detached easily, rotate the ice separation handle of the icemaker once again. • Please note that ice may stick together if you rotate the ice separation handle of the icemaker before the water has co...
Page 26 - Other Functions; Door Open Alarm
26 EN Fresh Vegetable Drawer( * ) The Humidity in the vegetable crisper drawer can be controlled by sliding the lever in either direction.If moved to the left side, the air guide will be open and allow air to circulate through the drawer for reduced humidity. And if moved to the right side, the air ...
Page 27 - Things to check before using LG; Installing LG SmartThinQ; SMART FUNCTIONS
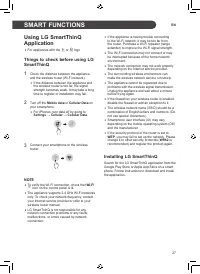
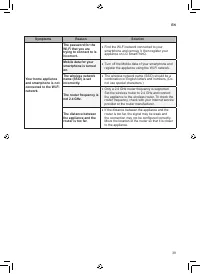
27 EN Using LG SmartThinQ Application • For appliances with the a or b logo Things to check before using LG SmartThinQ 1 Check the distance between the appliance and the wireless router (Wi-Fi network). • If the distance between the appliance and the wireless router is too far, the signal strength b...
Page 29 - Using Smart DiagnosisTM; Smart DiagnosisTM Through the
29 EN Using Smart Diagnosis™ • For appliances with the c or d logo Smart Diagnosis™ Through the Customer Information Centre Use this function if you need an accurate diagnosis by an LG Electronics customer information centre when the appliance malfunctions or fails. Use this function only to contact...
Page 30 - MAINTENANCE; Notes for Cleaning
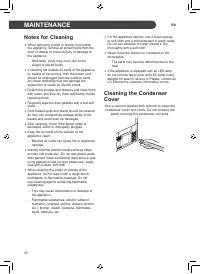
30 EN MAINTENANCE Notes for Cleaning • When removing a shelf or drawer from inside the appliance, remove all stored foods from the shelf or drawer to prevent injury or damage to the appliance. − Otherwise, injury may occur due to the weight of stored foods. • If cleaning the outside air vents of the...
Page 31 - Cleaning the Door Basket; Removing the Fridge/Freezer; Cleaning the Shelf; Refitting the Fridge/Freezer Shelf; Cleaning the Vegetable; Removing the Vegetable Drawer
31 EN Cleaning the Door Basket Removing the Fridge/Freezer Door Basket Hold both edges of the basket and remove it by lifting it upward. Refitting the Fridge/Freezer Door Basket 1 Hold both edges of the door basket, gently push one edge to assemble, and then in the same manner assemble the other edg...
Page 32 - Refitting the Vegetable Drawer
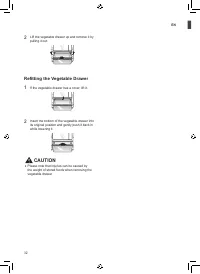
32 EN 2 Lift the vegetable drawer up and remove it by pulling it out. Refitting the Vegetable Drawer 1 If the vegetable drawer has a cover, lift it. 2 Insert the bottom of the vegetable drawer into its original position and gently push it back in while lowering it. CAUTION • Please note that injurie...
Page 33 - TROUBLESHOOTING
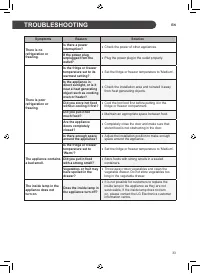
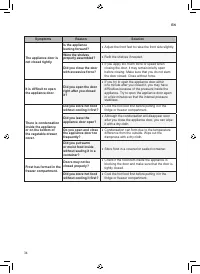
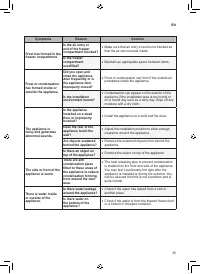
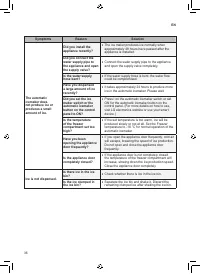
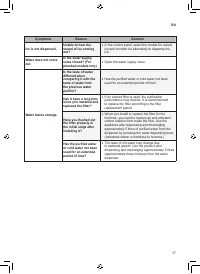
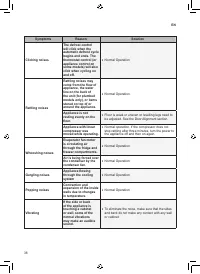
33 EN Symptoms Reason Solution There is no refrigeration or freezing. Is there a power interruption? • Check the power of other appliances. If the power plug unplugged from the outlet? • Plug the power plug in the outlet properly. There is poor refrigeration or freezing. Is the fridge or freezer tem...
Page 40 - Memo
Page 41 - РУКОВОДСТВО; ХОЛОДИЛЬНИК С
www.lg.com Перед началом работы с прибором внимательно прочитайте данное руководство и держите его постоянно под рукой. РУКОВОДСТВО ПОЛЬЗОВАТЕЛЯ ХОЛОДИЛЬНИК С МОРОЗИЛЬНЫМ ОТДЕЛЕНИЕМ Copyright © 2017 - 2019 LG Electronics Inc. Все права защищены.
Page 42 - СОДЕРЖАНИЕ
СОДЕРЖАНИЕ В данном руководстве могут встречаться изображения или материалы, не относящиеся к купленной вами модели.Производитель может вносить изменения в содержание руководства. ТЕХНИКА БЕЗОПАСНОСТИ ........................................................ 3 Важные указания по технике безопасности ...
Page 43 - ТЕХНИКА БЕЗОПАСНОСТИ; Важные указания по технике безопасности
3 RU ТЕХНИКА БЕЗОПАСНОСТИ Следующие рекомендации по технике безопасности призваны предотвратить непредвиденные риски и ущерб, вызванные небезопасной либо неверной эксплуатацией изделия. Рекомендации делятся на две категории: ОСТОРОЖНО и ВНИМАНИЕ (см. ниже). Этим символом помечены действия, связанные...
Page 44 - Установка
4 RU • Если изделие оснащено замком (только для некоторых моделей), держите ключ в недоступном для детей месте. Установка • Для безопасной транспортировки данного устройства требуются два человека или более. • Убедитесь в том, что розетка была должным образом заземлена, а контакт заземления на кабел...
Page 45 - Эксплуатация
5 RU • Не устанавливайте устройство в местах с высокой влажностью или большим количеством пыли. Не устанавливайте и не храните устройство вне помещений или в местах, подверженных прямому воздействию погодных условий (прямой солнечный свет, ветер, дождь или температура ниже нуля градусов). • Не устан...
Page 47 - Обслуживание
7 RU • Не допускайте повреждения контура хладагента. • Не помещайте внутрь устройства электронные приборы (такие как нагреватели или мобильные телефоны). Обслуживание • Отсоедините кабель питания перед очисткой устройства или заменой лампы внутреннего освещения (при ее наличии). • После полного удал...
Page 52 - УСТАНОВКА; Комплектация
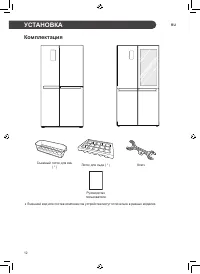
12 RU УСТАНОВКА Комплектация Съемный лоток для яиц ( * ) Лоток для льда ( * ) Ключ Руководство пользователя • Внешний вид или состав компонентов устройства могут отличаться в разных моделях.
Page 56 - Подключение устройства; Транспортировка
16 RU Подключение устройства После завершения установки устройства вставьте штекер шнура питания в розетку электросети. ПРИМЕЧАНИЕ • После подключения кабеля питания (или вилки) к розетке подождите 2–3 часа перед загрузкой продуктов внутрь устройства. Если положить их до того, как устройство полност...
Page 57 - ЭКСПЛУАТАЦИЯ; Детали и функции; Наружная часть
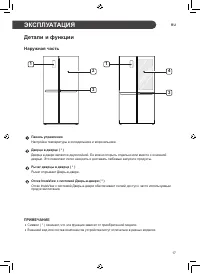
17 RU ЭКСПЛУАТАЦИЯ Детали и функции Наружная часть 1 2 3 1 3 4 Панель управления Настройка температуры в холодильнике и морозильнике. Дверца в дверце ( * ) Дверца в двери является двухслойной. Ее можно открыть отдельно или вместе с основной дверью. Это позволяет легко находить и доставать любимые за...
Page 58 - Внутренняя часть
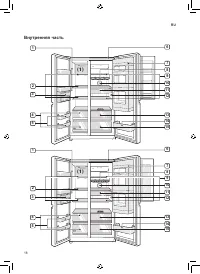
18 RU Внутренняя часть 2 4 6 1 (1) 3 5 9 8 10 1112 13 15 14 7 2 4 6 1 (1) 3 5 9 8 10 1112 13 15 14 7
Page 61 - Рекомендации по
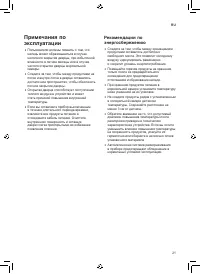
21 RU Примечания по эксплуатации • Пользователи должны помнить о том, что наледь может образовываться в случае неполного закрытия дверцы, при избыточной влажности в летние месяцы или в случае частого открытия дверцы морозильной камеры. • Следите за тем, чтобы между продуктами на полке и внутри лотка...
Page 63 - Использование панели управления; Типы панелей и функции
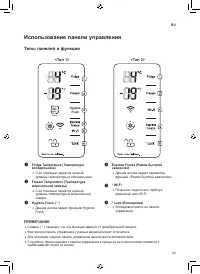
23 RU Использование панели управления Типы панелей и функции <Тип 1> <Тип 2> Power Hygiene Fresh ПРИМЕЧАНИЕ • Символ ( * ) означает, что эта функция зависит от приобретенной модели. • Фактически панель управления у разных моделей может отличаться. • Для экономии энергии панель управления...
Page 66 - Очистка лотка для льда
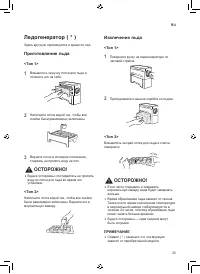
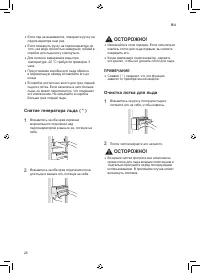
26 RU • Если лед не вынимается, поверните ручку на ледогенераторе еще раз. • Если повернуть ручку на ледогенераторе до того, как вода полностью замерзнет, кубики в коробке для льда могу слипнуться. • Для полного замерзания воды при температуре -20 °C требуется примерно 3 часа. • При установке коробк...
Page 68 - Прочие функции; Сигнал открытой дверцы
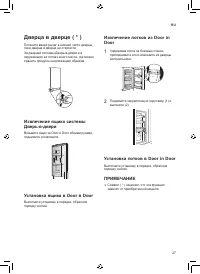
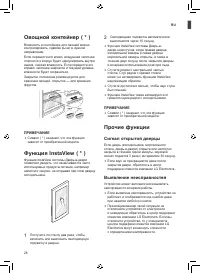
28 RU Овощной контейнер ( * ) Влажность в контейнере для овощей можно контролировать, сдвигая рычаг в нужном направлении.Если перевести его влево, воздушная заслонка откроется и воздух будет циркулировать внутри ящика, снижая влажность. Если перевести его вправо, заслонка закроется и текущий уровень...
Page 69 - Проверьте перед; Установка приложения LG; ИНТЕЛЛЕКТУАЛЬНЫЕ ФУНКЦИИ
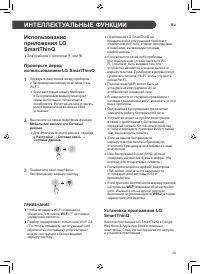
29 RU Использование приложения LG SmartThinQ • Для приборов с логотипом a или b . Проверьте перед использованием LG SmartThinQ 1 Проверьте расстояние между прибором и беспроводным маршрутизатором (сеть Wi-Fi). • Если расстояние между прибором и беспроводным маршрутизатором слишком большое, сила сигн...
Page 71 - Система диагностики Smart
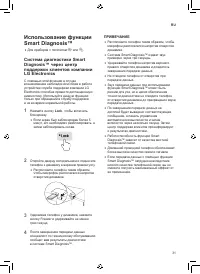
31 RU Использование функции Smart Diagnosis™ • Для приборов с логотипом c или d . Система диагностики Smart Diagnosis™ через центр поддержки клиентов компании LG Electronics С помощью этой функции в случае возникновения неполадок или сбоев в работе устройства служба поддержки компании LG Electronics...
Page 72 - ТЕХНИЧЕСКОЕ ОБСЛУЖИВАНИЕ; Примечания по очистке
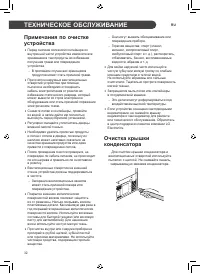
32 RU ТЕХНИЧЕСКОЕ ОБСЛУЖИВАНИЕ Примечания по очистке устройства • Перед снятием полки или контейнера из внутренней части устройства извлеките все хранившиеся там продукты во избежание получения травм или повреждения устройства. − В противном случае вес хранящихся продуктов может стать причиной травм...
Page 73 - Очистка овощного
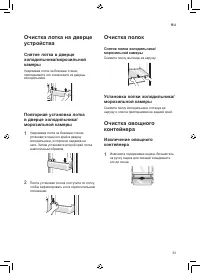
33 RU Очистка лотка на дверце устройства Снятие лотка в дверце холодильника/морозильной камеры Удерживая лоток за боковые стенки, приподнимите его и извлеките из дверцы холодильника. Повторная установка лотка в дверце холодильника/ морозильной камеры 1 Удерживая лоток за боковые стенки, установите о...
Page 74 - Установка овощного контейнера
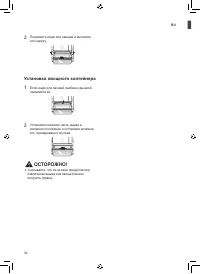
34 RU 2 Поднимите ящик для овощей и вытяните его наружу. Установка овощного контейнера 1 Если ящик для овощей снабжен крышкой, поднимите ее. 2 Установите нижнюю часть ящика в исходное положение и осторожно вставьте его, одновременно опуская. ОСТОРОЖНО! • Учитывайте, что из-за веса продуктов при извл...
Page 75 - ПОИСК И УСТРАНЕНИЕ НЕИСПРАВНОСТЕЙ
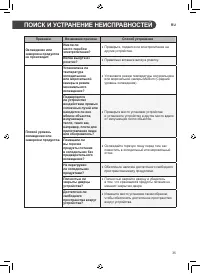
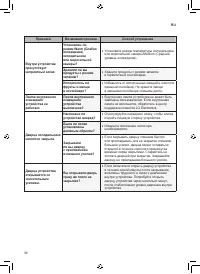
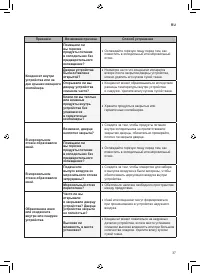
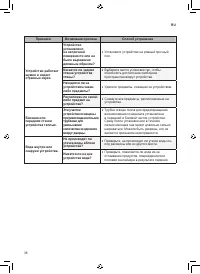
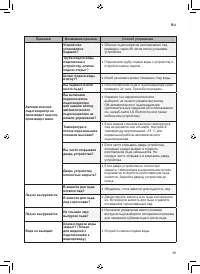
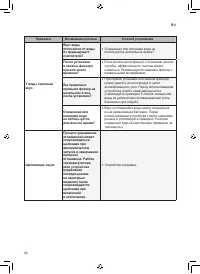
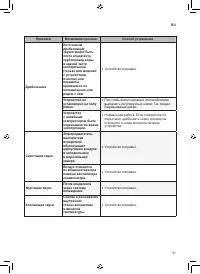
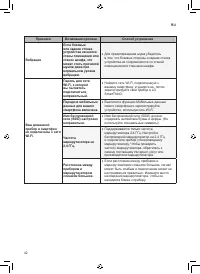
35 RU Признаки Возможная причина Способ устранения Охлаждение или заморозка продуктов не происходит. Имели ли место перебои электропитания? • Проверьте, подается ли электропитание на другие устройства. Вилка вынута из розетки? • Правильно вставьте вилку в розетку. Плохой уровень охлаждения или замор...
Page 83 - Для заметок
Page 85 - FOYDALANUVCHI QO'LLANMASI; MUZLATKICH
www.lg.com Ushbu foydalanuvchi qo'llanmani yaxshilab o'qib chiqing va kеlgusida foydalanish uchun saqlab qo'ying. FOYDALANUVCHI QO'LLANMASI SOVUTKICH& MUZLATKICH Copyright © 2017 - 2019 LG Electronics Inc. All Rights Reserved
Page 86 - MUNDARIJA
MUNDARIJA Ushbu qo'llanmada siz xarid qilgan rusumga taalluqli bo'lmagan tasvirlar yoki tarkib bo'lishi mumkin.Ushbu qo'llanma ishlab chiqaruvchi tomonidan qayta ko'rib chiqilishi mumkin. XAVFSIZLIK KO'RSATMALARI .................................................. 3 Muhim xavfsizlik ko'rsatmalari ......
Page 87 - XAVFSIZLIK KO'RSATMALARI; Quyidagi xavfsizlik ko'rsatmalari kutilmagan xavflar hamda; Muhim xavfsizlik ko'rsatmalari; ehtiyotkorlik choralariga amal qiling:; Uydagi bolalar; Ushbu jihoz jismoniy, sеzgi yoki aqliy qobiliyati chеklangan,
3 UZ XAVFSIZLIK KO'RSATMALARI Quyidagi xavfsizlik ko'rsatmalari kutilmagan xavflar hamda jihozdan ehtiyotsizlik bilan yoki noto'g'ri foydalanish oqibatida kеlib chiqadigan zararlarning oldini olishga mo'ljallangan. Ushbu ko'rsatmalar quyida ko'rsatilganidеk “OGOHLANTIRISH” va “DIQQAT” belgilari bila...
Page 89 - Ishlatish
5 UZ • Jihoz eshigini o‘rnatishda yoki yechishda uning qulab ketishiga yo‘l qo‘ymang. • Jihoz eshigini o‘rnatishda yoki yechishda elektr kabelining qisilib qolishi, ezilishi yoki shikastlanishidan ehtiyot bo‘ling. • Elektr kabeli sanchqisiga sanchqi adapteri yoki boshqa qurilmalarni ulamang. Ishlati...
Page 90 - Tеxnik xizmat ko'rsatish
6 UZ • Agar gaz (izobutan, propan, tabiiy gaz va h.k.) chiqayotgan bo‘lsa, jihozga yoki elektr kabeli sanchqisiga tegmang va darhol xonani shamollating. Bu jihoz sovutuvchi gazdan (izobutan, R600a) foydalanadi. Garchi undagi gaz miqdori juda oz bo‘lsa-da, u baribir yonuvchandir. Jihozni tashish, o‘r...
Page 91 - Chiqitga chiqarish
7 UZ • Jihozning ichki tomonini quritish uchun soch qurituvchi uskunadan foydalanmang va badbo‘y islarni ketkazish uchun jihoz ichiga sham tiqmang. • Muzdan tushish jarayonini tezlatish uchun mexanik qurilma yoki boshqa vositalardan foydalanmang. • Faqat ichimlik suvi manbasini suv tarmog‘iga ulang ...
Page 92 - Yong‘in va yonuvchan materiallar xavfi; DIQQAT
8 UZ Yong‘in va yonuvchan materiallar xavfi Bu belgi e’tiborsiz qoldirilgan hollarda uchqunlashi va yong‘inga sabab bo‘lishi mumkin bo‘lgan yonuvchan materiallar haqida ogohlantiradi. • Bu jihoz tarkinida oz miqdordagi izobutan sovutish vositasi (R600a) mavjud, biroq u yonuvchan hamdir. Jihozni tash...
Page 94 - O‘RNATISH; Bo‘lmalar
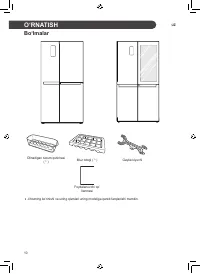
10 UZ O‘RNATISH Bo‘lmalar Olinadigan tuxum qutichasi ( * ) Muz lotogi ( * ) Gayka klyuchi Foydalanuvchi qo’ llanmasi • Jihozning ko‘rinishi va uning qismlari uning modeliga qarab farqlanishi mumkin.
Page 95 - O‘lchamlar va oraliqlar
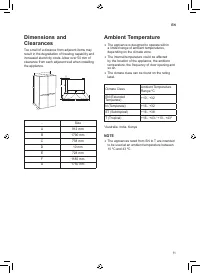
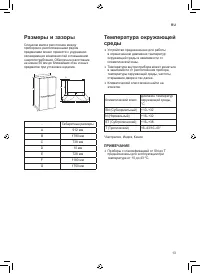
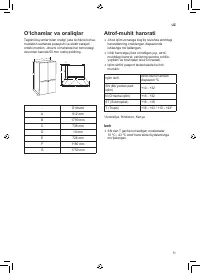
11 UZ O‘lchamlar va oraliqlar Tegishli buyumlar bilan oralig‘i juda kichkina bo‘lsa, muzlatish samarasi pasayishi va elektr xarajati ortishi mumkin. Jihozni o‘rnatishda har tomondagi devordan kamida 50 mm oraliq qoldiring. A C E F B D G - O‘lchami A 912 mm B 1790 mm C 738 mm D 10 mm E 728 mm F 1180 ...
Page 96 - Eshikni olib qo‘yish; OGOHLANTIRISH; [Muzlatkich va sovutkichning har; Eshikni qayta joylash
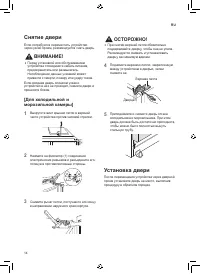
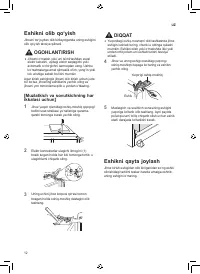
12 UZ Eshikni olib qo‘yish Jihozni tor joydan olib kirilayotganda uning eshigini olib qo‘yish tavsiya qilinadi. OGOHLANTIRISH • Jihozni o‘rnatish yoki uni ta’mirlashdan avval elektr kabelini, uydagi elektr saqlagichi yoki avtomatik o‘chirgichni tarmoqdan uzng. Ushbu ko‘rsatmalarga amal qilmaslik o‘l...
Page 97 - Eshik balandligini sozlash
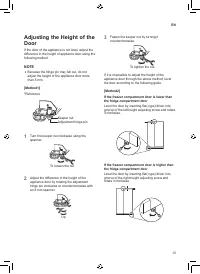
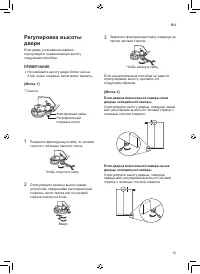
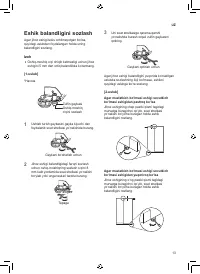
13 UZ Eshik balandligini sozlash Agar jihoz eshigi tekis ochilmayotgan bo‘lsa, quyidagi uslubdan foydalangan holda uning balandligini sozlang. Izoh • Oshiq-moshiq o‘qi chiqib ketmasligi uchun jihoz eshigini 5 mm dan ortiq balandlikka ko‘tarmang. [1-uslub] *Havola Zulfin gaykasi Oshiq-moshiq o‘qini s...
Page 98 - Jihozni ulash; Jihozni ko‘chirish
14 UZ Jihozni ulash Jihozni o‘rnatgandan keyin elektr shnurini devordagi rozetkaga ulang. Izoh • Rozetkaga elektr kabelini (yoki sanchqini) ulagandan so‘ng, jihoz ichiga oziq-ovqat mahsulotlarini qo‘yish uchun 2 yoki 3 soat kuting. Agar jihoz to‘liq sovib olgunga qadar uning ichiga oziq-ovqat mahsul...
Page 99 - Qismlar va funksiyalar; Korpus
15 UZ Ishlatish Qismlar va funksiyalar Korpus 1 2 3 1 3 4 Boshqaruv paneli Muzlatkich va sovutkich haroratini o‘rnatish Door-in-Door (Eshikdagi eshik) ( * ) Eshikdagi eshik bu ikki qatlamli eshik tizimidir. Uni alohida holda yoki asosiy eshik bilan birgalikda ochish mumkin. Sevimli gazaklaringiz yok...
Page 100 - Ichki qism
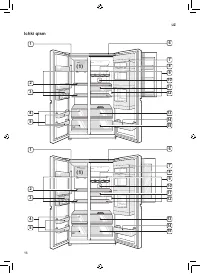
16 UZ Ichki qism 2 4 6 1 (1) 3 5 9 8 10 1112 13 15 14 7 2 4 6 1 (1) 3 5 9 8 10 1112 13 15 14 7
Page 103 - Ishlatish bo‘yicha izohlar; Enеrgiyani tеjash bo'yicha
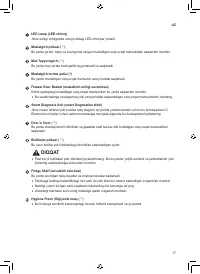
19 UZ Ishlatish bo‘yicha izohlar • Agar eshiklari yaxshi yopilmagan bo‘lsa, yoz paytida namlik yuqori bo‘lsa yoki muzlatkich eshigi tez-tez ochiladigan bo‘lsa, jihoz eshiklarida muz hosil bo‘lib qolishini foydalanuvchilar yodda tutishlari zarur. • Jihoz tokchasi yoki eshik savatchasida saqlanayotgan...
Page 104 - Mahsulotlarni yaxshi saqlash
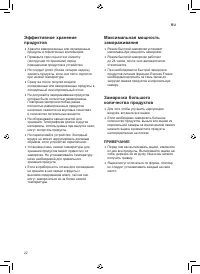
20 UZ Mahsulotlarni yaxshi saqlash • Muzlatilgan yoki sovitilgan oziq-ovqat mahsulotlarini zich yopiladigan idishlarda saqlang. • Jihozga oziq-ovqat mahsulotini qo‘yishdan avval uning iste‘mol qilinishi mumkin bo‘lgan mudati va yorlig‘ini (saqlash bo‘yicha ko‘rsatmalar) tekshiring. • Agar oziq-ovqat...
Page 105 - Using Control Panel (boshqaruv panelidan foydalanish); Units and Functions (birliklar va funksiyalar)
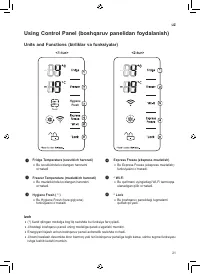
21 UZ Using Control Panel (boshqaruv panelidan foydalanish) Units and Functions (birliklar va funksiyalar) <1-tur> <2-tur> Power Hygiene Fresh Izoh • (*) Xarid qilingan modelga bog‘liq ravishda bu funksiya farq qiladi. • Jihozdagi boshqaruv paneli uning modeliga qarab o‘zgarishi mumkin. ...
Page 106 - Setting Hygiene Fresh (toza
22 UZ Setting the Temperature (haroratni o‘rnatish) Bu sovutkich yoki muzlatkich haroratini o‘rnatadi. • Haroratni sozlash uchun Fridge yoki Freezer tugmasini bosing. • Haroratni quyidagicha sozlanishi mumkin. − Sovutkich: 1°C dan 7°C gacha − Muzlatkich: -14°C dan -24°C gacha • Joriy ichki harorat j...
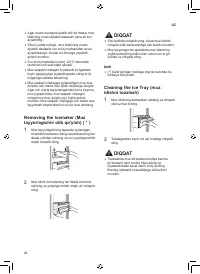
Page 108 - Removing the Icemaker (Muz; Cleaning the Ice Tray (muz
24 UZ • Agar muzni osongina ajratib olib bo‘lmasa, muz idishning muzni ajratish dastasini yana bir bor aylantiring. • Shuni yodda tutingki, muz idishining muzni ajratish dastasini suv to‘liq muzlashidan avval aylantirsangiz, muzlar bir-birlariga yopishib qolishi mumkin. • Suv to‘liq muzlatishi uchun...
Page 109 - Door in Door (eshikdagi eshikdan
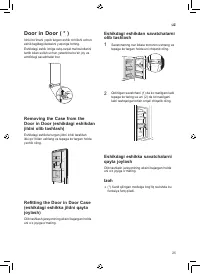
25 UZ Door in Door ( * ) Ichki boʻlmani yopib turgan eshik ochilishi uchun eshik tagidagi dastakni yuqoriga torting.Eshikdagi eshik ichiga oziq-ovqat mahsulotlarini tartib bilan solish uchun yetarlicha bo‘sh joy va atrofidagi savatchalar bor. Removing the Case from the Door in Door (eshikdagi eshikd...
Page 110 - Yangi sabzavotlar tortma; Boshqa funksiyalari; Door Open Alarm (eshik
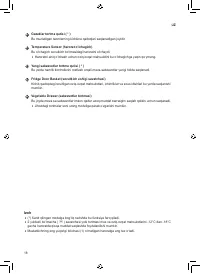
26 UZ Yangi sabzavotlar tortma qutisi ( * ) Dastakni har ikkala yo‘nalishda surish orqali sabzavotlarni yangi saqlash tortma qutisidagi namlikni boshqarish mumkin.Agar chap tomonga surilsa, namlikni kamaytirish uchun havo yo‘lagi ochiladi va tortma qutida havo aylanishiga imkon beriladi. Va agar o‘n...
Page 111 - LG SmartThinQ ilovasidan; foydalanishdan avval; LG SmartThinQ ilovasini o'rnatish; AQLLI FUNKSIYALAR
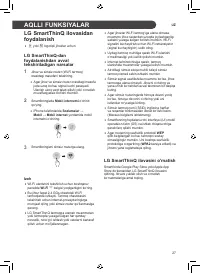
27 UZ LG SmartThinQ ilovasidan foydalanish • a yoki b logotipli jihozlar uchun LG SmartThinQ-dan foydalanishdan avval tekshiriladigan narsalar 1 Jihoz va simsiz router (Wi-Fi tarmoq) orasidagi masofani tekshiring. • Agar jihoz va simsiz router orasidagi masofa juda uzoq bo‘lsa, signal kuchi pasayadi...
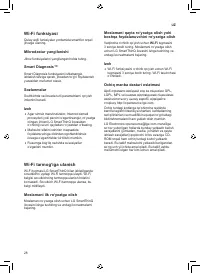
Page 112 - Wi-Fi tarmog‘iga ulanish
28 UZ Wi-Fi funksiyasi Qulay aqlli funksiyalar yordamida smartfon orqali jihozga ulaning. Mikrodastur yangilanishi Jihoz funksiyalarini yangilangan holda tuting. Smart Diagnosis™ Smart Diagnosis funksiyasini ishlatsangiz, ishlatish tarziga qarab, jihozdan to‘g‘ri foydalanish yuzasidan ma’lumot olasi...
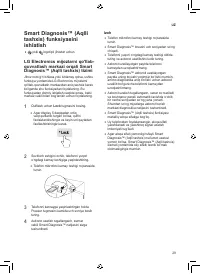
Page 113 - Smart DiagnosisTM (Aqlli; quvvatlash markazi orqali Smart
29 UZ Smart Diagnosis™ (Aqlli tashxis) funksiyasini ishlatish • yoki logotipli jihozlar uchun LG Electronics mijozlarni qo'llab- quvvatlash markazi orqali Smart Diagnosis™ (Aqlli tashxis) tizimi Jihoz noto‘g‘ri ishlasa yoki ishlamay qolsa, ushbu funksiya yordamida LG Electronics mijozlarni qo'llab-q...
Page 114 - TEXNIK XIZMAT KO‘RSATISH
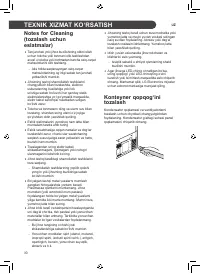
30 UZ TEXNIK XIZMAT KO‘RSATISH Notes for Cleaning (tozalash uchun eslatmalar) • Tan jarohati yoki jihoz buzilishining oldini olish uchun tokcha yoki tortmani olib tashlashdan avval u tokcha yoki tortmadan barcha oziq-ovqat mahsulotlarini olib tashlang. − Aks holda saqlanayotgan oziq-ovqat mahsulotla...
Page 115 - Tokchani tozalash
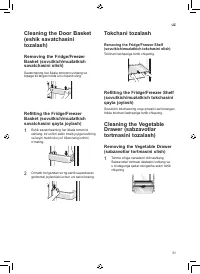
31 UZ Cleaning the Door Basket (eshik savatchasini tozalash) Removing the Fridge/Freezer Basket (sovutkich/muzlatkich savatchasini olish) Savatchaning har ikkala tomonini ushlang va tepaga ko‘targan holda uni chiqarib oling. Refitting the Fridge/Freezer Basket (sovutkich/muzlatkich savatchasini qayt...
Page 117 - NOSOZLIKLARNI BARTARAF ETISH
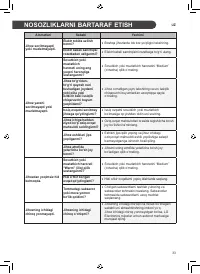
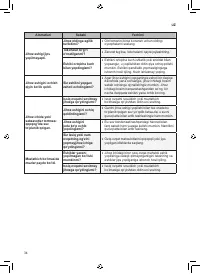
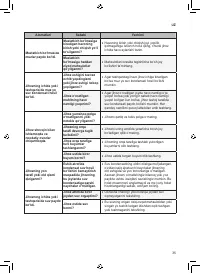
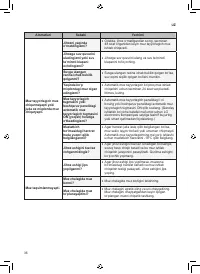
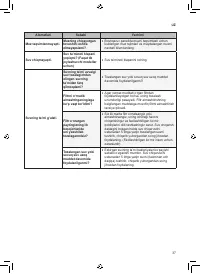
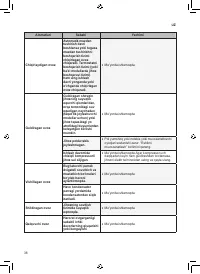
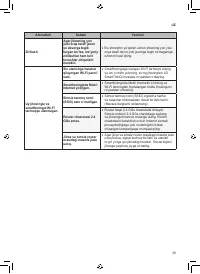
33 UZ Alomatlari Sababi Yechimi Jihoz sovitmayapti yoki muzlatmayapti. Elektr tokida uzilish bormi? • Boshqa jihozlarda tok bor-yo‘qligini tekshiring. Elektr kabeli sanchqisi rozetkadan uzilganmi? • Elektr kabeli sanchqisini rozetkaga to‘g‘ri ulang. Jihoz yaxshi sovitmayapti yoki muzlatmayapti. Sovu...


 LG DoorCooling+ GC-B247SEDC
User Manual
LG DoorCooling+ GC-B247SEDC
User Manual
 LG DoorCooling+ GC-B247SMDC
User Manual
LG DoorCooling+ GC-B247SMDC
User Manual
 LG GA-B379PLQA
User Manual
LG GA-B379PLQA
User Manual
 LG GA-B379PVCA
User Manual
LG GA-B379PVCA
User Manual
 LG GA-B409UCA
User Manual
LG GA-B409UCA
User Manual
 LG GA-B419SEUL
Manual
LG GA-B419SEUL
Manual
 LG GA-B419SLUL
Manual
LG GA-B419SLUL
Manual
 LG GA-B419SMHL
Manual
LG GA-B419SMHL
Manual
 LG GA-B419SQGL
Manual
LG GA-B419SQGL
Manual
 LG GA-B419SQUL
Manual
LG GA-B419SQUL
Manual
 LG GA-B419SWJL
Manual
LG GA-B419SWJL
Manual
 LG GA-B459CESL
User Manual
LG GA-B459CESL
User Manual
 LG GA-B459CLSL
User Manual
LG GA-B459CLSL
User Manual
 LG GA-B459CLWL
User Manual
LG GA-B459CLWL
User Manual
 LG GA-B459CQSL
User Manual
LG GA-B459CQSL
User Manual
 LG GA-B509
User Manual
LG GA-B509
User Manual
 LG GA-B509CESL
User Manual
LG GA-B509CESL
User Manual