LG 45GR95QE-B - Manuals
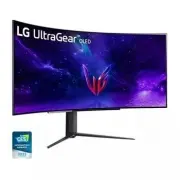
User Manual LG 45GR95QE-B


Summary
2 ENGLISH TABLE OF CONTENTS ASSEMBLING AND PREPARING ......................................................... 4 - Installing ............................................................................................................................5Moving and Lifting the Monitor .....................
4 ENGLISH ASSEMBLING AND PREPARING CAUTION • Always use genuine LG components to ensure safety and product performance. • The product warranty will not cover damage or injury caused by the use of unauthorized components. • It is recommended that use the supplied components. • The product figures and...
5 ENGLISH Installing Moving and Lifting the Monitor When moving or lifting the monitor, follow these instructions to prevent the monitor from being scratched or damaged and to ensure safe transportation, regardless of its shape or size. • Place the monitor in the original box or packing material bef...
LG Monitors Manuals
-
 LG 22MP410-B (22MP410-B)
User Manual
LG 22MP410-B (22MP410-B)
User Manual
-
 LG 24GL600F
User Manual
LG 24GL600F
User Manual
-
 LG 24MD4KL-B.AUS
User Manual
LG 24MD4KL-B.AUS
User Manual
-
 LG 27LQ615S
User Manual
LG 27LQ615S
User Manual
-
 LG 27MD5KL-B.AUS
User Manual
LG 27MD5KL-B.AUS
User Manual
-
 LG 27MP400-B
User Manual
LG 27MP400-B
User Manual
-
 LG 27UL500
User Manual
LG 27UL500
User Manual
-
 LG 27UL500WAUS
User Manual
LG 27UL500WAUS
User Manual
-
 LG 27UL850
User Manual
LG 27UL850
User Manual
-
 LG 27UP850N-W (27UP850N-W)
User Manual
LG 27UP850N-W (27UP850N-W)
User Manual
-
 LG 28MQ780-B
User Manual
LG 28MQ780-B
User Manual
-
 LG 32GN50R-B (32GN50R-B)
User Manual
LG 32GN50R-B (32GN50R-B)
User Manual
-
 LG 32GQ850-B (32GQ850-B)
User Manual
LG 32GQ850-B (32GQ850-B)
User Manual
-
 LG 32MN500M-B
User Manual
LG 32MN500M-B
User Manual
-
 LG 35WN75C
User Manual
LG 35WN75C
User Manual
-
 LG 38WN95C-WL
User Manual
LG 38WN95C-WL
User Manual
-
 LG E2060S
Manual
LG E2060S
Manual
-
 LG E2360V
Manual
LG E2360V
Manual
-
 LG UltraWide 34WP500-B
User Manual
LG UltraWide 34WP500-B
User Manual
-
 LG 16MQ70
User Manual
LG 16MQ70
User Manual