LG 32MU99-W - Manuals
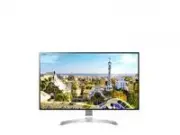
User Manual LG 32MU99-W


Summary
2 ENG ENGLISH CONTENTS 19 - Connecting Headphones 20 USER SETTINGS 20 Activating the Main Menu20 - Main Menu Features 21 User Settings21 - Menu Settings 26 TROUBLESHOOTING 28 SPECIFICATIONS 29 Factory Support Mode (Preset Mode, PC) 29 HDMI29 DisplayPort / USB-C30 HDMI Timing (Video)30 Power LED 3 LI...
3 ENG ENGLISH LICENSE Each model has different licenses. Visit www.lg.com for more information on the license. The terms HDMI and HDMI High-Definition Multimedia Interface, and the HDMI logo are trademarks or registered trademarks of HDMI Licensing LLC in the United States and other countries. The f...
4 ENG ENGLISH ASSEMBLING AND PREPARING Product Components Please check whether all the components are included in the box before using the product. If there are missing com-ponents, contact the retail store where you purchased the product. Note that the product and components may look different from...
LG Monitors Manuals
-
 LG 22MP410-B (22MP410-B)
User Manual
LG 22MP410-B (22MP410-B)
User Manual
-
 LG 24GL600F
User Manual
LG 24GL600F
User Manual
-
 LG 24MD4KL-B.AUS
User Manual
LG 24MD4KL-B.AUS
User Manual
-
 LG 27LQ615S
User Manual
LG 27LQ615S
User Manual
-
 LG 27MD5KL-B.AUS
User Manual
LG 27MD5KL-B.AUS
User Manual
-
 LG 27MP400-B
User Manual
LG 27MP400-B
User Manual
-
 LG 27UL500
User Manual
LG 27UL500
User Manual
-
 LG 27UL500WAUS
User Manual
LG 27UL500WAUS
User Manual
-
 LG 27UL850
User Manual
LG 27UL850
User Manual
-
 LG 27UP850N-W (27UP850N-W)
User Manual
LG 27UP850N-W (27UP850N-W)
User Manual
-
 LG 28MQ780-B
User Manual
LG 28MQ780-B
User Manual
-
 LG 32GN50R-B (32GN50R-B)
User Manual
LG 32GN50R-B (32GN50R-B)
User Manual
-
 LG 32GQ850-B (32GQ850-B)
User Manual
LG 32GQ850-B (32GQ850-B)
User Manual
-
 LG 32MN500M-B
User Manual
LG 32MN500M-B
User Manual
-
 LG 35WN75C
User Manual
LG 35WN75C
User Manual
-
 LG 38WN95C-WL
User Manual
LG 38WN95C-WL
User Manual
-
 LG E2060S
Manual
LG E2060S
Manual
-
 LG E2360V
Manual
LG E2360V
Manual
-
 LG UltraWide 34WP500-B
User Manual
LG UltraWide 34WP500-B
User Manual
-
 LG 16MQ70
User Manual
LG 16MQ70
User Manual