Page 2 - Küppersbusch-Kundendienst; Freitag; Garantiebedingungen; Unsere Garantieleistung besteht darin, dass wir nach unse-
2 D Küppersbusch-Kundendienst Zentrale Kundendienst- / ErsatzteilanforderungDeutschland: Küppersbusch Hausgeräte GmbH Küppersbuschstraße 1645883 Gelsenkirchen Telefon: 0209-401631Telefax: (0209) 4 01-7 14 / 7 15Internet: www.kueppersbusch.de Sie erreichen uns:Montag bis Donnerstag von 8:30 Uhr bis 1...
Page 3 - Verpackungs-Entsorgung; umgebungen
D 3 4. In Fällen, in denen die Nachbesserung fehlschlägt oder von uns abgelehnt wird, liefern wir innerhalb der oben genanntenGarantiezeit auf Wunsch des Endabnehmers kostenfreigleichwertigen Ersatz. 5. Garantieleistungen bewirken weder eine Verlängerung der Garantiefrist noch setzen sie eine neue G...
Page 5 - Für Personen; Sicherheitshinweise und Warnungen
D 5 • Sollte sich das Kochfeld durch einen Defekt der Sen- sorsteuerung nicht mehr abschalten lassen, sofort dieHaushalts-Sicherung ausschalten und den Kunden-dienst rufen. • Vorsicht beim Arbeiten mit Haushaltsgeräten! Anschlussleitungen dürfen nicht mit den heißenKochzonen in Berührung kommen. • B...
Page 6 - Gerätebeschreibung
6 Gerätebeschreibung D G er ät eb es ch re ib u n g 1. Induktionskochzone vorne links2. Induktionskochzone hinten links3. Glaskeramik-Kochfeld4. Touch-Control Bedienfeld5. Stand-by Taste und Lüftesteuerung6. Lüfter 7. Stand-by Taste8. Ein/Aus-Taste (Kochfeld)9. Sensorfeld10. Kochstufen-Anzeige11. Ve...
Page 7 - Bedienung durch Sensortasten; Symbole
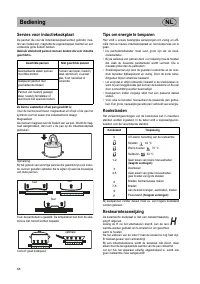
Gerätebeschreibung D 7 Bedienung durch Sensortasten Die Bedienung des Glaskeramik-Kochfeldes erfolgt durch Touch-Control Sensortasten. Die Sensortasten funktionieren wie folgt:mit der Fingerspitze ein Symbol auf der Glaskeramikoberflächekurz berühren. Jede korrekte Betätigung wird durch einen Signal...
Page 8 - Das Kochfeld; – Energiesparendes Kochen durch direkte Energieübertragung; Topferkennung
8 Bedienung D Bedienung Das Kochfeld Die Kochfläche ist mit einem Induktionskochfeld ausgestattet.Eine Induktionsspule unterhalb der Glaskeramik-Kochflächeerzeugt ein elektromagnetisches Wechselfeld, das die Glaskera-mik durchdringt und im Geschirrboden den wärmeerzeugendenStrom induziert.Bei einer ...
Page 9 - Geschirr für Induktionskochfeld
Bedienung D 9 Geschirr für Induktionskochfeld Das für die Induktionskochfläche benutzte Kochgefäß muss ausMetall sein, magnetische Eigenschaften haben und eine ausrei-chende Bodenfläche besitzen. Benutzen Sie nur Töpfe mit induktionsgeeignetem Boden. So können Sie die Eignung des Gefäßes feststellen...
Page 10 - Gerät betriebsbereit schalten
10 Bedienung D Gerät betriebsbereit schalten Mit der Stand-by Taste wird das Gerät betriebsbereit geschaltet. Die Taste ist sozusagen der Hauptschalter. Es erfolgt zuerst ein Selbst-Test derSteuerung und die Anzeigen leuchten kurz auf.Nach dem Ausschalten über diese Taste bleibt das Gerät noch ca. 1...
Page 11 - blinkende Sensorfeld
Bedienung D 11 STOP-Funktion Der Kochvorgang kann kurzzeitig durch die STOP-Funktion unterbrochenwerden, z.B. wenn es an der Haustüre klingelt. Um den Kochvorgang mit dengleichen Kochstufen fortzusetzen, muss die STOP-Funktion aufgehoben wer-den. Ein evtl. eingestellter Timer wird angehalten und läu...
Page 12 - Kindersicherung
12 Bedienung D Kindersicherung Die Kindersicherung soll verhindern, dass Kinder versehentlich oder absicht-lich das Induktionskochfeld einschalten. Dazu wird die Bedienung gesperrt. Kindersicherung einschalten 1. Die Ein-/Aus-Taste Kochfeld betätigen (ca. 1 Sek.), um das gesamte Kochfeld einzuschalt...
Page 14 - Ankochautomatik; Warmhaltefunktion; Sensorfeld
14 Bedienung D Ankochautomatik Bei der Ankochautomatik erfolgt das Ankochen mit Kochstufe 9. Nach einerbestimmten Zeit wird automatisch auf eine geringere Fortkochstufe (1 bis 8)zurückgeschaltet.Bei Anwendung der Ankochautomatik muss lediglich die Fortkochstufegewählt werden, mit der das Gargut weit...
Page 15 - Verriegelung; Verriegelung einschalten; Verriegelung ausschalten; betätigen. Die LED über der Verriegelungs-; Hinweise; Powerstufe; der gewünschten Koch-; Powermanagement
Bedienung D 15 Verriegelung Durch die Verriegelung kann die Bedienung der Tasten und die Einstellungeiner Kochstufe gesperrt werden. Lediglich die Ein-/Aus-Taste bleibt zumAusschalten des Kochfeldes bedienbar. Verriegelung einschalten 1. Die Verriegelungs-Taste betätigen. Die LED über der Verriegelu...
Page 16 - Lüfter verwenden
16 Bedienung D Lüfter verwenden In der Mitte des Kochfelds befindet sich der Lüfter mit dem Abzug nachunten. Vor Inbetriebnahme des Lüfters Abdeckung vollständig abnehmen. Lüfter ein- und ausschalten 1. Stand-by Taste betätigen (ca. 1 Sek.), bis das Gerät auf Betriebsbe- reitschaft schaltet. 2. Die ...
Page 17 - Spezielle Verschmutzungen
Reinigung und Pflege D 17 Reinigung und Pflege • Vor dem Reinigen das Kochfeld ausschalten und abkühlen lassen. • Das Glaskeramikkochfeld darf unter keinen Umständen mit einem Dampfreinigungsgerät oder ähnlichem gereinigt wer-den! • Beim Reinigen darauf achten, dass nur kurz über die Ein/Aus- Taste ...
Page 18 - • Hat die Sicherung der Hausinstallation (Sicherungskasten)
18 Was tun bei Problemen? D Was tun bei Problemen? Unqualifizierte Eingriffe und Reparaturen am Gerät sind gefähr-lich, weil Stromschlag- und Kurzschlussgefahr besteht. Sie sindzur Vermeidung von Körperschäden und Schäden am Gerät zuunterlassen. Deshalb solche Arbeiten nur von einem Elektrofach-mann...
Page 19 - Belüftung; Wichtige Hinweise
Montageanleitung D 19 Montageanleitung Sicherheitshinweise für den Küchenmöbelmonteur • Furniere, Kleber bzw. Kunststoffbeläge der angrenzenden Möbel müssen temperaturbeständig sein (>75°C). Sind dieFurniere und Beläge nicht genügend temperaturbeständig,können sie sich verformen. • Der Berührungs...
Page 20 - Einbau Kochmulden Lüfter
20 Montageanleitung D Einbau Kochmulden Lüfter • Das Produkt darf nur von einem zugelassenen Fachmann unter Beachtung der örtlich geltenden Vorschriften ange-schlossen werden, gleiches gilt für die Abluftanschlüsse. DerInstallateur ist für die einwandfreie Funktion am Aufstellort ver-antwortlich! • ...
Page 21 - Elektrischer Anschluss
Montageanleitung D 21 • Abluftleitungen sollen so kurz wie möglich sein, nicht im 90 Grad-Winkel sondern in weichen Bögen geführt werden undkeine Querschnittsreduzierungen haben. • Rohrdurchmesser nie kleiner als 150 mm wählen. 50 cm vor dem Lüfterbaustein dürfen keine Bögen/Winkel verlegt wer-den. ...
Page 22 - environments; Contents
22 GB Disposing of the packaging Please ensure the environmentally-friendly disposal of thepackaging that came with your appliance. Recycling thepackaging material saves on resources and cuts down on waste. Disposing of old appliances The symbol on the product or on its packagingindicates that this ...
Page 23 - For connection and operation
Safety Instructions and Warnings GB 23 Safety Instructions and Warnings For connection and operation • The appliances are constructed in accordance with the relevant safety regulations. • Connecting the appliances to the mains and repai- ring and servicing the appliances may only be car-ried out by ...
Page 24 - For persons
24 Safety Instructions and Warnings GB • Whenever possible, use the back cooking zones for large pans so that the sensor keys are not hea-ted up too much (touch control overheating; errormessage E2). • Activate the childproof lock if there are any pets in the home which could make contact with the h...
Page 25 - Touch control for
Appliance description GB 25 Appliance description 1. Induction cooking zone front2. Induction cooking zone back3. Glass ceramic surface4. Touch-control operating panel5. Standby key and fan control6. Fan 7. Standby key8. ON/OFF key (hob)9. Touch control10. Power setting display11. Locking key12. War...
Page 26 - Operating the hob with the sensor keys
26 Appliance description GB Operating the hob with the sensor keys The hob is operated with touch control sensor keys. The sensorkeys are operated as follows: lightly touch a symbol on thesurface of the ceramic glass plate. A buzzer will indicate whenthe controls have been operated correctly.The tou...
Page 27 - The hob
Operation GB 27 Operation The hob The hob is equipped with an induction cooking mode. Aninduction coil underneath the glass ceramic hob generates anelectromagnetic alternating field which penetrates the glassceramic and induces the heat-generating current in the pot base.With an induction cooking zo...
Page 28 - Cookware for induction hobs
28 Operation GB Cookware for induction hobs Cookware for induction cooking zones must be made of metaland have magnetic properties. The base must be sufficientlylarge. Only use pots with a base suitable for induction. This is how to establish the suitability of a pot Conduct the magnet test describe...
Page 29 - Switch the device ready
Operation GB 29 Switch the device ready With the Standby key , the unit is switched operational. The key is like the main switch. After switching off using this button the unit remains about10 min. in standby mode. First there is a self-test of the controls and then theindicators light up briefly.Af...
Page 30 - STOP function; Recall function; STOP key
30 Operation GB STOP function The cooking process can be briefly interrupted with the STOP function, e.g. ifthe doorbell rings. The STOP function must be released in order to continuecooking at the same power level. If a timer has been set it will pause and willthen continue.This function is only av...
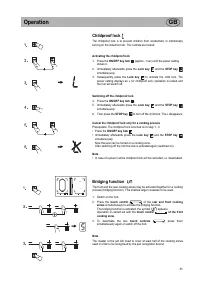
Page 31 - Childproof lock
Operation GB 31 Childproof lock The childproof lock is to prevent children from accidentally or intentionallyturning on the induction hob. The controls are locked. Activating the childproof lock 1. Press the ON/OFF key hob (approx. 1 sec) until the power setting shows 0. 2. Immediately afterwards pr...
Page 33 - Automatic boost function
Operation GB 33 Automatic boost function Food is parboiled at power setting 9 with the automatic boost function. After acertain time, the power level will switch down automatically to a lowersimmering setting (1 to 8).When using the automatic boost function only the simmering setting withwhich the f...
Page 34 - Locking
34 Operation GB Locking The lock can be used to lock key operation and cooking level settings. Onlythe ON/OFF key can be used to switch the hob off. Activating the lock 1. Press the Lock key to activate the function. The control lamp above the Lock key will light up. Switching off the lock 2. Press ...
Page 35 - Using the fan
Operation GB 35 Using the fan In the center of the cooktop, the fan is positioned with the air exhaust down-ward.Remove the cover completely before using the fan. Switching the fan on and off 1. Press the Standby key (about 1 sec.) until the unit goes into standby mode. 2. Press the plus key from th...
Page 36 - Glass ceramic hob
36 Cleaning and care GB Cleaning and care • Switch the hob off and let it cool down before you clean it.• Never clean the glass ceramic hob with a steam cleaner or similar appliance! • When cleaning make sure that you only wipe lightly over the ON/OFF key . The hob may otherwise be accidentally swit...
Page 37 - Contact a technical customer service or an electrician!
The worktop does not work? GB 37 The worktop does not work? Interference with and repairs to the appliance by unqualifiedpersons are dangerous as they can result in an electric shock ora short circuit. Do not interfere with or try to repair the appliance;this could cause injury to persons and damage...
Page 38 - Safety instructions for kitchen unit fitters; Important information
38 Instructions for assembly GB Instructions for assembly Safety instructions for kitchen unit fitters • Veneers, adhesives and plastic surfaces of surrounding furniture must be temperature resistant (>75°C). If the veneersand surfaces are not sufficiently heat resistant they maybecome deformed. ...
Page 39 - Installation of the hob fan
Instructions for assembly GB 39 Installation of the hob fan • The product may only be connected by an authorised qualified technician in compliance with applicable local regulations. Thesame applies for the exhaust connections. The fitter isresponsible for perfect functioning at the installation loc...
Page 40 - Electrical connection; • The electrical connection must be carried out by a
40 Instructions for assembly GB • Exhaust pipes should be very short with wide curves (no 90° curves) and no reduction of the diameter. • Always use pipes with a diameter of not less than 150 mm. Elbows/bends may not be installed closer than 50 cm in frontof the fan module. Always insert a straight ...
Page 41 - Mains cable available in the factory; Technical data; Hob dimensions
Instructions for assembly GB 41 Mains cable available in the factory • The hob has been fitted with a temperature-resistant connection cable in the factory. • Connection to the mains is carried out in accordance with the circuit diagram, unless the connection cable is already fittedwith a plug. • If...
Page 42 - ronnements professionnels semblables; Sommaire
42 F Elimination de l’emballage Eliminez le plus écologiquement possible l’emballage de trans-port. Le recyclage des matériaux d’emballage permet d’économi-ser des matières premières et de réduire le volume des déchets. Elimination des appareils hors service Le symbole sur le produit ou son emballag...
Page 43 - Pour la table de cuisson en général
Consignes de sécurité et avertissements F 43 Consignes de sécurité et avertissements Pour le raccordement et le fonctionnement • Les appareils ont été conçus selon les normes de sécurité en vigueur. • Le raccordement au secteur, l’entretien et la répara- tion de l’appareil ne doivent être effectués ...
Page 44 - Pour les personnes
44 Consignes de sécurité et avertissements F • Les casseroles et les poêles chaudes ne doivent pas recouvrir la zone des touches sensitives. Dans cecas, l’appareil s’arrête automatiquement. • Posez les grandes casseroles idéalement sur les zones de cuisson arrières, afin d’éviter une tempéra-ture tr...
Page 45 - champ sensitif
Description de l’appareil F 45 Description de l’appareil 1. Zone de cuisson à induction avant 2. Zone de cuisson à induction arrière3. Table de cuisson vitrocéramique4. Bandeau de commande Touch-Control5. Touche de veille et commande des ventilateurs6. Ventilateur 7. Touche de veille8. Touche Marche...
Page 46 - Commande par touches sensitives
46 Description de l’appareil F Commande par touches sensitives La commande de la table vitrocéramique se fait via les touchessensitives Touch-Control. Les touches sensitives fonctionnent dela manière suivante : effleurez brièvement, avec la pointe dudoigt, un symbole sur la surface vitrocéramique. C...
Page 47 - La table de cuisson
Utilisation F 47 Utilisation La table de cuisson La surface de cuisson est composée d’une table de cuisson àinduction. Une bobine à induction, située sous la surface vitrocé-ramique, génère un champ électromagnétique alternatif quipénètre la vitrocéramique et induit dans le fond des récipients uncou...
Page 48 - Vaisselle pour table de cuisson à induction
48 Utilisation F Vaisselle pour table de cuisson à induction Le récipient utilisé avec la table à induction doit être en métal,avoir des propriétés magnétiques et posséder un fond de taillesuffisante. N’utilisez que des récipients possédant un fond convenant àl’induction. Pour savoir si un récipient...
Page 49 - Mettre l'appareil en marche
Utilisation F 49 Mettre l'appareil en marche La touche de veille met l'appareil en marche. Elle fait ainsi office d'inter- rupteur général. Il s'ensuit ainsi un auto-test de la platine et les afficheurss'allument brièvement.La plaque reste encore en mode opérationnel pendant env. 10 mn si vousvoulez...
Page 50 - Fonction STOP
50 Utilisation F Fonction STOP Le déroulement de la cuisson peut être interrompu momentanément à l’aidede la fonction STOP, p.ex. lorsque quelqu’un sonne à la porte. Pour continuerla cuisson avec les mêmes positions de cuisson, la fonction STOP doit êtreannulée. Une minuterie programmée sera arrêtée...
Page 51 - Fonction de pontage
Utilisation F 51 Sécurité-enfants La sécurité enfants permet d'empêcher la mise en marche accidentelle de lazone de cuisson par induction par des enfants. L'utilisation sera bloquée. Activer la sécurité enfant 1. Appuyez sur la touche Marche/Arrêt (plaque de cuisson) jusqu’à ce que les affichages de...
Page 53 - Précuisson automatique
Utilisation F 53 Précuisson automatique Avec la précuisson automatique, la précuisson se fait sur position 9. Après uncertain temps, le réglage est ramené automatiquement sur une position infé-rieure (1 à 8) pour terminer la cuisson.En utilisant la précuisson automatique, réglez seulement la positio...
Page 54 - Verrouillage; Activer le verrouillage; au-dessus de la touche de verrouillage s’allume.; Désactiver le verrouillage; diode au-dessus de la touche de verrouillage s’éteint.; Position Power; Mettre la plaque de cuisson en marche.; champ sensitif complètement vers la droite; symbole s’éteint et la cuisson continue sur la position 9.
54 Utilisation F Verrouillage Le verrouillage permet de bloquer la commande des touches et le réglaged’une intensité de cuisson. Seule la touche Arrêt reste accessible pour cou-per la zone de cuisson. Activer le verrouillage 1. Appuyez sur la touche de verrouillage , afin d’activer la fonction. La d...
Page 55 - Utiliser le ventilateur
Utilisation F 55 Utiliser le ventilateur Le ventilateur se trouve au milieu de la plaque de cuisson, son extracteur setrouvant en bas.Avant de mettre le ventilateur en marche, retirez complètement son recouvre-ment. Allumer et éteindre le ventilateur 1. Appuyer sur la touche de veille (pendant env. ...
Page 56 - Table de cuisson vitrocéramique
56 Nettoyage et entretien F Nettoyage et entretien • Avant le nettoyage, éteignez la table de cuisson et laissez-la refroidir. • La table de cuisson en vitrocéramique ne doit, en aucun cas, être nettoyée avec un appareil à vapeur ou avec un ustensilesimilaire ! • Pendant le nettoyage, veillez à pass...
Page 58 - Ventilation; Renseignements importants
58 Instructions de montage F Instructions de montage Consignes de sécurité pour l’installateur des meubles de cuisine • Les placages, colles ou revêtements plastiques des meubles voisins doivent résister à la chaleur (75°C au minimum). Lesplacages et revêtements non résistants à la chaleur risquentd...
Page 59 - Dimensions en mm
Instructions de montage F 59 Montage d'un ventilateur pour la table de cuisson • Le produit ne doit être raccordé que par un professionnel agréé dans le respect des prescriptions légales en vigueur ;cela vaut également pour les raccordements des conduitesd'évacuation d'air. L'installateur est respon...
Page 60 - Raccordement électrique; • Le branchement électrique ne doit être effectué que par
60 Instructions de montage F • Les conduites d'évacuation doivent être le plus court possible, ne pas passer pas des coudes de 90° mais pas des coudeslégers et ne doivent pas comporter de sections transversales. • Ne jamais choisir un diamètre de tuyau inférieur à 150 mm. Aucun coude ne doit être in...
Page 61 - Appareil livré avec cordon d’alimentation; • La table de cuisson est équipée en usine d’un cordon élec-; Possibilités de branchement; Caractéristiques techniques; * Puissance, la position Power étant activée; Mise en service; Dimensions de la table de cuisson
Instructions de montage F 61 Appareil livré avec cordon d’alimentation • La table de cuisson est équipée en usine d’un cordon élec- trique thermorésistant. • Le raccordement au réseau se fait d’après le schéma élec- trique, seul le cordon de raccordement est déjà muni d’uneprise électrique. • En cas...
Page 62 - digheden; Inhoud
62 NL Verwijderen van de verpakking Verwijder de transportverpakking op een zo milieubewust moge-lijke manier. Recycling van het verpakkingsmateriaal bespaartgrondstoffen en vermindert de afvalberg. Verwijderen van oude apparaten Het symbool op het product of op de verpakkingwijst erop dat dit produ...
Page 63 - Voor aansluiting en werking
Veiligheidsaanwijzingen en waarschuwingen NL 63 Veiligheidsaanwijzingen en waarschuwingen Voor aansluiting en werking • De apparaten worden volgens de geldende veilig- heidsvoorschriften gebouwd. • Aansluiting op het net, onderhoud en reparatie van het apparaat mogen alleen door een erkend vakmanvol...
Page 64 - Voor personen
64 Veiligheidsaanwijzingen en waarschuwingen NL • De keramische kookplaat mag in geen geval met een stoomreinigingsapparaat of dergelijke wordenschoongemaakt! • Let erop dat er geen voorwerpen (bijv. stofdoek) in de onmiddellijke nabijheid van de kookplaatafzuiging lig-gen. Deze kunnen door de lucht...
Page 66 - Bediening door sensoren
66 Beschrijving van het apparaat NL Bediening door sensoren De bediening van de keramische kookplaat gebeurt met touch-control-sensoren. De sensoren functioneren als volgt: met devingertop een symbool op het keramische oppervlak even aan-raken. Elke correcte bediening wordt door een signaaltoonbeves...
Page 67 - De kookplaat; – Energiebesparend koken door rechtstreekse energieover-; Panherkenning
Bediening NL 67 Bediening De kookplaat De kookplaat is met een inductiekookveld uitgerust. Een inductie-spoel onder de keramische kookplaat wekt een elektromagne-tisch wisselveld op, dat de vitrokeramiek doordringt en in debodem van de pan een warmtevormende stroom induceert.Bij een inductiekookzone...
Page 68 - Servies voor inductiekookplaat; Zo kunt u vaststellen of uw pan geschikt is:; Tips om energie te besparen; Geschikte pannen
68 Bediening NL Servies voor inductiekookplaat De pannen die voor de inductiekookplaat worden gebruikt, moe-ten van metaal zijn, magnetische eigenschappen bezitten en eenvoldoende grote bodem hebben. Gebruik uitsluitend pannen met een bodem die voor inductiegeschikt is. Zo kunt u vaststellen of uw p...
Page 69 - Apparaat bedrijfsklaar maken; daarna; Kookplaat en kookzone inschakelen; sensorveld; Kookzone uitschakelen
Bediening NL 69 Apparaat bedrijfsklaar maken Met de stand-by-toets wordt het apparaat bedrijfsklaar gemaakt. De toets is bij wijze van spreken de hoofdschakelaar. Eerst vindt er een zelftestvan de besturing plaats en de aanwijzingen lichten eventjes op.Na het uitschakelen met deze toets blijft het a...
Page 70 - knipperend sensorveld
70 Bediening NL STOP-functie Het koken kan tijdelijk met de STOP-toets worden onderbroken, bijv. als eraan de deur wordt gebeld. Om het koken met dezelfde kookstanden voort tezetten, moet de STOP-functie worden beëindigd. Een ev. ingestelde timerwordt gestopt en loopt daarna verder.Om veiligheidsred...
Page 71 - Kinderbeveiliging
Bediening NL 71 Kinderbeveiliging De kinderbeveiliging moet verhinderen dat kinderen de inductiekookplaat perongeluk of opzettelijk inschakelen. Hiervoor wordt de bediening geblokkeerd. Kinderbeveiliging inschakelen 1. Op de Aan/Uit-toets kookplaat drukken (ca. 1 sec.) om de volledige kookplaat in t...
Page 72 - De kookzones zijn uitgeschakeld
72 Bediening NL Automatische uitschakeling (timer) Door de automatische uitschakeling wordt elke ingeschakelde kookzone naeen instelbare tijd automatisch uitgeschakeld. Er kunnen kooktijden van10 sec. (0.10) tot 1 uur 59 min. (1.59) worden ingesteld. 1. De kookplaat inschakelen. Een of meer kookzone...
Page 73 - Aankookautomaat; Warmhoudfunctie; warmhoudtoets
Bediening NL 73 Aankookautomaat Bij de aankookautomaat gebeurt het aan de kook brengen met kookstand 9.Na een bepaalde tijd wordt automatisch naar een lagere doorkookstand (1 tot8) teruggeschakeld.Bij het gebruik van het automatisch aankoken moet alleen de doorkookstandworden gekozen waarmee de bere...
Page 74 - Vergrendeling; drukken. De led boven de vergrendeltoets; Powerstand; van de gewenste kook-
74 Bediening NL Vergrendeling Door de vergrendeling kunnen de bediening van de toetsen en de instellingvan een kookstand worden geblokkeerd. Alleen de Aan/Uit-toets kan nogaltijd worden bediend om de kookplaat uit te schakelen. Vergrendeling inschakelen 1. Op de vergrendeltoets drukken. De led boven...
Page 75 - Afzuiging gebruiken; Afzuiging in- en uitschakelen; Naloop van de afzuiging; Naloop van de afzuiging instellen
Bediening NL 75 Afzuiging gebruiken In het midden van de kookplaat bevindt zich de afzuiging met de afvoer naarbeneden. Voor ingebruikname van de afzuiging de afdekking volledig verwijderen. Afzuiging in- en uitschakelen 1. Op de stand-by-toets drukken (ca. 1 sec.) tot het apparaat bedrijfs- klaar i...
Page 76 - Keramische kookplaat
76 Reiniging en onderhoud NL Reiniging en onderhoud • Vóór het reinigen de kookplaat uitschakelen en laten afkoelen.• De keramische kookplaat mag in geen geval met een stoom- reinigingsapparaat of dergelijke worden schoongemaakt! • Bij het reinigen erop letten dat slechts kort over de Aan/Uit- toets...
Page 77 - Neem contact op met de klantenservice of een elektromonteur!
Wat te doen bij problemen? NL 77 Wat te doen bij problemen? Ongekwalificeerde ingrepen en reparaties aan het apparaat zijngevaarlijk omdat er gevaar voor stroomstoten en kortsluitingbestaat. Om lichamelijk letsel en schade aan het apparaat tevoorkomen, moeten ze worden vermeden. Daarom mogen der-gel...
Page 78 - Ventilatie; Belangrijke opmerkingen
78 Montagehandleiding NL Montagehandleiding Veiligheidsinstructies voor de keukenmeubelmonteur • Het fineer, de lijm of de kunststofbekleding van de aangren- zende meubels moeten temperatuurbestendig zijn (>75 °C).Als het fineer en de bekleding onvoldoende temperatuurbe-stendig zijn, kunnen ze ve...
Page 79 - Inbouw kookplaatafzuiging
Montagehandleiding NL 79 Inbouw kookplaatafzuiging • Het product mag alleen door een erkend vakman worden aan- gesloten, waarbij de plaatselijk geldende voorschriften moetenworden nageleefd; hetzelfde geldt voor de afvoerkanalen. Deinstallateur is verantwoordelijk voor de correcte werking op deplaat...
Page 80 - Elektrische aansluiting; • De elektrische aansluiting mag uitsluitend door een
80 Montagehandleiding NL • Afvoerkanalen dienen zo kort mogelijk te zijn, mogen niet in een hoek van 90 graden, maar in een ronde boog wordengelegd en mogen geen diameterreducties hebben. • Nooit een buisdiameter kiezen die kleiner dan 150 mm is. 50 cm voor de afzuigmotor mogen er geen bochten/hoeke...
Page 81 - Aansluitkabel standaard aanwezig; • De kookplaat is bij levering met een temperatuurbestendige; Aansluitingsmogelijkheden; Technische gegevens; * Vermogen bij ingeschakelde powerstand; Inbedrijfstelling; Afmetingen kookplaat
Montagehandleiding NL 81 Aansluitkabel standaard aanwezig • De kookplaat is bij levering met een temperatuurbestendige aansluitkabel uitgerust. • De aansluiting op het net wordt volgens het aansluitschema uitgevoerd, tenzij de aansluitkabel al met een stekker is uitge-rust. • Als de netaansluitkabel...
Page 82 - entornos residenciales similares; Índice
82 E Eliminación de los materiales de embalaje En la medida de lo posible, elimine el embalaje de transporte deforma acorde con el medio ambiente. El retorno de los materialesde embalaje al circuito de material economiza materias primas yreduce la generación de residuos. Eliminación de los aparatos ...
Page 83 - Conexión y funcionamiento; ¡A causa de la rápida reacción a un nivel alto de
Indicaciones de seguridad y advertencias E 83 Indicaciones de seguridad y advertencias Conexión y funcionamiento • Los aparatos hay que montarlos siguiendo las normas de seguridad correspondientes. • La conexión a la red, el mantenimiento y la reparación de los aparatos deben ser llevados a cabo exc...
Page 84 - Para personas
84 Indicaciones de seguridad y advertencias E • Si hay animales domésticos en la vivienda que puedan alcanzar la encimera, entonces se debe activar el seguro para niños. • ¡La encimera de vitrocerámica no debe limpiarse bajo ninguna circunstancia con un aparato de limpieza a vapor o similares! • Ase...
Page 85 - Campo de sensor para
Descripción del aparato E 85 Descripción del aparato 1. Zona de cocción por inducción delante izquierda2. Zona de cocción por inducción detrás izquierda3. Encimera de vitrocerámica4. Panel de mando Touchcontrol5. Tecla standby y control de ventilador6. Ventilador 7. Tecla standby8. Tecla de encendid...
Page 86 - Manejo mediante teclas de sensor
86 Descripción del aparato E Manejo mediante teclas de sensor El manejo del campo de cocción de vitrocerámica se lleva a cabopor medio de teclas de sensor Touch-Control. Las teclas de sensorfuncionan como se indica a continuación: tocar con la punta deldedo brevemente un símbolo de la superficie de ...
Page 87 - Encimera de cocción
Manejo E 87 Manejo Encimera de cocción La encimera de cocción está equipada con una campo decocción por inducción. Una bobina de inducción debajo de lasuperficie de cocción vitrocerámica genera un campo alternadoelectromagnético que atraviesa la vitrocerámica y genera unacorriente de calentamiento e...
Page 88 - Consejos para el ahorro de energía
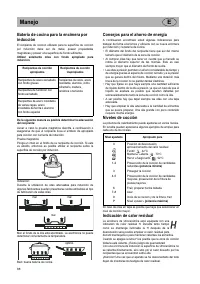
88 Manejo E Batería de cocina para la encimera por inducción El recipiente de cocción utilizado para la superficie de cocciónpor inducción debe ser de metal, poseer propiedadesmagnéticas y poseer una superficie de fondo suficiente. Utilizar solamente ollas con fondo apropiado parainducción. De la si...
Page 89 - Conectar el aparato para que esté preparado
Manejo E 89 Conectar el aparato para que esté preparado Con la tecla standby se conecta el aparato, con lo que queda listo para trabajar. La tecla es, por así decir, el interruptor principal. En primer lugar elcontrol ejecuta un test de funcionamiento y los indicadores se iluminan.Tras desconectar e...
Page 90 - Función de STOP
90 Manejo E Función de STOP El proceso de cocción puede interrumpirse brevemente por medio de lafunción STOP, por ejemplo cuando llaman a la puerta de la casa. Paraproseguir después el proceso de cocción con los mismos niveles, hay queanular la función STOP. Si el temporizador estuviera en marcha, é...
Page 91 - Seguro para niños
Manejo E 91 Seguro para niños El seguro de protección para niños tiene como función el evitar que los niñospuedan conectar la encimera de vitrocerámica deliberadamente o pordescuido. Para ello se bloquean el manejo. Activación del seguro para niños 1. Pulsar la tecla de encendido / apagado de la enc...
Page 92 - Automatismo de desconexión (temporizador)
92 Manejo E Automatismo de desconexión (temporizador) Por medio del automatismo de desconexión es posible desconectarautomáticamente después de un tiempo determinado todas las zonas decocción que estuvieran conectadas. Pueden configurarse tiempos de cocciónde 10 segundos (0.10) hasta 1 hora 59 minut...
Page 93 - Función golpe de cocción
Manejo E 93 Función golpe de cocción Con el automatismo de golpe de cocción, la cocción comienza al nivel 9.Después de un tiempo determinado se cambia a un nivel de cocción másbajo (de 1 a 8).Cuando se emplea la función golpe de cocción sólo hay que elegir el nivel decocción con el que se desea que ...
Page 94 - Bloqueo de sensores; . El LED situado por encima de la tecla de; Nivel «power»; de la zona; Gestión de potencia
94 Manejo E Bloqueo de sensores Mediante el bloqueo es posible impedir el manejo y un ajuste de un nivel decocción. La única tecla que se mantiene activa para la desconexión de laencimera es la tecla de encendido / apagado. Conexión del bloqueo 1. Pulsar la tecla de bloqueo . El LED situado por enci...
Page 95 - Uso del ventilador
Manejo E 95 Uso del ventilador En el centro de la encimera está el ventilador con el extractor hacia abajo. Antes de la puesta en marcha del ventilador debe retirarse la cubiertacompletamente. Conexión y desconexión del ventilador 1. Pulse la tecla standby (aprox. 1 segundo) hasta que el aparato est...
Page 96 - Encimera de vitrocerámica
96 Limpieza y conservación E Limpieza y conservación • Antes de proceder a la limpieza hay que desconectar la encimera y dejar que se enfríe. • ¡La encimera de vitrocerámica no debe limpiarse bajo ninguna circunstancia con un aparato de limpieza a vapor o similares! • Al limpiar hay que procurar pas...
Page 97 - ¡Llame al servicio técnico o a un instalador eléctrico!
Qué hacer en caso de problemas E 97 Qué hacer en caso de problemas Manipulaciones y reparaciones en el aparato por parte depersonas no cualificadas son peligrosas, ya que existe peligro deelectrocución y de cortocircuito. Hay que prescindir de talesmanipulaciones y reparaciones para prevenir daños p...
Page 98 - Entrada de aire; Indicaciones importantes
98 Instrucciones de montaje E Instrucciones de montaje Indicaciones de seguridad para el montador de muebles de cocina • Los recubrimientos de contrachapado, el pegamento utilizado y los recubrimientos de plástico de los muebles limítrofestienen que ser resistentes a la temperatura (>75°C). Si lo...
Page 99 - Montaje del ventilador de encimera
Instrucciones de montaje E 99 Montaje del ventilador de encimera • El producto solo debe ser conectado por un profesional autorizado de acuerdo con las normas localescorrespondientes; lo mismo es válido para las conexiones delventilador. El instalador es responsable del funcionamientocorrecto en el ...
Page 100 - Conexión eléctrica
100 Instrucciones de montaje E • Las conducciones de escape de aire deben ser lo más cortas posibles y no presentar ángulos de 90 grados sino conducirseen curvas suaves sin reducciones de la sección transversal. • El diámetro del tubo no debe ser inferior a 150 mm. No deben instalarse arcos o codos ...
Page 101 - similares
P 101 Eliminação da embalagem Elimine a embalagem de transporte do modo mais ecológicopossível. O retorno dos materiais de embalagem ao ciclo demateriais economiza matéria-prima e reduz o lixo. Eliminação dos aparelhos antigos O símbolo no produto ou na embalagem indicaque este produto não pode ser ...
Page 102 - Ligação e funcionamento
102 Indicações de segurança e avisos P Indicações de segurança e avisos Ligação e funcionamento • Os aparelhos são construídos de acordo com as normas de segurança pertinentes. • A ligação à rede, a manutenção e a reparação dos aparelhos só podem ser efetuadas por um técnicoautorizado de acordo com ...
Page 103 - Pessoas
Indicações de segurança e avisos P 103 • As teclas de sensor não podem ser cobertas por panelas e frigideiras quentes. Se tal acontecer, oaparelho desliga-se automaticamente. • Sempre que possível, use panelas grandes nas zonas de cozinhar traseiras, para que as teclas desensor não sejam demasiado a...
Page 104 - esquerda
104 Descrição do aparelho P Descrição do aparelho 1. Zona de cozinhar de indução frontal esquerda 2. Zona de cozinhar de indução traseira esquerda 3. Placa vitrocerâmica 4. Painel de comando Touch-Control 5. Tecla de stand-by e controlo do ventilador 6. Ventilador 7. Tecla de stand-by 8. Tecla LIG/D...
Page 105 - Comando através das teclas de sensor
Descrição do aparelho P 105 Comando através das teclas de sensor O comando da placa de cozinhar vitrocerâmica é efetuadoatravés de teclas de sensor Touch-Control. As teclas de sensorfuncionam da seguinte forma: toque brevemente com a ponta dodedo num símbolo na superfície vitrocerâmica. Cadaacioname...
Page 106 - A placa de cozinhar
106 Utilização P Utilização A placa de cozinhar A superfície de cozinhar está equipada com uma placa decozinhar de indução. A bobina de indução, localizada por baixoda placa de cozinhar vitrocerâmica, gera um campo alternativoeletromagnético que penetra na vitrocerâmica e induz a correntegeradora de...
Page 107 - Louça para placa de cozinhar de indução
Utilização P 107 Louça para placa de cozinhar de indução As panelas usadas sobre a placa de cozinhar de indução têm deser de metal, ter propriedades magnéticas e uma área de fundosuficiente. Utilizar panelas com fundo adequado para indução. Proceda como se segue para verificar se as vasilhas sãoadeq...
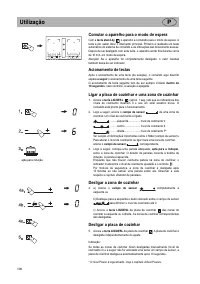
Page 108 - Comutar o aparelho para o modo de espera
108 Utilização P Comutar o aparelho para o modo de espera Com a tecla stand-by , o aparelho é comutado para o modo de espera. A tecla é por assim dizer o interruptor principal. Primeiro é realizado um testeautomático do sistema de comando e as indicações são brevemente acesas.Depois de ser desligado...
Page 109 - Função STOP
Utilização P 109 Função STOP O processo de cozinhar pode ser interrompido brevemente com a funçãoSTOP, p. ex. se alguém tocar à porta. Para continuar o processo de cozinharcom os mesmos níveis de cozimento, a função STOP precisa de seranulada. Se o temporizador estiver ajustado, nesse caso é parado ...
Page 110 - Proteção para crianças
110 Utilização P Proteção para crianças A proteção para crianças tem por objetivo evitar que as crianças ligueminvoluntária ou voluntariamente a placa de cozinhar de indução. Para o efeitoo comando é bloqueado. Ligar a proteção para crianças 1. Acione a tecla LIG/DESL da placa de cozinhar (aprox. 1 ...
Page 111 - Sistema automático de desconexão (temporizador)
Utilização P 111 Sistema automático de desconexão (temporizador) Através do sistema automático de desconexão, cada zona de cozinhar ligadaé desconectada automaticamente após um determinado período de tempoajustável. Podem ser ajustados tempos de cozinhar de 10 seg. (0.10) até 1hora 59 min. (1.59). 1...
Page 112 - Sistema automático de levar a fervura
112 Utilização P Sistema automático de levar a fervura No sistema automático para levar a fervura, a primeira fervura é efetuadacom o nível de cozimento 9. Após um determinado período de tempo, osistema volta automaticamente para um nível de continuação de cozimentomais baixo (1 a 8).Para usar o sis...
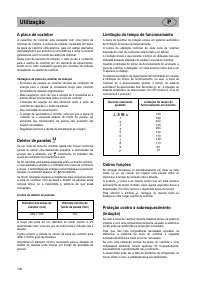
Page 113 - Bloqueio; • O bloqueio ativado mantém-se mesmo depois de se desligar a placa de; Nível «Power»; Após 10 minutos, o nível Power é automaticamente desligado. O; Gestão do nível Power
Utilização P 113 Bloqueio Com o bloqueio pode-se bloquear a operação das teclas e o ajuste de umnível de cozimento. A única tecla que pode ser usada é a tecla de LIG/DESLpara desligar a placa de cozinhar. Ligar o bloqueio 1. Acione a tecla de bloqueio . O indicador do díodo luminoso, situado acima d...
Page 114 - Usar o ventilador
114 Utilização P Usar o ventilador No centro da placa de cozinhar está integrado o ventilador com a exaustãovirada para baixo. Retire a cobertura por completo antes de colocar o ventilador emfuncionamento. Ligar e desligar o ventilador 1. Acione a tecla stand-by (aprox. 1 seg.) até o aparelho ser co...
Page 115 - Placa vitrocerâmica
Limpeza e manutenção P 115 Limpeza e manutenção • Desligue e deixe a placa de cozinhar arrefecer antes de a limpar. • A placa vitrocerâmica não pode, em hipótese alguma, ser limpa com ajuda de um aparelho de limpeza a vapor ousemelhante! • Ao limpar, ter o cuidado de só passar brevemente com o pano ...
Page 117 - Ventilação; Indicações importantes
Instruções de montagem P 117 Instruções de montagem Indicações de segurança para o instalador de móveis de cozinha • Os contraplacados, as colas e os revestimentos de material sintético dos móveis adjacentes têm de ser resistentes àtemperatura (>75°C). Se os contraplacados e osrevestimentos não f...
Page 119 - Ligação elétrica
Instruções de montagem P 119 • Deve ser sempre usado o sistema Compair Flow 150 da Naber, que é recomendado para o canal de ventilação ecompatível com o exaustor da placa de cozinhar. • Os tubos de extração devem ser o mais curtos possível, não devem ser conduzidos num ângulo de 90 graus, mas sim em...