Page 2 - IMPORTANT SAFETY INSTRUCTIONS; read before the subwoofer is operated.; ) Heed Warnings — All warnings on the subwoofer and in the operating; instructions should be followed.; ) Follow Instructions — All operating and use instructions should; and the point where they exit the subwoofer.; WARNING: TO REDUCE THE RISK OF FIRE OR ELECTRIC SHOCK,; DO NOT EXPOSE THIS PRODUCT TO RAIN OR MOISTURE.; CAUTION; RISK OF ELECTRIC SHOCK; CAUTION: TO REDUCE THE RISK OF ELECTRIC SHOCK, DO NOT REMOVE; AMP PANEL OR SPEAKER. NO USER SERVICEABLE PARTS INSIDE. REFER
| d108 & d110 Page 2 IMPORTANT SAFETY INSTRUCTIONS 1) Read the Instructions — All safety and operating instructions should be read before the subwoofer is operated. 2) Retain the Instructions — The safety and operating instructions should be retained for future reference. 3) Heed Warnings — All ...
Page 3 - ENGLISH; WARNING
Page 3 | d108 & d110 ENGLISH 10) Cleaning — The subwoofer should be cleaned only as recommended in the operating instructions. 11) Nonuse Periods — The power cord of the subwoofer should be unplugged from the outlet when the subwoofer is left unused for long periods of time. 12) Lightning and Po...
Page 4 - FCC COMPLIANCE STATEMENT; TABLE OF CONTENTS; Unpacking your; INTRODUCTION; Congratulations on your purchase of a JL Audio; JL AUDIO TECHNOLOGIES INCLUDED
| d108 & d110 Page 4 FCC COMPLIANCE STATEMENT NOTE: This equipment has been tested and found to comply with the limits of Part 15 of the FCC Rules. These limits are designed to provide reasonable protection against harmful interference in a residential installation. This equipment generates, use...
Page 5 - PRODUCT OVERVIEW; If you require assistance, we urge you to contact your authorized; IMPORTANT; IMPORTANT! IT IS A VERY GOOD IDEA TO READ THE NEXT SECTION; BEFORE UNPACKING YOUR DOMINIONTM SUBWOOFER. UNPACKING THE
Page 5 | d108 & d110 ENGLISH beautifully crafted package to deliver an unparalleled listening experience. We sincerely thank you for your purchase and invite you to read this manual thoroughly in order to achieve the highest level of performance with your Dominion™ subwoofer system. Enjoy. PRODU...
Page 6 - We recommend that you begin by placing your DominionTM in the front; If you are planning to install your
| d108 & d110 Page 6 PLACING YOUR DOMINION™ SUBWOOFER IN YOUR LISTENING ROOM: Your listening room or theater is an integral part of your sound reproduction system. The physical dimensions of the room and its furnishings, materials, doors and windows play an important role in defining how your sy...
Page 7 - SMOO; SMOO; COMPROMISED SEATING POSITIONS; BEST SEATING POSITIONS; Recommended Floor Placement for One DominionTM Subwoofer
Page 7 | d108 & d110 ENGLISH M O R E I N T E N S E SMOOTHER RECOMMENDED SUBWOOFER PLACEMENT ZONES (For Single Subwoofer) SMOO THER SMOO THER M O R E I N T E N S E SMOOTHER SMOO THER SMOO THER COMPROMISED SEATING POSITIONS (Results in weaker, uneven bass performance) BEST SEATING POSITIONS (Most ...
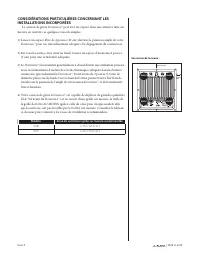
Page 8 - SPECIAL CONSIDERATIONS FOR BUILT-IN INSTALLATIONS; Model
| d108 & d110 Page 8 SPECIAL CONSIDERATIONS FOR BUILT-IN INSTALLATIONS The Dominion™ subwoofer can be integrated into custom cabinetry by following a few simple guidelines. 1) Allow 4 inches (10 cm) of clear space behind the amp panel of your Dominion™ for adequate cooling and connector clearanc...
Page 9 - Recommended Subwoofer Placement for Two DominionTM Subwoofers; DominionTM
Page 9 | d108 & d110 ENGLISH Recommended Subwoofer Placement for Two Dominion™ Subwoofers Using Two Dominion™ Subs When using two Dominion™ subwoofers, try placement near the front corners of the room, at diagonally-opposite corners of the room, or at the center points of opposing walls as shown...
Page 11 - Detailed instructions on unpacking the subwoofer:; bottom of the subwoofer cabinet.; Unpack this box close to where the; UNPACKING YOUR DOMINIONTM; Now that you have determined the position of your; IMPORTANT: DUE TO THE WEIGHT OF THE; DOMINIONTM; IMPORTANT! PLEASE RETAIN ALL PACKAGING FOR SAFE TRANSPORTATION
Page 11 | d108 & d110 ENGLISH Detailed instructions on unpacking the subwoofer: 1. Place the carton on the floor near its intended location in the room. 2. Open the top of the carton (observe markings on carton) and remove the manual and power cord. 3. The subwoofer is packed upside down. Lift t...
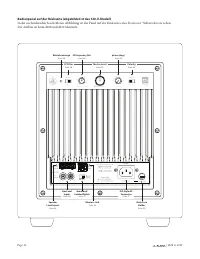
Page 12 - The labeled figure below depicts the rear panel of a
0 Master Level 0 max 0 | 180 deg. off | on phase (deg.) Polarity LP Filter 45 270 0 280 90 180 225 LP frequency (Hz) 25 130 40 60 120 100 80 FUSE FUS E | d108 & d110 Page 12 Rear Control Panel (120V Model Shown) The labeled figure below depicts the rear panel of a Dominion™ subwoofer. The d108 a...
Page 14 - DOMINIONTM CONTROLS IN DETAIL; Power Indicator LED; LED Color; LP Filter Switch
| d108 & d110 Page 14 DOMINION™ CONTROLS IN DETAIL Power Indicator LED The indicator LED on the control panel shows the operational readiness of the Dominion™ subwoofer. Note: Dominion™ subwoofers DO NOT have a Power Switch. Instead, the Dominion™ will automatically power up its internal amplifi...
Page 15 - Master Level Knob; Polarity Switch
Page 15 | d108 & d110 ENGLISH Master Level Knob The “Master Level” Knob is used to set the output level of the Dominion™, relative to the rest of the audio system. When rotated fully counter-clockwise, the subwoofer’s output will be completely muted. When at the “0” or vertical position, the lev...
Page 16 - CONNECTING YOUR DOMINIONTM; Line Level Inputs; The Left and Right inputs on the DominionTM; JLINKTM TRX
| d108 & d110 Page 16 0 Master Level 0 max 0 | 180 deg. off | on phase (deg.) Polarity LP Filter 45 270 0 280 90 180 225 LP frequency (Hz) 25 130 40 60 120 100 80 FUSE FUS E 0 Master Level 0 max 0 | 180 deg. off | on phase (deg.) Polarity LP Filter 45 270 0 280 90 180 225 LP frequency (Hz) 25 13...
Page 17 - “Grounded / Isolated” Switch; only the “RCA Inputs”; Holder, please see the Troubleshooting section of this manual.
Page 17 | d108 & d110 ENGLISH 0 Master Level 0 max 0 | 180 deg. off | on phase (deg.) Polarity LP Filter 45 270 0 280 90 180 225 LP frequency (Hz) 25 130 40 60 120 100 80 FUSE FUS E “Grounded / Isolated” Switch This feature is included to address signal grounding issues often encountered in home...
Page 18 - SYSTEM CONNECTION DIAGRAM 1:; IN THE SYSTEM BEFORE MAKING OR CHANGING ANY CONNECTIONS!
| d108 & d110 Page 18 SUB REAR REAR CENTER FRONT FRONT R L PRE OUT DOMINION™ REAR PANEL RECEIVER / PROCESSOR off | on LP Filter SYSTEM CONNECTION DIAGRAM 1: One Dominion™ to Home Theater Receiver or Home Theater Preamp/ Processor Most home theater receivers and preamp/processors provide a single...
Page 20 - SYSTEM CONNECTION DIAGRAM 3:
| d108 & d110 Page 20 WARNING! TURN OFF THE DOMINION™(s) AND ALL OTHER EQUIPMENT IN THE SYSTEM BEFORE MAKING OR CHANGING ANY CONNECTIONS! WARNING DOMINION™ REAR PANEL PRE-AMPLIFIER R OUTPUTS L off | on LP Filter R R L L INPUTS SATELLITE AMPLIFIER TO SATELLITE SPEAKERS (L) (R) + – + – SPEAKER OUT...
Page 21 - SYSTEM CONNECTION DIAGRAM 4:
Page 21 | d108 & d110 ENGLISH WARNING WARNING! TURN OFF THE DOMINION™(s) AND ALL OTHER EQUIPMENT IN THE SYSTEM BEFORE MAKING OR CHANGING ANY CONNECTIONS! SYSTEM CONNECTION DIAGRAM 4: Two Dominion™ Subwoofers in Stereo to a Two-Channel Audio System When connecting two Dominion™ subwoofers in ster...
Page 22 - SYSTEM CONNECTION DIAGRAM 5:
| d108 & d110 Page 22 WARNING! TURN OFF THE DOMINION™(s) AND ALL OTHER EQUIPMENT IN THE SYSTEM BEFORE MAKING OR CHANGING ANY CONNECTIONS! WARNING OR OR DOMINION™ REAR PANEL DOMINION™ REAR PANEL STEREO RECEIVER STEREO RECEIVER R L TO SATELLITE SPEAKERS HIGH LEVEL INPUT PLUG (L) (R) + – + – SPEAKE...
Page 24 - On your Home Theater Receiver or Preamp/Processor:; Speaker Distance; Subwoofer Level; Subwoofer Output Level
| d108 & d110 Page 24 RECOMMENDED SETUP PROCEDURES 1) Preparation for Setup Process: . . . . . . . . . . . . . . . . . . . . . . . . . . . . . . . . . . . . . 24-252) Level Setting: . . . . . . . . . . . . . . . . . . . . . . . . . . . . . . . . . . . . . . . . . . . . . . . . . . . . . . . 263)...
Page 25 - On the DominionTM Control Panel:; management processor, flip the “LP Filter” switch of your; , select the “on” position and set the “LP frequency (Hz)” knob; Flip the “Polarity” switch to “0.”
Page 25 | d108 & d110 ENGLISH On the Dominion™ Control Panel: 1. “LP Filter” Switch and “LP frequency (Hz)” Knob If your home theater receiver/processor is handling bass management (speakers set on “small”), or if you are using an outboard crossover/bass- management processor, flip the “LP Filte...
Page 26 - RECOMMENDED SETUP PROCEDURES; Subwoofer System Setup:; ) Polarity and Phase Adjustment; FUTURE REFERENCE. PAGE 30 IS PROVIDED FOR INSTALLATION NOTES.
| d108 & d110 Page 26 RECOMMENDED SETUP PROCEDURES Subwoofer System Setup: Once you have set the controls on your home theater receiver or preamp/ processor and your subwoofer to the settings recommended on pages 24 and 25, you are ready to begin setting up your Dominion™ for optimum performance...
Page 27 - FREQUENTLY ASKED QUESTIONS; Can I place objects on my subwoofer?; Whenever it is plugged into AC power, the; Is it safe to use my DominionTM outdoors, in a sauna or on a pool deck?; Is the DominionTM magnetically shielded?; artifacts disappear.
Page 27 | d108 & d110 ENGLISH FREQUENTLY ASKED QUESTIONS Can I place objects on my subwoofer? We do not recommend placing any items on the subwoofer cabinet as they may vibrate, causing undesirable noise and possible damage to the finish. Under no circumstances should any object containing liqui...
Page 28 - No sound from subwoofer.
| d108 & d110 Page 28 CLEANING YOUR DOMINION™ Dust your Dominion™s ubwoofer’s cabinet using a clean, soft microfiber cloth or feather duster. Microfiber cloths are commonly available where automotive detailing supplies are sold. Gloss-Black models: Light smudges can generally be wiped off with a...
Page 29 - TROUBLESHOOTING - continued; Bass sounds “muddy” or “too heavy.”; Your DominionTM is clearly audible outside of your house.; Angry neighbors knocking at your door.; MAIN FUSE HOLDER
Page 29 | d108 & d110 ENGLISH TROUBLESHOOTING - continued Bass sounds “muddy” or “too heavy.” 1. Decrease the overall subwoofer level. 2. Verify your receiver’s subwoofer settings. 3. Try a different subwoofer location or main listening seat location. Changing one or the other can have a HUGE ef...
Page 30 - INSTALLATION NOTES
Page 31 - LIMITED WARRANTY / SERVICE INFORMATION; covered under warranty.; If you need service on your JL Audio product:; JL Audio customer service:; International Warranties:; country’s distributor and not by JL Audio, Inc.
Page 31 | d108 & d110 ENGLISH LIMITED WARRANTY / SERVICE INFORMATION JL Audio warrants this product to be free of defects in materials and workmanship for a period of three (3) years from the original date of purchase. Damage caused by the following is not covered under warranty: accident, misus...
Page 32 - FEATURES; 4 dB per octave with Linkwitz-Riley
Page 32 Specifications d108 Dominion™ powered subwoofer d110 Dominion™ powered subwoofer Enclosure Type: Sealed Sealed Driver: Single 8-inch (nominal diameter) Single 10-inch (nominal diameter) Frequency Response (anechoic): 31 – 112 Hz (±1.5dB) –3 dB at 29 Hz / 119 Hz –10 dB at 21 Hz / 143 Hz 27 – ...
Page 33 - Manual del propietario
Page 34 - INSTRUCCIONES IMPORTANTES DE SEGURIDAD; ADVERTENCIA: PARA DISMINUIR EL RIESGO DE INCENDIO O DESCARGA; ELÉCTRICA, NO EXPONGA ESTE PRODUCTO A LA LLUVIA O LA HUMEDAD.; PRECAUCIÓN; RIESGO DE DESCARGA
| d108 & d110 Página 2 INSTRUCCIONES IMPORTANTES DE SEGURIDAD 1) Lea las Instrucciones: Deben leerse todas las instrucciones de seguridad y operación antes de utilizar el subwoofer. 2) Conserve las Instrucciones: Deben conservarse todas las instrucciones de seguridad y operación para tenerlas co...
Page 35 - Página 3; ADVERTENCIA
| d108 & d110 Página 3 ESPAÑOL 10) Limpieza: El altavoz de graves debe limpiarse únicamente según las recomendaciones en las instrucciones de operación. 11) Periodos de no uso: El cable de alimentación del altavoz de graves debe ser desconectado del tomacorriente cuando el altavoz permanezca sin...
Page 36 - Página 4; DECLARACIÓN DE CUMPLIMIENTO CON LA COMISIÓN FEDERAL; ÍNDICE; TECNOLOGÍAS JL AUDIO INCLUIDAS
| d108 & d110 Página 4 DECLARACIÓN DE CUMPLIMIENTO CON LA COMISIÓN FEDERAL DE COMUNICACIONES (FCC, POR SU SIGLA EN INGLÉS) NOTA: Este equipo ha sido probado y se ha comprobado que cumple con los límites de la Sección 15 de las Reglas de la FCC. Dichos límites tienen como fin proporcionar protecc...
Page 37 - Página 5; sistema de subwoofer DominionTM. Que lo disfrute.; DESCRIPCIÓN GENERAL DEL PRODUCTO; autorizado de JL Audio para obtener consejos de expertos sobre la; IMPORTANTE; ¡IMPORTANTE! ES UNA MUY BUENA IDEA LEER LA SECCION SIGUIENTE; ANTES DE DESEMBALAR SU SUBWOOFERTM. SE RECOMIENDA COLOCAR
| d108 & d110 Página 5 ESPAÑOL Le agradecemos sinceramente por su compra y lo invitamos a leer este manual en su totalidad para poder lograr el mayor nivel de rendimiento con su sistema de subwoofer Dominion™. Que lo disfrute. DESCRIPCIÓN GENERAL DEL PRODUCTO Los subwoofer Dominion™ de JL Audio ...
Page 38 - Página 6; COLOCACIÓN DE SU SUBWOOFER DOMINIONTM EN; Si está planeando instalar su DominionTM
| d108 & d110 Página 6 COLOCACIÓN DE SU SUBWOOFER DOMINION™ EN SU SALA DE AUDIO: Su sala de audio o cine en el hogar son una parte integral de su sistema de reproducción de sonidos. Las dimensiones físicas de la sala y sus muebles, materiales, puertas y ventanas juegan un papel importante en el ...
Page 39 - Página 7; ÁS SU; ÁS SU; POSICIONES DE ASIENTOS AFECTADAS; MEJORES POSICIONES PARA LOS ASIENTOS
| d108 & d110 Página 7 ESPAÑOL MÁS INTENSO MÁS SUAVE ZONAS RECOMENDADAS DE COLOCACIÓN DEL ALTAVOZ DE GRAVES (para un solo altavoz de graves) M ÁS SU AVE MÁS SU AVE MÁS INTENSO MÁS SUAVE M ÁS SU AVE MÁS SU AVE POSICIONES DE ASIENTOS AFECTADAS (Genera un rendimiento más débil y poco uniforme de lo...
Page 40 - Página 8; CONSIDERACIONES ESPECIALES PARA INSTALACIONES; Modelo; Vista trasera de la instalación en gabinete:
| d108 & d110 Página 8 CONSIDERACIONES ESPECIALES PARA INSTALACIONES INCRUSTADAS El altavoz de graves Dominion™ puede integrarse en un gabinete personalizado siguiendo unas simples pautas. 1) Deje 4 pulgadas (10 cm) de espacio libre detrás del panel del amplificador de su Dominion™ para obtener ...
Page 41 - Página 9; Colocación recomendada para dos altavoces de graves DominionTM
| d108 & d110 Página 9 ESPAÑOL Colocación recomendada para dos altavoces de graves Dominion™ Uso de dos altavoces de graves Dominion™ Cuando use dos altavoces de graves Dominion™ , trate de colocarlos cerca de las esquinas frontales de la sala, en esquinas diagonalmente opuestas en la sala, o en...
Page 42 - Colocación recomendada para tres altavoces de graves DominionTM
| d108 & d110 Página 10 Colocación recomendada para tres altavoces de graves Dominion™ Colocación recomendada para cuatro altavoces de graves Dominion™ Uso de tres o cuatro altavoces de graves Dominion™ Conforme a lo investigado, la mejor respuesta de los sonidos graves en un área amplia de escu...
Page 43 - DESEMBALAJE DE SU DOMINIONTM; ¡IMPORTANTE! CONSERVE TODO EL EMBALAJE PARA EL TRANSPORTE; SEGURO DEL ALTAVOZ DE GRAVES Y PARA CUALQUIER TAREA DE
| d108 & d110 Página 11 ESPAÑOL Instrucciones detalladas sobre el desembalaje del altavoz de graves: 1. Coloque la caja sobre el suelo, cerca de su ubicación designada en la sala. 2. Abra la tapa de la caja (observe las marcas en ella) y extraiga el manual y el cable de alimentación. 3. El altav...
Page 44 - Panel de control trasero (se muestra el modelo de 120 V)
0 Master Level 0 max 0 | 180 deg. off | on phase (deg.) Polarity LP Filter 45 270 0 280 90 180 225 LP frequency (Hz) 25 130 40 60 120 100 80 FUSE FUS E | d108 & d110 Página 12 Panel de control trasero (se muestra el modelo de 120 V) La figura etiquetada a continuación muestra el panel trasero de...
Page 46 - DETALLE DE LOS CONTROLES DEL EQUIPO DOMINIONTM; Indicador LED de alimentación; Color del LED; Interruptor del filtro LP
| d108 & d110 Página 14 DETALLE DE LOS CONTROLES DEL EQUIPO DOMINION™ Indicador LED de alimentación El indicador LED en el panel de control muestra la preparación operativa del altavoz de graves Dominion™ . Nota: Los altavoces de graves (Subwoofers) Dominion™ NO tienen un interruptor de alimenta...
Page 47 - Perilla de nivel maestro; Interruptor de polaridad
| d108 & d110 Página 15 ESPAÑOL Perilla de nivel maestro La perilla de “nivel maestro” se utiliza para establecer el nivel de salida del equipo Dominion™ , en relación con el resto del sistema de audio. Si se la gira por completo en sentido antihorario, la salida del altavoz de graves quedará co...
Page 48 - CONEXIÓN DE SU EQUIPO DOMINIONTM; Entradas de nivel de línea; Las entradas izquierda y derecha del equipo; Sistema TRX JLINKTM
| d108 & d110 Página 16 0 Master Level 0 max 0 | 180 deg. off | on phase (deg.) Polarity LP Filter 45 270 0 280 90 180 225 LP frequency (Hz) 25 130 40 60 120 100 80 FUSE FUS E 0 Master Level 0 max 0 | 180 deg. off | on phase (deg.) Polarity LP Filter 45 270 0 280 90 180 225 LP frequency (Hz) 25 ...
Page 49 - Conector de alimentación por CA estilo IEC
| d108 & d110 Página 17 ESPAÑOL 0 Master Level 0 max 0 | 180 deg. off | on phase (deg.) Polarity LP Filter 45 270 0 280 90 180 225 LP frequency (Hz) 25 130 40 60 120 100 80 FUSE FUS E Nota: El uso del sistema TRX JLINK requiere salidas de nivel de línea desde su receptor o amplificador. Las sali...
Page 50 - DIAGRAMA 1 DE LA CONEXIÓN DEL; LOS DEMÁS EQUIPOS EN EL SISTEMA ANTES DE REALIZAR O MODIFICAR
| d108 & d110 Página 18 PANEL TRASERO DEL EQUIPO DOMINION™ RECEPTOR/PROCESADOR R L SUB REAR REAR CENTER FRONT FRONT PRE OUT off | on LP Filter DIAGRAMA 1 DE LA CONEXIÓN DEL SISTEMA: Un Dominion™ con el receptor del cine en el hogar o preamplificador/ procesador del cine en el hogar La mayoría de...
Page 52 - DIAGRAMA 3 DE LA CONEXIÓN DEL
| d108 & d110 Página 20 ¡ADVERTENCIA! ¡APAGUE EL/LOS EQUIPO(S) DOMINION™ Y TODOS LOS DEMÁS EQUIPOS EN EL SISTEMA ANTES DE REALIZAR O MODIFICAR CUALQUIER CONEXIÓN! ADVERTENCIA PANEL TRASERO DEL EQUIPO DOMINION™ PREAMPLIFICADOR D SALIDAS I apagado | encendido Filtro LP D D I I ENTRADAS AMPLIFICADO...
Page 53 - DIAGRAMA 4 DE LA CONEXIÓN DEL
| d108 & d110 Página 21 ESPAÑOL ADVERTENCIA ¡ADVERTENCIA! ¡APAGUE EL/LOS EQUIPO(S) DOMINION™ Y TODOS LOS DEMÁS EQUIPOS EN EL SISTEMA ANTES DE REALIZAR O MODIFICAR CUALQUIER CONEXIÓN! DIAGRAMA 4 DE LA CONEXIÓN DEL SISTEMA: Dos altavoces de graves Dominion™ en estéreo con un sistema de audio bican...
Page 54 - DIAGRAMA 5 DE LA CONEXIÓN DEL
| d108 & d110 Página 22 ¡ADVERTENCIA! ¡APAGUE EL/LOS EQUIPO(S) DOMINION™ Y TODOS LOS DEMÁS EQUIPOS EN EL SISTEMA ANTES DE REALIZAR O MODIFICAR CUALQUIER CONEXIÓN! ADVERTENCIA off | on LP Filter LP frequency (Hz) 25 130 40 60 120 100 80 O PANEL TRASERO DEL DOMINION™ PANEL TRASERO DEL DOMINION™ RE...
Page 56 - En el receptor o preamplificador/procesador de su cine en el hogar:; Distancia del altavoz; Nivel del altavoz de graves; Frecuencia del filtro de paso activo
| d108 & d110 Página 24 PROCEDIMIENTOS DE CONFIGURACIÓN RECOMENDADOS 1) Preparación para el proceso de configuración: . . . . . . . . . . . . . . . . . . . . . . . . 24-252) Configuración de nivel: . . . . . . . . . . . . . . . . . . . . . . . . . . . . . . . . . . . . . . . . . . . . . . 263) A...
Page 57 - En el panel de control del altavoz de graves DominionTM:; sonidos graves, gire el interruptor del “filtro LP” de su
| d108 & d110 Página 25 ESPAÑOL En el panel de control del altavoz de graves Dominion™: 1. Interruptor de "filtro LP" y perilla de "frecuencia LP (Hz)" Si el receptor/procesador de su cine en el hogar tiene el control actual de los sonidos graves (los altavoces están configurados...
Page 58 - PROCEDIMIENTOS DE CONFIGURACIÓN RECOMENDADOS; Configuración del sistema del altavoz de graves:; ) Configuración de nivel; ) Ajuste de polaridad y fase; LOS PASOS 1-3 PARA TENERLAS COMO REFERENCIA FUTURA. LA PÁGINA
| d108 & d110 Página 26 PROCEDIMIENTOS DE CONFIGURACIÓN RECOMENDADOS Configuración del sistema del altavoz de graves: Una vez que haya configurado los controles de su receptor o preamplificador/ procesador de su cine en el hogar y su altavoz de graves a las configuraciones recomendadas en las pá...
Page 59 - PREGUNTAS FRECUENTES; ¿Puedo colocar objetos en mi altavoz de graves?; me ausento por mucho tiempo?; ¿El equipo DominionTM tiene una pantalla de protección magnética?
| d108 & d110 Página 27 ESPAÑOL PREGUNTAS FRECUENTES ¿Puedo colocar objetos en mi altavoz de graves? No recomendamos colocar ningún artículo en el gabinete del altavoz de graves ya que pueden vibrar y causar ruidos no deseados y posibles daños en el acabado del aparato. Bajo ninguna circunstanci...
Page 60 - LIMPIEZA DE SU EQUIPO DOMINIONTM; Modelos enchapados en vinilo:; RESOLUCIÓN DE PROBLEMAS; No se escucha ningún sonido en el altavoz de graves.
| d108 & d110 Página 28 LIMPIEZA DE SU EQUIPO DOMINION™ Quite el polvo del gabinete de su altavoz de graves Dominion™ , usando un paño limpio de microfibra suave o un plumero. Los paños de microfibra generalmente pueden conseguirse en los lugares de ventas de suministros de limpieza para automóv...
Page 61 - RESOLUCIÓN DE PROBLEMAS - continuación; Tengo vecinos enojados golpeando a mi puerta.; PORTAFUSIBLE PRINCIPAL
| d108 & d110 Página 29 ESPAÑOL RESOLUCIÓN DE PROBLEMAS - continuación Los sonidos graves suenan "confusos" o "demasiado pesados". 1. Disminuya el nivel general del altavoz de graves. 2. Verifique las configuraciones del altavoz de graves de su receptor. 3. Pruebe colocando el al...
Page 62 - NOTAS SOBRE LA INSTALACIÓN
| d108 & d110 Página 30 NOTAS SOBRE LA INSTALACIÓN
Page 63 - GARANTÍA LIMITADA/INFORMACIÓN SOBRE EL SERVICIO DE; eliminado o estropeado.; Garantías Internacionales:; únicamente por el distribuidor de ese país y no por JL Audio, Inc.; ADVERTENCIA: ESTE PRODUCTO NO CONTIENE PIEZAS QUE EL; USUARIO PUEDA REPARAR.
| d108 & d110 Página 31 ESPAÑOL GARANTÍA LIMITADA/INFORMACIÓN SOBRE EL SERVICIO DE MANTENIMIENTO: JL Audio garantiza que este producto se encuentra libre de fallas en sus materiales o mano de obra por un periodo de tres (3) años a partir de la fecha original de compra. Los daños causados por lo ...
Page 64 - CARACTERÍSTICAS; Variable: silencio completo a +15 dB por
Página 32 P A R T E S U P E R I O R F R E N T E B A S E P A R T E T R A S E R A L A T E R A L C O N R E J I L L A P A AN. Especificaciones d108 Altavoz de graves potenciado (Subwoofer) Dominion™ d110 Altavoz de graves potenciado (Subwoofer) Dominion™ Tipo de alojamiento: Sellado Sellado Transductor:...
Page 65 - Benutzerhandbuch
Page 66 - WICHTIGE SICHERHEITSHINWEISE; ) Anweisungen durchlesen – Lesen Sie vor der Inbetriebnahme des; VORSICHT; NICHT ÖFFNEN; VORSICHT: ZUR VERMEIDUNG VON STROMSCHLÄGEN DIE ABDECKUNG; ODER LAUTSPRECHER DES VERSTÄRKERS NICHT ENTFERNEN. TEILE IM
| d108 & d110 Page 2 WICHTIGE SICHERHEITSHINWEISE 1) Anweisungen durchlesen – Lesen Sie vor der Inbetriebnahme des Subwoofers sämtliche Sicherheits- und Bedienungshinweise durch. 2) Anleitungen aufbewahren – Bewahren Sie die Sicherheits- und Bedienungsanleitungen für zukünftige Referenzzwecke au...
Page 67 - 0) Reinigung – Der Subwoofer ist ausschließlich wie in der; WARNHINWEIS
Page 3 | d108 & d110 DEUT SCH 10) Reinigung – Der Subwoofer ist ausschließlich wie in der Bedienungsanleitung beschrieben zu reinigen. 11) Nichtnutzungszeiten – Wenn der Subwoofer über einen längeren Zeitraum ungenutzt bleibt, das Stromkabel des Subwoofers abziehen. 12) Blitzschlag und Überspann...
Page 68 - FCC-KONFORMITÄTSERKLÄRUNG; INHALTSVERZEICHNIS; TM Technologie. Dieses Produkt wurde nach strengsten Vorgaben; DOMINIONTM SUBWOOFER MIT
| d108 & d110 Page 4 FCC-KONFORMITÄTSERKLÄRUNG HINWEIS: Das Gerät wurde überprüft und entspricht den Beschränkungen gemäß Absatz 15 der FCC-Normen für digitale Geräte. Diese Anforderungen gewährleisten angemessenen Schutz gegen elektromagnetische Störungen im häuslichen Bereich. Dieses Gerät erz...
Page 69 - Handbuch gründlich durch, um das Optimum aus Ihrem DominionTM; PRODUKTÜBERSICHT; WICHTIG; WICHTIG! LESEN SIE SICH UNBEDINGT DEN NÄCHSTEN ABSCHNITT DURCH,; BEVOR SIE DEN DOMINIONTM SUBWOOFER AUSPACKEN. ES WIRD EMPFOHLEN,
Page 5 | d108 & d110 DEUT SCH Nochmals herzlichen Dank für Ihren Kauf. Bitte lesen Sie sich dieses Handbuch gründlich durch, um das Optimum aus Ihrem Dominion™ Subwoofer-System herauszuholen. Wir wünschen Ihnen viel Vergnügen. PRODUKTÜBERSICHT JL Audio Dominion ™ Subwoofer stehen für modernste J...
Page 70 - SO STELLEN SIE DEN DOMINIONTM SUBWOOFER IN IHREM; Wir empfehlen Ihnen, den DominionTM auf dem Boden vorn im Raum in der; Wenn Sie den DominionTM in einem
| d108 & d110 Page 6 SO STELLEN SIE DEN DOMINION™ SUBWOOFER IN IHREM HÖRRAUM AUF: Ihr Hörraum oder Kino ist integraler Bestandteil Ihres Klangwiedergabesystems. Die physischen Abmessungen des Raumes sowie der darin befindlichen Möbel, Materialien, Türen und Fenster wirken sich allesamt auf den K...
Page 71 - WEICHER; WEICHER; BEEINTRÄCHTIGTE SITZPOSITIONEN; BESTE SITZPOSITIONEN; Empfohlener Standort auf dem Boden für einen DominionTM Subwoofer
Page 7 | d108 & d110 DEUT SCH INTENSIVER WEICHER EMPFOHLENE AUFSTELLBEREICHE FÜR SUBWOOFER (für Einzel-Subwoofer) WEICHER WEICHER INTENSIVER WEICHER WEICHER WEICHER BEEINTRÄCHTIGTE SITZPOSITIONEN (führt zu schwächerer, ungleichmäßigerer Bassleistung) BESTE SITZPOSITIONEN (präzise Bassleistung) B...
Page 72 - SPEZIELLE HINWEISE FÜR EINBAUANLAGEN; Modell; Rückansicht der Schrankinstallation:
| d108 & d110 Page 8 SPEZIELLE HINWEISE FÜR EINBAUANLAGEN Beim Integrieren des Dominion™ Subwoofers in kundenspezifische Schranksysteme sind folgende einfache Richtlinien zu beachten. 1) Hinter dem Verstärkerpanel des Dominion™ 10 cm Platz lassen, um eine hinreichende Kühlung und genügend Abstan...
Page 73 - Empfohlene Aufstellung bei zwei DominionTM Subwoofern
Page 9 | d108 & d110 DEUT SCH Empfohlene Aufstellung bei zwei Dominion™ Subwoofern Einsatz von zwei Dominion™ Subwoofern Wenn Sie zwei Dominion™ Subwoofer verwenden, stellen Sie diese nach Möglichkeit in den vorderen Ecken des Raums, in diagonal gegenüberliegenden Ecken des Raums oder in der Mit...
Page 75 - Detaillierte Anweisungen zum Auspacken des Subwoofers:; AUSPACKEN DES DOMINIONTM; WICHTIG: AUFGRUND DES HOHEN GEWICHTS DES; WICHTIG! BEWAHREN SIE SÄMTLICHE VERPACKUNGSMATERIALIEN AUF,
Page 11 | d108 & d110 DEUT SCH Detaillierte Anweisungen zum Auspacken des Subwoofers: 1. Stellen Sie den Karton in der Nähe der vorgesehenen Position auf den Boden. 2. Öffnen Sie den Karton oben (die Markierungen auf dem Karton beachten) und nehmen Sie Handbuch und Stromkabel heraus. 3. Der Subw...
Page 78 - DIE DOMINIONTM REGLER IM EINZELNEN; Subwoofer HABEN KEINEN; Zustand
| d108 & d110 Page 14 DIE DOMINION™ REGLER IM EINZELNEN LED-Betriebsanzeige Die LED-Anzeige auf dem Bedienpanel zeigt die Betriebsbereitschaft des Dominion™ Subwoofers an. Hinweis: Dominion™ Subwoofer HABEN KEINEN Netzschalter. Stattdessen schaltet der Dominion™ den internen Verstärker automatis...
Page 80 - SO SCHLIESSEN SIE IHREN DOMINIONTM AN:; Eingänge auf Leitungsebene; Die linken und rechten Eingänge am
| d108 & d110 Page 16 0 Master Level 0 max 0 | 180 deg. off | on phase (deg.) Polarity LP Filter 45 270 0 280 90 180 225 LP frequency (Hz) 25 130 40 60 120 100 80 FUSE FUS E 0 Master Level 0 max 0 | 180 deg. off | on phase (deg.) Polarity LP Filter 45 270 0 280 90 180 225 LP frequency (Hz) 25 13...
Page 81 - nur die „RCA-Eingänge“
Page 17 | d108 & d110 DEUT SCH 0 Master Level 0 max 0 | 180 deg. off | on phase (deg.) Polarity LP Filter 45 270 0 280 90 180 225 LP frequency (Hz) 25 130 40 60 120 100 80 FUSE FUS E „Grounded/Isolated“-Schalter Mit dieser Funktion lassen sich Probleme mit der Signalerdung beheben, die häufig be...
Page 82 - SYSTEMANSCHLUSS DIAGRAMM 1:; WARNHINWEIS! SCHALTEN SIE DEN DOMINIONTM UND ALLE ANDEREN; GERÄTE IM SYSTEM AUS, BEVOR SIE ANSCHLÜSSE EINRICHTEN ODER ÄNDERN!
| d108 & d110 Page 18 SUB REAR REAR CENTER FRONT FRONT R L PRE OUT DOMINION™ RÜCKSEITE RECEIVER/PROZESSOR off | on LP Filter SYSTEMANSCHLUSS DIAGRAMM 1: Ein Dominion™ Receiver an Heimkino-Receiver oder Heimkino- Vorverstärker/Prozessor Die meisten Heimkino-Receiver und Vorverstärker/Prozessoren ...
Page 84 - GERÄTE IM SYSTEM AUS, BEVOR SIE ANSCHLÜSSE HERSTELLEN ODER ÄNDERN!; SYSTEMANSCHLUSS DIAGRAMM 3:
| d108 & d110 Page 20 WARNHINWEIS! SCHALTEN SIE DEN DOMINION™ UND ALLE ANDEREN GERÄTE IM SYSTEM AUS, BEVOR SIE ANSCHLÜSSE HERSTELLEN ODER ÄNDERN! WARNHINWEIS SI CH ERUNG SIC HER UN G DOMINION™ RÜCKSEITE VORVERSTÄRKER R AUSGÄNGE L off | on LP Filter R R L L EINGÄNGE SATELLITENVERSTÄRKER AN SATELL...
Page 85 - SYSTEMANSCHLUSS DIAGRAMM 4:
Page 21 | d108 & d110 DEUT SCH WARNHINWEIS WARNHINWEIS! SCHALTEN SIE DEN DOMINION™ UND ALLE ANDEREN GERÄTE IM SYSTEM AUS, BEVOR SIE ANSCHLÜSSE HERSTELLEN ODER ÄNDERN! SYSTEMANSCHLUSS DIAGRAMM 4: Zwei Dominion™ Subwoofer in Stereo angeschlossen an ein Zweikanal- Audiosystem Beim Stereoanschluss v...
Page 86 - SYSTEMANSCHLUSS DIAGRAMM 5:
| d108 & d110 Page 22 WARNHINWEIS! SCHALTEN SIE DEN DOMINION™ UND ALLE ANDEREN GERÄTE IM SYSTEM AUS, BEVOR SIE ANSCHLÜSSE EINRICHTEN ODER ÄNDERN! WARNHINWEIS off | on LP Filter LP frequency (Hz) 25 130 40 60 120 100 80 ODER DOMINION™ RÜCKSEITE DOMINION™ RÜCKSEITE STEREO-RECEIVER STEREO-RECEIVER ...
Page 88 - Lautsprecherabstand
| d108 & d110 Page 24 EMPFOHLENE EINRICHTUNGSSCHRITTE 1) Vorbereitung auf die Einrichtung: . . . . . . . . . . . . . . . . . . . . . . . . . . . . . . . . . . 24-252) Level-Einstellung: . . . . . . . . . . . . . . . . . . . . . . . . . . . . . . . . . . . . . . . . . . . . . . . . . . . 263) Pol...
Page 89 - Beim DominionTM Bedienpanel:; Stellen Sie den „LP Filter“-Schalter Ihres
Page 25 | d108 & d110 DEUT SCH Beim Dominion™ Bedienpanel: 1. „LP Filter“-Schalter und „LP frequency (Hz)“-Regler Stellen Sie den „LP Filter“-Schalter Ihres Dominion™ auf „off “, wenn Ihr Heimtheater-Receiver/Prozessor gerade das Bassmanagement nutzt (Lautsprecher auf „klein“ eingestellt) oder w...
Page 90 - EMPFOHLENE EINRICHTUNGSSCHRITTE; ) Probieren Sie ggf. andere Aufstellorte für den Subwoofer aus.; EINSTELLUNGEN FÜR ZUKÜNFTIGE REFERENZZWECKE. SEITE 30 IST FÜR
| d108 & d110 Page 26 EMPFOHLENE EINRICHTUNGSSCHRITTE Einrichtung des Subwoofer-Systems: Sobald Sie die Regler an Ihrem Heimkino-Receiver oder Vorverstärker/ Prozessor eingestellt und die auf den Seiten 24 und 25 empfohlenen Subwoofer- Einstellungen vorgenommen haben, können Sie mit der Einricht...
Page 91 - HÄUFIG GESTELLTE FRAGEN; Darf ich etwas auf meinen Subwoofer stellen?; der Flüssigkeit enthält, auf das Gehäuse gestellt werden.; Ist es sicher, meinen DominionTM draußen, in einer Sauna oder an einem; Ist der DominionTM magnetisch abgeschirmt?; Subwoofer weiter weg, bis diese verschwinden.
Page 27 | d108 & d110 DEUT SCH HÄUFIG GESTELLTE FRAGEN Darf ich etwas auf meinen Subwoofer stellen? Wir empfehlen, keine Gegenstände auf das Subwoofer-Gehäuse zu stellen, da diese vibrieren und so unerwünschte Geräusche sowie mögliche Schäden an der Oberfläche verursachen können. Unter keinen Um...
Page 92 - Aus dem Subwoofer kommt kein Ton.
| d108 & d110 Page 28 REINIGEN DES DOMINION™: Entfernen Sie den Staub vom Gehäuse des Dominion™ Subwoofers mit einem sauberen, weichen Mikrofasertuch oder einem Staubwedel. Mikrofasertücher sind u. a. dort erhältlich, wo Automobilzubehör verkauft wird.Schwarze Hochglanzmodelle: Leichte Verschmut...
Page 93 - FEHLERBEHEBUNG – Fortsetzung; Bass klingt „matschig“ und „zu schwer“.; Ihr DominionTM ist außerhalb des Hauses deutlich zu hören.; Wütende Nachbarn klopfen an Ihrer Tür.; HAUPTSICHERUNGSHALTER
Page 29 | d108 & d110 DEUT SCH FEHLERBEHEBUNG – Fortsetzung Bass klingt „matschig“ und „zu schwer“. 1. Senken Sie das gesamte Subwoofer-Level. 2. Überprüfen Sie die Subwoofer-Einstellungen Ihres Receivers. 3. Probieren Sie einen anderen Subwoofer-Standort oder einen anderen Haupthörplatz aus. Di...
Page 94 - EINBAUNOTIZEN
Page 95 - EINGESCHRÄNKTE GEWÄHRLEISTUNG/; Für einen Zeitraum von drei (3) Jahren ab dem Kaufdatum garantiert; Bearbeitungsmängeln ist.; WARNHINWEIS: DIESES PRODUKT ENTHÄLT KEINE TEILE, DIE VOM; BENUTZER GEWARTET WERDEN KÖNNEN. PRODUKTE, DIE VON
Page 31 | d108 & d110 DEUT SCH EINGESCHRÄNKTE GEWÄHRLEISTUNG/ KUNDENDIENSTINFORMATIONEN Für einen Zeitraum von drei (3) Jahren ab dem Kaufdatum garantiert JL Audio dem Erstkäufer, dass dieses Produkt frei von Material- oder Bearbeitungsmängeln ist. Schäden, die auf die folgenden Ursachen zurückz...
Page 96 - MERKMALE; Variabel von 0 – 280 Grad, eingestellt
Page 32 O B E R S E I T E V O R D E R S E I T E U N T E R S E I T E R Ü C K S E I T E S E I T E M I T G I T T E R T B Technische Daten d108 Dominion™ aktiver Subwoofer d110 Dominion™ aktiver Subwoofer Gehäusetyp: Abgedichtet Abgedichtet Treiber: Single 8 Zoll (Nenndurchmesser) Single 10 Zoll (Nenndu...
Page 97 - Manuel du propriétaire
Page 98 - INSTRUCTIONS IMPORTANTES SUR LA SÉCURITÉ; fonctionnement avant d'utiliser le caisson de grave.; ) Ventilation — Le caisson de grave doit être placé de sorte que son; de chaleur du caisson de grave avec des nappes, des rideaux, etc.; ) Chaleur et flammes — Le caisson de grave ne doit pas être installé à; chaleur. Ne posez pas de bougies sur ou à côté du caisson de grave.; AVERTISSEMENT : POUR RÉDUIRE LES RISQUES D'INCENDIE OU DE CHOC; ATTENTION; ATTENTION : POUR RÉDUIRE LES RISQUES DE CHOC ÉLECTRIQUE, NE
| d108 & d110 Seite 2 INSTRUCTIONS IMPORTANTES SUR LA SÉCURITÉ 1) Lire les instructions — Lisez toutes les instructions de sécurité et de fonctionnement avant d'utiliser le caisson de grave. 2) Conserver les instructions — Conservez les instructions de sécurité et de fonctionnement afin de pouvo...
Page 99 - Seite 3; ANÇ; AVERTISSEMENT
| d108 & d110 Seite 3 FR ANÇ AIS 9) Protection du cordon d'alimentation — Le cordon d'alimentation doit être disposé de sorte à éviter d'être piétiné ou pincé par des objets placés sur ou contre lui. Faites particulièrement attention aux cordons au niveau des prises, des fiches multiples, et du ...
Page 100 - Seite 4; DÉCLARATION DE COMPATIBILITÉ FCC; TABLE DES MATIÈRES; Déballage de votre; performances de basse fréquence exceptionnelles. Votre; LES TECHNOLOGIES JL AUDIO
| d108 & d110 Seite 4 DÉCLARATION DE COMPATIBILITÉ FCC REMARQUE : cet appareil a été testé et déclaré conforme aux limites de la partie 15 des règles de la FCC. Ces limites visent à garantir une protection raisonnable contre les interférences nuisibles d'une installation domestique. Cet appareil...
Page 101 - Seite 5; votrecaisson de grave DominionTM. Bonne écoute.; PRÉSENTATION DU PRODUIT; TM JL Audio renferment un diffuseur; IMPORTANT ! IL EST BON DE LIRE LE CHAPITRE SUIVANT AVANT DE; DÉBALLER VOTRE CAISSON DE GRAVE DOMINIONTM. IL EST RECOMMANDÉ
| d108 & d110 Seite 5 FR ANÇ AIS Nous vous remercions sincèrement pour votre achat et vous invitons à lire ce manuel avec soin afin d'obtenir le plus haut niveau de performance de votrecaisson de grave Dominion™. Bonne écoute. PRÉSENTATION DU PRODUIT Les caissons de grave Dominion ™ JL Audio ren...
Page 102 - Seite 6; INSTALLATION DE VOTRE CAISSON DE GRAVE DOMINIONTM; Nous vous recommandons de commencer en plaçant votre DominionTM; Si vous prévoyez d' installer votre
| d108 & d110 Seite 6 INSTALLATION DE VOTRE CAISSON DE GRAVE DOMINION™ DANS VOTRE LOCAL D'ÉCOUTE : Votre espace d'écoute ou théâtre fait partie intégrante de votre système de reproduction du son. Les dimensions physiques de l'espace, son ameublement, son équipement, les portes et les fenêtres so...
Page 103 - Seite 7; PLUS DOUX; PLUS DOUX; PLACES ASSISES COMPROMISES; MEILLEURES PLACES ASSISES; ZONES; PLACES ASSISES COMPROMISES
| d108 & d110 Seite 7 FR ANÇ AIS PLUS INTENSE PLUS DOUX PL US DOUX PL US DOUX PLUS INTENSE PLUS DOUX PL US DOUX PL US DOUX PLACES ASSISES COMPROMISES (Reproduction plus faible et irrégulière des basses) MEILLEURES PLACES ASSISES (Reproduction plus précise des basses) CENTRE DE LA PIÈCE PRÈS DU M...
Page 104 - Seite 8; CONSIDÉRATIONS PARTICULIÈRES CONCERNANT LES; Modèle
| d108 & d110 Seite 8 CONSIDÉRATIONS PARTICULIÈRES CONCERNANT LES INSTALLATIONS INCORPORÉES Le caisson de grave Dominion™ peut être incorporé dans une armoire faite sur mesure en suivant ces quelques conseils simples. 1) Laissez un espace libre de 4 pouces (10 cm) derrière le panneau ampli de vo...
Page 105 - Seite 9; Positionnement recommandé pour Deux caissons de grave DominionTM
| d108 & d110 Seite 9 FR ANÇ AIS Positionnement recommandé pour Deux caissons de grave Dominion™ Utilisation de deux caissons de grave Dominion™ Si vous utilisez deux caisson de grave Dominion™, placez-les à proximité des angles avant de la pièce, aux angles diagonalement opposés de la pièce, ou...
Page 107 - Instructions détaillées pour le déballage du caisson de grave :; Déballez le carton près de l'endroit où le; DÉBALLAGE DE VOTRE DOMINIONTM; IMPORTANT : À CAUSE DU POIDS DU CAISSON DE GRAVE; IMPORTANT ! VEUILLEZ CONSERVER TOUT L'EMBALLAGE POUR GARANTIR
| d108 & d110 Seite 11 FR ANÇ AIS Instructions détaillées pour le déballage du caisson de grave : 1. Placez le carton sur le sol près de l'endroit où vous voulez l'installer dans la pièce. 2. Ouvrez le haut du carton (en respectant les marquages) et retirez le manuel et le câble électrique. 3. L...
Page 108 - Panneau de commande arrière (Modèle 120 V représenté)
0 Master Level 0 max 0 | 180 deg. off | on phase (deg.) Polarity LP Filter 45 270 0 280 90 180 225 LP frequency (Hz) 25 130 40 60 120 100 80 FUSE FUS E | d108 & d110 Seite 12 Panneau de commande arrière (Modèle 120 V représenté) Le schéma étiqueté ci-dessous décrit le panneau arrière d'un caisso...
Page 110 - DOMINIONTM COMMANDES EN DÉTAIL; Indicateur de puissance à LED; Dominion; Couleur du LED; Interrupteur du Filtre LP
| d108 & d110 Seite 14 DOMINION™ COMMANDES EN DÉTAIL Indicateur de puissance à LED L'indicateur à LED sur le panneau de commande indique la disponibilité opérationnelle du caisson de grave Dominion ™. Remarque : l es caissons de grave Dominion™ N'ONT PAS d'interrupteur d'alimentation. En revanch...
Page 111 - Bouton Niveau principal; Interrupteur de polarité
| d108 & d110 Seite 15 FR ANÇ AIS filtre communément utilisée et constitue généralement un bon point de départ pour les ajustements. Bouton Niveau principal Le Bouton de « Niveau principal » est utilisé pour régler le niveau de sortie du Dominion™, relatif au reste du système audio. Lorsqu'on le...
Page 112 - CONNEXION DU DOMINIONTM; Entrées de niveau ligne; Entrées de niveau haut-parleur; Connecteur liaison sans fil; Les entrées gauche et droite du DominionTM
| d108 & d110 Seite 16 0 Master Level 0 max 0 | 180 deg. off | on phase (deg.) Polarity LP Filter 45 270 0 280 90 180 225 LP frequency (Hz) 25 130 40 60 120 100 80 FUSE FUS E 0 Master Level 0 max 0 | 180 deg. off | on phase (deg.) Polarity LP Filter 45 270 0 280 90 180 225 LP frequency (Hz) 25 1...
Page 113 - Interrupteur « de mise à la terre /d'isolement »; que les « Entrées RCA »; Connecteur de puissance CA type IEC
| d108 & d110 Seite 17 FR ANÇ AIS 0 Master Level 0 max 0 | 180 deg. off | on phase (deg.) Polarity LP Filter 45 270 0 280 90 180 225 LP frequency (Hz) 25 130 40 60 120 100 80 FUSE FUS E Interrupteur « de mise à la terre /d'isolement » Cette fonction permet de résoudre les problèmes de mise à la ...
Page 114 - CONNEXION DU SYSTÈME; AVERTISSEMENT ! ÉTEIGNEZ LE(S) DOMINIONTM ET TOUS LES AUTRES; COMPOSANTS DU SYSTÈME AVANT D'EFFECTUER OU DE CHANGER DES
| d108 & d110 Seite 18 PANNEAU ARRIÈRE DOMINION™ RÉCEPTEUR / PROCESSEUR R L SUB REAR REAR CENTER FRONT FRONT PRE OUT off | on LP Filter CONNEXION DU SYSTÈME DIAGRAMME 1 : Un Dominion™ connecté au Récepteur home cinéma ou au Préamplificateur/ Processeur home cinéma La plupart des récepteurs et de...
Page 120 - Sur le récepteur ou préampli/processeur de votre home cinéma :; Fréquence de coupure du filtre
| d108 & d110 Seite 24 PROCÉDURES DE RÉGLAGE RECOMMANDÉ 1) Préparation de la procédure de réglage : . . . . . . . . . . . . . . . . . . . . . . . . . . . . . 24-252) Réglage du niveau : . . . . . . . . . . . . . . . . . . . . . . . . . . . . . . . . . . . . . . . . . . . . . . . . . . 263) Ajust...
Page 121 - Sur le panneau de commande DominionTM :; « Filtre LP » de votre; Interrupteur « Polarité »; Placez l'interrupteur « Polarité » sur « 0 ».
| d108 & d110 Seite 25 FR ANÇ AIS Sur le panneau de commande Dominion™ : 1. Interrupteur « Filtre LP » et bouton « fréquence LP (Hz) » Si le récepteur/processeur de votre home cinéma dispose d'une gestion des graves (haut-parleurs réglés sur « petit »), ou si vous utilisez un processeur externe ...
Page 122 - PROCÉDURES DE RÉGLAGE RECOMMANDÉES; Configuration du caisson de grave :; ) Réglage de la polarité et de la phase; POUR RÉFÉRENCE. LA PAGE 30 FOURNIT DES INSTRUCTIONS
| d108 & d110 Seite 26 PROCÉDURES DE RÉGLAGE RECOMMANDÉES Configuration du caisson de grave : Une fois les commandes du récepteur de votre home cinéma ou du préampli/ processeur et du caisson de grave établies selon les réglages recommandés aux pages 24 et 25 du présent manuel, vous êtes prêt à ...
Page 123 - QUESTIONS LES PLUS FRÉQUENTES; Puis-je poser des objets sur mon caisson de grave ?; contenant du liquide ne doit être placé sur l'appareil.; Le DominionTM est-il blindé magnétiquement ?; encore plus loin jusqu'à ce que ces perturbations disparaissent.
| d108 & d110 Seite 27 FR ANÇ AIS QUESTIONS LES PLUS FRÉQUENTES Puis-je poser des objets sur mon caisson de grave ? Il n'est pas recommandé de poser des objets sur le boîtier du caisson de grave car ils peuvent vibrer et générer des bruits indésirables et des dégâts éventuels. Aucun objet conten...
Page 124 - NETTOYAGE DE VOTRE DOMINIONTM; Modèles placage de vinyle :; DÉPANNAGE; Aucun son ne sort du caisson de grave.
| d108 & d110 Seite 28 NETTOYAGE DE VOTRE DOMINION™ Dépoussiérez le boîtier de votre caisson de grave Dominion™ avec un chiffon en microfibre propre et doux ou un plumeau à poussière. Les chiffons en microfibre sont généralement vendus dans les commerces de fourniture d'accessoires automobiles.M...
Page 125 - Les basses sont « brouillées » ou « trop lourdes ».; Votre DominionTM est nettement audible en dehors de votre foyer.; Des voisins en colère frappent à votre porte.
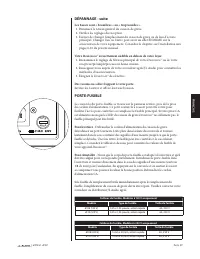
| d108 & d110 Seite 29 FR ANÇ AIS DÉPANNAGE - suite Les basses sont « brouillées » ou « trop lourdes ». 1. Diminuez le niveau général du caisson de grave. 2. Vérifiez les réglages du récepteur. 3. Essayez de changer l'emplacement du caisson de grave ou de lieu d'écoute principal. Changer l'un ou...
Page 127 - INFORMATIONS SUR LA GARANTIE LIMITÉE / ASSISTANCE; produit neuf ou réusiné, et ce sans aucun frais.; Si votre produit JL AUDIO nécessite une réparation :; AVERTISSEMENT : CE PRODUIT NE CONTIENT PAS DE PIÈCES; ET/OU LA MODIFICATION DU PRODUIT PAR UNE PERSONNE NON; Pour obtenir des informations; Service clientèle JL Audio :; Garanties internationales :; Les produits achetés en dehors des
| d108 & d110 Seite 31 FR ANÇ AIS INFORMATIONS SUR LA GARANTIE LIMITÉE / ASSISTANCE JL Audio garantit que ce produit ne présente aucun défaut matériel ou de fabrication pour une période de trois (3) ans à compter de la date d'achat d'origine. Les dommages entraînés par les éléments suivants ne s...
Page 128 - CARACTÉRISTIQUES; Variable : silencieux à +15 dB sur gain de
Caractéristiques d108 Caisson de grave amplifié Dominion™ d110 Caisson de grave amplifié Dominion™ Type de boîtier : Scellé Scellé Driver : 8 pouces simples (diamètre nominal) 10 pouces simples (diamètre nominal) Réponse en fréquence (anéchoïque) : 31 – 112 Hz (±1,5dB) –3 dB at 29 Hz / 119 Hz –10 dB...


 JL Audio 90197
User Manual
JL Audio 90197
User Manual
 JL Audio 93330
User Manual
JL Audio 93330
User Manual
 JL Audio 93528
User Manual
JL Audio 93528
User Manual
 JL Audio 93615
User Manual
JL Audio 93615
User Manual
 JL Audio 93633
User Manual
JL Audio 93633
User Manual