Page 4 - DEUTSCH; qualifizierten Fachkraft gemäß den; Sicherheitshinweise
DEUTSCH 4 Ihre eigene Sicherheit und die anderer Personen ist von höchster Wichtigkeit! Diese Anweisungen sowie das Gerät selbst enthalten wichtige Sicherheitshinweise, die Sie durchlesen und stets beachten sollten. Dieses Symbol warnt vor möglichen Gefahren für die Sicherheit des Benutzers und ande...
Page 5 - Entsorgung von Altgeräten
DEUTSCH 5 Das Gerät ist ausschließlich zur - Zubereitung von Nahrungsmitteln für private Haushalte konzipiert. Jeder hiervon abweichende Gebrauch ist nicht gestattet (z.B. das Heizen von Räumen). Der Hersteller übernimmt keine Verantwortung für Schäden aufgrund von unsachgemäßer oder falscher Verwen...
Page 6 - Zubehör
DEUTSCH 6 Produktbeschreibung Zubehör Kuchenblech 1x Rost 1x Fettpfanne 1x 1 Bedienfeld 2 Kühlgebläse 1) (nicht sichtbar) 3 Grillschutzvorrichtung 2) 4 Oberes Heizelement/Grill 5 Hintere Backofenbeleuchtung 6 Backofengebläse 7 Unteres Heizelement (nicht sichtbar) 8 Kühle Backofentür 1) Das Kühlgeblä...
Page 7 - Einschieben der Roste und anderer
DEUTSCH 7 Einschieben der Roste und anderer Zubehörteile in den Backofen Der Rost und die anderen Zubehörteile sind mit einem Blockiersystem ausgestattet, das ein versehentliches Herausziehen verhindert. Schieben Sie den Rost mit dem erhöhten 1. Teil „A“ nach oben zeigend waagerecht ein (Abb. 1). A ...
Page 8 - Bedienknopf zur Funktionswahl; Bedienfeld; Betrieb des Backofens
DEUTSCH 8 A Bedienknopf zur Funktionswahl B Garzeitprogrammierknopf C Thermostatknopf D Thermostat, rote Kontrollleuchte. Bedienfeld Täglicher Gebrauch °C 15 100 50 150 250 200 90 30 75 105 120 45 60 0 A B C D Betrieb des Backofens Drehen Sie den Bedienknopf zur • Funktionswahl auf das Symbol der ge...
Page 10 - Zum Garen großer Fleischstücke
DEUTSCH 10 Betriebsart Voreinstellung Temperatur / Leistungsstufe Temperatur Bereich / Grillbereich Funktionsbeschreibung TURBOGRILL – – Zum Garen großer Fleischstücke (Keulen, Roastbeef, Hähnchen). Geben Sie das Gargut auf die mittleren Ebenen. Es wird empfohlen, eine Fettpfanne zu verwenden, um de...
Page 11 - Art der Speise; Gartabellen
DEUTSCH 11 Art der Speise Betriebs- art Vorheizen Einschubebene (von unten) Temperatur (°C) Garzeit (Min.) BACKWAREN, TEILCHEN USW. Hefekuchen X 2 150-175 35-90 X 2-4 150-170 30-90 Gefüllte Kuchen (Käsekuchen, Strudel, Obstkuchen) X 2 150-190 30-85 X 2-4 150-190 35-90 Plätzchen (Kekse), Törtchen X 2...
Page 12 - FLEISCH
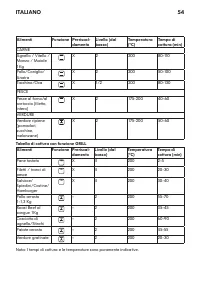
DEUTSCH 12 Art der Speise Betriebs- art Vorheizen Einschubebene (von unten) Temperatur (°C) Garzeit (Min.) FLEISCH Lamm, Kalb, Rind, Schwein 1kg X 2 200 80-110 Hähnchen, Kaninchen, Ente 1 kg X 2 200 50-100 Puter, Gans 3kg X 1/2 200 80-130 FISCHFisch gebacken / in Folie (Filet, ganz) X 2 175-200 40-6...
Page 13 - Scheuermittel. Falls ein solches Mittel doch
DEUTSCH 13 Reinigung und Pflege REINIGUNG ACHTUNG! Verwenden Sie keine - Wasserdampfreinigungsgeräte. Lassen Sie das Gerät vor dem Reinigen - auskühlen. Trennen Sie das Gerät von der - Stromversorgung. Außenoberflächen i WICHTIG: Verwenden Sie keine aggressiven Reinigungs- oder Scheuermittel. Falls ...
Page 14 - Bei dieser Funktion werden die
DEUTSCH 14 Bei dieser Funktion werden die Schmutzablagerungen bei einer Temperatur von ca. 500°C verbrannt. Die erzeugten Ascherückstände lassen sich dann nach Auskühlen des Backofens leicht mit einem feuchten Schwamm entfernen. Aktivieren Sie den Pyrolysezyklus nicht nach jedem Gebrauch, sondern nu...
Page 15 - Glühlampe der hinteren
DEUTSCH 15 B B C Abb. 3 D Abb. 4 Einsetzen der Tür: Setzen Sie die Scharniere in die 1. Aussparungen ein. Öffnen Sie die Backofentür vollständig. 2. Drücken Sie beide Schließhaken nach 3. unten. Schließen Sie die Gerätetür. 4. Glühlampe der hinteren Backofenbeleuchtung auswechseln: Trennen Sie den O...
Page 16 - Fehler
DEUTSCH 16 Störung - was tun? Fehler Mögliche Ursachen Abhilfemaßnahme Der Backofen funktioniert nicht: Keine Netzversorgung. Prüfen Sie, ob das Stromnetz Strom führt. Der Backofen ist nicht an das Stromnetz angeschlossen. Schließen Sie den Backofen an die Stromversorgung an. Der Bedienknopf steht a...
Page 17 - Bevor Sie den Kundendienst rufen:
DEUTSCH 17 Bevor Sie den Kundendienst rufen: Versuchen Sie zuerst, die Störung 1. anhand der in „Störung - was tun?“ beschriebenen Anleitungen/Tabelle selbst zu beheben. Schalten Sie das Gerät aus und wieder 2. ein, um festzustellen, ob die Störung behoben ist. Falls nach den vorstehend beschriebene...
Page 18 - Fläche (Nettofläche) des größten Backblechs cm
DEUTSCH 18 Technische Daten AbmessungenBreite 595 Höhe 595 Tiefe 538 Nutzinhalt (l) 59 Fläche (Nettofläche) des größten Backblechs cm 2 1200 Unter-/Oberhitze Heizelement W 2050 Grill W 2300 Abtauen W 45 Kühlerlüfter W 21 Backofenlampe W 40 Gesamtleistung W 2400 Anzahl der Funktionen 5 Energieverbrau...
Page 19 - Vorbereitung des Unterbauschranks; Aufstellung
DEUTSCH 19 Prüfen Sie nach dem Auspacken, dass das Gerät keine Transportschäden aufweist und die Backofentür richtig schließt Bei auftretenden Problemen wenden Sie sich bitte an Ihren Händler oder rufen die nächste Kundendienststelle an. Um eventuellen Schäden vorzubeugen, sollten Sie das Gerät erst...
Page 20 - Sicherheitselement der Tür
DEUTSCH 20 Sicherheitselement der Tür Näheres zum Öffnen der Tür mit dem Sicherheitselement siehe Abb. 1. Abb. 1 Das Sicherheitselement der Tür kann ausgebaut werden durch Befolgen der Anweisungen in den Bildern in der angegebenen Reihenfolge (siehe Abb. 2). Abb. 2
Page 21 - Entsorgung von Verpackungsmaterial; Umweltschutz; befindet sich an der Vorderkante des; Elektrischer Anschluss
DEUTSCH 21 Entsorgung von Verpackungsmaterial Das Verpackungsmaterial ist zu 100% - wieder verwertbar und trägt das Recycling-Symbol ( ). Werfen Sie das Verpackungsmaterial deshalb nicht einfach fort, sondern entsorgen Sie es auf die von den verantwortlichen Stellen festgelegte Weise. Entsorgung von...
Page 24 - kundendienstspezifischen Fragen bitten
DEUTSCH 24 Damit wir Ihnen im Falle einer Störung jederzeit schnell und kompetent helfen können, bitten wir Sie, sich an die in diesem Handbuch angegebene Service-Rufnummer zu wenden. Halten Sie dazu bitte die (8-stellige) IKEA Artikelnummer und die 12-stellige Servicenummer (auf dem Geräte-Typschil...
Page 25 - FRANÇAIS; figurent dans le présent manuel et sur; Informations relatives à la sécurité
FRANÇAIS 25 Votre sécurité et celle d'autrui est très importante. D'importants messages relatifs à la sécurité figurent dans le présent manuel et sur l'appareil. Nous vous invitons à les lire attentivement et à les observer en toute circonstance. Ceci est le symbole de danger relatif à la sécurité. ...
Page 26 - matériaux inflammables (chiffons ou
FRANÇAIS 26 Ce four est un appareil ménager destiné - exclusivement à la cuisson des aliments. Toute autre utilisation (pour le chauffage d'une pièce, par exemple) est interdite. Le fabricant décline toute responsabilité en cas d'utilisation impropre de l'appareil ou de réglage incorrect des command...
Page 27 - Accessoires
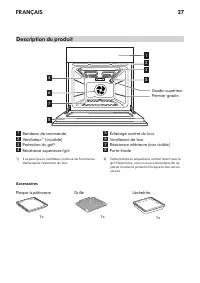
FRANÇAIS 27 Description du produit Accessoires Plaque à pâtisserie 1x Grille 1x Lèchefrite 1x 1 Bandeau de commande 2 Ventilateur 1) (invisible) 3 Protection du gril 2) 4 Résistance supérieure/gril 5 Éclairage arrière du four 6 Ventilateur de four 7 Résistance inférieure (non visible) 8 Porte froide...
Page 28 - Introduction de grilles et autres
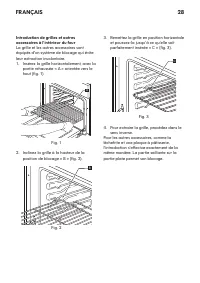
FRANÇAIS 28 Introduction de grilles et autres accessoires à l'intérieur du four La grille et les autres accessoires sont équipés d'un système de blocage qui évite leur extraction involontaire. Insérez la grille horizontalement, avec la 1. partie rehaussée « A » orientée vers le haut (fig. 1). A Fig....
Page 29 - Mode d'emploi du four
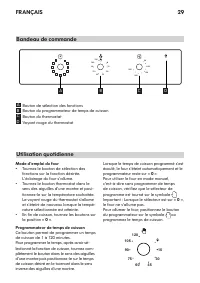
FRANÇAIS 29 A Bouton de sélection des fonctions B Bouton du programmateur de temps de cuisson C Bouton du thermostat D Voyant rouge du thermostat Bandeau de commande Utilisation quotidienne °C 15 100 50 150 250 200 90 30 75 105 120 45 60 0 A B C D Mode d'emploi du four Tournez le bouton de sélection...
Page 30 - Fonction idéale pour cuire
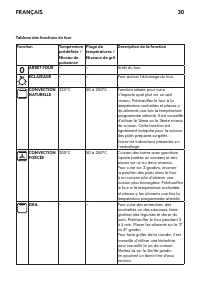
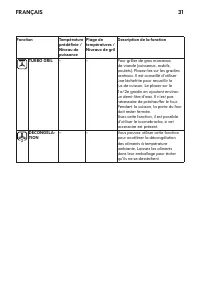
FRANÇAIS 30 Tableau des fonctions du four Fonction Température prédéfinie / Niveau de puissance Plage de températures / Niveaux de gril Description de la fonction 0 ARRÊT FOUR – – Arrêt du four. ÉCLAIRAGE – – Pour activer l'éclairage du four. CONVECTION NATURELLE 225°C 50 à 250°C Fonction idéale pou...
Page 32 - Type d’aliment; Tableaux de cuisson
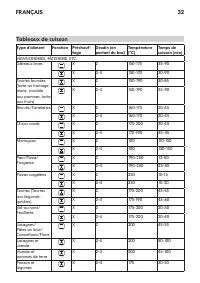
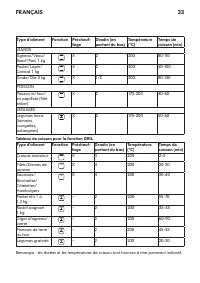
FRANÇAIS 32 Type d’aliment Fonction Préchauf- fage Gradin (en partant du bas) Température (°C) Temps de cuisson (min) VIENNOISERIES, PÂTISSERIE, ETC. Gâteaux levés X 2 150-175 35-90 X 2-4 150-170 30-90 Tourtes fourrées (tarte au fromage blanc, crumble aux pommes, tarte aux fruits) X 2 150-190 30-85 ...
Page 34 - Faites tremper les accessoires dans une
FRANÇAIS 34 Nettoyage et entretien NETTOYAGE AVERTISSEMENT ! Pour nettoyer votre appareil, n'utilisez - en aucun cas un jet d'eau sous haute pression ni d'appareil de nettoyage à la vapeur. Attendez que le four soit froid avant de - procéder à son nettoyage. Débranchez l'appareil. - Extérieur du fou...
Page 35 - cuisson, vérifiez que les brûleurs ou
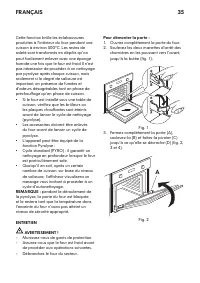
FRANÇAIS 35 Cette fonction brûle les éclaboussures produites à l'intérieur du four pendant une cuisson à environ 500°C. Les restes de saleté sont transformés en dépôts qu'on peut facilement enlever avec une éponge humide une fois que le four est froid Il n'est pas nécessaire de procéder à un nettoya...
Page 36 - Pour remonter la porte :
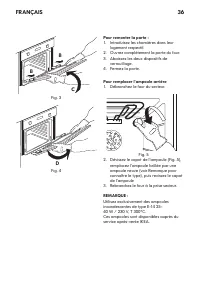
FRANÇAIS 36 B B C Fig. 3 D Fig. 4 Pour remonter la porte : Introduisez les charnières dans leur 1. logement respectif. Ouvrez complètement la porte du four. 2. Abaissez les deux dispositifs de 3. verrouillage. Fermez la porte. 4. Pour remplacer l'ampoule arrière Débranchez le four du secteur. 1. Fig...
Page 37 - Problème
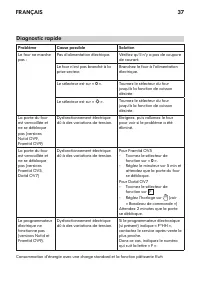
FRANÇAIS 37 Diagnostic rapide Problème Cause possible Solution Le four ne marche pas : Pas d'alimentation électrique. Vérifiez qu'il n'y a pas de coupure de courant. Le four n'est pas branché à la prise secteur. Branchez le four à l'alimentation électrique. Le sélecteur est sur « 0 ». Tournez le sél...
Page 38 - Avant de faire appel au service après-
FRANÇAIS 38 Avant de faire appel au service après- vente : Vérifiez en premier lieu si vous pouvez 1. remédier au problème par vous-même à l'aide des suggestions de la section « Diagnostic rapide ». Arrêtez le four puis remettez-le en 2. marche pour vérifier si le problème a été éliminé. Si, après c...
Page 40 - Préparation du meuble pour; Montage
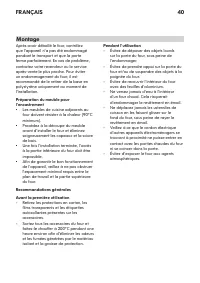
FRANÇAIS 40 Après avoir déballé le four, contrôlez que l'appareil n'a pas été endommagé pendant le transport et que la porte ferme parfaitement. En cas de problème, contactez votre revendeur ou le service après-vente le plus proche. Pour éviter un endommagement du four, il est recommandé de le retir...
Page 41 - Dispositif de sécurité du four
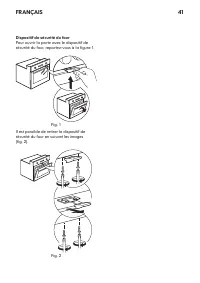
FRANÇAIS 41 Dispositif de sécurité du four Pour ouvrir la porte avec le dispositif de sécurité du four, reportez-vous à la figure 1. Fig. 1 Il est possible de retirer le dispositif de sécurité du four en suivant les images (fig. 2). Fig. 2
Page 42 - Élimination des emballages; Considérations environnementales; Vérifiez que la tension figurant sur la plaque; Branchements électriques
FRANÇAIS 42 Élimination des emballages Les matériaux d'emballage sont - entièrement recyclables, comme l'indique le symbole de recyclage ( ). Par conséquent, ne les jetez jamais dans la nature et respectez les réglementations locales en vigueur en matière d'élimination des déchets. Mise au rebut de ...
Page 43 - Les exceptions sont spécifiées sous la
FRANÇAIS 43 GARANTIE IKEA Quelle est la durée de validité de la garantie IKEA ? Cette garantie est valable 5 (cinq) ans à compter de la date d’achat/de livraison de votre appareil, sauf pour les appareils de la marque LAGAN pour lesquels une garantie de 2 (deux) ans est applicable. La preuve d’achat...
Page 44 - Loi nationale applicable
FRANÇAIS 44 sauf s’il est prouvé que ces dommages sont dus à des vices de fabrication. Les cas où aucun défaut n’est mis à jour • par le technicien. Les réparations qui ne sont pas effectuées • par nos réparateurs désignés et/ou un partenaire contractuel autorisé ou lorsque des pièces autres que d’o...
Page 45 - appareil acheté figurent également sur
FRANÇAIS 45 Dans le but de vous fournir un service après-vente plus rapide, utilisez les numéros spécifiques repris sur ce livret de garantie et citez toujours le numéro d’article IKEA (numéro composé de 8 chiffres) de l’appareil pour lequel vous avez besoin d’assistance ainsi que le code service à ...
Page 46 - ITALIANO; specificano il potenziale pericolo esistente; Informazioni sulla sicurezza
ITALIANO 46 Importanza della sicurezza per sé e per gli altri. Il presente manuale e l'apparecchio stesso sono corredati da importanti messaggi relativi alla sicurezza, da leggere ed osservare sempre. Questo è il simbolo di pericolo, relativo alla sicurezza, il quale avverte dei potenziali rischi pe...
Page 47 - Smaltimento elettrodomestici
ITALIANO 47 L'apparecchio è destinato - esclusivamente ad uso domestico per la cottura di alimenti. Non sono consentiti altri usi (es. riscaldamento di ambienti). Il costruttore declina ogni responsabilità per usi non appropriati o per errate impostazioni dei comandi. L'utilizzo dell'apparecchio non...
Page 48 - Accessori
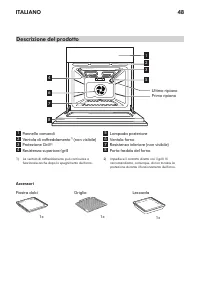
ITALIANO 48 Descrizione del prodotto Accessori Piastra dolci 1x Griglia 1x Leccarda 1x 1 Pannello comandi 2 Ventola di raffreddamento 1) (non visibile) 3 Protezione Grill 2) 4 Resistenza superiore/grill 5 Lampada posteriore 6 Ventola forno 7 Resistenza inferiore (non visibile) 8 Porta fredda del for...
Page 49 - Inserimento di griglie e altri accessori
ITALIANO 49 Inserimento di griglie e altri accessori all’interno del forno La griglia e gli altri accessori sono dotati di un sistema di blocco che ne evita l’estrazione involontaria. Inserire la griglia orizzontalmente, con la 1. parte rialzata “A” orientata verso l’alto (Fig. 1). A Fig. 1 Inclinar...
Page 50 - Funzionamento del forno
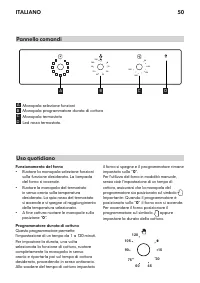
ITALIANO 50 A Manopola selezione funzioni B Manopola programmatore durata di cottura C Manopola termostato D Led rosso termostato. Pannello comandi Uso quotidiano °C 15 100 50 150 250 200 90 30 75 105 120 45 60 0 A B C D Funzionamento del forno Ruotare la manopola selezione funzioni • sulla funzione...
Page 51 - Funzione adatta a cuocere qual
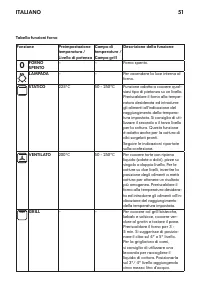
ITALIANO 51 Tabella funzioni forno Funzione Preimpostazione temperatura / Livello di potenza Campo di temperature / Campo grill Descrizione della funzione 0 FORNO SPENTO – – Forno spento. LAMPADA – – Per accendere la luce interna al forno. STATICO 225°C 50 - 250°C Funzione adatta a cuocere qual - si...
Page 53 - Alimenti; Tabelle di cottura
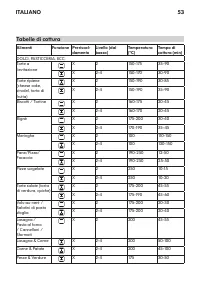
ITALIANO 53 Alimenti Funzione Preriscal- damento Livello (dal basso) Temperatura (°C) Tempo di cottura (min) DOLCI, PASTICCERIA, ECC. Torte a lievitazione X 2 150-175 35-90 X 2-4 150-170 30-90 Torte ripiene (cheese cake, strudel, torta di frutta) X 2 150-190 30-85 X 2-4 150-190 35-90 Biscotti / Tort...
Page 56 - risulta impossibile aprirla fino a che, la
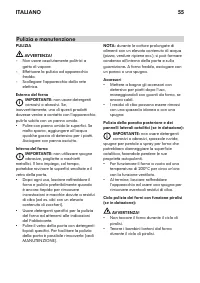
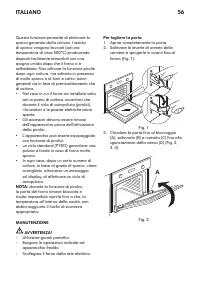
ITALIANO 56 Questa funzione permette di eliminare lo sporco generato dalla cottura. I residui di sporco vengono bruciati (ad una temperatura di circa 500°C) producendo depositi facilmente removibili con una spugna umida dopo che il forno si è raffreddato. Non attivare la funzione pirolisi dopo ogni ...
Page 57 - Per riposizionare la porta
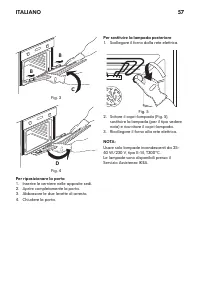
ITALIANO 57 B B C Fig. 3 D Fig. 4 Per riposizionare la porta Inserire le cerniere nelle apposite sedi. 1. Aprire completamente la porta. 2. Abbassare le due levette di arresto. 3. Chiudere la porta. 4. Per sostituire la lampada posteriore Scollegare il forno dalla rete elettrica. 1. Fig. 5 Svitare i...
Page 58 - Problema
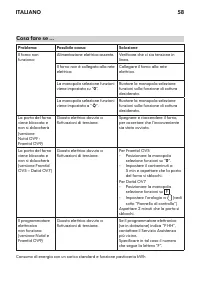
ITALIANO 58 Cosa fare se ... Problema Possibile causa Soluzione Il forno non funziona: Alimentazione elettrica assente. Verificare che ci sia tensione in linea. Il forno non è collegato alla rete elettrica. Collegare il forno alla rete elettrica. La manopola selezione funzioni viene impostata su “ 0...
Page 59 - Prima di contattare il Servizio Assistenza:
ITALIANO 59 Prima di contattare il Servizio Assistenza: Verificare che non sia possibile risolvere 1. da soli il problema sulla base dei punti descritti nella tabella “Cosa fare se”. Spegnere e riaccendere l'apparecchio 2. per accertarsi che l'inconveniente sia stato ovviato. Se dopo i suddetti cont...
Page 60 - Zona della teglia da forno più grande (superficie netta) cm
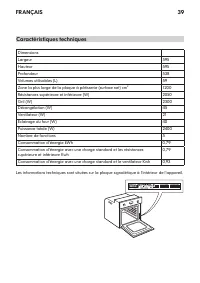
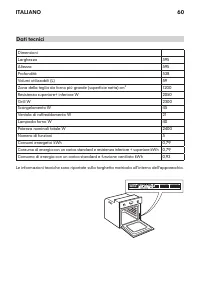
ITALIANO 60 Dati tecnici DimensioniLarghezza 595 Altezza 595 Profondità 538 Volumi utilizzabili (L) 59 Zona della teglia da forno più grande (superficie netta) cm 2 1200 Resistenza superiore+ inferiore W 2050 Grill W 2300 Scongelamento W 45 Ventola di raffreddamento W 21 Lampada forno W 40 Potenza n...
Page 61 - Predisposizione del mobile per incasso; Installazione
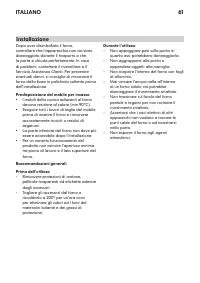
ITALIANO 61 Dopo aver disimballato il forno, controllare che l’apparecchio non sia stato danneggiato durante il trasporto e che la porta si chiuda perfettamente. In caso di problemi, contattare il rivenditore o il Servizio Assistenza Clienti. Per prevenire eventuali danni, si consiglia di rimuovere ...
Page 62 - Dispositivo Blocca Porta
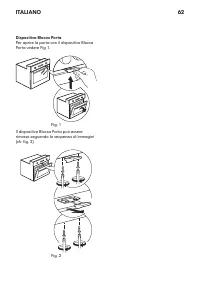
ITALIANO 62 Dispositivo Blocca Porta Per aprire la porta con il dispositivo Blocca Porta vedere Fig 1. Fig. 1 Il dispositivo Blocca Porta può essere rimosso seguendo la sequenza di immagini (cfr. fig. 2). Fig. 2
Page 63 - Smaltimento imballaggio; Preoccupazioni ambientali; personale qualificato. Contattare il Servizio; Collegamento elettrico
ITALIANO 63 Smaltimento imballaggio Il materiale di imballaggio è riciclabile - al 100% ed è contrassegnato dal simbolo di riciclaggio ( ). Le diverse parti dell'imballaggio non devono essere disperse nell'ambiente, ma smaltite in conformità alle norme stabilite dalle autorità locali. Smaltimento pr...
Page 64 - che non influiscono sul normale uso
ITALIANO 64 GARANZIA IKEA Quanto dura la garanzia IKEA? Questa garanzia è valida per 5 (cinque) anni a partire dalla data di acquisto/ consegna del vostro elettrodomestico presso un negozio IKEA, salvo che l’elettrodomestico appartenga alla gamma LAGAN, nel qual caso la garanzia è di 2 (due) anni. È...
Page 65 - che potrebbero verificarsi durante il
ITALIANO 65 Casi in cui non vengono rilevati difetti • funzionali durante la visita di un tecnico. Riparazioni non eseguite dal nostro • Servizio Assistenza autorizzato e/o da un Partner di Assistenza contrattuale autorizzato o in caso di uso di ricambi non originali. Riparazioni causate da un’insta...
Page 66 - è necessario esibirlo affinché la
ITALIANO 66 Al fine di garantirvi un servizio più veloce, vi suggeriamo di utilizzare i numeri di telefono riportati in questo manuale. Fate sempre riferimento ai numeri indicati nel manuale dell’apparecchiatura per la quale avete bisogno di assistenza. Vi suggeriamo di avere sempre a disposizione i...
Page 67 - ENGLISH; All safety warnings give specific details of; Safety Information
ENGLISH 67 Your safety and that of others are very important This manual and the appliance itself provide important safety warnings, to be read and observed at all times. This is the danger symbol, pertaining to safety, which alerts users to potential risks to themselves and others. All safety warni...
Page 68 - Scrapping of household appliances
ENGLISH 68 During and after use, do not touch the - heating elements or interior surfaces of the appliance - risk of burns. Do not allow the appliance to come into contact with cloths or other flammable materials until all the components have cooled sufficiently. At the end of cooking, exercise - ca...
Page 69 - Accessories
ENGLISH 69 Product description Accessories Baking tray 1x Wire Shelf 1x Drip tray 1x 1 Control panel 2 Cooling fan 1) (hidden) 3 Grill safety guard 2) 4 Upper heating element/Grill 5 Rear oven lamp 6 Oven fan 7 Bottom heating element (not visible) 8 Oven cool door 1) The cooling fan may continue run...
Page 70 - Inserting wire shelves and other
ENGLISH 70 Inserting wire shelves and other accessories in the oven The wire shelf and other accessories are provided with a locking mechanism to prevent their unintentional removal. Insert the wire shelf horizontally, with the 1. raised part “A” upwards (Fig. 1). A Fig. 1 Angle the wire shelf when ...
Page 71 - Function selector knob; Control panel; How to operate the oven
ENGLISH 71 A Function selector knob B Cooking time selector knob C Thermostat knob D Thermostat red led. Control panel Daily use °C 15 100 50 150 250 200 90 30 75 105 120 45 60 0 A B C D How to operate the oven Turn the selector knob to the required • function. The oven light switches on. Turn the t...
Page 72 - Function suitable for cooking
ENGLISH 72 Oven Functions table Function Preset temperature / Power level Temperature range / Grill range Description of function 0 OVEN OFF – – Oven OFF. LAMP – – To switch on the oven light. CONVENTIONAL 225°C 50 - 250°C Function suitable for cooking any type of dish on one level. Preheat the oven...
Page 74 - Type of food; Cooking tables
ENGLISH 74 Type of food Function Preheating Shelf (from the bottom) Temperature (°C) Cooking time (min) SWEETS, PASTRY, ETC Leavened cakes X 2 150-175 35-90 X 2-4 150-170 30-90 Filled pies (cheesecake, strudel, fruit pie) X 2 150-190 30-85 X 2-4 150-190 35-90 Biscuits/tartlets X 2 160-175 20-45 X 2-...
Page 76 - Finish off with a dry cloth.
ENGLISH 76 Cleaning and maintenance CLEANING WARNING! Never use steam cleaning equipment. - Only clean the oven when it is cool to - the touch. Disconnect the appliance from the - power supply. Oven exterior i IMPORTANT: do not use corrosive or abrasive detergents. If any of these products accidenta...
Page 77 - oven door will not open it will remain
ENGLISH 77 The appliance could be equipped with • pyrolysis function: Standard cycle (PYRO): which is suitable • for cleaning a very dirty oven. In any case, after a certain number of • uses and depending on how dirty the oven is, a message on the oven display advises you to run a self-cleaning cycl...
Page 78 - To refit the door
ENGLISH 78 To refit the door Insert the hinges in their seats. 1. Open the door fully. 2. Lower the two catches. 3. Close the door. 4. To replace the rear lamp Disconnect the oven from the power supply. 1. Fig. 5 Unscrew the lamp cover (Fig. 5), replace 2. the lamp (see note for lamp type) and screw...
Page 79 - Problem
ENGLISH 79 What to do if ... Problem Possible cause Solution The oven does not work: No electrical power supply. Verify the presence of mains electrical power The oven is not plugged into the mains socket. Connect the oven to the power supply. The selector knob is set to “0 ”. Turn the selector knob...
Page 80 - a brief description of the fault
ENGLISH 80 Before calling the After-Sales Service: See if you can solve the problem 1. yourself with the help of the suggestions given in the “What to do if ...” table. Switch the appliance off and back on 2. again it to see if the fault persists. If after the above checks the fault still occurs, co...
Page 81 - Cooling Fan W
ENGLISH 81 Technical data DimensionsWidth 595 Height 595 Depth 538 Usable Volumes (L) 59 Area of largest baking sheet (net surface) cm 2 1200 Top+ bottom heating element W 2050 Grill W 2300 Defrost W 45 Cooling Fan W 21 Oven Lamp W 40 Total rating W 2400 Number of functions 5 Energy consumptions kWh...
Page 82 - Preparing the housing unit; Installation
ENGLISH 82 After unpacking the oven, make sure that it has not been damaged during transport and that the oven door closes properly. In the event of problems, contact the dealer or your nearest After-sales Service. To prevent any damage, only remove the oven from its polystyrene foam base at the tim...
Page 83 - Door lock device
ENGLISH 83 Door lock device To open the door with the door lock device see Fig 1. Fig. 1 The door lock device can be removed by following the sequence of images (see Fig. 2). Fig. 2
Page 84 - Disposal of packing material; Environmental concerns; Make sure the power voltage specified on; Electrical connection
ENGLISH 84 Disposal of packing material The packing material is 100% recyclable - and is marked with the recycle symbol ( ). The various parts of the packing must therefore be disposed of responsibly and in full compliance with local authority regulations governing waste disposal. Scrapping the prod...


 Ikea IUD8500BX1
User Manual
Ikea IUD8500BX1
User Manual
 Ikea IMH160DW1
User Manual
Ikea IMH160DW1
User Manual
 Ikea IDF320PAFW0
User Manual
Ikea IDF320PAFW0
User Manual
 Ikea IHI75UC6FS0
User Manual
Ikea IHI75UC6FS0
User Manual
 Ikea IBS350PXS01
User Manual
Ikea IBS350PXS01
User Manual
 Ikea IH3402YS0
User Manual
Ikea IH3402YS0
User Manual
 Ikea IBS550DS03
User Manual
Ikea IBS550DS03
User Manual
 Ikea IBS550PWS00
User Manual
Ikea IBS550PWS00
User Manual
 Ikea IHW61UC0FS
User Manual
Ikea IHW61UC0FS
User Manual
 Ikea IX5BBEXDS00
User Manual
Ikea IX5BBEXDS00
User Manual
 Ikea IGS900DS00
User Manual
Ikea IGS900DS00
User Manual