Page 2 - GENERAL SAFETY RULES; WORK AREA; SAVE THIS MANUAL; SYMBOLS
In this manual, on the labels, packages and all other information provided with this tool. The following signal words and meanings are intended to explain the levels of risk associated with this tool. SYMBOLS SIGNAL MEANING ! ! WARNING: CAUTION: CAUTION: Indicates a potentially hazardous situation, ...
Page 3 - OPERATION; AIR SOURCE
05 04 TOOL USE AND CARE Proper footing and balance enables better control of the tool in unexpected situations. Stable footing on a solid surface enables better control of the tool in unexpected situations. Entangled or snarled hoses can cause loss of balance or footing and may become damaged, resul...
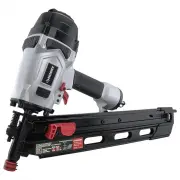
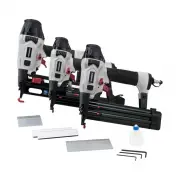
Page 4 - UNPACKING; SPECIFICATIONS; Figure 1; FEATURES; Figure 2
07 06 AIR SUPPLY AND CONNECTIONS The connector on the tool must not hold pressure when air supply is disconnected. Do not use any type of reactive gases, including, but not limited to, oxygen and combustible gases, as a power source. Use only a pressure-regulated compressed air source to limit the a...
Page 5 - Figure 4
09 08 The tool may fire when it is first connected to the air source. Always connect the tool to the air source before loading fasteners to prevent injury from unintended cycling. Always make sure the tool's magazine is empty at the beginning of each work session, before connecting to an air source....
Page 6 - Too Deep; FIRING THE TOOL
11 10 SETTING THE AIR PRESSURE The amount of air pressure required depends on the size of the fasteners and the workpiece material. Begin testing the depth of drive by driving a test nail into the same type of workpiece material used for the actual job. Drive a test fastener with the air pressure se...
Page 7 - ANTI DUST CAP; LUBRICATION; MAINTENANCE; CLEANING; RECOMMENDED HOOKUP
13 12 Turn the tool so the air inlet is facing up. Place 2 3 drops of pneumatic fastening tool oil into air inlet. Do not use detergent oils, oil additives, or air-tool oils - as these lubricants will cause accelerated wear to the seals and bumpers in the tool, resulting in poor tool performance and...
Page 8 - TROUBLESHOOTING
TROUBLESHOOTING Stop using tool immediately if any of the following problems occur. Serious personal injury could result. Any repairs or replacements must be done by a qualified service person or an authorized service center. WARNING: ! Air leaking at trigger valve area. O-rings in trigger valve hou...
Page 9 - GUARDA ESTE MANUAL PARA CONSULTARLO EN EL FUTURO.
MODELO: DPFR2190 No seguir las advertencias correctamente puede causar LA MUERTE O LESIONES GRAVES. GUARDA ESTE MANUAL PARA CONSULTARLO EN EL FUTURO. GUARDE SU COMPROBANTE DE COMPRA CON FECHA PARA FINES DE LA GARAT Í A. ADVERTENCIA:
Page 10 - SEGURIDAD PERSONAL; GUARDAR ESTE MANUAL; MBOLOS; NORMAS GENERALES DE; PROPOSICI
16-Sp 17-Sp S í mbolos en este manual, las etiquetas, envases y en toda la informaci ó n provista con esta herramienta. Las siguientes palabras de aviso y significados tienen el objetivo de explicar los niveles de riesgo asociados con esta herramienta. S Í MBOLOS AVISO SIGNIFICADO ! ! ADVERTENCIA: P...
Page 11 - USO Y CUIDADO DE LA HERRAMIENTA
19-Sp 18-Sp ● ● ● ● ● ● ● ● ● USO Y CUIDADO DE LA HERRAMIENTA Cuando utilices una herramienta de motor mantente alerta, observa lo que est á s haciendo y utiliza el sentido com ú n. Para evitar disparos accidentales mantenga los dedos alejados del gatillo cuando no accione los sujetadores, especialm...
Page 12 - ENTRADA DE AIRE Y CONEXIONES; CARGAR LA HERRAMIENTA; DESEMPACAR; REPARACI; FUNCIONAMIENTO; CARACTER; FUENTE DEL AIRE; ESPECIFICACIONES
21-Sp ENTRADA DE AIRE Y CONEXIONES El conector de la herramienta no debe estar bajo presi ó n al desconectar la entrada de aire No utilice ning ú n tipo de gases reactivos, lo que incluye pero no se limita al ox í geno o a gases combustibles, como fuente de alimentaci ó n. Use ú nica men te una fuen...
Page 13 - OPERACI; MO CARGAR LOS SUJETADORES; Figura 1; MO DESCARGAR LOS; Figur 5
23-Sp La herramienta puede dispararse al ser conectada por primera vez a la fuente de aire. Conecta siempre la herramienta a la fuente de aire antes de cargar los fijadores para evitar lesiones causadas por ciclos accidentales. Aseg ú rate siempre de que el cargador de la herramienta est é vac í o a...
Page 14 - Figur 6; ADVERTENCIA; AJUSTE DE PROFUNDIDAD; Est
25-Sp 24-Sp Desconecte la herramienta de la fuente de aire cada vez que retire un sujetador atascado. Luego de desconectar la herramienta del compresor de aire, deber í a haber suficiente presi ó n de aire para disparar. Luego de desconectar la manguera de aire, siempre dispare la herramienta varias...
Page 15 - MANTENIMIENTO; FUNCI
26-Sp 27-Sp Desconecta la herramienta de la fuente de aire. gire el interruptor de modo de disparo seleccionable en la posici ó n hacia arriba, í a estar á apuntando hacia el icono de clavo Conecta la herramienta de la fuente de aire. á ndose de la pieza de trabajo. Presione el bot ó n de modo de di...
Page 16 - CONEXI; SOLUCI
Acople r á pido Manguera de aire Lubricador Filtro Compresor Conector r á pido Regulador Conector r á pido Acople r á pido 28-Sp 29-Sp Lubrica la herramienta ú nicamente con los lubricantes especificados. : PRECAUCI Ó N Evita el uso de solventes para limpiar las piezas pl á sticas. La mayor í a de l...