Page 2 - English; Français
2 • WARNING: The appliance and its accessible parts become hot during use. • Care should be taken to avoid touching heating elements. • Children less than 8 years of age shall be kept away unless continuously supervised. • This appliance can be used by children aged from 8 years and above and person...
Page 6 - RS; Русский; ВНИМАНИЕ
6 RS Русский ВНИМАНИЕ ! • ВНИМАНИЕ : Данное изделие и его доступные комплектующие сильно нагреваются в процессе эксплуатации . • Будьте осторожны и не касайтесь нагревательных элементов . • Не разрешайте детям младше 8 лет приближаться к изделию без контроля . • Данное изделие может быть использован...
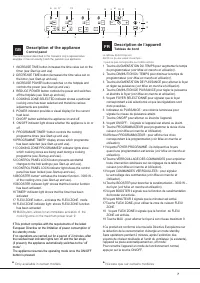
Page 7 - Description of the appliance; Control panel; Description de l’appareil; Tableau de bord; MAX button- allows for an immediate activation of the
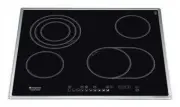
GB 7 Description of the appliance Control panel GB Description de l’appareil Tableau de bord FR The control panel described in this manual is only a representative example: it may not exactly match the panelon your appliance. 1 INCREASE TIME button increases the time value set on the timer (see Star...
Page 8 - Descripción del aparato; Panel de control; Descrição do aparelho; Painel de comandos
8 Descripción del aparato Panel de control ES Descrição do aparelho Painel de comandos PT El panel de control se describe a continuación a modo de ejemplo: puede no ser una exacta reproducción delmodelo adquirido. 1 Botón AUMENTO TIEMPO para aumentar el tiempo del temporizador (ver Puesta en funcion...
Page 9 - Beschreibung des Gerätes; Questo prodotto soddisfa i requisiti imposti dalla nuova; Descrizione dell’apparecchio
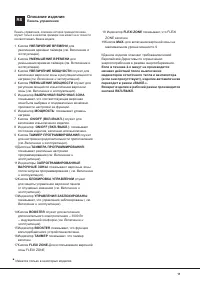
GB 9 IT DE Beschreibung des Gerätes Bedienfeld Das hier beschriebene Bedienfeld dient nur als Beispiel, es handelt sich nicht unbedingt um eine genaueWidergabe des von Ihnen erworbenen Modells. 1 Taste ZEIT ERHÖHEN zur Verlängerung der Zeit des Timers (siehe Inbetriebsetzung und Gebrauch) . 2 Taste ...
Page 10 - Beschrijving van het apparaat; Bedieningspaneel; Opis urz; Panel sterowania; Dit product voldoet aan de eisen die gesteld worden door; ść; BOOSTER; łą
10 NL PL Beschrijving van het apparaat Bedieningspaneel Opis urz ą dzenia Panel sterowania Het bedieningspaneel dat hier wordt beschreven en afgebeeld geldt alleen als voorbeeld: het is mogelijk dat het niet exact overeenkomt met het door u aangeschafte model. 1 Toets TOENAME TIJD om de tijd van de ...
Page 11 - FLEXI ZONE; FLEXI; Панель
GB 11 Панель управления , описание которои приводится ниже , служит только в качестве примера : она может не в точности соответствовать Вашеи модели 1 Кнопка УВЕЛИЧЕНИЕ ВРЕМЕНИ для увеличения времени таймера ( см . Включение и эксплуатация ). 2 Кнопка УМЕНЬШЕНИЕ ВРЕМЕНИ для уменьшения времени таймер...
Page 12 - Installation; Positioning; see Precautions and tips; COMPARTMENT
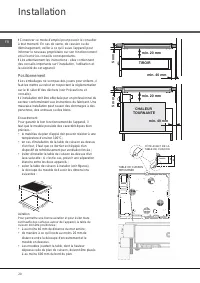
12 GB Installation ! Before operating your new appliance please read this instruction booklet carefully. It contains important information concerning the safe operation, installation and maintenance of the appliance. ! Please keep these operating instructions for future reference. Pass them on to an...
Page 13 - Electrical connection
13 GB The appliance must be installed on a perfectly level supporting surface. Any deformities caused by improper fi xing could affect the features and operation of the hob.The thickness of the supporting surface should be taken into account when choosing the length of the screws for the fi xing hoo...
Page 14 - Technical description of; Switching off the cooking zones
14 GB Start-up and use ! The glue applied on the gaskets leaves traces of grease on the glass. Before using the appliance, we recommend you remove these with a special non-abrasive cleaning product. During the fi rst few hours of use there may be a smell of rubber which will disappear very quickly. ...
Page 16 - The FlexiZONE mode; Selecting and using FLEXI ZONE; Practical cooking advice
16 GB The FlexiZONE mode The FLEXI Zone can be used to set the power of two „interconnected” hotplates to the same level. It can be activated if the two hotplates are OFF, by pressing the FLEXI ZONE button The FLEXI ZONE can be activated while the hob is on by pressing the FLEXI ZONE button once; th...
Page 17 - Safety devices; Practical advice on using the appliance
17 GB the cookware. * SUITABLE UNSUITABLE Cast iron Enamelled steel Special stainless steel Copper, Aluminium, Glass, Earthenware, Ceramic, non magnetic Stainless steel In addition, to obtain the best results from your hob:• Use pans with a thick, fl at base in order to fully utilise the cooking zon...
Page 18 - Precautions and tips; General safety; For the attention of wearers of pacemakers or; • The appliance is not intended to be operated by; Disposal
18 GB Precautions and tips ! This appliance has been designed and manufactured in compliance with international safety standards. The following warnings are provided for safety reasons and must be read carefully. This appliance conforms to the following European Economic Community directives: - 2006...
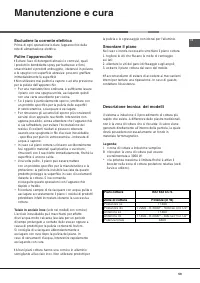
Page 19 - Care and maintenance; Switching the appliance off; Technical description of the models
19 GB Care and maintenance Switching the appliance off Disconnect your appliance from the electricity supply before carrying out any work on it. Cleaning the appliance ! Do not use abrasive or corrosive detergents (for example, products in spray cans for cleaning barbecues and ovens), stain removers...
Page 20 - Positionnement; voir Précautions et; TIROIR
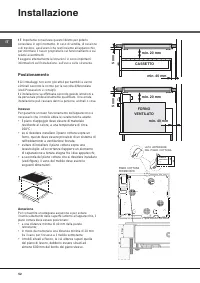
20 FR Installation ! Conserver ce mode d’emploi pour pouvoir le consulter à tout moment. En cas de vente, de cession ou de déménagement, veiller à ce qu’il suive l’appareil pour informer le nouveau propriétaire sur son fonctionnement et lui fournir les conseils correspondants. ! Lire attentivement l...
Page 21 - FR; Raccordement électrique; Ne retirer ou ne remplacer en aucun cas le câble
21 FR FixationIl est impératif d’assurer l’encastrement de l’appareil sur un plan d’appui parfaitement plat. Les déformations provoquées par une mauvaise fi xation risquent d’altérer les caractéristiques de la table de cuisson ainsi que ses performances. La longueur de la vis de réglage des crochets...
Page 22 - Mise sous tension de la table de cuisson; Description; Extinction des foyers
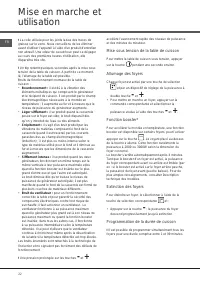
22 FR Mise en marche et utilisation ! La colle utilisée pour les joints laisse des traces de graisse sur le verre. Nous conseillons de les éliminer avant d’utiliser l’appareil à l’aide d’un produit d’entretien non abrasif. Une odeur de caoutchouc peut se dégager au cours des premières heures d’utili...
Page 23 - Le minuteur
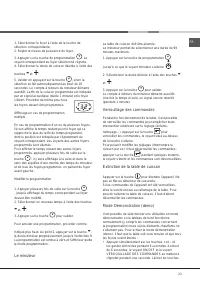
23 FR 1. Sélectionner le foyer à l’aide de la touche de sélection correspondante.2. Régler le niveau de puissance du foyer. 3. Appuyer sur la touche de programmation . Le voyant correspondant au foyer sélectionné clignote.4. Sélectionner la durée de cuisson désirée à l’aide des touches - et + . 5. V...
Page 24 - Conseils d’utilisation de l’appareil; Les sécurités
24 FR + et – et appuyer sur la touche ; • il y a affi chage de DE et de MO et la table s’éteint;• au rallumage successif, la table se trouvera en mode démonstration (demo). Pour quitter ce mode de fonctionnement, suivre la procédure décrite plus haut. Il y a affi chage de DE et de OF et la table s’é...
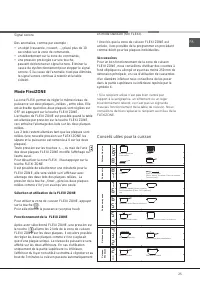
Page 25 - Signal sonore; Mode FlexiZONE; Sélection et utilisation de la FLEXI ZONE; Conseils utiles pour la cuisson
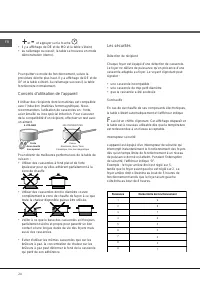
25 FR Signal sonore Des anomalies, comme par exemple :• un objet (casserole, couvert, ...) placé plus de 10 secondes sur la zone de commande, • un débordement sur la zone de commande,• une pression prolongée sur une touche, peuvent déclencher un signal sonore. Eliminer la cause de dysfonctionnement ...
Page 26 - Précautions et conseils; Sécurité générale; voir Mise en marche et Utilisation; Mise au rebut
26 FR Précautions et conseils ! Cet appareil a été conçu et fabriqué conformément aux normes internationales de sécurité. Ces consignes de sécurité sont très importantes et doivent être lues attentivement. Cet appareil est conforme aux Directives Communautaires suivantes : - 2006/95/CEE du 12/12/06 ...
Page 27 - Nettoyage et entretien; Mise hors tension; voir
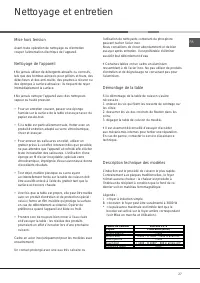
27 FR Nettoyage et entretien Mise hors tension Avant toute opération de nettoyage ou d’entretien couper l’alimentation électrique de l’appareil. Nettoyage de l’appareil ! Ne jamais utiliser de détergents abrasifs ou corrosifs, tels que des bombes aérosols pour grilloirs et fours, des détacheurs et d...
Page 28 - Instalación; Colocación; Empotramiento; CAJÓN
28 ES Instalación ! Es importante conservar este manual para poder consultarlo en todo momento. En el caso de venta, de cesión o de mudanza, verifi que que permanezca junto al aparato para informar al nuevo propietario sobre su funcionamiento y sobre las advertencias correspondientes. ! Lea atentame...
Page 29 - Conexión eléctrica; Conexión monofásica; Otros tipos de conexión; Conexión del cable de alimentación eléctrica a la red
29 ES Las deformaciones que se podrían provocar por una mala fi jación, pueden alterar las características y las prestaciones de la encimera. La longitud del tornillo de regulación de los ganchos de fi jación se debe determinar antes de su montaje en base al espesor de la superfi cie de apoyo: • esp...
Page 30 - Ruidos de normal funcionamiento de la placa de cocina:; • Rumor: Se debe a la vibración de los elementos metálicos que; Encendido de la encimera; Apagado de las zonas de cocción
30 ES Puesta en funcionamiento y uso ! La cola aplicada sobre las juntas deja algunas trazas de grasa en el vidrio. Antes de utilizar el aparato, se recomienda eliminarlas con un producto específi co para el mantenimiento, no abrasivo. Durante las primeras horas de funcionamiento, es posible adverti...
Page 31 - El contador de minutos
31 ES 5. Confi rme la operación presionando el botón , si no lo hace, después de 10 segundos se selecciona automáticamente.La cuenta al revés del temporizador comienza inmediatamente. La fi nalización de la cocción programada está indicada por una señal sonora (durante 1 minuto) y la zona de cocción...
Page 32 - Dispositivos de seguridad; Detección de los recipientes; Señal sonora
32 ES Además, para obtener las mejores prestaciones de la encimera:• Utilice ollas con fondo plano y de gran espesor para asegurarse que se adhieran perfectamente a la zona calentadora • Utilice ollas de un diámetro sufi ciente para cubrir completamente la zona de cocción, de ese modo se garantiza e...
Page 33 - Modalidad; FlexiZONE; Selección y uso de FLEXI ZONE; Consejos prácticos para la cocción
33 ES Modalidad FlexiZONE La zona FLEXI permite regular el mismo nivel de potencia en las dos placas „conectadas” entre sí. Se puede activar si las dos placas se encuentran en estado OFF presionando la tecla ( )FLEXI ZONE.Se puede activar el FLEXI ZONE con la placa de cocción encendida presionando l...
Page 34 - Precauciones y consejos; Seguridad general; El aparato no se debe poner en funcionamiento; Eliminación
34 ES Precauciones y consejos ! El aparato ha sido proyectado y fabricado en conformidad con las normas internacionales sobre seguridad. Estas advertencias se suministran por razones de seguridad y deben ser leídas atentamente. Este aparato es conforme con las siguientes Normas Comunitarias: -2006/9...
Page 35 - Mantenimiento y cuidados; Limpiar el aparato; Estructura de acero inoxidable; Desmontar la encimera
35 ES Mantenimiento y cuidados Interrumpir el suministro de corriente eléctrica Antes de realizar cualquier operación, desconecte el aparato de la red de alimentación eléctrica. Limpiar el aparato ! Evite el uso de detergentes abrasivos o corrosivos, como aerosoles para barbacoas y hornos, quitamanc...
Page 36 - Instalação; Posicionamento; veja em Precauções e; GAVETA
36 PT Instalação ! É importante guardar este folheto para poder consultá- lo a qualquer momento. No caso de venda, cessão ou mudança, assegure-se que o mesmo permanece com o aparelho para informar o novo proprietário sobre o funcionamento e sobre as respectivas advertências. ! Leia com atenção as in...
Page 37 - Ligação eléctrica
37 PT do bordo do mesmo plano. Fixação A instalação do aparelho deve ser realizada sobre uma superfície de apoio perfeitamente plana. As deformações eventualmente provocadas por uma fi xação errada poderão alterar as características e as performances do plano de cozedura. O comprimento do parafuso d...
Page 38 - Início e utilização; Acender o plano de cozedura; Descrição técnica dos modelos.; Desligar as zonas de cozedura
38 PT Início e utilização ! A cola aplicada nas guarnições deixa alguns traços de graxa no vidro. Antes de utilizar o aparelho, é recomendável eliminá-la com um produto não abrasivo específi co para a manutenção. Durante as primeiras horas de funcionamento, pode ser que note odor de borracha, que em...
Page 40 - Dispositivos de segurança
40 PT Para obter as melhores performances do plano de cozedura:• Empregue panelas com fundo chato e elevada espessura, para ter a certeza que haverá uma perfeita aderência à zona de aquecimento. • Empregue panelas com diâmetro sufi ciente para cobrir inteiramente a zona de aquecimento, de maneira qu...
Page 41 - Modo FlexiZONE; zona FLEXI; consente regular o mesmo nível de; Selecção e uso FLEXI ZONE; Conselhos práticos para a cozedura
41 PT Modo FlexiZONE A zona FLEXI consente regular o mesmo nível de potência em duas chapas „ligadas” entre si. Pode ser activada se as duas chapas estiverem em OFF, pressionando a tecla ( ) FLEXI ZONE. É possível activar o FLEXI com plano aceso carregando uma vez na tecla FLEXI ZONE. acendem-se os ...
Page 42 - Precauções e conselhos; Segurança geral; veja Início e; Advertência para os portadores de pacemaker; • Não permita que as crianças brinquem com o; Eliminação
42 PT Precauções e conselhos ! Este aparelho foi projectado e fabricado em conformidade com as normas internacionais de segurança. Estas advertências são fornecidas por razões de segurança e devem ser lidas com atenção. Este aparelho é em conformidade com as seguintes Directivas da Comunidade Europe...
Page 43 - Manutenção e cuidados; Desligar a corrente eléctrica; Descrição técnica dos modelos
43 PT Manutenção e cuidados Desligar a corrente eléctrica Antes de realizar qualquer operação, desligue o aparelho da alimentação eléctrica. Limpeza do aparelho ! Evite o emprego de detergentes abrasivos ou corrosivos, tais como sprays para churrasqueiras e fornos, tira-manchas e produtos contra fer...
Page 44 - Posizionamento; siehe Vorsichtsmaßregeln und Hinweise; Einbau; siehe; Belüftung; WÄRMEFACH
44 DE Installation ! Bewahren Sie diese Bedienungsanleitung bitte sorgfältig auf, damit Sie sie jederzeit zu Rate ziehen können. Sorgen Sie dafür, dass sie im Falle eines Verkaufs, eines Umzugs oder einer Übergabe an einen anderen Benutzer das Gerät stets begleitet, damit auch der Nachbesitzer die M...
Page 45 - Elektroanschluss
45 DE Befestigung Das Kochfeld muss auf einer perfekt ebenen Stütz- bzw. Auflagefläche installiert werden. Durch unsachgemäße Befestigung hervorgerufene Verformungen könnten die Eigenschaften und Leistungen des Kochfeldes beeinträchtigen.Die Länge der Regelschrauben der Befestigungsklammern wird vor...
Page 46 - Technischen Beschreibung der jeweiligen; Ausschalten der Kochzonen; Normale Funktionsgeräusche des Kochfeldes:
46 DE Inbetriebsetzung und Gebrauch ! Durch längeres Drücken der Tasten - und + können die Leistungswerte und die Minuten des Timers im Schnelllauf verändert werden. Einschalten des Kochfeldes Das Kochfeld wird über die Taste (für ca. 1 Sekunde gedrückt halten) eingeschaltet. Einschalten der Kochzon...
Page 47 - Änderung der Programmierung; Die Minutenuhr
47 DE 3. Drücken Sie die Programmiertaste . Die Kontrollleuchte der ausgewählten Zone blinkt.4. Stellen Sie über die Tasten “-” und “+” die gewünschte Garzeit ein.5. Bestätigen Sie die Einstellung durch Druck auf die Taste , oder warten Sie 10 Sekunden für die automatische Auswahl.Die Zeitrechnung (...
Page 48 - Sicherheitsvorrichtungen; Topferkennung; Tonsignal
48 DE Wird das Kochfeld daraufhin wieder eingeschaltet, funktioniert es wieder auf normale Weise. Praktische Ratschläge zum Einsatz des Gerätes ! Verwenden Sie Kochgeschirr, dessen Herstellungsmaterial (magnetisiertes Material) sich für das Induktionssystem eignet. Wir empfehlen Ihnen Töpfe und Pfan...
Page 50 - Allgemeine Sicherheit; siehe Inbetriebsetzung und Gebrauch; Hinweis für Herzschrittmacherträger oder Träger; • Kinder dürfen nicht mit dem Gerät spielen.; Dieses Gerät kann nicht mit einem externen Timer; Entsorgung
50 DE Vorsichtsmaßregeln und Hinweise ! Das Gerät wurde entsprechend den strengsten internationalen Sicherheitsvorschriften entworfen und gebaut. Nachstehende Hinweise werden aus Sicherheitsgründen geliefert und sollten aufmerksam gelesen werden. Dieses Gerät entspricht den folgenden EG- Richtlinien...
Page 51 - Reinigung und Pflege; Abschalten Ihres Gerätes vom Stromnetz; Edelstahlrahmen; Demontage des Kochfeldes
51 DE Reinigung und Pflege Abschalten Ihres Gerätes vom Stromnetz Vor jeder Reinigung und Pflege ist das Gerät vom Stromnetz zu trennen. Reinigung des Gerätes ! Der Einsatz von Scheuermitteln oder scharfen oder chemischen Reinigungsmitteln wie Backofensprays, Fleckenentferner, Rostentfernungsmittel,...
Page 52 - Installazione; Incasso; • il piano d’appoggio deve essere di materiale; Aerazione; I mobili situati a fi anco, la cui altezza superi quella; CASSETTO
52 IT Installazione ! È importante conservare questo libretto per poterlo consultare in ogni momento. In caso di vendita, di cessione o di trasloco, assicurarsi che resti insieme all’apparecchio per informare il nuovo proprietario sul funzionamento e sui relativi avvertimenti. ! Leggere attentamente...
Page 53 - Fissaggio; Collegamento elettrico; Collegamento monofase; Allacciamento del cavo di alimentazione alla rete; L’azienda declina ogni responsabilità qualora queste
IT 53 Fissaggio L’installazione dell’apparecchio deve essere effettuata su un piano d’appoggio perfettamente piano. Le eventuali deformazioni provocate da un errato fi ssaggio potrebbero alterare le caratteristiche e le prestazioni del piano cottura. La lunghezza della vite di regolazione dei ganci ...
Page 54 - Avvio e utilizzo; Rumori di normale funzionamento del piano cottura:; Accensione del piano cottura; Descrizione tecnica dei modelli; Spegnimento delle zone di cottura
54 IT Avvio e utilizzo ! La colla applicata sulle guarnizioni lascia alcune tracce di grasso sul vetro. Prima di utilizzare l’apparecchio, si raccomanda di eliminarle con un prodotto specifi co per la manutenzione non abrasivo. Durante le prime ore di funzionamento è possibile avvertire un odore di ...
Page 55 - Il contaminuti
IT 55 5. Confermare premendo il tasto oppure si seleziona in automatico dopo 10 secondi.Il conto alla rovescia del timer ha inizio immediatamente. La fi ne della cottura programmata è indicata da un segnale acustico (per la durata di 1 minuto) e la zona di cottura si spegne.Ripetere la procedura sop...
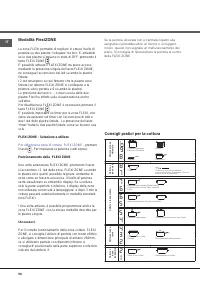
Page 56 - Modalità FlexiZONE; FLEXI ZONE - Selezione e utilizzo; Per utilizzare la zona di cottura FLEXI ZONE; Funzionamento della FLEXI ZONE; Consigli pratici per la cottura
56 IT Modalità FlexiZONE La zona FLEXI permette di regolare lo stesso livello di potenza su due piastre “collegate” tra loro. E’ attivabile se le due piastre si trovano in stato di OFF, premendo il tasto FLEXI ZONE: .E’ possibile attivare il FLEXI ZONE da piano acceso mediante la pressione singola d...
Page 57 - Dispositivi di sicurezza; Rilevamento dei recipienti; Segnale acustico
IT 57 dell’induzione (materiale ferromagnetico). Si raccomanda l’uso di pentole in: ghisa, acciaio smaltato o inox speciale per induzione. Per sincerarsi della compatibilità di un recipiente è suffi ciente fare una prova con una calamita. Inoltre, per ottenere le migliori prestazioni dal piano di co...
Page 58 - Precauzioni e consigli; Sicurezza generale; vedi Avvio e utilizzo; Avvertenza per i portatori di pacemaker o altri; Smaltimento
58 IT Precauzioni e consigli ! L’apparecchio è stato progettato e costruito in conformità alle norme internazionali di sicurezza. Queste avvertenze sono fornite per ragioni di sicurezza e devono essere lette attentamente. Questa apparecchiatura è conforme alle seguenti Direttive Comunitarie: - 2006/...
Page 59 - Manutenzione e cura; Escludere la corrente elettrica; Telaio in acciaio inox; Smontare il piano; vedi
IT 59 Manutenzione e cura Escludere la corrente elettrica Prima di ogni operazione isolare l’apparecchio dalla rete di alimentazione elettrica. Pulire l’apparecchio ! Evitare l’uso di detergenti abrasivi o corrosivi, quali i prodotti in bombolette spray per barbecue e forni, smacchiatori e prodotti ...
Page 60 - Installatie; Plaatsing; zie; LADE
60 NL Installatie ! Bewaar dit instructieboekje zorgvuldig voor eventuele raadpleging in de toekomst. Wanneer u het product weggeeft, verkoopt, of wanneer u verhuist, dient u dit boekje bij het apparaat te bewaren zodat waarschuwingen en informatie betreffende werking voorhanden blijven. ! Lees de i...
Page 61 - Elektrische aansluiting; Verwijder of vervang de voedingskabel voor geen enkele
61 NL Het apparaat moet op een absoluut horizontaal oppervlak worden geïnstalleerd. Eventuele door onjuiste installatie veroorzaakte vervormingen kunnen de eigenschappen en de prestaties van de kookplaat aantasten.De lengte van de regelschroef van de bevestigingshaken moet op basis van de dikte van ...
Page 62 - Starten en gebruik; Inschakelen kookplaat; Technische beschrijving van; Uitschakelen kookgedeeltes
62 NL Starten en gebruik ! De lijm die gebruikt is voor de afdichtingen laat wat vetvlekjes achter op het glas. Voordat u het apparaat gebruikt raden wij u aan de vlekken te verwijderen met een speciaal niet-schurend schoonmaakmiddel. Gedurende de eerste paar uur dat u het apparaat gebruikt kan het ...
Page 64 - Veiligheidssystemen; Vermogensniveau
64 NL Praktische tips voor het gebruik van het apparaat ! Gebruik pannen die gemaakt zijn van materiaal dat geschikt is voor inductie (ferromagnetisch materiaal). Wij raden het gebruik aan van pannen van: gietijzer, geëmailleerd staal of speciaal inductie roestvrij staal. U kunt zelf testen of een p...
Page 65 - modus; Praktische kooktips
65 NL FlexiZONE modus M.b.v. de FlexiZONE zone kunt u dezelfde stroomsterkte instellen op twee „aaneengesloten” kookplaten. U kunt deze functie activeren door op de FlexiZONE toets ( ) te drukken mits de twee kookplaten zich in de OFF stand bevinden.Het is mogelijk de FlexiZONE functie te activeren ...
Page 66 - Algemene veiligheidsmaatregelen; zie Starten en gebruik; Afvalverwijdering
66 NL Voorzorgsmaatregelen en advies ! Dit apparaat is ontwikkeld en gefabriceerd volgens de geldende internationale veiligheidsvoorschriften. Deze aanwijzingen zijn geschreven voor uw veiligheid en u dient ze derhalve goed door te nemen. Dit apparaat voldoet aan de volgende EU Richtlijnen: - 2006/9...
Page 67 - Onderhoud en verzorging; De elektrische stroom afsluiten
67 NL Onderhoud en verzorging De elektrische stroom afsluiten Sluit altijd eerst de stroom af voordat u tot enige handeling overgaat. Reinigen van het apparaat ! Vermijd het gebruik van schuurmiddelen of bijtende middelen, zoals sprays voor barbecues en ovens, vlekkenmiddelen, roestverwijderende pro...
Page 68 - Instalacja; Ustawienie; patrz Zalecenia i srodki ostroznosci; Zabudowa; patrz rysunki; Obieg powietrza; Mocowanie; SZUFLADY
68 PL Instalacja ! Nale ż y zachowa ć niniejsz ą instrukcj ę , aby móc z niej skorzysta ć w ka ż dej chwili. W razie sprzeda ż y, odst ą pienia lub przeniesienia urz ą dzenia, nale ż y si ę upewni ć , czy instrukcja zosta ł a przekazana wraz z nim, aby nowy w ł a ś ciciel p ł yty grzejnej móg ł si ę...
Page 70 - Intensywne gwizdanie:
70 PL Uruchomienie i u ż ytkowanie ! Klej stosowany do uszczelek pozostawia na szkle t ł uste plamy. Przed przyst ą pieniem do eksploatacji urz ą dzenia zaleca si ę usun ąć te plamy przy pomocy odpowiedniego produktu nieposiadaj ą cego w ł a ś ciwo ś ci ś ciernych. Podczas pierwszych godzin dzia ł a...
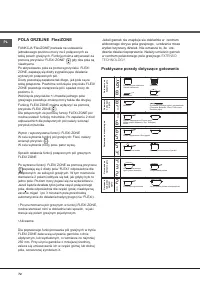
Page 72 - POLA GRZEJNE FlexiZONE; EXTENSO; Praktyczne porady dotycz
72 PL POLA GRZEJNE FlexiZONE FUNKCJA“FlexiZONE”pozwala na ustawienie jednakowego poziomu mocy na 2 po łą czonych ze sob ą polach grzejnych. Funkcj ę mo ż na aktywowa ć za pomoc ą przycisku “FLEXI ZONE” ( ) gdy oba pola s ą nieaktywne.Po aktywowaniu pola za pomoc ą przycisku FLEXI ZONE, zapalaj ą si ...
Page 74 - Ogólne zasady bezpiecze; patrz; Utylizacja
74 PL Zalecenia i ś rodki ostro ż no ś ci ! Urz ą dzenie zosta ł o zaprojektowane i wyprodukowane zgodnie z mi ę dzynarodowymi normami bezpiecze ń stwa. Poni ż sze ostrze ż enia dotycz ą zasad bezpiecze ń stwa i nale ż y je uwa ż nie przeczyta ć . Niniejsze urz ą dzenie jest zgodne z nast ę puj ą cy...
Page 75 - Konserwacja i utrzymanie; Rama ze stali nierdzewnej; ęż
75 PL Konserwacja i utrzymanie Od łą czenie pr ą du elektrycznego Przed ka ż d ą czynno ś ci ą nale ż y od łą czy ć urz ą dzenie od sieci zasilania elektrycznego. Mycie urz ą dzenia ! Unika ć stosowania ś rodków czyszcz ą cych o w ł a ś ciwo ś ciach ś ciernych lub korozyjnych, takich jak produkty w ...
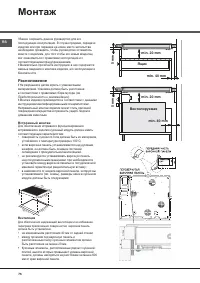
Page 76 - Монтаж; Расположение; Встроенный; см; Вентиляция; Ящик
76 RS Монтаж ! Важно сохранить данное руководство для его последующих консультации . В случае продажи , передачи изделия или при переезде на новое место жительства необходимо проверить , чтобы руководство оставалось вместе с изделием , для того чтобы его новыи владелец мог ознакомиться с правилами э...
Page 77 - Электрическое; INDESIT
77 RS Крепление Изделие должно быть установлено на идеально ровнои поверхности . Возможные деформации , вызванные неправильным креплением , могут привести к изменениям характеристик и эксплуатационных качеств варочнои панели . Длина регуляционного винта крепежных крюков регулируется перед началом мо...
Page 78 - Включение
78 RS Включение и эксплуатация ! На стекляннои поверхности варочнои панели могут быть видны сальные следы от клея , нанесенного на прокладки Перед началом эксплуатации изделия следует удалить следы клея при помощи специального неабразивного моющего средства . В первые часы работы вы можете почувство...
Page 79 - «demo»; DE
79 RS 5. Подтвердить настройки при помощи кнопки , или переключение происходит автоматически через 10 секунды . Обратный отсчет таймера начинается сразу же . По завершении заданного приготовления раздается звуковой сигнал ( в течение 1 минуты ), и варочная зона выключается . Повторите вышеописанную ...
Page 81 - Практические
81 RS Варочная зона FlexiZONE Варочная зона FlexiZONE позволяет регулировать тот же уровень мощности на двух конфорках , соединенных между собой . Она включается , если две конфорки находятся в состоянии OFF ( ВЫКЛ .), нажав кнопку ( ) FlexiZONE . Можно включить FlexiZONE на включенной варочной пане...
Page 82 - Предосторожности; Общие; Утилизация
82 RS Предосторожности и рекомендации ! Изделие спроектировано и изготовлено в соответствии с международными нормативами по безопасности . Необходимо внимательно прочитать настоящие предупреждения , составленные в целях вашеи безопасности . Данное оборудование отвечает требованиям нижеуказанных Дире...
Page 83 - Техническое; Структура
83 RS Техническое обслуживани и уход Отключение электропитания Перед началом какои - либо операции по обслуживанию или чистке отсоедините изделие от сети электропитания . Чистка изделия ! Не следует пользоваться абразивными или коррозивными чистящими средствами такими как спраи для чистки духовок и ...
Page 84 - Условные; XEROX FABRIANO
84 RS Техническое описание моделей Система индукционного нагревания является самой быстрой из существующих технологий нагрева . В отличие от традициональных конфорок нагрев производится не варочной зоной : нагревается непосредственно содержимое кастрюли , дно которой обязательно должно быть из ферро...


 Hotpoint-Ariston 641 PCN IX/HA RU
User Manual
Hotpoint-Ariston 641 PCN IX/HA RU
User Manual
 Hotpoint-Ariston 7H KRC 631 T
User Manual
Hotpoint-Ariston 7H KRC 631 T
User Manual
 Hotpoint-Ariston 7H KRO 642 TO X
User Manual
Hotpoint-Ariston 7H KRO 642 TO X
User Manual
 Hotpoint-Ariston 7HPC 640 N WH /HA
User Manual
Hotpoint-Ariston 7HPC 640 N WH /HA
User Manual
 Hotpoint-Ariston 7HTD 640 S MR X
User Manual
Hotpoint-Ariston 7HTD 640 S MR X
User Manual
 Hotpoint-Ariston 9YPS 645 (AN) GH R/HA
User Manual
Hotpoint-Ariston 9YPS 645 (AN) GH R/HA
User Manual
 Hotpoint-Ariston 9YPS 645 (OW) GH R/HA
User Manual
Hotpoint-Ariston 9YPS 645 (OW) GH R/HA
User Manual
 Hotpoint-Ariston GPL 64L CI
User Manual
Hotpoint-Ariston GPL 64L CI
User Manual
 Hotpoint-Ariston GPN 64 NCI RFH
User Manual
Hotpoint-Ariston GPN 64 NCI RFH
User Manual
 Hotpoint-Ariston HR 607 B
User Manual
Hotpoint-Ariston HR 607 B
User Manual
 Hotpoint-Ariston HR 607 IN
User Manual
Hotpoint-Ariston HR 607 IN
User Manual
 Hotpoint-Ariston IB 644 CRFH E
User Manual
Hotpoint-Ariston IB 644 CRFH E
User Manual
 Hotpoint-Ariston IO 632 CC RFH
User Manual
Hotpoint-Ariston IO 632 CC RFH
User Manual
 Hotpoint-Ariston KEM 645 D C(X)
User Manual
Hotpoint-Ariston KEM 645 D C(X)
User Manual
 Hotpoint-Ariston KIB 633 C E
User Manual
Hotpoint-Ariston KIB 633 C E
User Manual