Page 5 - ORIGINAL OPERATING INSTRUCTIONS; PD‐E laser range meter; It is essential that the operating instructions; General information
ORIGINAL OPERATING INSTRUCTIONS PD‑E laser range meter It is essential that the operating instructions are read before the tool is operated for the first time.Always keep these operating instructions to- gether with the tool.Ensure that the operating instructions are with the tool when it is given t...
Page 6 - Description
Location of identification data on the tool The type designation and serial number can be found on the type identification plate on the tool. Make a note of this data in your operating instructions and always refer to it when making an enquiry to your Hilti representative or service department. Type...
Page 7 - Accessories
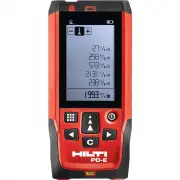
2.9 Control panel “Measure” button Quick start (when the tool is switched off, press the button briefly to switch it on). Begins distance measurement.Activates the laser beam.Activates continuous measuring mode (long press, approx. 2 sec.).Stops continuous measuring mode.Confirms the selected functi...
Page 8 - Technical data
4 Technical data Right of technical changes reserved. Power supply 2 x 1.5 V, type AAA batteries Battery condition check Battery condition indicator with 4 segments showing 100%, 75%, 50%, 25% charge. No segments shown = battery is completely discharged. Measuring range with target plate 0…200 m (0....
Page 9 - Safety instructions
5 Safety instructions In addition to the information relevant to safety given in each of the sections of these operating instructions, the following points must be strictly observed at all times. Keep all safety instructions and information for future reference. 5.1 Basic information concerning safe...
Page 10 - Before use
unintentionally for a brief moment. This eyelid closure reflex, however, may be negatively affected by medicines, alcohol or drugs. Nevertheless, as with the sun, one should not look directly into sources of bright light. Do not direct the laser beam toward persons. 5.7 Transport Always remove the b...
Page 13 - Operation
7 Operation 7.1 Distance measurement NOTE Generally speaking, the individual steps in all functions are always assisted by the graphic symbols displayed. NOTE If measuring errors occur during continuous measuring, and continuous measuring mode is canceled by pressing the “Measure” button again, the ...
Page 20 - Care and maintenance
The Offset function automatically adds or subtracts a predefined value to or from all measurements. This value can be entered manually or measured. 1. Select Offset from the group of special functions. 2. In order to enter the distance manually, use the left or right arrow buttons to select the keyb...
Page 21 - Troubleshooting
8.4.3 Hilti calibration service We recommend that the tool is checked by the Hilti calibration service at regular intervals in order to ver- ify its reliability in accordance with standards and legal requirements. Use can be made of the Hilti calibration service at any time, but checking at least on...
Page 22 - 1 Manufacturer’s warranty - tools
For EC countries onlyDo not dispose of electrical appliances together with household waste.In observance of the European Directive on waste electrical and electronic equipment and its implemen- tation in accordance with national law, electrical appliances and batteries that have reached the end of t...
Page 23 - Hilti Corporation; Printed in Germany © 2013
*2068470* 2068470 Hilti Corporation LI-9494 Schaan Tel.: +423 / 234 21 11 Fax: +423 / 234 29 65 www.hilti.com Hilti = registered trademark of Hilti Corp., Schaan W 4277 | 1013 | 00-Pos. 1 | 1 Printed in Germany © 2013 Right of technical and programme changes reserved S. E. & O. 2068470 / A3 Prin...