Page 2 - SAFETY DEFINITIONS; INSTALLER: LEAVE THIS MANUAL WITH THE OWNER OF THE APPLIANCE.
IF THE INFORMATION IN THIS MANUAL IS NOT FOLLOWED EXACTLY, A FIRE OR EXPLOSION MAY RESULT CAUSING PROPERTY DAMAGE, PERSONAL INJURY, OR DEATH. READ THESE INSTRUCTIONS CAREFULLY AND COMPLETELY BEFORE INSTALLING OR USING YOUR APPLIANCE TO REDUCE THE RISK OF FIRE, BURN HAZARD, OR OTHER INJURY. KEEP THIS...
Page 5 - SAFETY PRECAUTIONS - BEFORE YOU BEGIN; ELECTRICAL SHOCK HAZARD; TABLE OF CONTENTS
SAFETY PRECAUTIONS - BEFORE YOU BEGIN ELECTRICAL SHOCK HAZARD ELECTRICAL SHOCK HAZARD It is the responsibility of the user to have the appliance connected by a licensed electrician in accordance with all applicable codes and standards, including fire-related construction. See step 16 - “WIRING CONNE...
Page 6 - TO REDUCE THE RISK OF FIRE, ELECTRIC SHOCK, OR INJURY TO
GENERAL SAFETY PRECAUTIONS GENERAL SAFETY PRECAUTIONS When properly cared for, your new Hestan ventilation hood has been designed to be a safe, reliable ventilation system. Read all instructions carefully before using this ventilation system. When using kitchen appliances, basic safety precautions m...
Page 7 - BURN HAZARD; available and highly visible next to any cooking appliance.; SAFETY DURING CLEANING; cleaning instructions.
BURN HAZARD This ventilation system is intended for use with ranges or cooktops, which can get very hot during operation. Observe the warnings and cautions for the cooking appliance.This ventilation system should be serviced only by a Hestan authorized service technician. Contact the nearest authori...
Page 8 - DESCRIPTION; POWER AND FLOW RATINGS
(serial number) (model number) RATING LABEL The rating label contains important information about your Hestan appliance such as the model and serial number, electrical rating and the minimum installation clearances.The rating label is located on the blower housing.If service is necessary, contact He...
Page 9 - FEATURES OF THE VENTILATION SYSTEM; BLOWER CONTROL KNOB
REGULATORY / CODE REQUIREMENTS Installation of this ventilation system must be made in accordance with local codes. In the absence of local codes, this unit should be installed in accordance with the National Electrical Code and local codes. This appliance must be electrically grounded in accordance...
Page 10 - CLEANING AND MAINTENANCE; CLEANING THE VENTILATION SYSTEM; HOOD CANOPY; BLOWER SHIELD REMOVAL
CLEANING AND MAINTENANCE CLEANING THE VENTILATION SYSTEM CLEANING THE VENTILATION SYSTEM Cleaning requirements depend completely on usage and environment. The more high-heat and/or greasy cooking, the more often the hood and blower will need cleaning.The grease tray and blower aren’t visible from th...
Page 12 - BLOWER WHEEL REMOVAL
CLEANING AND MAINTENANCE (CONT.) BLOWER WHEEL REMOVAL BLOWER WHEEL REMOVAL For instances where the blower wheel must be removed, follow the instructions below. • Removing the blower wheel requires a 1/8” hex wrench. This may be obtained from your local hardware store or tool supply. The wheel is ret...
Page 13 - TROUBLESHOOTING; MOTOR REPLACEMENT; MOTOR IDENTIFICATION AND POSITIONING
TROUBLESHOOTING If the hood does not perform satisfactorily, check the following:• Do the blowers run?• Are the blower wheels installed on the correct motors? (black wheel on black motor, white wheel on white motor) • Are the motor and wheel assemblies installed in the correct locations?• Check the ...
Page 14 - DUCTING DO’S AND DON’TS; GENERAL REQUIREMENTS; BLOWER REQUIREMENTS; YES
©2020 Hestan Commercial Corporation 10 EN DUCTING DO’S AND DON’TS GENERAL REQUIREMENTS GENERAL REQUIREMENTS Observe local codes regarding special duct requirements and placement of duct work against combustibles.• Using recommended transitions (see VENT ACCESSORIES) will ensure proper efficiency.• U...
Page 15 - INSTALLATION; TO REDUCE THE RISK OF FIRE, USE ONLY METAL DUCTWORK.; INSTALLATION DETAILS; IF THE HOOD IS TO BE “BACK VENTED”, PROCEED DIRECTLY TO
INSTALLATION TO REDUCE THE RISK OF FIRE, ELECTRIC SHOCK, OR INJURY TO PERSONS, OBSERVE THE FOLLOWING: a) Installation work and electrical wiring must be done by qualified person(s) in accordance with all applicable codes and standards, including fire-rated construction. b) Sufficient air is needed f...
Page 16 - Optional AKVT6810 transition
TRANSITION HEIGHTS: TRANSITION HEIGHTS: Dual Blower (WM2L = 600 CFM): no transition - 8” round duct will connect directly to the blower outlets, 9” below top edge of the hood. Single and Dual Blower (WM1L + WM2L = 900 CFM): 6” round duct will connect directly to the single blower outlet, 8” round wi...
Page 17 - transition piece installed
4. Remove the hood from its packaging and place the back of the hood on the floor or countertop in front of the wall where it will hang. 5. With the hood on its back facing you, remove the shield(s) and blower housing(s) as follows: a) Remove the shipping tape that is securing the blower shield(s) i...
Page 19 - FOR BACK VENTING APPLICATIONS ONLY.
INSTALLATION (CONT.) b) Remove hood and drill 3/32” pilot holes at the center of marks in the wood strip to prevent splitting. 13. FOR BACK VENTING APPLICATIONS ONLY. IF YOU ARE NOT BACK VENTING, PROCEED DIRECTLY TO STEP 15. a) Place the appropriate elbow on the top of the hood. Elbow should be plac...
Page 20 - blower configuration:; Side View; Elbow and Transition Heights; Height when
BACK VENTING BACK VENTING When venting out through the wall, one or two elbow fittings are required, depending on the blower configuration: ELBOWS FOR 600 CFM ELBOWS FOR 600 CFM Hoods with 600 CFM blower systems require one 8” elbow. ELBOWS FOR 900 CFM ELBOWS FOR 900 CFM Units with 900 CFM blower sy...
Page 21 - VENT ACCESSORIES
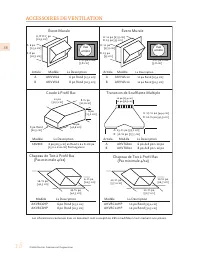
VENT ACCESSORIES ©2020 Hestan Commercial Corporation 17 EN THE INFORMATION IN THIS DOCUMENT IS SUBJECT TO CHANGE AT ANY TIME WITHOUT NOTICE. LOW PROFILE ROOF CAP (MINIMUM 4/12 PITCH) 6-½” 16-¾” 16-¾” MODEL DESCRIPTION AKVRC6HP 6” Round AKVRC8HP 8” Round LOW PROFILE ROOF CAP (MINIMUM 4/12 PITCH) 10-½...
Page 22 - DUCT COVERS; -TQ for Bora Bora – Turquoise
DUCT COVERS HESTAN MODEL # DESCRIPTION USE WITH HOOD MODEL KVDC1812 DUCT COVER, VENTILATION, 18W X 12H KVC30 KVDC1812-XX DUCT COVER, VENTILATION, 18W X 12H (COLOR) KVC30 KVDC2412 DUCT COVER, VENTILATION, 24W X 12H KVC36 KVDC2412-XX DUCT COVER, VENTILATION, 24W X 12H (COLOR) KVC36 KVDC3012 DUCT COVER...
Page 23 - SERVICE; Hestan Commercial Corporation; PARTS LIST; WHAT THIS LIMITED WARRANTY COVERS
SERVICE DATA RECORD SERVICE DATA RECORD The rating label contains the model number and serial number of the appliance. See page 4 for the location of the rating label. Now is a good time to write this information below in the space provided. Keep your invoice for warranty validation.Model Number ___...
Page 24 - LIMITED WARRANTY
Purchaser is responsible for making the Product reasonably accessible for service or for paying the cost to make the Product reasonably accessible for service. Service is to be provided during normal business hours of the authorized Hestan Commercial Service Provider. To the extent Purchaser request...
Page 25 - HCC SHALL NOT BE LIABLE FOR LOSS OF REVENUE OR PROFITS, FAILURE TO
LIMITED WARRANTY (CONT.) HCC SHALL NOT BE LIABLE FOR LOSS OF REVENUE OR PROFITS, FAILURE TO REALIZE SAVINGS OR OTHER BENEFITS, OR ANY OTHER SPECIAL, INCIDENTAL OR CONSEQUENTIAL DAMAGES CAUSED BY THE USE, MISUSE OR INABILITY TO USE THE PRODUCT, REGARDLESS OF THE LEGAL THEORY ON WHICH THE CLAIM IS BAS...
Page 26 - DÉFINITIONS DE SÉCURITÉ; PROPRIÉTAIRE: CONSERVEZ CE MANUEL POUR RÉFÉRENCE FUTURE.
DÉFINITIONS DE SÉCURITÉ CECI INDIQUE QUE L’INOBSERVATION DE CET AVERTISSEMENT PEUT ENTRAÎNER DES BLESSURES GRAVES VOIRE MORTELLES. LISEZ ATTENTIVEMENT ET COMPLÈTEMENT CES INSTRUCTIONS AVANT D’INSTALLER OU D’UTILISER VOTRE APPAREIL AFIN DE RÉDUIRE LES RISQUES D’INCENDIE, DE BRÛLURE OU D’AUTRES BLESSU...
Page 29 - PRÉCAUTIONS DE SÉCURITÉ - AVANT DE COMMENCER; RISQUE DE CHOC ÉLECTRIQUE; TABLES DES MATIERES
Lorsque votre système de ventilation Hestan est correctement entretenu, il assure un service sûr et fiable pendant de nombreuses années. Lors de l’utilisation de ce système de ventilation, les pratiques de sécurité de base doivent être suivies comme décrit dans les pages suivantes.IMPORTANT: Conserv...
Page 31 - RISQUE DE BRÛLURE; SÉCURITÉ PENDANT LE NETTOYAGE; CE MANUEL DOIT RESTER AVEC LA PROPRIÉTAIRE POUR RÉFÉRENCE FUTURE.
RISQUE DE BRÛLURE Ce système de ventilation est conçu pour être utilisé avec des cuisinières ou tables de cuisson, qui peuvent devenir très chauds pendant le fonctionnement. Respectez les avertissements et les mises en garde concernant l’appareil de cuisson.Ce système de ventilation doit être réparé...
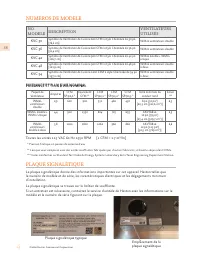
Page 32 - NUMÉROS DE MODÈLE; PUISSANCE ET FLUX D’AIR NOMINAL; Emplacement de la; PLAQUE SIGNALÉTIQUE; modèle et le numéro de série figurant sur la plaque.
FR ©2020 Hestan Commercial Corporation 4 NUMÉROS DE MODÈLE NO. MODÈLE DESCRIPTION VENTILATEURS UTILISÉS KVC 30 Système de Ventilation de Cuisine 600 CFM à style Cheminée de 30 po [76,2 cm] WM2L ventilateurs double KVC 36 Système de Ventilation de Cuisine 600 CFM à style Cheminée de 36 po [91,4 cm] W...
Page 33 - RESPECT DE LA RÉGLEMENTATION ET DES CODES EN VIGUEUR; CARACTÉRISTIQUES DU SYSTÈME DE VENTILATION; BOUTON DE COMMANDE DE VENTILATEUR
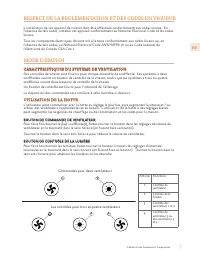
FR ©2020 Hestan Commercial Corporation 5 RESPECT DE LA RÉGLEMENTATION ET DES CODES EN VIGUEUR L’installation de cet appareil de cuisson doit être effectuée conformément aux codes locaux. En l’absence de tels codes, installer cet appareil conformément au National Electrical Code et les codes locaux.T...
Page 34 - NETTOYAGE DU SYSTÈME DE VENTILATION; NETTOYAGE ET ENTRETIEN
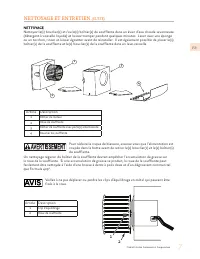
FR ©2020 Hestan Commercial Corporation 6 NETTOYAGE DU SYSTÈME DE VENTILATION NETTOYAGE DU SYSTÈME DE VENTILATION Les exigences de nettoyage dépendent entièrement de l’utilisation et de l’environnement. Plus la cuisson est chaude et / ou grasse, plus le hotte et le souffleur doivent être nettoyés.Le ...
Page 35 - NETTOYAGE
FR ©2020 Hestan Commercial Corporation 7 NETTOYAGE ET ENTRETIEN (SUITE) NETTOYAGE NETTOYAGE Nettoyez le(s) bouclier(s) et /ou le(s) boîtier(s) du soufflante dans un évier d’eau chaude savonneuse (détergent à vaisselle liquide) et laissez tremper pendant quelques minutes. Laver avec une éponge ou un ...
Page 36 - RETRAIT DE LA ROUE
FR ©2020 Hestan Commercial Corporation 8 RETRAIT DE LA ROUE RETRAIT DE LA ROUE Pour les cas où la roue de soufflante doit être retirée, suivez les instructions ci-dessous. • Le retrait de la roue de soufflante nécessite une clé hexagonale de 1/8 po. Ceci peut être obtenu auprès de votre quincailleri...
Page 37 - REMPLACEMENT DU MOTEUR; IDENTIFICATION ET POSITIONNEMENT DU MOTEUR; DÉPANNAGE
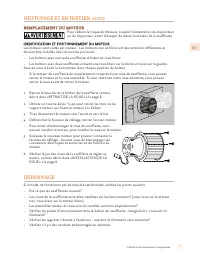
FR ©2020 Hestan Commercial Corporation 9 REMPLACEMENT DU MOTEUR REMPLACEMENT DU MOTEUR Pour réduire le risque de blessure, coupez l’alimentation du disjoncteur ou du disjoncteur avant d’essayer de retirer le moteur de la soufflante. IDENTIFICATION ET POSITIONNEMENT DU MOTEUR IDENTIFICATION ET POSITI...
Page 38 - EXIGENCES GÉNÉRALES; métallique; OUI; BONNE PRATIQUE DE CANALISATION
FR ©2020 Hestan Commercial Corporation 10 EXIGENCES GÉNÉRALES EXIGENCES GÉNÉRALES Respectez les codes locaux en ce qui concerne les exigences de conduits spéciaux et le placement du conduit contre les combustibles. • L’utilisation des transitions recommandées (voir ACCESSOIRES DE VENTILATION) garant...
Page 39 - POUR RÉDUIRE LES RISQUES D’INCENDIE, DE CHOC; DÉTAILS D’INSTALLATION; détails sur le placement de la sortie d’échappement.
FR ©2020 Hestan Commercial Corporation 11 POUR RÉDUIRE LES RISQUES D’INCENDIE, DE CHOC ÉLECTRIQUE OU DE BLESSURE, OBSERVEZ CE QUI SUIT: a) Les travaux d’installation et de câblage électrique doivent être effectués par des personnes qualifiées conformément à tous les codes et normes applicables, y co...
Page 40 - Assurez-vous qu’une fois la hotte installée, les orifices de
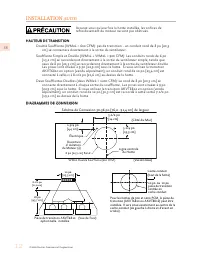
FR ©2020 Hestan Commercial Corporation 12 Assurez-vous qu’une fois la hotte installée, les orifices de refroidissement du moteur ne sont pas obstrués. HAUTEUR DE TRANSITION HAUTEUR DE TRANSITION Double Soufflante (WM2L = 600 CFM): pas de transition - un conduit rond de 8 po [20,3 cm] se connectera d...
Page 41 - devant le mur où il sera accroché.
FR ©2020 Hestan Commercial Corporation 13 4. Retirez le hotte de son emballage et placez l’arrière de la hotte sur le sol ou sur le comptoir devant le mur où il sera accroché. 5. Avec l’unité sur le dos face à vous, retirez le(s) boîtier(s) et le(s) bouclier(s) de la ventilateur comme suit: a) Retir...
Page 42 - Assurez-vous que le panneau d’alimentation / disjoncteur est hors
FR ©2020 Hestan Commercial Corporation 14 c) Fermez doucement le(s) porte(s) amortissante du côté supérieur de la hotte. d) Pour retirer le(s) boîtier(s) de la soufflante, déverrouillez les loquets de la valise (un de chaque côté du boîtier). e) Soutenez le boîtier et soulevez-le pour l’éloigner de ...
Page 43 - N’EST PAS ARRIÈRE, PASSEZ DIRECTEMENT À L’ÉTAPE 12.
FR ©2020 Hestan Commercial Corporation 15 b) Retirez la bande de fixation en bois de l’arrière de la hotte et placez le bord supérieur de la bande sur la ligne horizontale supérieure et horizontale du mur. c) En vous référant à la ligne centrale verticale de l’étape 10, placez la bande de montage su...
Page 44 - TRANSITION» à la page 12.
FR ©2020 Hestan Commercial Corporation 16 SI L’ÉVACUATION À L’ARRIÈRE, PASSEZ LES ÉTAPES 14 ET 15. PASSEZ DIRECTEMENT À L’ÉTAPE 16. 14. Ventilation NON-à l’arrière a) Insérez le fil électrique du panneau de service dans la pince de fil électrique sur chaque boîte de moteur. Serrez la serre-câble. b)...
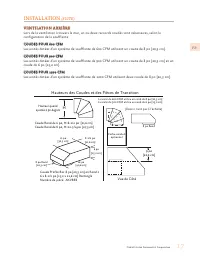
Page 45 - VENTILATION ARRIÈRE; configuration de la soufflante:; Hauteurs des Coudes et des Pièces de Transition; Vue de Côté
FR ©2020 Hestan Commercial Corporation 17 INSTALLATION (SUITE) VENTILATION ARRIÈRE VENTILATION ARRIÈRE Lors de la ventilation à travers le mur, un ou deux raccords coudés sont nécessaires, selon la configuration de la soufflante: COUDES POUR 600 CFM COUDES POUR 600 CFM Les unités dotées d’un système...
Page 46 - ACCESSOIRES DE VENTILATION
FR ©2020 Hestan Commercial Corporation 18 ACCESSOIRES DE VENTILATION Vue arrière Vue arrière A: 17-½ po [44,4 cm] B: 16-½ po [41,9 cm] A: 23-¼ po [59,1 cm] B: 30-½ po [77,5 cm] 10 po [25,4 cm] 12 po [30,5 cm] 10-½ po [26,7 cm] 22-½ po [57,2 cm] 20-¾ po [52,7 cm] 6-½ po [16,5 cm] 16-¾ po [42,5 cm] 16...
Page 48 - numéros de modèle et de série à portée de la main.; LISTE DES PIÈCES; ENREGISTREMENT DE DONNÉES DE SERVICE; ÉLÉMENTS COUVERTS PAR LA PRÉSENTE GARANTIE LIMITÉE
FR ©2020 Hestan Commercial Corporation 20 SERVICE Toutes les réparations dans le cadre ou en dehors de la garantie doivent être effectuées par du personnel d’entretien qualifié. Pour localiser un réparateur agréé dans la région, s’adresser au concessionnaire Hestan, au représentant local ou à l’usin...
Page 49 - MARCHE À SUIVRE POUR UNE RÉPARATION AU TITRE DE LA GARANTIE; GARANTIE LIMITÉE
FR ©2020 Hestan Commercial Corporation 21 MARCHE À SUIVRE POUR UNE RÉPARATION AU TITRE DE LA GARANTIE En cas de défaillance du Produit pendant la Période de garantie limitée pour des raisons couvertes par la présente Garantie limitée, l’Acheteur doit contacter immédiatement le revendeur auquel il a ...
Page 50 - LIMITATION DE RESPONSABILITÉ :
FR ©2020 Hestan Commercial Corporation 22 LIMITATION DE RESPONSABILITÉ : LIMITATION DE RESPONSABILITÉ : La présente Garantie limitée constitue l’accord définitif, intégral et exclusif entre HCC et l’Acheteur eu égard au Produit. IL N’EXISTE AUCUNE GARANTIE EXPRESSE AUTRE QUE CELLES ÉNUMÉRÉES ET DÉCR...
Page 52 - RETAIN THIS MANUAL FOR FUTURE REFERENCE
Hestan Commercial Corporation 3375 E. La Palma Ave. Anaheim, CA 92806 (888) 905-7463 ©2020 Hestan Commercial Corporation P/N 022656 REV C RETAIN THIS MANUAL FOR FUTURE REFERENCE CONSERVEZ CE MANUEL POUR UNE RÉFÉRENCE FUTURE