Page 2 - TABLE OF CONTENTS
2 08 TURN UP THE HEAT WITH DUAL COOKING ZONES TABLE OF CONTENTS 04 MEET THE ELITE 1-BURNER 2-ZONE OUTDOOR GRIDDLE 06 FEATURES OF YOUR ELITE 1B
Page 4 - MEET THE
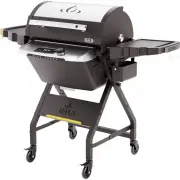
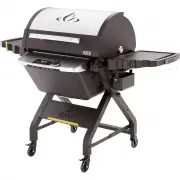
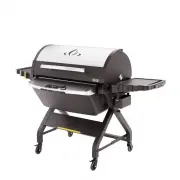
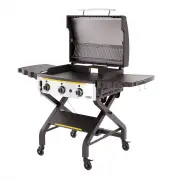
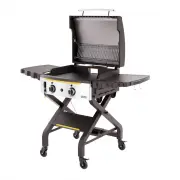
4 MEET THE Taking your outdoor cooking skills above and beyond never felt so simple. With the Elite 1B, enjoy true wall to wall cooking with the industry’s first and only dual zone, single burner outdoor griddle. Propane fueled and with features like a unique wind proof design, rear grease disposal ...
Page 6 - FEATURES OF YOUR
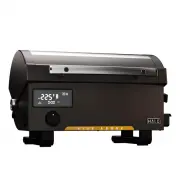
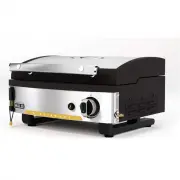
6 N o mo re c o l d zo nes ! Innovative burner design for cooking and keeping foods warm. Control 2 zones with 1 burner. WALL TO WALL COOKING SURFACE S e a so n t he E li t e 1 B's 2 7 3 i n 2 t o t a l c o o ki n g s u r fa c e wi t h i n 3 0 m i n u t es . At t a c h t he ha nd l es t o e a s i ly...
Page 8 - WITH DUAL COOKING ZONES
Page 9 - experience —
9 99 The Elite 1B Outdoor Griddle has two zones within one burner, designed to give you the benefit of precise control over your cooking surface. Independently operate each zone and control cooking temperatures for an elevated, wall to wall cooking experience — no more cold zones! ZONE 2
Page 10 - O W N E R S M A N U A L
10 S C A N F O R Product Registration Online Owner’s Guide Assembly Videos 10 O W N E R S M A N U A L M O D E L N O : H Z - 1 0 0 7 - A N A
Page 11 - IMPORTANT SAFETY INFORMATION
11 IMPORTANT SAFETY INFORMATION If you smell gas:• Shut off gas to the appliance. • Extinguish any open flame. • Open lid. • If odor continues, keep away from the appliance and immediately call your fire department. Failure to follow the Dangers, Warnings and Cautions contained in this Owner’s Manua...
Page 13 - STORING YOUR GRIDDLE; CLEANING AND BURNER ASSEMBLY; WHAT YOU SHOULD KNOW ABOUT
13 CSA - ENGLISH • Stainless Steel Cleaning Tips: Step 1: Dip a soft cloth in warm water mixed with a mild dish detergent. Wipe the surface, rinse the cloth and wipe again, then dry with a towel to prevent water spots. Step 2: If you still see fingerprints, spray a glass cleaner onto a soft cloth ...
Page 14 - HOW TO CHECK IF MEAT IS DONE ON; PRODUCT RECORD
14 CSA - ENGLISH • Use a meat thermometer to ensure food has reached a safe internal temperature. • Whole poultry should reach 165° F/ 73.8 °C for dark meat, 160°F/ 71°C for white meat. • Hamburgers made of any ground meat or poultry should reach 160°F/71°C and be brown in the middle with no pink ju...
Page 15 - CONNECTING; WARNING; CONNECTING 1 LB. DISPOSABLE CYLINDER
15 CONNECTING 1 LB. CYLINDER WARNING For your safety, when not in use remove the cylinder and the regulator. Cap the cylinder, the insert fitting and the quick disconnect. 1. Make sure the control knob is in OFF position. 2. Remove plastic cap from top of propane cylinder. Save cap for storage. Scre...
Page 17 - ADDED FEATURE; CONNECTING HOSE + ADJUSTABLE
17 CONNECTING 20 LBS. TANK ADDED FEATURE Your appliance is equipped with an adjustable low-pressure regulator. The normal operating pressure is 11" water column and the lower operating pressure available is 8.5" water column. When operating your appliance under normal circumstances you will ...
Page 18 - LEAK TEST PROCEDURE; HOW TO SET REGULATOR SETTING
18 1. Attach hose assembly to cylinder.2. Slowly open cylinder valve.3. Perform leak check on regulator to Flat Top Griddle, hose to regulator and hose to cylinder connections with soapy water. Bubbles indicate a leak. Check that the connection is not cross threaded and that it is tight. 4. Perform ...
Page 20 - LIGHTING THE PIZZA OVEN; LIGHTING
20 LIGHTING THE PIZZA OVEN 1. Open lid during lighting.2. Push and turn any control knob to . Press electronic igniter and hold for 3-5 seconds then turn to . 3. If ignition does not occur in 5 seconds, turn the burner control off, wait 5 minutes, and repeat the lighting procedure. LIGHTING INSTRUCT...
Page 21 - MATCH LIGHTING INSTRUCTIONS; IGNITION-ELECTRODE GAP
21 MATCH LIGHTING INSTRUCTIONS 1. Open Lid2. Make sure the control knob is in the OFF position (Push control knob down and turn clockwise to make sure that it is in the OFF position.) 3. Light burner with match lighting stick or with an 11” long match, then place the match on top of the burner. 4. P...
Page 22 - FOLDING THE GREASE CUP HANDLE; POSITIONING THE GREASE CUP
22 GREASE CUP POSITION Make sure the lip of grease cup is positioned under the griddle drip ledge when installing the grease cup to avoid grease leakage. Check the grease cup often and clean out after each use. 1. Pull-out spring-loaded knurl knob.2. Rotate the handle back to empty the grease. FOLDI...
Page 23 - INITIAL GRIDDLE SEASONING
23 SEASONING YOUR GRIDDLE The simple idea behind your initial seasoning is to coat the griddle with oil and heat the oil above its smoke point to polymerize the oil and create a bond with the griddle top. You will end up with a dark coating surface that is easy to clean. 1. Apply small amount of oil...
Page 24 - CARING FOR YOUR ELITE 1B; CLEAN AND MAINTAIN YOUR GRIDDLE; USING CARE; UNIQUE FEATURE
CARING FOR YOUR ELITE 1B CLEAN AND MAINTAIN YOUR GRIDDLE To clean the griddle after each use, scrape gently with a metal spatula or scraper and wipe down the griddle surface with a cloth or paper towel. For tough food residue, pour water onto the hot griddle surface and let it boil the residue off. ...
Page 25 - BURNER WILL NOT LIGHT USE THE ELECTRONIC IGNITION; TROUBLESHOOTING; BURNER WILL NOT LIGHT WITH A MATCH
25 ■ Faulty regulator ■ Obstructions in burner Venturis ■ Obstructions in gas orifice or gas hose ■ Electrode is damaged/faulty igniter ■ Empty LP Cylinder 25 P O S S I B L E C A U S E : S O L U T I O N : BURNER WILL NOT LIGHT USE THE ELECTRONIC IGNITION TROUBLESHOOTING BURNER WILL NOT LIGHT WITH A ...
Page 26 - ELITE 1B PARTS LIST
26 ELITE 1B PARTS LIST 1 2 3 29 4.1 4 5 6 7 8 9 10 11 12 13 14 15 16 17 18 19 20 21 22 23 24 25 26 27 28 30
Page 30 - ITEMS MANUFACTURER WILL NOT PAY FOR; Disclaimer of Implied Warranties and Limitation of Remedies
30 FIVE (5) YEAR LIMITED WARRANTY ITEMS MANUFACTURER WILL NOT PAY FOR 1. Shipping cost, standard or expedited, for warranty and replacement parts.2. Service calls to your home.3. Repairs when your product is used for other than normal, single-family household or residential use. 4. Damage, failures,...
Page 31 - CUSTOMER SERVICE
31 THIS LIMITED WARRANTY IS THE SOLE EXPRESS WARRANTY GIVEN BY THE MANUFACTURER. NO PRODUCT PERFORMANCE SPECIFICATION OR DESCRIPTION WHEREVER APPEARING IS WARRANTED BY MANUFACTURER EXCEPT TO THE EXTENT SET FORTH IN THIS LIMITED WARRANTY. ANY IMPLIED WARRANTY PROTECTION ARISING UNDER THE LAWS OF ANY ...
Page 32 - STAY CONNECTED WITH US!; SCAN TO REGISTER
32 © 2021 Halo Products Group LLC Halo and the Halo flame are registered trademarks of Halo Products Group LLC www.halo-pg.com Halo Products Group LLC 850 West Park Rd Elizabethtown KY 42701 Toll free: 1-833-572-1688 STAY CONNECTED WITH US! H A LO P r o d u c t s G r o u p H a l o P r o d u c t s G ...