Page 2 - TABLE OF CONTENTS
2 08 TURN UP THE HEAT WITH 6 COOKING ZONES TABLE OF CONTENTS 04 MEET THE ELITE3B OUTDOOR GRIDDLE 06 FEATURES OF YOUR ELITE3B 10 OWNER'S MANUAL 18 LIGHTING INSTRUCTIONS 24 CARING FOR YOUR ELITE3B 14 PRODUCT RECORD 11 CSA - ENGLISH 15 CONNECTING 20 LBS. TANK GREASE CUP + LEVELING 20 TROUBLESHOOTING 29...
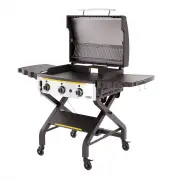
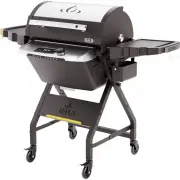
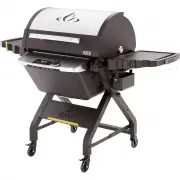
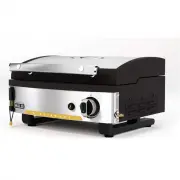
Page 4 - MEET THE; Elite3B; , enjoy true wall to wall cooking with the industry’s first; Elite; outdoor cooking experience, we’ve
4 MEET THE Taking your outdoor cooking skills above and beyond never felt so simple. With the Elite3B , enjoy true wall to wall cooking with the industry’s first 6 zone 3 burner outdoor griddle. Simplify your cooking experience with a unique wind proof design, rear grease management and utensil clea...
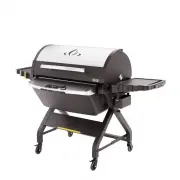
Page 6 - WALL TO WALL COOKING SURFACE; SEASON YOUR GRIDDLE IN UNDER 30 MINUTES; FEATURES OF YOUR; QUICK WARM UP TIME
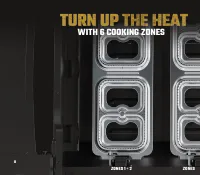
6 Get the most use out of your entire cooking surface with custom zones! Control 6 zones with 3 control knobs. WALL TO WALL COOKING SURFACE Season the Elite3B's 564 in 2 total cooking surface within 18-20 minutes. SEASON YOUR GRIDDLE IN UNDER 30 MINUTES 6 ZONE BURNER SYSTEM FEATURES OF YOUR WIND-PRO...
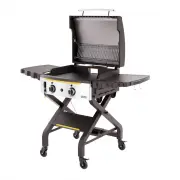
Page 8 - WITH 6 COOKING ZONES
8 88 ZONES 1 + 2 8 ZONES 3 + 4 WITH 6 COOKING ZONES
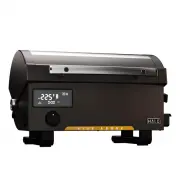
Page 10 - O W N E R ' S M A N U A L; This instruction manual; WARNING; WARNING; WARNING
10 S C A N F O R Product Registration Online Owner’s Guide Assembly Videos 10 O W N E R ' S M A N U A L M O D E L N O : H Z - 1 0 0 2 - X N A This instruction manual contains important information necessary for the proper assembly and safe use of the appliance. WARNING Do not try to light this appli...
Page 11 - IMPORTANT SAFETY INFORMATION; Extinguish any open flame.; If a fire should occur, keep; DANGER
11 IMPORTANT SAFETY INFORMATION If you smell gas: • Shut off gas to the appliance. • Extinguish any open flame. • Open lid. • If odor continues, keep away from the appliance and immediately call your fire department. Failure to follow the Dangers, Warnings and Cautions contained in this Owner’s Manu...
Page 13 - WHAT YOU SHOULD KNOW ABOUT; HOW TO CHECK IF MEAT IS DONE ON
13 CSA - ENGLISH • Stainless Steel Cleaning Tips: Step 1: Dip a soft cloth in warm water mixed with a mild dish detergent. Wipe the surface, rinse the cloth and wipe again, then dry with a towel to prevent water spots. Step 2: If you still see fingerprints, spray a glass cleaner onto a soft cloth ...
Page 14 - PRODUCT RECORD; IMPORTANT; Fill out the product information record below, or to
14 PRODUCT RECORD IMPORTANT : Fill out the product information record below, or to register your product, visit our website at www.halo-pg.com. Model Number:Serial Number:Purchase Date: NOTICE: Model Number and Serial Number located on the back of front panel.
Page 15 - CONNECTING; CONNECTING HOSE + ADJUSTABLE REGULATOR
15 CONNECTING 20 LBS. TANK 1. Place LP tank on tank support bracket and secure with tank retention wire or level, and stable surface. 2. Make sure the burner valve is on OFF position. 3. LP tank should be in the OFF position. If not, turn the wheel clockwise until it stops. 4. Remove the protective ...
Page 16 - ADDED FEATURE; HOW TO SET REGULATOR SETTING
16 Regulator attached 11" Water Column 8.5" Water Column 11" Water Column 8.5" Water Column ADDED FEATURE Your griddle is equipped with an adjustable low-pressure regulator. The normal operating pressure is 11" water column and the lower operating pressure available is 9.5" w...
Page 17 - LEAK TEST PROCEDURE
17 1. Attach hose assembly to the cylinder. 2. Slowly open the cylinder valve. 3. Perform a leak check on regulator to griddle hose to regulator and hose to cylinder connections with soapy water. Bubbles indicate a leak. Check that the connection is not cross threaded and that it is tight. 4. Perfor...
Page 18 - LIGHTING THE GRIDDLE; LIGHTING; SYMBOLS
18 Lighting instructions located here Burner Viewing Ports 1. Open lid during lighting.2. Push and turn control knob to . Press the electronic igniter and hold for 3-5 seconds then turn to light front section of burner. LIGHTING THE GRIDDLE LIGHTING INSTRUCTIONS NOTE: To confirm the burner is lit, l...
Page 19 - MATCH LIGHTING INSTRUCTIONS; IGNITION-ELECTRODE GAP
19 MATCH LIGHTING INSTRUCTIONS 1. Open lid.2. Make sure the control knob is in the OFF position (Push control knob down and turn clockwise to make sure that it is in the OFF position.) 3. Light burner with match lighting stick or with an 11” long match, then place the match on top of the burner. 4. ...
Page 20 - FOLDING THE GREASE CUP HANDLE; POSITIONING THE GREASE CUP
20 GREASE CUP + LEVELING To avoid grease leakage, position the lip of the grease cup under the griddle drip ledge when installing the grease cup. Check the grease cup often and clean it out after each use. 1. Pull-out spring-loaded knurl knob. 2. Rotate the handle back to empty the grease. FOLDING T...
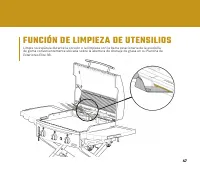
Page 21 - UTENSIL CLEAN-OFF FEATURE
21 UTENSIL CLEAN-OFF FEATURE Clean your spatula during cooking or clean-up with the stationary squeegee bar conveniently located above the grease drain opening on your Elite 3B Outdoor Griddle.
Page 22 - LEVELING FEATURE
22 LEVELING FEATURE We made leveling your cooking surface easier. Use the provided leveler (located on the left front of the griddle) and M12 caster wrench when adjusting the griddle feet (casters) before cooking. Turn clockwise to reduce the height Turn counterclockwise to increase the height NOTE:...
Page 23 - INITIAL GRIDDLE SEASONING; WHAT A WELL-SEASONED GRIDDLE SHOULD LOOK LIKE; CAUTION
23 SEASONING YOUR GRIDDLE The simple idea behind an initial seasoning is to coat the griddle with oil and then heat the oil above its smoke point to polymerize the oil and create a bond with the griddle top. You will end up with a dark coated surface that is easy to clean. 1. Preheat the griddle for...
Page 24 - CARING FOR YOUR ELITE3B; STORAGE; FIRST TIME CLEANING; THIS IS THE ONLY TIME YOU SHOULD USE SOAP ON THE; CLEAN
24 CARING FOR YOUR ELITE3B USE + CARE ■ Regularly clean your HALO Elite3B Outdoor Griddle between uses and especially after extended periods of storage. ■ Make sure the HALO Elite3B Outdoor Griddle and its components are adequately cooled before cleaning your griddle. ■ Never handle hot parts with u...
Page 25 - Turn gas OFF at the control knobs and at LP
25 HOW TO CLEAN THE BURNERS Turn gas OFF at the control knobs and at LP cylinder (not pictured). Remove the swing-away warming rack and griddle plate. Carefully detach and remove the burner. 1 2
Page 27 - HOW TO; Remove Hose and Regulator
27 CONVERTING YOUR GRIDDLE HOW TO CONVERT YOUR GRIDDLE FROM PORTABLE TO TABLETOP 1 Remove Hose and Regulator assembly from the cylinder. 2 Loosen all 4 x 1/4"-20 x 15mm Knobs w/ Threaded Shaft from sides and back of unit.
Page 29 - BURNER WILL NOT LIGHT USING ELECTRONIC IGNITION; TROUBLESHOOTING; BURNER WILL NOT LIGHT WITH A MATCH
29 ■ Faulty regulator ■ Obstructions in burner venturis ■ Obstructions in gas orifice or gas hose ■ Electrode is damaged/faulty igniter ■ Empty LP cylinder 29 P O S S I B L E C A U S E : S O L U T I O N : BURNER WILL NOT LIGHT USING ELECTRONIC IGNITION TROUBLESHOOTING BURNER WILL NOT LIGHT WITH A MA...
Page 30 - ELITE3B PARTS LIST
Page 34 - ITEMS MANUFACTURER WILL NOT PAY FOR; Disclaimer of Implied Warranties and Limitation of Remedies
34 FIVE (5) YEAR LIMITED WARRANTY ITEMS MANUFACTURER WILL NOT PAY FOR 1. Shipping cost, standard or expedited, for warranty and replacement parts.2. Service calls to your home.3. Repairs when your product is used for other than normal, single-family household or residential use.4. Damage, failures, ...
Page 35 - Halo Products Group LLC 850 West Park Rd Elizabethtown KY, 42701; CONSUMER SERVICE
35 THIS LIMITED WARRANTY IS THE SOLE EXPRESS WARRANTY GIVEN BY THE MANUFACTURER. NO PRODUCT PERFORMANCE SPECIFICATION OR DESCRIPTION WHEREVER APPEARING IS WARRANTED BY MANUFACTURER EXCEPT TO THE EXTENT SET FORTH IN THIS LIMITED WARRANTY. ANY IMPLIED WARRANTY PROTECTION ARISING UNDER THE LAWS OF ANY ...
Page 36 - M A N U A L D E L U S U A R I O; Este manual de; ADVERTENCIA; E S C A N E A R P A R A
36 36 M A N U A L D E L U S U A R I O M O D E L O N O : H Z - 1 0 0 2 - X N A Este manual de instrucciones contiene información importante necesaria para el montaje correcto y el uso seguro del aparato. ADVERTENCIA No intente encender este aparato sin leer la sección de Instrucciones de Encendido de...
Page 37 - INFORMACIÓN IMPORTANTE DE SEGURIDAD; PELIGRO; lejos de cualquier superficie
37 INFORMACIÓN IMPORTANTE DE SEGURIDAD Si huele a gas: • Cierre el gas del aparato. • Apague cualquier llama abierta. • Abra la tapa. • Si el olor continúa, aléjese del aparato y llame inmediatamente a los bomberos. El incumplimiento de los Peligros, Advertencias y Precauciones contenidas en este Ma...
Page 39 - LO QUE DEBE SABER SOBRE LA; CÓMO COMPROBAR SI LA CARNE
39 CSA - ESPAÑOL grasa o la grasa horneada pueden requerir el uso de una esponja de limpieza de plástico no abrasiva. No aplique un limpiador de hornos corrosivo a las superficies pintadas. • Consejos para la Limpieza del Acero Inoxidable: Paso 1: Sumerja un paño suave en agua tibia mezclada con un ...
Page 40 - REGISTRO DE PRODUCTOS; Llenar la información de registro del producto a
40 REGISTRO DE PRODUCTOS Número de Modelo:Número de Serie:Fecha de Compra: AVISO: El Número de modelo y el Número de Serie se encuentran en la parte posterior del panel frontal. IMPORTANTE: Llenar la información de registro del producto a continuación, o para registrar su producto, visite nuestra pá...
Page 41 - CONECTAR; CONECTAR MANGUERA + REGULADOR AJUSTABLE
41 CONECTAR TANQUE DE 20 LBS. 1. Coloque el tanque LP en el soporte del tanque y asegúrelo con el cable de retención del tanque o el nivel, y una superficie estable. 2. Asegúrese de que la válvula del quemador está en posición OFF. 3. El tanque LP debe estar en la posición OFF. Si no es así, gire en...
Page 42 - CARACTERÍSTICA AÑADIDA; CÓMO AJUSTAR EL REGULADOR
42 Regulator attached 11" Water Column 8.5" Water Column 11" Water Column 8.5" Water Column CARACTERÍSTICA AÑADIDA Su plancha está equipada con un regulador ajustable de baja presión. La presión de funcionamiento normal es de 11" de columna de agua y la presión de funcionamiento ...
Page 43 - PROCEDIMIENTO DE PRUEBA DE FUGAS
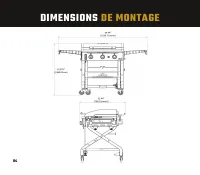
43 Table Height 30” (76.2cm) Hose Length 23.35”(59.31cm) 1. Coloque el conjunto de mangueras en el cilindro. 2. Abra lentamente la válvula del cilindro. 3. Realice una verificación de fugas en las conexiones del regulador a la manguera de la plancha al regulador y de la manguera a las conexiones del...
Page 44 - ENCENDER LA PLANCHA; INSTRUCCIONES; SÍMBOLOS
44 FRONT ZONE DUAL ZONES Lighting instructions located here Burner Viewing Ports 1. Abra la tapa durante el encendido.2. Empuje y gire el mando de control a . Presione el encendedor electrónico y manténgalo presionado durante 3-5 segundos y luego gire para encender la sección frontal del quemador. E...
Page 45 - INSTRUCCIONES DE ENCENDIDO DE FÓSFOROS; DISTANCIA ENTRE EL
45 3/16”-1/4”(4.76-6.35mm) Match Lighting Opening Match Lighting Stick INSTRUCCIONES DE ENCENDIDO DE FÓSFOROS 1. Abra la tapa.2. Asegúrese de que el mando de control está en la posición OFF (Empuje el mando de control hacia abajo y gire en el sentido de las agujas del reloj para asegurarse de que es...
Page 46 - PLEGANDO EL ASA DEL DEPÓSITO DE GRASA; COLOCACIÓN DEL DEPÓSITO DE GRASA
46 DEPÓSITO DE GRASA + NIVELACIÓN Para evitar fugas de grasa, coloque el labio del depósito de grasa debajo del borde de goteo de la plancha al instalar el depósito de grasa. Compruebe el depósito de grasa con frecuencia y límpielo después de cada uso. 1. Perilla de resorte extraíble. 2. Gire la man...
Page 47 - FUNCIÓN DE LIMPIEZA DE UTENSILIOS
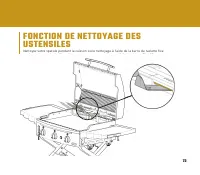
47 FUNCIÓN DE LIMPIEZA DE UTENSILIOS Limpie su espátula durante la cocción o la limpieza con la barra estacionaria de la escobilla de goma convenientemente ubicada sobre la abertura de drenaje de grasa en su Plancha de Exteriores Elite 3B.
Page 48 - FUNCIÓN DE NIVELACIÓN
48 FUNCIÓN DE NIVELACIÓN Hemos facilitado la nivelación de la superficie de cocción. Utilice el nivelador suministrado (situado en la parte frontal izquierda de la plancha) y la llave de ruedas M12 cuando ajuste las patas (ruedas) de la plancha antes de cocinar. Gire en el sentido de las agujas del ...
Page 49 - TRATAMIENTO INICIAL DE LA PLANCHA; CÓMO DEBE SER UNA PLANCHA BIEN TRATADA; PRECAUCIÓN
49 TRATAMIENTO DE SU PLANCHA TRATAMIENTO INICIAL DE LA PLANCHA Su plancha bien tratada debe ser de color negro brillante y tener una superficie de cocción antiadherente natural. Cuanto más cocine y trate su plancha, más oscura, resistente a pegarse y brillante se volverá. CÓMO DEBE SER UNA PLANCHA B...
Page 50 - CUIDANDO TU ELITE3B; ALMACENAMIENTO; PRIMERA VEZ QUE SE LIMPIA; ESTE ES EL ÚNICO MOMENTO EN EL QUE DEBE; LIMPIEZA Y MANTENIMIENTO DE; PASO 1; PASO 4
50 CUIDANDO TU ELITE3B USO + CUIDADO ■ Limpie regularmente su Plancha de Exteriores HALO Elite3B entre cada uso y especialmente después de largos períodos de almacenamiento. ■ Asegúrese de que la Plancha de Exteriores HALO Elite3B y sus componentes se han enfriado adecuadamente antes de limpiarla. ■...
Page 51 - Apague el gas en las perillas de control
51 CÓMO LIMPIAR LOS QUEMADORES Apague el gas en las perillas de control y en el cilindro LP (no se muestra). Retire la rejilla de calentamiento abatible y la placa de la plancha. Separe y retire con cuidado el quemador. 1 2
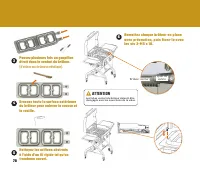
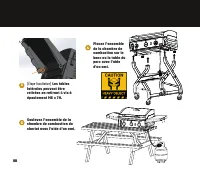
Page 53 - CÓMO CONVERTIR; Retire el conjunto de
53 CONVERTIR SU PLANCHA CÓMO CONVERTIR SU PLANCHA DE COCINA DE PORTÁTIL A DE MESÓN 1 Retire el conjunto de Manguera y Regulador del cilindro. 2 Afloje las cuatro perillas de 1/4"-20 x 15 mm con eje roscado.
Page 55 - EL QUEMADOR NO SE ENCIENDE CON EL ENCENDIDO ELECTRÓNICO; SOLUCIÓN DE PROBLEMAS; EL QUEMADOR NO SE ENCIENDE CON UN FÓSFORO
55 ■ Regulador defectuoso ■ Obstrucciones en los venturis del quemador ■ Obstrucciones en la boquilla de gas o en la manguera de gas ■ El electrodo está dañado/encendedor defectuoso ■ Cilindro de LP vacío 55 C A U S A P O S I B L E : S O L U C I Ó N : EL QUEMADOR NO SE ENCIENDE CON EL ENCENDIDO ELEC...
Page 56 - LISTA DE PIEZAS ELITE3B
Page 60 - ARTÍCULOS QUE EL FABRICANTE NO PAGARÁ; Renuncia a las Garantías Implícitas y Limitación de los Recursos
60 GARANTÍA LIMITADA DE CINCO (5) AÑOS ARTÍCULOS QUE EL FABRICANTE NO PAGARÁ 1. Gastos de envío, estándar o expedito, para la garantía y las piezas de recambio. 2. Llamadas de servicio a domicilio. 3. Reparaciones cuando su producto se utiliza para un uso distinto al normal, doméstico o residencial....
Page 61 - S E R V I C I O A L C O N S U M I D O R
61 ESTA GARANTÍA LIMITADA ES LA ÚNICA GARANTÍA EXPRESA OFRECIDA POR EL FABRICANTE. NINGUNA ESPECIFICACIÓN O DESCRIPCIÓN DEL RENDIMIENTO DEL PRODUCTO, DONDEQUIERA QUE APAREZCA, ESTÁ GARANTIZADA POR EL FABRICANTE, EXCEPTO EN LA MEDIDA ESTABLECIDA EN ESTA GARANTÍA LIMITADA. CUALQUIER PROTECCIÓN DE GARA...
Page 62 - R E C H E R C H E; M A N U E L D U P R O P R I É T A I R E; Ce manuel d'instructions; AVERTISSEMENT
62 R E C H E R C H E Enregistrement du produit Guide du propriétaire en ligne Vidéos d'assemblage 62 M A N U E L D U P R O P R I É T A I R E M O D È L E N ° : H Z - 1 0 0 2 - X N A Ce manuel d'instructions contient des informations importantes nécessaires au montage correct et à l'utilisation sûre d...
Page 63 - D'INFORMATIONS IMPORTANTES EN MATIÈRE DE SÉCURITÉ; Éteignez toute flamme nue.
63 D'INFORMATIONS IMPORTANTES EN MATIÈRE DE SÉCURITÉ Si vous sentez une odeur de gaz : • Fermez le gaz de l'appareil. • Éteignez toute flamme nue. • Ouvrez le couvercle. • Si l'odeur persiste, éloignez-vous de l'appareil et appelez immédiatement les pompiers. Le non-respect des Dangers, des Avertiss...
Page 65 - COMMENT VÉRIFIER SI LA VIANDE
65 CSA - FRANCAIS graphiques. Les dépôts de graisse ou la graisse cuite peuvent nécessiter l'utilisation d'un tampon de nettoyage en plastique non abrasif. N'appliquez pas de nettoyant pour four corrosif sur les surfaces peintes. • Conseils de nettoyage pour l'acier inoxydable : Étape 1: Trempez un ...
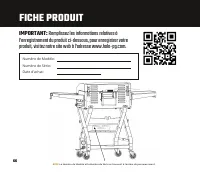
Page 66 - FICHE PRODUIT; Remplissez les informations relatives à
66 FICHE PRODUIT Numéro de Modèle:Numéro de Série:Date d'achat: AVIS: Le Numéro de Modèle et leNuméro de Série se trouvent à l'arrière du panneau avant. IMPORTANT: Remplissez les informations relatives à l'enregistrement du produit ci-dessous, pour enregistrer votre produit, visitez notre site web à...
Page 67 - CONNEXION; TUYAU DE RACCORDEMENT + RÉGULATEUR RÉGLABLE
67 CONNEXION 20 LBS. RÉSERVOIR 1. Placez la bouteille de gaz liquéfié sur le support du réservoir et fixez-le à l'aide d'un câble de maintien du réservoir ou d'une surface plane et stable. 2. Assurez-vous que la vanne du brûleur est sur la position OFF. 3. La bouteille de GPL doit être en position O...
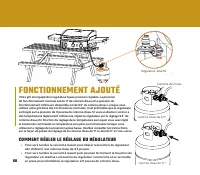
Page 68 - FONCTIONNEMENT AJOUTÉ; COMMENT RÉGLER LE RÉGLAGE DU RÉGULATEUR
68 Regulator attached 11" Water Column 8.5" Water Column 11" Water Column 8.5" Water Column FONCTIONNEMENT AJOUTÉ Votre gril est équipé d'un régulateur basse pression réglable. La pression de fonctionnement normale est de 11" de colonne d'eau et la pression de fonctionnement infé...
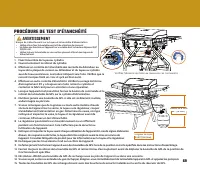
Page 69 - PROCÉDURE DE TEST D'ÉTANCHÉITÉ
69 Table Height 30” (76.2cm) Hose Length 23.35”(59.31cm) 1. Fixez l'ensemble du tuyau au cylindre. 2. Ouvrez lentement le robinet du cylindre. 3. Effectuez un contrôle de l'étanchéité des raccords du détendeur au tuyau de la plaque de cuisson au détendeur et du tuyau au cylindre avec de l'eau savonn...
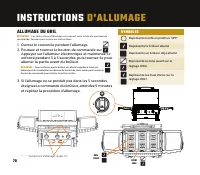
Page 70 - ALLUMAGE DU GRIL; INSTRUCTIONS; SYMBOLES
70 Lighting instructions located here Burner Viewing Ports FRONT ZONE DUAL ZONES Orifices de visualisation du brûleur Instructions d'éclairage situées ici 1. Ouvrez le couvercle pendant l'allumage. 2. Poussez et tournez le bouton de commande sur . Appuyez sur l'allumeur électronique et maintenez-le ...
Page 71 - DISTANCE ENTRE L'ALLUMAGE ET; INSTRUCTIONS D'ALLUMAGE AVEC BATON D'ALLUMAGE
71 Match Lighting Opening Match Lighting Stick 3/16”-1/4”(4.76-6.35mm) 1. Ouvrez le couvercle.2. Assurez-vous que le bouton de commande soit en position OFF (Poussez le bouton de commande vers le bas et tournez-le dans le sens des aiguilles d'une montre pour vous assurer qu'il est en position OFF). ...
Page 72 - PLIER LA POIGNÉE DU BAC À GRAISSE; POSITIONNEMENT + BAC À GRAISSE
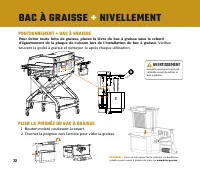
72 BAC À GRAISSE + NIVELLEMENT Pour éviter toute fuite de graisse, placez la lèvre du bac à graisse sous le rebord d'égouttement de la plaque de cuisson lors de l'installation du bac à graisse. Vérifiez souvent le godet à graisse et nettoyez-le après chaque utilisation. 1. Bouton moleté coulissant à...
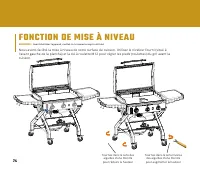
Page 74 - FONCTION DE MISE À NIVEAU
74 FONCTION DE MISE À NIVEAU Nous avons facilité la mise à niveau de votre surface de cuisson. Utilisez le niveleur fourni (situé à l'avant gauche de la plancha) et la clé à roulette M12 pour régler les pieds (roulettes) du gril avant la cuisson. Tournez dans le sens des aiguilles d'une montre pour ...
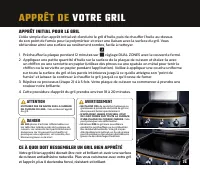
Page 75 - APPRÊT INITIAL POUR LE GRIL; ATTENTION
75 APPRÊT DE VOTRE GRIL APPRÊT INITIAL POUR LE GRIL Votre gril bien apprêté devrait être noir et brillant et avoir une surface de cuisson antiadhésive naturelle. Plus vous cuisinerez avec votre gril et l'apprêt, plus il deviendra foncé, résistant et brillant. CE À QUOI DOIT RESSEMBLER UN GRIL BIEN A...
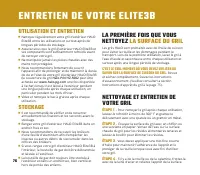
Page 76 - ENTRETIEN DE VOTRE ELITE3B; UTILISATION ET ENTRETIEN; LA PREMIÈRE FOIS QUE VOUS; C'EST LE SEUL MOMENT OÙ VOUS DEVEZ UTILISER DU; NETTOYAGE ET ENTRETIEN DE; ÉTAPE 1; ÉTAPE 3; ÉTAPE 4
76 ENTRETIEN DE VOTRE ELITE3B UTILISATION ET ENTRETIEN ■ Nettoyez régulièrement votre gril d'extérieur HALO Elite3B entre les utilisations et surtout après de longues périodes de stockage. ■ Assurez-vous que le gril d'extérieur HALO Elite3B et ses composants sont suffisamment refroidis avant de nett...
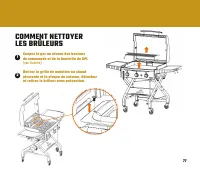
Page 77 - Coupez le gaz au niveau des boutons
77 COMMENT NETTOYER LES BRÛLEURS Coupez le gaz au niveau des boutons de commande et de la bouteille de GPL (non illustrée). Retirez la grille de maintien au chaud pivotante et la plaque de cuisson. Détachez et retirez le brûleur avec précaution. 1 2
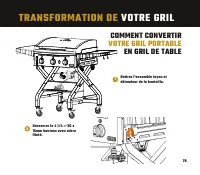
Page 79 - COMMENT CONVERTIR; Retirez l'ensemble tuyau et
79 TRANSFORMATION DE VOTRE GRIL COMMENT CONVERTIR VOTRE GRIL PORTABLE EN GRIL DE TABLE 1 Retirez l'ensemble tuyau et détendeur de la bouteille. 2 Desserrer le 4 1/4 »-20 x 15mm boutons avec arbre fileté.
Page 81 - LE BRÛLEUR NE S'ALLUME PAS AVEC L'ALLUMAGE ÉLECTRONIQUE; DÉPANNAGE; BRÛLEUR NE SERA PAS AVEC UNE ALLUMETTE
81 ■ Régulateur défectueux ■ Obstruction des venturis du brûleur ■ Obstruction de l'orifice ou du tuyau de gaz ■ L'électrode est endommagée/l'allumeur est défectueux ■ Bouteille de GPL vide ■ Cilindro de LP vacío 81 C A U S E P O S S I B L E : S O L U T I O N : LE BRÛLEUR NE S'ALLUME PAS AVEC L'ALLU...
Page 82 - LISTE DES PIÈCES ELITE3B
Page 86 - ARTICLES POUR LESQUELS LE FABRICANT NE PAIERA PAS; Exclusion des Garanties Implicites et Limitation des Recours
86 GARANTIE LIMITÉE DE CINQ (5) ANS ARTICLES POUR LESQUELS LE FABRICANT NE PAIERA PAS 1. Frais d'expédition, standard ou accéléré, pour la garantie et les pièces de rechange. 2. Appels de service à votre domicile. 3. Les réparations lorsque votre produit est utilisé à des fins autres que l'usage nor...
Page 87 - S E R V I C E C O N S O M M A T E U R S
87 CETTE GARANTIE LIMITÉE EST LA SEULE GARANTIE EXPRESSE DONNÉE PAR LE FABRICANT. AUCUNE SPÉCIFICATION OU DESCRIPTION DE PERFORMANCE DU PRODUIT, OÙ QU'ELLE APPARAISSE, N'EST GARANTIE PAR LE FABRICANT, SAUF DANS LA MESURE PRÉVUE PAR LA PRÉSENTE GARANTIE LIMITÉE. TOUTE PROTECTION DE GARANTIE IMPLICITE...
Page 88 - STAY CONNECTED WITH US!; SCAN TO REGISTER
88 © 2022 Halo Products Group LLC Halo and the Halo flame are registered trademarks of Halo Products Group LLC www.halo-pg.com Halo Products Group LLC 850 West Park Rd Elizabethtown KY 42701 Toll free: 1-833-572-1688 STAY CONNECTED WITH US! H A LO P r o d u c t s G r o u p H a l o P r o d u c t s G ...