Page 3 - Tools and Parts; Tools needed; You; Your safety and the safety of others are very important.; DANGER; IMPORTANT SAFETY INSTRUCTIONS; DISPOSING OF THE UNIT
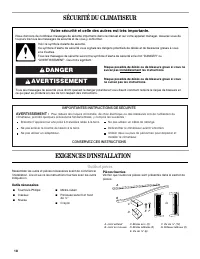
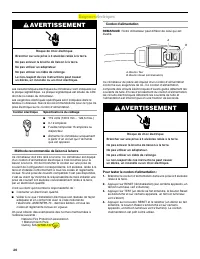
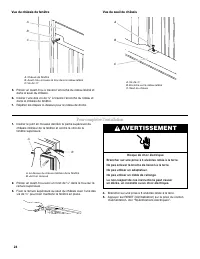
3 AIR CONDITIONER SAFETY INSTALLATION REQUIREMENTS Tools and Parts Gather the required tools and parts before starting installation. Read and follow the instructions provided with any tools listed here. Tools needed Parts supplied Check that all parts are included in parts package. You can be killed...
Page 4 - Location Requirements; IMPORTANT: Observe all governing codes and ordinances.; Window Installation; Electrical Requirements; Electrical Shock Hazard; WARNING; Power supply cord
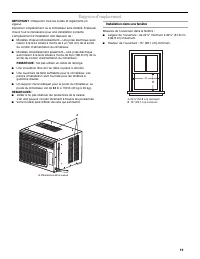
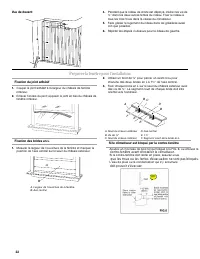
4 Location Requirements IMPORTANT: Observe all governing codes and ordinances. Check the location where the air conditioner will be installed. Make sure you have everything necessary for correct installation. The location should provide: ■ Heat/Cool Models—Grounded electrical outlet within 4 ft (122...
Page 5 - Power Supply Cord; Plug power supply cord into a grounded 3 prong outlet.; INSTALLATION INSTRUCTIONS; Unpack the Air Conditioner; Remove packaging materials; Recommended Grounding Method
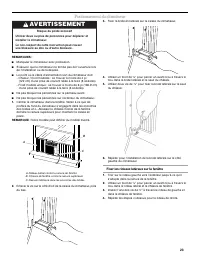
5 It is the customer's responsibility: ■ To contact a qualified electrical installer. ■ To assure that the electrical installation is adequate and in conformance with National Electrical Code, ANSI/NFPA 70 - latest edition, and all local codes and ordinances. Copies of the standards listed may be ob...
Page 6 - Prepare Air Conditioner for Installation; Install Side Curtains; Insert top and then bottom of right-hand curtain housing in; Back View; Extend right-hand curtain outward so you may insert a; Front View; Slide the curtain housing into the channels as far as it will go.
6 Prepare Air Conditioner for Installation Install Side Curtains NOTE: Attach curtains to the air conditioner before placing the air conditioner in window. 1. Locate provided bag of screws. 2. Insert top and then bottom of right-hand curtain housing in top and bottom curtain channels on air conditio...
Page 7 - Prepare Window for Installation; Attach Adhesive Seal; Cut the adhesive seal to the width of the lower window sash.; Install L Brackets; Measure the width of the window opening and mark the; Position the Air Conditioner; Center air conditioner in window. Be sure the bottom; Excessive Weight Hazard; IF AC IS BLOCKED BY STORM WINDOW
7 Prepare Window for Installation Attach Adhesive Seal 1. Cut the adhesive seal to the width of the lower window sash. 2. Remove the backing from the seal and attach the seal to the bottom of the lower window sash. Install L Brackets 1. Measure the width of the window opening and mark the center lin...
Page 9 - Complete Installation; Insert foam seal behind the top of the lower window sash and; Attach top channel to window sash with one; Press RESET on the power supply cord. See “Electrical; AIR CONDITIONER USE
9 Complete Installation 1. Insert foam seal behind the top of the lower window sash and against the glass of the upper window. 2. Use a ¹⁄₈ " drill bit to drill a starter hole through the hole in the top channel. 3. Attach top channel to window sash with one ³⁄₄ " screw to secure window in p...
Page 10 - Starting Your Air Conditioner; Cool Only Models; Press POWER to turn on the air conditioner.; Mode; Press MODE repeatedly until you see the indicator light glow; Fan Speed; Press FAN SPEED until you see the indicator light glow for
10 Starting Your Air Conditioner Cool Only Models Heat/Cool Models NOTE: When the air conditioner is set to Fan mode and the room temperature is below 32ºF (0ºC), the display will show LO. If the room temperature is above 99ºF (37ºC), the display will show HI. 1. Press POWER to turn on the air condi...
Page 12 - Using the MagnaStore Remote Control*; NOTE: Remote control may differ in appearance.; Power; Press SUPER control. The air conditioner automatically; Fan; NOTE: Auto fan speed cannot be selected in Fan mode.; SMAR
12 Using the MagnaStore Remote Control* NOTE: Remote control may differ in appearance. NOTE: One CR2025 battery (included) powers the remote control. Replace battery after 6 months of use, or when the remote control starts to lose power. Power Press POWER to turn on the air conditioner. Mode Press M...
Page 14 - AIR CONDITIONER CARE; Cleaning the Air Filter; Remove the air filter by sliding the filter out from the left-hand; Use a vacuum cleaner to clean the air filter. If the air filter is; Cleaning the Front Panel
14 Changing Air Direction Exhaust Air Vent ■ Pull out the exhaust air vent control to open the exhaust air vent and draw stale or smoky air from the room. ■ Push in the exhaust air vent control to close the exhaust air vent for maximum continuous cooling. NOTE: The exhaust air vent control will func...
Page 15 - TROUBLESHOOTING; Air conditioner will not operate; The local power has failed. Wait for power to be restored.; Air conditioner blows fuses or trips circuit breakers; The filter is dirty or is obstructed by debris. Clean the filter.
15 Repairing Paint Damage Check once or twice a year for paint damage. This is very important, especially in areas near oceans or where rust is a problem. If needed, touch up with a good grade enamel paint. Annual Maintenance Your air conditioner needs annual maintenance to help ensure steady, top p...
Page 16 - ASSISTANCE OR SERVICE; In Canada
16 ■ The outside temperature is below 66°F (19°C). Do not try to operate your air conditioner in the cooling mode when the outside temperature is below 66°F (19°C). ■ The temperature of the room you are trying to cool is extremely hot. Allow extra time for the air conditioner to cool off a very hot ...
Page 18 - Outils et pièces; Outils nécessaires; Votre sécurité et celle des autres est très importante.; AVERTISSEMENT; IMPORTANTES INSTRUCTIONS DE SÉCURITÉ
18 SÉCURITÉ DU CLIMATISEUR EXIGENCES D’INSTALLATION Outils et pièces Rassembler les outils et pièces nécessaires avant de commencer l’installation. Lire et suivre les instructions fournies avec les outils indiqués ici. Outils nécessaires Pièces fournies Vérifier que toutes les pièces sont présentes ...
Page 19 - Exigences d’emplacement; REMARQUE : Ne pas utiliser un câble de rallonge.; Installation dans une fenêtre
19 Exigences d’emplacement IMPORTANT : Respecter tous les codes et règlements en vigueur. Inspecter l’emplacement où le climatiseur sera installé. S'assurer d'avoir tout le nécessaire pour une installation correcte. L’emplacement d’installation doit disposer de : ■ Modèles chaleur/refroidissement—Un...
Page 20 - Exigences électriques; Méthode recommandée de liaison à la terre; Cordon d'alimentation; Brancher le cordon d'alimentation dans une prise à 3 alvéoles
20 Exigences électriques Les caractéristiques électriques du climatiseur sont indiquées sur la plaque signalétique. La plaque signalétique est située du côté droit de la caisse du climatiseur. Les exigences électriques spécifiques sont indiquées dans le tableau ci-dessous. Suivre les recommandations...
Page 21 - INSTRUCTIONS D'INSTALLATION; Déballage du climatiseur; Enlèvement des matériaux d'emballage; Préparer le climatiseur pour l’installation; Installation des rideaux latéraux; Insérer la partie supérieure, puis la partie inférieure du; Vue arrière; Déployer le rideau de droite vers l’extérieur pour pouvoir; Risque du poids excessif
21 REMARQUES : ■ Le bouton de réinitialisation doit être enfoncé pour un fonctionnement correct. ■ Le cordon d'alimentation doit être remplacé en cas d'absence de déclenchement lorsque le bouton de test est enfoncé ou en cas d'échec de la réinitialisation. ■ Ne pas utiliser le cordon d'alimentation ...
Page 22 - Vue de devant; Préparer la fenêtre pour l’installation; Fixation du joint adhésif; Si le climatiseur est bloqué par la contre-fenêtre
22 Vue de devant 4. Pendant que le rideau de droite est déployé, insérer les vis de ³⁄₈ " dans les deux autres fentes du rideau. Fixer le rideau à tous les trois trous dans la caisse du climatiseur. 5. Faire glisser le logement du rideau dans les glissières aussi loin que possible. 6. Répéter le...
Page 23 - Positionnement du climatiseur; Fixer les rideaux latéraux sur la fenêtre
23 Positionnement du climatiseur REMARQUES : ■ Manipuler le climatiseur avec précaution. ■ S'assurer que le climatiseur ne tombe pas de l'ouverture lors de l'installation ou de la dépose. ■ Le point où le câble d’alimentation sort du climatiseur doit: - Chaleur / froid modèles : se trouver à moins d...
Page 24 - Pour compléter l’installation; Risque de choc électrique
24 Vue du châssis de fenêtre 5. Percer un avant-trou à travers l’encoche du rideau latéral et dans le seuil du châssis. 6. Insérer l'une des vis de ³⁄₄ " à travers l’encoche du rideau et dans le châssis de fenêtre. Vue du seuil du châssis Pour compléter l’installation 1. Insérer le joint en mous...
Page 25 - UTILISATION DU CLIMATISEUR; Mise en marche du climatiseur; Modèles Refroidissement seulement; Sélectionner la vitesse du ventilateur. Voir “Fan Speed
25 UTILISATION DU CLIMATISEUR Une bonne utilisation de votre climatiseur vous aidera à obtenir les meilleurs résultats possibles. Cette section explique le fonctionnement correct du climatiseur. IMPORTANT : ■ Si on doit éteindre le climatiseur, attendre au moins 3 minutes avant de le rallumer. Ceci ...
Page 26 - Filter Monitor; Appuyer sur le bouton TEMP “+” ou “-” pour changer la durée; Permutation de l’affichage de température de °F à °C :; Lorsque le témoin lumineux du Filter Monitor (contrôleur du
26 ■ Fan (ventilateur)—Fait fonctionner le ventilateur sans refroidir. Appuyer sur le bouton FAN SPEED pour choisir High (élevée), Med ou Low (basse). L'affichage indique la température actuelle de la pièce. ■ Heat (chaleur)—Chauffe la pièce. Appuyer sur le bouton FAN SPEED pour choisir High (élevée...
Page 27 - Utilisation de la télécommande
27 Pour régler la minuterie pour mettre en marche le climatiseur en gardant les réglages précédents : 1. Arrêter le climatiseur. 2. Appuyer sur TIMER. L’indicateur lumineux clignotera. L'afficheur indiquera le temps restant avant que le climatiseur s'éteigne automatiquement. 3. Appuyer sur le bouton...
Page 28 - SUPER
28 Commande SUPER Pour un refroidissement rapide. Le climatiseur règle automatiquement la vitesse du ventilateur à High (élevée) et la température à 64°F (18ºC). REMARQUE : Le bouton du système de commande SMARTne fonctionne pas au mode de commande SUPER . 1. Appuyer sur la commande SUPER . Le clima...
Page 30 - ENTRETIEN DU CLIMATISEUR; Nettoyage du filtre à air; Faire glisser le filtre à air d'un côté ou de l'autre à l’avant de; Nettoyage du panneau avant; Nettoyer le panneau avant avec un chiffon doux humide.; Remise en état de la peinture; DÉPANNAGE; problème sans aide extérieure.
30 ENTRETIEN DU CLIMATISEUR Votre nouveau climatiseur est conçu pour vous fournir de nombreuses années de service fiable. Cette section vous expliquera comment nettoyer et entretenir votre climatiseur correctement. Contacter votre marchand local autorisé pour une vérification annuelle. Ne pas oublie...
Page 31 - Le mode Power Saver (économie d’énergie) a été
31 ■ Vous utilisez un cordon de rallonge. Ne pas utiliser une rallonge avec cet appareil. ■ Tentative de remise en marche du climatiseur trop tôt après l’arrêt de l’appareil. Attendre au moins 3 minutes avant de tenter une nouvelle mise en marche. Le cordon d'alimentation du climatiseur se déclenche...
Page 32 - ASSISTANCE OU SERVICE; Si vous avez besoin de pièces de rechange; Au Canada; Pour plus d’assistance
32 ASSISTANCE OU SERVICE Avant de faire un appel pour assistance ou service, consulter la section “Dépannage”. Ce guide peut vous faire économiser le coût d’une visite de service. Si vous avez encore besoin d’aide, suivre les instructions ci-dessous. Lors d’un appel, veuillez connaître la date d’ach...