Gymax GYM11467 - Manuals

User Manual Gymax GYM11467


Summary
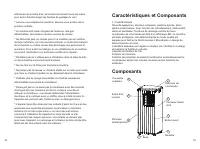
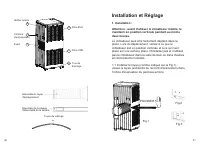
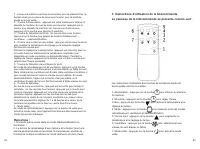
Exhaust Pipe Assembly Drain Hose Installation and Adjustment 1. Installation: Fig.2 Fig.3 Fig. PUSH 1 Rear Husing Winding coluom Air Vent EVA Filter CON Filter Drainage Hole 9 10 11 12 13 14 Warning: before using the mobile air conditioning, keep it upright for at least two hours. The air conditioni...
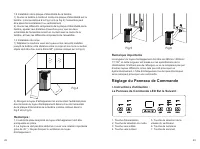
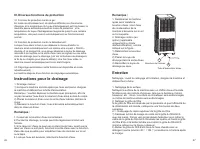
Notes: Fig.4 50cm/20” 50cm/20” Control Panel Setting Important Notice 1. Power Key 2. Mode Selection Key . Down Key . Up Key . Fan Speed Selection Key . Timer Key I. Operating instructions: LED Control Panel is as follows: Fig.5 Fig.6 . Sleep Key 1.2 Install the window sealing plate assembly 1) Half...
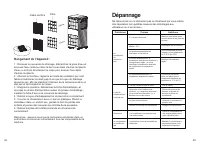
III. A Variety of Protection Functions Notes: Drainage Instructions Maintenance Note: 1. Keep the water plug properly. 2. During drainage, the body can be tilted slightly backwards. 3. If the water container cannot hold all the water, before the water container is full, stuff the water outlet with t...
Gymax Air Conditioners Manuals
-
 Gymax GYM06546
User Manual
Gymax GYM06546
User Manual
-
 Gymax GYM06925
User Manual
Gymax GYM06925
User Manual
-
 Gymax GYM07548
User Manual
Gymax GYM07548
User Manual
-
 Gymax GYM07549
User Manual
Gymax GYM07549
User Manual
-
 Gymax GYM08116
User Manual
Gymax GYM08116
User Manual
-
 Gymax GYM09408
User Manual
Gymax GYM09408
User Manual
-
 Gymax GYM09595
User Manual
Gymax GYM09595
User Manual
-
 Gymax GYM09628
User Manual
Gymax GYM09628
User Manual
-
 Gymax GYM09629
User Manual
Gymax GYM09629
User Manual
-
 Gymax GYM09630
User Manual
Gymax GYM09630
User Manual
-
 Gymax GYM09634
User Manual
Gymax GYM09634
User Manual
-
 Gymax GYM09753
User Manual
Gymax GYM09753
User Manual
-
 Gymax GYM11455
User Manual
Gymax GYM11455
User Manual
-
 Gymax GYM11466
User Manual
Gymax GYM11466
User Manual
-
 Gymax GYM11472
User Manual
Gymax GYM11472
User Manual
-
 Gymax GYM11473
User Manual
Gymax GYM11473
User Manual
-
 Gymax GYMHD0088
User Manual
Gymax GYMHD0088
User Manual
-
 Gymax GYMHD0089
User Manual
Gymax GYMHD0089
User Manual
-
 Gymax GYMHD0091
User Manual
Gymax GYMHD0091
User Manual
-
 Gymax GYMHD0097
User Manual
Gymax GYMHD0097
User Manual