Page 2 - THANK YOU FOR MAKING GE APPLIANCES A PART OF YOUR HOME.; card included in the packing material.
2 49-2000896 Rev. 1 THANK YOU FOR MAKING GE APPLIANCES A PART OF YOUR HOME. Whether you grew up with GE Appliances, or this is your first, we’re happy to have you in the family. We take pride in the craftsmanship, innovation and design that goes into every GE Appliances product, and we think you wil...
Page 3 - CAUTION; CAUTION; WARNING
49-2000896 Rev. 1 3 SAFETY INFORMATION IMPORTANT SAFETY INFORMATIONREAD ALL INSTRUCTIONS BEFORE USING READ AND SAVE THESE INSTRUCTIONS WARNING TO REDUCE THE RISK OF FIRE, ELECTRIC SHOCK OR INJURY TO PERSONS, OBSERVE THE FOLLOWING: A. Use this unit only in the manner intended by the manufacturer. If ...
Page 4 - How to Remove Protective Shipping Film and Packaging Tape; SAFETY INFORMATION
4 49-2000896 Rev. 1 How to Remove Protective Shipping Film and Packaging Tape Carefully grasp a corner of the protective shipping film with your fingers and slowly peel it from the appliance surface. Do not use any sharp items to remove the film. Remove all of the film before using the appliance for...
Page 5 - Controls; Control
49-2000896 Rev. 1 5 Controls USING THE HOOD: Controls 1. Rangehood Control Panel: The control panel is located on the front of the canopy. The position and function of each control pad are noted below. 2. On/Off: On/Off switch for the fan and lighting up the display. The fan can be operated by tappi...
Page 6 - Default Sync Settings:; Chef Connect
6 49-2000896 Rev. 1 Wi-Fi Connect USING THE HOOD: Chef Connect / Wi-Fi Connect * Compatible Apple or Android devices and home Wi-Fi network required. Connecting your Wi-Fi Connect Enabled hood (on some models) Your GE Appliances hood is designed to provide you with two-way communication between your...
Page 7 - Filters
49-2000896 Rev. 1 7 Be sure the circuit breaker is off and all surfaces are cool before cleaning or servicing any part of the vent hood. Metal Grease Filter The metal filters trap grease during cooking. The filters must ALWAYS be in place when the hood is in use. The grease filters are dishwasher-sa...
Page 8 - Lights; Painted Surfaces and Black Stainless Color (on some models); Surfaces; Stainless Steel Surfaces (on some models)
8 49-2000896 Rev. 1 Lights Painted Surfaces and Black Stainless Color (on some models) Do not use a steel wool pads or other abrasive cleaners; they will scratch the surface. Clean grease-laden surfaces of the hood frequently. To clean the hood surface, use a hot, damp cloth with a mild detergent su...
Page 9 - BEFORE YOU BEGIN; IMPORTANT; FOR YOUR SAFETY; Wall Hoods
49-2000896 Rev. 1 9 Installation Instructions “If you have questions, call GE Appliances at 800.GE.CARES (800.432.2737) or visit our website at: GEAppliances.com. In Canada, visit GEAppliances.ca or call 800.561.3344. INST ALLA TION INSTRUCTIONS BEFORE YOU BEGIN Read these instructions completely an...
Page 10 - Installation Preparation; INSTALLATION CLEARANCES; PRODUCT DIMENSIONS; INSTALLATION PREPARATION
10 49-2000896 Rev. 1 Installation Preparation INSTALLATION CLEARANCES These vent hoods are designed to be installed onto a wall with no above cabinets. The vent hood must be installed between the 24” required minimum and 36” recommended maximum above the cooking surface. For supplied duct cover ceil...
Page 11 - PLAN THE INSTALLATION; TOOLS AND MATERIALS REQUIRED
49-2000896 Rev. 1 11 INST ALLA TION PREP ARA TION Installation Preparation PLAN THE INSTALLATION CAUTION To reduce risk of fire and to properly exhaust air, be sure to duct the air outside. Do not vent exhaust air into spaces within walls or ceilings or into attics, crawl spaces, or garages. PARTS S...
Page 12 - INSTALLATION DIMENSIONS; HARDWARE COMPONENTS
12 49-2000896 Rev. 1 Installation Preparation INSTALLATION DIMENSIONS The Wall Hoods duct covers can be adjusted for different ceiling heights depending on the distance between the bottom of the hood and the cooktop (distance X). See Installation Height Table. RANGE HOOD COMPONENTS RECIRCULATION COM...
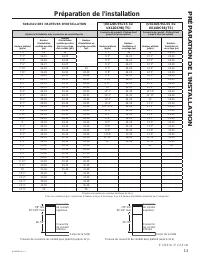
Page 13 - INSTALLATION HEIGHT TABLE
49-2000896 Rev. 1 13 INST ALLA TION PREP ARA TION Installation Preparation INSTALLATION HEIGHT TABLE (UX12DC9SLSS or UX12DC9BJTS) (UX14DC9SLSS or UX14DC9BJTS) Installation Height with Supplied Duct Covers Optional High Ceiling Duct Cover up to 12 ft. (not included with unit) Optional High Ceiling Du...
Page 14 - ADVANCE PLANNING; POWER SUPPLY
14 49-2000896 Rev. 1 INST ALLA TION PREP ARA TION ADVANCE PLANNING Duct Install Planning Ŷ This hood is designed to be vented vertically through the ceiling. Use an 8" round duct. Use locally supplied elbows to vent horizontally through the rear wall. Ŷ Use metal ductwork only. Ŷ Determine the e...
Page 16 - INSTALLING THE HOOD BRACKET MOUNT
16 49-2000896 Rev. 1 Installation INST ALLA TION INSTALLING THE HOOD BRACKET MOUNT Hood Body 1. Put a protective covering over the surface below the location of the hood to protect from dirt and/or damage. 2. Determine and mark the centerline (C) on the wall (draw line up to the ceiling) where the r...
Page 17 - INSTALLING THE HOOD; Installation
49-2000896 Rev. 1 17 INST ALLA TION INSTALLING THE HOOD Remove the grease filters from the unit and set aside. The grease filters are removed by pressing the handle in the front of the filter. When replacing, make sure that the filters are properly positioned with the handles in front and visible. N...
Page 18 - ELECTRICAL CONNECTION
18 49-2000896 Rev. 1 Installation INST ALLA TION ELECTRICAL CONNECTION 1. Remove the electrical junction box cover. 2. Remove the electrical box knockout. 3. Feed the Power Supply Cable through the hole and secure with a strain relief. 4. Attach the white lead of the power supply (A) to the white le...
Page 19 - INSTALL DUCT COVERS
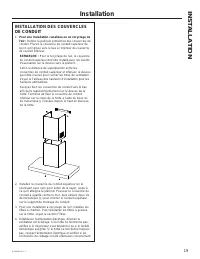
49-2000896 Rev. 1 19 INSTALL DUCT COVERS 1. For ducted and recirculation installation: Remove protective film from duct covers. Place the upper duct cover so that it slides down inside of the lower duct cover. NOTE: For recirculation, the upper duct cover must be installed with the exhaust vents on ...
Page 20 - MAKE UP AIR TECHNOLOGY
20 49-2000896 Rev. 1 Installation INST ALLA TION MAKE UP AIR TECHNOLOGY Note to Installers and Inspectors: This product comes equipped with a simple installation feature that limits maximum CFM levels in order to comply with certain local codes or regulations. This installation method may not be nec...
Page 21 - Before you call for service; TROUBLESHOOTING TIPS
49-2000896 Rev. 1 21 Save time and money! Review the charts on the following pages first and you may not need to call for service. Problem Possible Cause What To Do Fan/Light does not operate when button is turned ON A house fuse may be blown or a circuit breaker tripped. Replace fuse or reset circu...
Page 22 - What GE Appliances will not cover:; LIMITED W; GE Appliances Vented Range Hood Limited Warranty; EXCLUSION OF IMPLIED WARRANTIES; a Haier company; Garante en Canadá: MC Commercial
22 49-2000896 Rev. 1 Staple your receipt here. Proof of the original purchase date is needed to obtain service under the warranty . GEAppliances.com All warranty service is provided by our Factory Service Centers, or an authorized Customer Care ® technician. To schedule service online, visit us at g...
Page 23 - ACCESSORIES; Looking For Something More?; Accessories; Parts
49-2000896 Rev. 1 23 ACCESSORIES Looking For Something More? GE Appliances offers a variety of accessories to improve your cooking and maintenance experiences! Refer to the Consumer Support page for phone numbers and website information. The following products and more are available: Accessories Par...
Page 25 - HOTTES MURALES
49-2000896 Rev. 1 05-21 GEA UVW9301 UVW9361 Inscrivez ci-dessous les numéros de modèle et de série N° de modèle ____________ N° de série ______________ Vous les trouverez sur une étiquette à l’intérieur de la hotte. . HOTTES MURALES GE est une marque déposée de General Electric Company. Fabriqué sou...
Page 26 - NOUS VOUS REMERCIONS D’ACCUEILLIR GE APPLIANCES CHEZ VOUS; sommes heureux de vous accueillir dans notre famille.
2 49-2000896 Rev. 1 NOUS VOUS REMERCIONS D’ACCUEILLIR GE APPLIANCES CHEZ VOUS Que vous ayez grandi avec GE Appliances ou qu’il s’agisse de votre première acquisition, nous sommes heureux de vous accueillir dans notre famille. Nous sommes fiers du savoir-faire, de l’innovation et de l’esthétique qui ...
Page 27 - VEUILLEZ LIRE TOUTES LES CONSIGNES AVANT D’UTILISER; LISEZ CES INSTRUCTIONS ET RANGEZ-LES SOIGNEUSEMENT
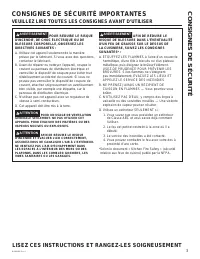
49-2000896 Rev. 1 3 CONSIGNES DE SÉCURITÉ CONSIGNES DE SÉCURITÉ IMPORTANTES VEUILLEZ LIRE TOUTES LES CONSIGNES AVANT D’UTILISER LISEZ CES INSTRUCTIONS ET RANGEZ-LES SOIGNEUSEMENT AVERTISSEMENT POUR RÉDUIRE LE RISQUE D’INCENDIE, DE CHOC ÉLECTRIQUE OU DE BLESSURE CORPORELLE, OBSERVEZ LES DIRECTIVES SU...
Page 28 - CONSIGNES DE SÉCURITÉ
4 49-2000896 Rev. 1 Comment retirer le film protecteur d’expédition et le ruban adhésif d’emballage Saisissez délicatement un coin du film protecteur d’expédition avec vos doigts et le décoller lentement de la surface de l’appareil. N’utilisez pas d’objets pointus pour retirer le film. Retirez compl...
Page 29 - Commandes
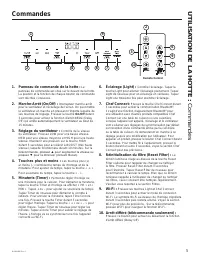
49-2000896 Rev. 1 5 1. Panneau de commande de la hotte : Le panneau de commande est situé sur le devant de la hotte. La position et la fonction de chaque bouton de commande sont décrites ci-dessous. 2. Marche-Arrêt (On/Off) : Interrupteur marche-arrêt pour le ventilateur et l’éclairage de l’écran. O...
Page 30 - Connexion Bluetooth
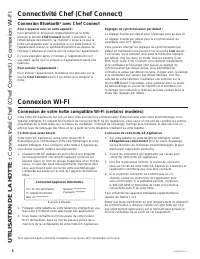
6 49-2000896 Rev. 1 UTILISA TION DE LA HOTTE : Connectivité Chef (Chef Connect) / Connexion WI-FI Connexion Bluetooth ® avec Chef Connect Pour s’apparier avec un autre appareil : Pour démarrer le processus d’appariement sur la hotte, pressez le bouton Chef Connect durant 3 secondes. Le rétroéclairag...
Page 31 - Filtre à graisse métallique; Filtres
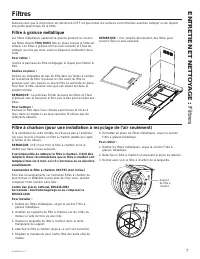
49-2000896 Rev. 1 7 Assurez-vous que le disjoncteur est déclenché (OFF) et que toutes les surfaces sont refroidies avant de nettoyer ou de réparer une partie quelconque de la hotte. Filtre à graisse métallique Les filtres métalliques capturent la graisse pendant la cuisson. Les filtres doivent TOUJO...
Page 32 - ENTRETIEN ET NETT; Surfaces en acier inoxydable (certains modèles); Ampoules
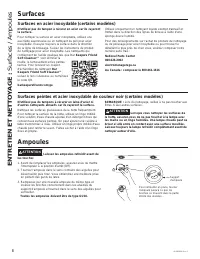
8 49-2000896 Rev. 1 Surfaces peintes et acier inoxydable de couleur noir (certains modèles) N’utilisez pas de tampons à récurer en laine d’acier ni d’autres nettoyants abrasifs car ils rayeront la surface. Nettoyez les surfaces graisseuses de la hotte fréquemment. Pour nettoyer la surface de la hott...
Page 33 - AVANT DE COMMENCER; IMPORTANT —; POUR VOTRE SÉCURITÉ
49-2000896 Rev. 1 9 Instructions d’installation INSTRUCTIONS D’INST ALLA TION Hottes murales UVW9301, UVW9361 Pour toute question, contactez GE Appliances au 800.561.3344 ou visitez notre site Web sur : electromenagersge.ca au 800.661.1616 AVANT DE COMMENCER Veuillez lire toutes ces instructions att...
Page 34 - Préparation de l'installation; DIMENSIONS DU PRODUIT; PRÉPARATION DE L'INSTALLATION
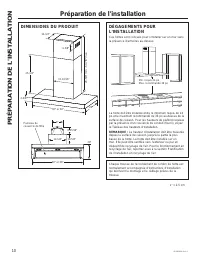
10 49-2000896 Rev. 1 Préparation de l'installation DÉGAGEMENTS POUR L’INSTALLATION Ces hottes sont conçues pour s’installer sur un mur sans la présence d’armoires au-dessus. La hotte doit être installée entre le minimum requis de 24 po et le maximum recommandé de 36 po au-dessus de la surface de cui...
Page 35 - PLANIFIEZ L’INSTALLATION; RETRAIT DE L’EMBALLAGE; OUTILS ET MATÉRIEL REQUIS
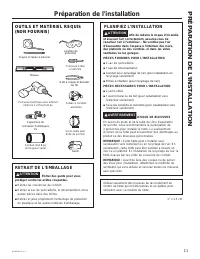
49-2000896 Rev. 1 11 PRÉPARATION DE L'INSTALLATION Préparation de l'installation PLANIFIEZ L’INSTALLATION ATTENTION Afin de réduire le risque d’incendie et évacuer l’air correctement, assurez-vous de canaliser l’air à l’extérieur – Ne ventilez pas l’air d’évacuation dans l’espace à l’intérieur des m...
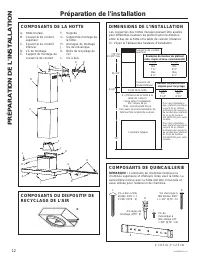
Page 36 - COMPOSANTS DE LA HOTTE; DIMENSIONS DE L’INSTALLATION; COMPOSANTS DE QUINCAILLERIE
12 49-2000896 Rev. 1 Préparation de l'installation PRÉPARATION DE L'INSTALLATION COMPOSANTS DE LA HOTTE COMPOSANTS DU DISPOSITIF DE RECYCLAGE DE L’AIR A. Hotte murale B. Couvercle de conduit supérieur C. Couvercle de conduit inférieur D. Vis de montage E. Support de montage du couvercle de conduit F...
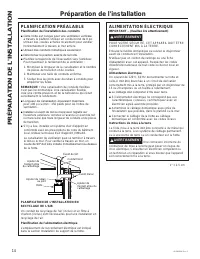
Page 38 - PLANIFICATION PRÉALABLE; ALIMENTATION ÉLECTRIQUE
14 49-2000896 Rev. 1 PRÉPARATION DE L'INSTALLATION Préparation de l'installation PLANIFICATION PRÉALABLE Planification de l’installation des conduits Ŷ&HWWHKRWWHHVWFRQoXHSRXUXQHYHQWLODWLRQYHUWLFDOH à travers le plafond. Utilisez un conduit rond de 8 po. Utilisez des coudes achetés localement pou...
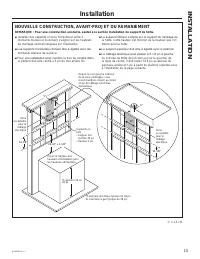
Page 39 - NOUVELLE CONSTRUCTION, AVANT-PROJET OU REMANIEMENT
49-2000896 Rev. 1 15 INST ALLA TION Installation NOUVELLE CONSTRUCTION, AVANT-PROJET OU REMANIEMENT REMARQUE : Pour une construction existante, sautez à la section Installation du support de hotte. Ŷ Installez des supports en bois horizontaux entre 2 montants muraux et ils doivent s'aligner sur les ...
Page 40 - INSTALLATION DU SUPPORT DE LA HOTTE
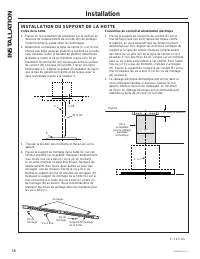
16 49-2000896 Rev. 1 Installation INST ALLA TION INSTALLATION DU SUPPORT DE LA HOTTE Corps de la hotte 1. Placez un recouvrement de protection sur la surface en dessous de l’emplacement de la hotte afin de protéger l’endroit contre la saleté et/ou les dommages. 2. Déterminez et marquez la ligne de c...
Page 41 - INSTALLATION DE LA HOTTE
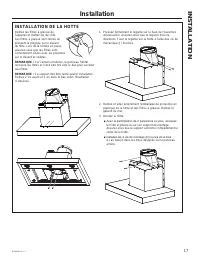
49-2000896 Rev. 1 17 INST ALLA TION Installation INSTALLATION DE LA HOTTE Retirez les filtres à graisse de l’appareil et mettez-les de côté. Les filtres à graisse sont retirés en pressant la poignée sur le devant du filtre. Lors de la remise en place, assurez-vous que les filtres sont correctement s...
Page 42 - RACCORDEMENT ÉLECTRIQUE
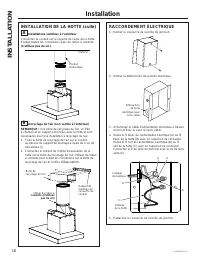
18 49-2000896 Rev. 1 Installation INST ALLA TION INSTALLATION DE LA HOTTE (suite) A Installations ventilées à l’extérieur Connectez la conduit sur le registre du corps de la hotte. Scellez toutes les connexions avec du ruban à conduits (n’utilisez pas de vis) . B Recyclage de l’air (non ventilé à l'...
Page 44 - TECHNOLOGIE DU DISPOSITIF D’AIR D’APPOINT
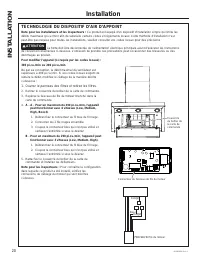
20 49-2000896 Rev. 1 Installation INST ALLA TION TECHNOLOGIE DU DISPOSITIF D’AIR D’APPOINT Note pour les installateurs et les inspecteurs : Ce produit est équipé d’un dispositif d’installation simple qui limite les débits maximaux (pi.cu./min) afin de satisfaire certains codes et règlements locaux. ...
Page 45 - Avant d’appeler le service à la clientèle; TRUCS DE DÉPANNAGE; Problème
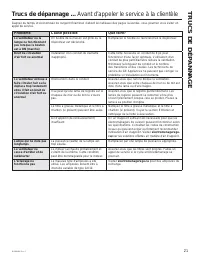
49-2000896 Rev. 1 21 Trucs de dépannage ... Avant d’appeler le service à la clientèle TRUCS DE DÉPANNAGE Gagnez du temps et économisez de l’argent! Examinez d’abord les tableaux des pages suivantes, vous pourriez vous éviter un appel de service. Problème Cause possible Que faire? Le ventilateur ou l...
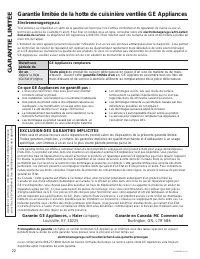
Page 46 - GARANTIE LIMITÉE; EXCLUSION DES GARANTIES IMPLICITES; GE; Ce que GE Appliances ne garantit pas :
22 49-2000896 Rev. 1 Agrafez ici votre reçu. Une preuve de l’achat original est requise pour l’accès à l‘entretien et aux réparations en vertu de la garantie. Electromenagersge.ca Tout entretien ou réparation en vertu de la garantie est fourni par nos Centres d’entretien et de réparation de l’usine ...
Page 47 - ACCESSOIRES; Vous êtes à la recherche d’autres articles?; Accessoires; Pièces; Articles de nettoyage
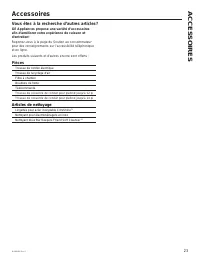
49-2000896 Rev. 1 23 ACCESSOIRES Vous êtes à la recherche d’autres articles? GE Appliances propose une variété d’accessoires afin d’améliorer votre expérience de cuisson et d’entretien! Reportez-vous à la page du Soutien au consommateur pour des renseignements sur l’accessibilité téléphonique et en ...
Page 48 - SOUTIEN AU; Soutien au consommateur
24 49-2000896 Rev. 1 Printed in China SOUTIEN AU CONSOMMA TEUR Imprimé en Chine Soutien au consommateur Site Web de GE Appliances Vous avez une question ou vous avez besoin d’aide pour votre appareil électroménager? Visitez le site Web de GE Appliances 24 heures par jour, tous les jours de l’année! ...
Page 49 - CAMPANAS DE PARED
CAMPANAS DE PARED 49-2000896 Rev. 1 05-21 GEA INFORMACIÓN DE SEGURIDAD . . . . 3 USO DE LA CAMPANA Controles . . . . . . . . . . . . . . . . . . . . . . . . . . . . . . . . . 5Chef Connect . . . . . . . . . . . . . . . . . . . . . . . . . . . . . 6Conexión Wi-Fi . . . . . . . . . . . . . . . . . . ....
Page 50 - GRACIAS POR HACER QUE GE APPLIANCES SEA PARTE DE SU HOGAR.; tenerlo en la familia.
2 49-2000896 Rev. 1 GRACIAS POR HACER QUE GE APPLIANCES SEA PARTE DE SU HOGAR. Ya sea que haya crecido usando GE Appliances, o que ésta es su primera vez, nos complace tenerlo en la familia. Sentimos orgullo por el nivel de arte, innovación y diseño de cada uno de los electrodomésticos de GE Applian...
Page 51 - ADVERTENCIA
49-2000896 Rev. 1 3 INFORMACIÓN DE SEGURIDAD INFORMACIÓN IMPORTANTE DE SEGURIDADLEA TODAS LAS INSTRUCCIONES ANTES DE USAR LEA Y GUARDE ESTAS INSTRUCCIONES ADVERTENCIA PARA REDUCIR EL RIESGO DE INCENDIO, DESCARGA ELÉCTRICA O LESIONES A PERSONAS, CUMPLA CON LOS SIGUIENTES PUNTOS: A. Utilice esta unida...
Page 53 - Controles; Panel de Control de la Campana
49-2000896 Rev. 1 5 Controles USO DE LA CAMP ANA: Controles 1. Panel de Control de la Campana Extractora: El panel de control está ubicado en la parte frontal de la base de la campana del extractor. La posición y función de cada tecla de control figura a continuación. 2. On/Off (Encendido/ Apagado):...
Page 54 - Conexión de Bluetooth
6 49-2000896 Rev. 1 * Se requiere el uso de dispositivos y de una red Wi-Fi hogareña que sean compatibles con Apple o Android. USO DE LA CAMP ANA: Chef Connect / Conexión Wi-Fi Conexión de Bluetooth ® al Funcionamiento de Chef Connect Para emparejar con otro dispositivo: A fin de iniciar el proceso ...
Page 55 - Filtro de carbón (Sólo Para Instalación con Recirculación); Filtros; Filtro de grasa metálico
49-2000896 Rev. 1 7 Filtro de carbón (Sólo Para Instalación con Recirculación) Si el modelo no tiene ventilación hacia afuera, el aire será recirculado a través de un filtro de carbón descartable que ayude a retirar el humo y los olores. NOTA: NO enjuague o coloque el filtro de carbón en el lavavaji...
Page 56 - Lámparas; Superficies; Superficies de acero inoxidable (en algunos modelos)
8 49-2000896 Rev. 1 Lámparas Superficies Pintadas y de Color Negro Inoxidable (en algunos modelos) No use virutas de acero u otros limpiadores abrasivos; estos rayarán la superficie. De forma frecuente, limpie las superficies sucias de grasa. Para limpiar la superficie de la campana, use una tela ca...
Page 57 - ANTES DE COMENZAR; IMPORTANTE; PARA SU SEGURIDAD; INSTRUCCIONES DE INSTALACIÓN
49-2000896 Rev. 1 9 Ante cualquier duda, llame a GE Appliances al 800.GE.CARES (800.432.2737) o visite nuestro sitio Web en: GEAppliances.com ANTES DE COMENZAR Lea estas instrucciones por completo y con detenimiento. Ŷ IMPORTANTE — Guarde estas instrucciones para el uso de inspectores locales. Ŷ IMP...
Page 58 - Preparación para la instalación; ESPACIO DE INSTALACIÓN; DIMENSIONES DEL PRODUCTO
10 49-2000896 Rev. 1 Preparación para la instalación ESPACIO DE INSTALACIÓN Estas campanas de ventilación están diseñadas para ser instaladas en una pared sin gabinetes superiores. La campana de ventilación debe ser instalada entre el mínimo requerido de 24” y el máximo recomendado de 36” sobre la s...
Page 59 - PLAN DE INSTALACIÓN; QUITE EL ENVOLTORIO
49-2000896 Rev. 1 11 PREP ARACIÓN P ARA LA INST ALACIÓN Preparación para la instalación PLAN DE INSTALACIÓN ADVERTENCIA A fin de reducir riesgos de incendios y para que el aire salga de forma apropiada, asegúrese de que el aire sea conducido hacia fuera.No ventile el aire de la salida hacia espacios...
Page 60 - DIMENSIONES DE INSTALACIÓN; COMPONENTE DE RECIRCULACIÓN
12 49-2000896 Rev. 1 DIMENSIONES DE INSTALACIÓN Las tapas de los conductos de las campanas de pared pueden ser ajustadas en diferentes alturas de cielorrasos, dependiendo de la distancia entre la parte inferior de la campana y la superficie de cocción (distancia X). Consulte la Tabla de Alturas de I...
Page 61 - TABLA DE ALTURAS DE INSTALACIÓN
49-2000896 Rev. 1 13 PREP ARACIÓN P ARA LA INST ALACIÓN Preparación para la instalación TABLA DE ALTURAS DE INSTALACIÓN (UX12DC9SLSS o UX12DC9BJTS) (UX14DC9SLSS o UX14DC9BJTS) Altura de Instalación con Tapas de Conductos Suministradas Tapa del Conducto para Cielorrasos Altos Opcional de hasta 12 pie...
Page 63 - NUEVA CONSTRUCCIÓN, PLANIFICACIÓN PREVIA O REMODELACIÓN
49-2000896 Rev. 1 15 Instalación INST ALACIÓN NUEVA CONSTRUCCIÓN, PLANIFICACIÓN PREVIA O REMODELACIÓN NOTA: Para construcciones existentes, pase a la sección de Instalación del Montaje del Soporte de la Campana. Ŷ Instale soportes de madera horizontales entre 2 montajes de pared que se alineen con l...
Page 64 - INSTALACIÓN DEL MONTAJE DEL SOPORTE DE LA CAMPANA
16 49-2000896 Rev. 1 Instalación INST ALACIÓN INSTALACIÓN DEL MONTAJE DEL SOPORTE DE LA CAMPANA Cuerpo de la Campana 1. Coloque una tapa protectora sobre la superficie que se encuentra debajo de la ubicación de la campana, a fin de proteger la misma de la suciedad y/o daños. 2. Determine y marque la...
Page 65 - INSTALACIÓN DE LA CAMPANA
49-2000896 Rev. 1 17 Instalación INST ALACIÓN INSTALACIÓN DE LA CAMPANA Retire los filtros de grasa de la unidad y deje los mismos a un costado. Los filtros de grasa deben ser retirados presionando la manija ubicada en el frente del filtro. Al realizar el reemplazo, asegúrese de que los filtros qued...
Page 66 - CONEXIÓN ELÉCTRICA
18 49-2000896 Rev. 1 Instalación INST ALACIÓN INSTALACIÓN DE LA CAMPANA (Cont.) A Instalaciones Ventiladas Conecte el conducto hogareño al regulador ubicado en el cuerpo de la campana. Selle todas las conexiones con cinta para conductos ( No use tornillos ). B Recirculación (No ventilada) NOTA: Una ...
Page 68 - TECNOLOGÍA DE REPOSICIÓN DE AIRE; Instalación
20 49-2000896 Rev. 1 TECNOLOGÍA DE REPOSICIÓN DE AIRE Nota para los Instaladores e Inspectores: Este producto está equipado con una función de instalación simple que limita los niveles máximos de CFM, a fin de cumplir con ciertos códigos o regulaciones locales. Es posible que este método de instalac...
Page 69 - Antes de solicitar el servicio técnico; CONSEJOS P; Problema
49-2000896 Rev. 1 21 Consejos para la Solución de Problemas... Antes de solicitar el servicio técnico CONSEJOS P ARA LA SOLUCIÓN DE PROBLEMAS Problema Causas posibles Qué hacer El Ventilador/ la Luz no funciona cuando el botón está en ON (Encendido) El fusible puede haberse quemado o el interruptor ...
Page 70 - Qué no cubrirá GE Appliances:; GARANTÍA; Garantía Limitada de la Cocina Eléctrica de GE Appliances; EXCLUSIÓN DE GARANTÍAS IMPLÍCITAS
22 49-2000896 Rev. 1 Abroche su recibo aquí. Para acceder al servicio técnico de acuerdo con la garantía deberá contar con la prueba de la fecha original de compra. GEAppliances.com Todo el servicio de garantía es provisto por nuestros Centros de Servicio de Fabricación, o un técnico autorizado de C...
Page 71 - Piezas
49-2000896 Rev. 1 23 ACCESORIOS ¿Busca Algo Más? GE Appliances ofrece una variedad de accesorios para mejorar sus experiencias de cocción y mantenimiento! Para acceder a números telefónicos e información de sitios Web, consulte la página de Soporte para el Consumidor. Estos y otros productos están d...
Page 72 - Soporte para el Consumidor
24 49-2000896 Rev. 1 Impreso en China Soporte para el Consumidor SOPORTE P ARA EL CONSUMIDOR Sitio Web de GE Appliances ¿Desea realizar una consulta o necesita ayuda con su electrodoméstico? ¡Intente a través del Sitio Web de GE Appliances las 24 horas del día, cualquier día del año! Usted también p...


 GE JN327HBB
User Manual
GE JN327HBB
User Manual
 GE JN327HWW
User Manual
GE JN327HWW
User Manual
 GE JV338HWW
User Manual
GE JV338HWW
User Manual
 GE JVW5301BJTS
User Manual
GE JVW5301BJTS
User Manual
 GE JVW5301EJES
User Manual
GE JVW5301EJES
User Manual
 GE JVW5301FJDS
User Manual
GE JVW5301FJDS
User Manual
 GE JVW5301SJSS
User Manual
GE JVW5301SJSS
User Manual
 GE JVW5361EJES
User Manual
GE JVW5361EJES
User Manual
 GE JVW5361FJDS
User Manual
GE JVW5361FJDS
User Manual
 GE JVW5361SJSS
User Manual
GE JVW5361SJSS
User Manual
 GE JVX3240DJWW
User Manual
GE JVX3240DJWW
User Manual
 GE JVX3240SJSS
User Manual
GE JVX3240SJSS
User Manual
 GE JVX3300DJBB
User Manual
GE JVX3300DJBB
User Manual
 GE JVX3300DJWW
User Manual
GE JVX3300DJWW
User Manual
 GE JVX3300SJSS
User Manual
GE JVX3300SJSS
User Manual
 GE JVX5300EJES
User Manual
GE JVX5300EJES
User Manual
 GE JVX5300SJSS
User Manual
GE JVX5300SJSS
User Manual
 GE JVX5305DJBB
User Manual
GE JVX5305DJBB
User Manual
 GE JVX5305DJWW
User Manual
GE JVX5305DJWW
User Manual
 GE JVX5305SJSS
User Manual
GE JVX5305SJSS
User Manual