Electrolux ZUP3822P - Manuals
User Manual Electrolux ZUP3822P


Summary
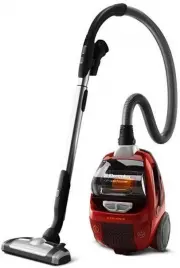
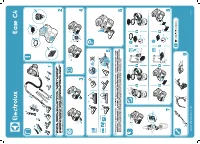
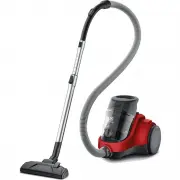
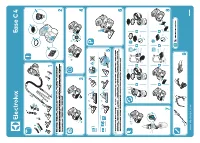
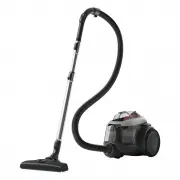
33 English Before starting • Unpack your UltraActive model and the accessory system and check that all acces- sories are included*. • Read the Operation Instruction carefully. • Pay special attention to the Safety advice chapter. Enjoy your Electrolux UltraActive ! Table of contents: How to use the ...
Click 44 place! Attach the telescopic tube to the hose handle (to remove it, press the release button and pull the hose handle out). Adjust the telescopic tube by holding the lock and pull the handle with the other hand. Pull out the power cord and plug it into the mains. Insert the hose (to remove ...
55 by pushing the ON/ OFF button. Adjust suction power. (Models with remote control.) To regulate press ” – ” button (decrease) or ” + ” button (increase) Models with remote control and AeroPro motorized nozzle BRUSH button on the handle. The indicator light on the nozzle will come on when BRUSH is ...
Electrolux Vacuums Manuals
-
 Electrolux 5540
Manual
Electrolux 5540
Manual
-
 Electrolux 5820
User Manual
Electrolux 5820
User Manual
-
 Electrolux Clario
User Manual
Electrolux Clario
User Manual
-
 Electrolux Clario 2001MN
User Manual
Electrolux Clario 2001MN
User Manual
-
 Electrolux Cyclone
User Manual
Electrolux Cyclone
User Manual
-
 Electrolux EC31-2IW
User Manual
Electrolux EC31-2IW
User Manual
-
 Electrolux EC41-2SW
User Manual
Electrolux EC41-2SW
User Manual
-
 Electrolux EC414ANIM
User Manual
Electrolux EC414ANIM
User Manual
-
 Electrolux EC41-4T
User Manual
Electrolux EC41-4T
User Manual
-
Electrolux EC41-ANIM
User Manual
-
 Electrolux EC41-H2SW
User Manual
Electrolux EC41-H2SW
User Manual
-
 Electrolux ECC21-2IW
User Manual
Electrolux ECC21-2IW
User Manual
-
Electrolux ECC21-4SB
User Manual
-
 Electrolux EER73DB
User Manual
Electrolux EER73DB
User Manual
-
 Electrolux EER73IGM
User Manual
Electrolux EER73IGM
User Manual
-
 Electrolux EER87MBM
User Manual
Electrolux EER87MBM
User Manual
-
 Electrolux EFC71622GG
User Manual
Electrolux EFC71622GG
User Manual
-
 Electrolux EFP91813
User Manual
Electrolux EFP91813
User Manual
-
 Electrolux EFP91824GY
User Manual
Electrolux EFP91824GY
User Manual
-
 Electrolux EFP91824UG
User Manual
Electrolux EFP91824UG
User Manual