Page 2 - Sisällys; Käyttäjälle; Pakkauksen purkaminen; Asentajalle
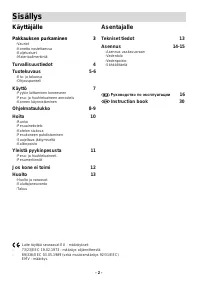
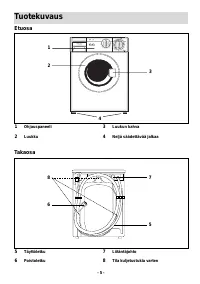
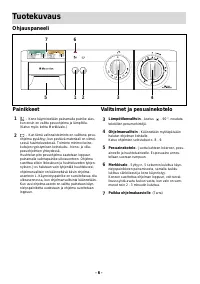
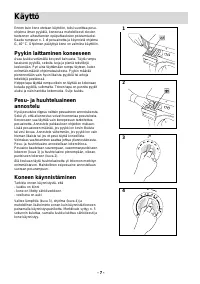
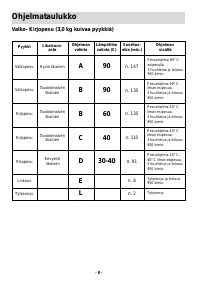
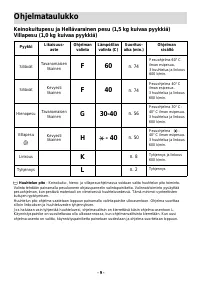
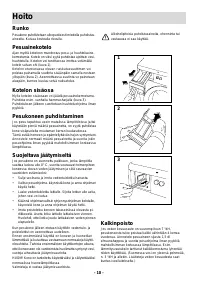
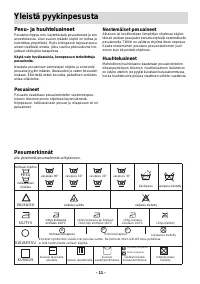
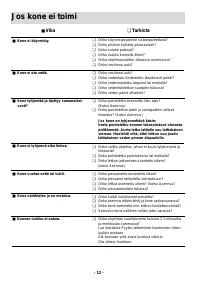
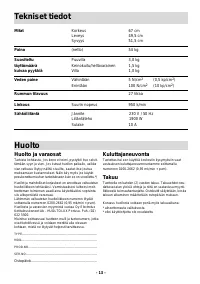
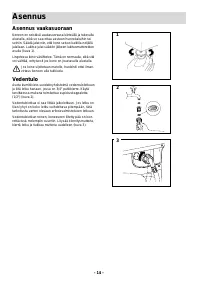
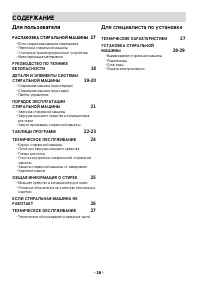
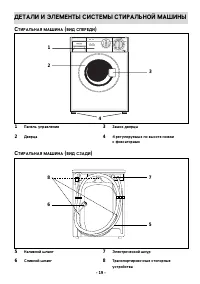
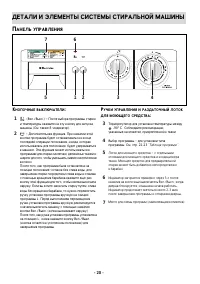
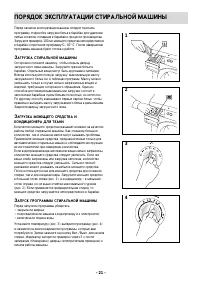
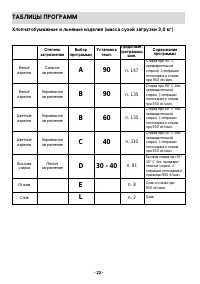
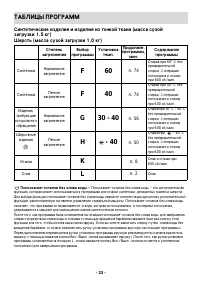
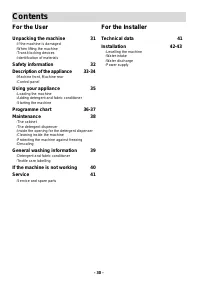
- 2 - Sisällys Käyttäjälle Pakkauksen purkaminen 3 -Vauriot-Konetta nostettaessa-Kuljetustuet-Materiaalimerkintä Turvallisuustiedot 4 Tuotekuvaus 5-6 -Etu- ja takaosa-Ohjauspaneeli Käyttö 7 -Pyykin laittaminen koneeseen-Pesu- ja huuhteluaineen annostelu-Koneen käynnistäminen Ohjelmataulukko 8-9 Hoit...
Page 3 - Vauriot
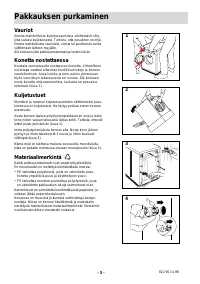
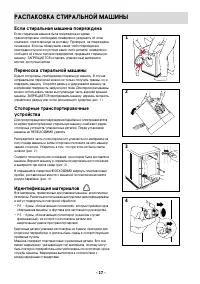
- 3 - 1 2 3 4 822 90 14-98 Pakkauksen purkaminen Vauriot Ilmoita mahdollisista kuljetusvaurioista välittömästi sille,joka vastasi kuljetuksesta. Tarkista, että pesukone on ehjä.Ilmoita mahdollisista vaurioista, vioista tai puuttuvista osistavälittömästi laitteen myyjälle. Älä koskaan jätä pakkausmat...
Page 4 - Turvallisuustiedot
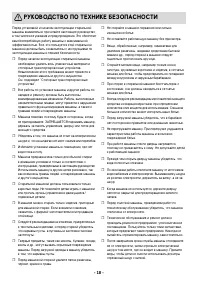
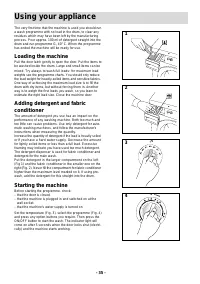
- 4 - Lue käyttöohje kaikkine ohjeineen, neuvoineen ja varoi-tuksineen ennen kuin pesukone asennetaan ja otetaankäyttöön. Tällöin kone toimii oikein ja saat siitä suurimmanhyödyn. Kaikkien konetta käyttävien on tunnettava käyt-töön ja turvallisuuteen liittyvät yksityiskohdat hyvin.Säilytä käyttöohje...
Page 5 - Etuosa; Tuotekuvaus; Takaosa
- 5 - Etuosa Tuotekuvaus 1 Ohjauspaneeli 2 Luukku 3 Luukun kahva 4 Neljä säädettävää jalkaa 1 2 4 3 Takaosa 6 7 5 5 Täyttöletku 6 Poistoletku 7 Liitäntäjohto 8 Tila kuljetustukia varten 8
Page 6 - Ohjauspaneeli; Valitsimet ja pesuainekotelo
- 6 - Tuotekuvaus Ohjauspaneeli Painikkeet – Kone käynnistetään painamalla painike alas, kun ensin on valittu pesuohjelma ja lämpötila. (Katso myös kohta Merkkivalo.) – Kun tämä valinnaistoiminto on valittuna pesu- ohjelma pysähtyy, kun pestävä materiaali on viimei- sessä huuhteluvedessä. Toiminto m...
Page 7 - Käyttö
- 7 - 1 2 3 4 Ennen kuin kone otetaan käyttöön, tulisi suorittaa pesu-ohjelma ilman pyykkiä, koneessa mahdollisesti olevientuotannon aiheuttamien epäpuhtauksien poistamiseksi.Kaada rumpuun n. 1 dl pesuainetta ja käynnistä ohjelmaG, 40° C. Ohjelman päätyttyä kone on valmiina käyttöön. Pyykin laittami...
Page 8 - Ohjelmataulukko
- 8 - Ohjelmataulukko Valko- Kirjopesu (3,0 kg kuivaa pyykkiä) Pyykki Valkopesu Valkopesu Kirjopesu Kirjopesu Pikapesu Linkous Tyhjennys Hyvin likainen Tavanomaisen likainen Tavanomaisen likainen Tavanomaisen likainen Kevyesti likainen A B B C D E L 90 90 60 40 30-40 n. 147 n. 135 n. 135 n. 110 n. 9...
Page 10 - Hoito
- 10 - Runko Pesukone puhdistetaan ulkopuolisesti miedolla puhdistus-aineella. Kuivaa kostealla rievulla. Pesuainekotelo Ajan myötä koteloon muodostuu pesu- ja huuhteluaine-kerrostumia. Kotelo on siksi syytä puhdistaa ajoittain vesi-huuhtelulla. Kotelon voi tarvittaessa irrottaa vetämälläkotelo salv...
Page 11 - Pesu- ja huuhteluaineet; Pesuaineet; Yleistä pyykinpesusta; Pesumerkinnät
- 11 - Pesu- ja huuhteluaineet Pesutulos riippuu mm. käytettävästä pesuaineesta ja senannostuksesta. Liian suuren määrän käyttö on turhaa jakuormittaa ympäristöä. Myös biologisesti hajoavat pesu-aineet sisältävät aineita, jotka suurina pitoisuuksina hor-juttavat ekologista tasapainoa. Käytä vain hyv...
Page 12 - Jos kone ei toimi
- 12 - ■ Vika ❏ Tarkista Jos kone ei toimi ■ Kone ei käynnisty. ■ Kone ei ota vettä. ■ Kone tyhjentää ja täyttyy samanaikai- sesti? ■ Kone ei tyhjennä eikä linkoa. ■ Kone vuotaa vettä tai tulvii. ■ Kone värähtelee ja on meluisa. ■ Koneen luukku ei aukea. ❏ Onko käynnistyspainike sisäänpainettuna? ❏ ...
Page 13 - Tekniset tiedot; Huolto ja varaosat; Kuluttajaneuvonta; Huolto
- 13 - Mitat Korkeus 67 cm Leveys 49,5 cm Syvyys 51,5 cm Paino (netto) 54 kg Suositeltu Puuvilla 3,0 kg täyttömäärä Keinokuitu/hellävarainen 1,5 kg kuivaa pyykkiä Villa 1,0 kg Veden paine Vähintään 5 N/cm 2 (0,5 kp/cm 2 ) Enintään 100 N/cm 2 (10 kp/cm 2 ) Rummun tilavuus 27 litraa Linkous Suurin nop...
Page 14 - Asennus
- 14 - 3 2 1 Asennus vaakasuoraan Koneen on seistävä vaakasuorassa kiinteällä ja tukevallaalustalla, eikä se saa ottaa vastaan huonekaluihin taiseiniin. Säädä jalat niin, että kone seisoo kaikilla neljälläjalallaan. Lukitse jalat säädön jälkeen lukitusmuttereidenavulla (kuva 1). Lingotessa kone värä...
Page 15 - Vedenpoisto; Sähköliitäntä
450-800 mm 40 mm 450-800 mm - 15 - 2 3 1 ON/OF ECO Electrolux EV 100C 4 Vedenpoisto Koneen poistoletku voidaan sijoittaa kolmella tavalla: Pesualtaan reunan yli: Tällöin poistoletku kiinnitetään koukulla seinään taikiinnitetään vesihanaan pätkällä narua (kuva 1) niin,ettei letku pääse liikkumaan kon...
Page 16 - SODERVANIE; Dlq polxzowatelq; Dlq specialista po ustanowke
- 16 - SODERVANIE Dlq polxzowatelq RASPAKOWKA STIRALXNOJ MA{INY 17 -Esli stiralxnaq ma[ina powrevdena-Perenoska stiralxnoj ma[iny-Stopornye transportirowo^nye ustrojstwa-Identifikaciq materialow RUKOWODSTWO PO TEHNIKEBEZOPASNOSTI 18 DETALI I |LEMENTY SISTEMYSTIRALXNOJ MA{INY 19-20 -Stiralxnaq ma[ina...
Page 17 - Esli stiralxnaq ma[ina powrevdena
1 2 4 RASPAKOWKA STIRALXNOJ MA{INY - 17 - 3 Esli stiralxnaq ma[ina powrevdena Esli stiralxnaq ma[ina byla powrevdena wo wremqtransportirowki, neobhodimo nemedlenno uwedomitx ob \tomkompani@, otwetstwennu@ za dostawku. Prowerxte, ne powrevdenali ma[ina. Esli wy obnaruvili kakie-libo powrevdeniq,neisp...
Page 18 - RUKOWODSTWO PO TEHNIKE BEZOPASNOSTI
Pered ustanowkoj i na^alom \kspluatacii stiralxnojma[iny wnimatelxno pro^itajte nastoq]ee rukowodstwo,w tom ^isle wse ukazaniq i preduprevdeniq. |to obespe^itwam besperebojnu@ rabotu ma[iny s maksimalxnoj\ffektiwnostx@. Wse, kto polxzuetsq \toj stiralxnojma[inoj dolvny bytx oznakomleny s instrukciqm...
Page 19 - DETALI I |LEMENTY SISTEMY STIRALXNOJ MA{INY
S TIRALXNAQ MA [ INA ( WID SPEREDI ) DETALI I |LEMENTY SISTEMY STIRALXNOJ MA{INY 1 Panelx uprawleniq 2 Dwerca 3 Zamok dwercy 4 4 reguliruemyh po wysote novki s fiksatorami - 19 - 1 2 4 3 S TIRALXNAQ MA [ INA ( WID SZADI ) 6 7 5 5 Naliwnoj [lang 6 Sliwnoj [lang 7 |lektri^eskij [nur 8 Transportirowo^n...
Page 20 - ANELX UPRAWLENIQ
DETALI I |LEMENTY SISTEMY STIRALXNOJ MA{INY P ANELX UPRAWLENIQ K NOPO ^ NYE WYKL @^ ATELI : (Wkl./Wykl.) – Posle wybora programmy stirki i temperatury navmite na \tu knopku dlq zapuska ma[iny (Sm. takve 8 -indikator). - Dopolnitelxnaq funkciq. Pri navatii \toj knopki programma budet ostanawliwatxsq ...
Page 25 - Kondicioner dlq tkani; OB}AQ INFORMACIQ O STIRKE
M O @] EE SREDSTWO I KONDICIONER DLQ TKANI Kak tip, tak i koli^estwo mo@]ego sredstwa wliq@t narezulxtaty raboty stiralxnoj ma[iny. Primenqtx^rezmernoe koli^estwo mo@]ego sredstwa netneobhodimosti i, krome togo, \to okazywaetnevelatelxnoe wliqnie na okruva@]u@ sredu. Davemo@]ie sredstwa s biodobawka...
Page 26 - ESLI STIRALXNAQ MA{INA NE RABOTAET; Neisprawnostx
- 26 - ESLI STIRALXNAQ MA{INA NE RABOTAET ■ Neisprawnostx ❏ Proweritx: ■ Ma[ina ne zapuskaetsq. ■ Ma[ina ne zapolnqetsq wodoj. ■ Wo wremq zapolneniq ma[iny wodoj proishodit sliw. ■ Otsutstwuet sliw ili otvim. ■ Perepolnenie ma[iny, ute^ka. ■ Stiralxnaq ma[ina wibriruet ili[umno rabotaet. ■ Dwerca st...
Page 28 - USTANOWKA STIRALXNOJ MA{INY
W YRAWNIWANIE STIRALXNOJ MA [ INY Ma[ina dolvna ustanawliwatxsq na ustoj^iwoj i twerdojpowerhnosti, i ona ne dolvna kasatxsq sten ili mebeli.Wyrawniwanie ma[iny (po urown@) proizwoditsq putemregulirowki novek. Ubeditesx, ^to ma[ina stoit nawseh ^etyreh novkah. Posle wyrawniwaniq ma[inyzafiksirujte n...
Page 30 - Contents; For the User; For the Installer
- 30 - Contents For the User Unpacking the machine 31 -If the machine is damaged-When lifting the machine-Transit locking devices-Identification of materials Safety information 32 Description of the appliance 33-34 -Machine front, Machine rear-Control panel Using your appliance 35 -Loading the machi...
Page 31 - Unpacking the machine
If the machine is damaged If the machine has been damaged during transportation,you should immediately notify the company responsible fordelivering it. Check that the washing machine is undamaged.If you discover any damage, faults or that anything ismissing, you should notify the seller immediately....
Page 32 - Safety information
Before installing and first using the washing machine,read the instruction booklet carefully, including its hintsand warnings. Doing so will ensure that your machinewill perform properly and to best advantage. Anyoneusing the machine should be thoroughly familiar with itsinstructions for use and saf...
Page 33 - Machine front; Description of the appliance; Machine rear
Machine front Description of the appliance 1 Control panel 2 Door 3 Door latch 4 All feet adjustable 1 2 4 3 Machine rear 6 7 5 5 Intake hose 6 Discharge hose 7 Electrical lead 8 For transit locking devices - 33 - 8
Page 34 - Control panel; Knob controls and detergent dispenser
Description of the appliance Control panel Push-button switches (ON/OFF) – After selecting the wash programme and temperature, push this button in to start the machine. (See 8, Indicator light). – An optional function. When this button is pressed in, the programme will halt at the end of the last ri...
Page 35 - Using your appliance
The very first time that the machine is used you should runa wash programme with no load in the drum, to clear anyresidues which may have been left by the manufacturingprocess. Pour approx. 100 ml of detergent straight into thedrum and run programme G, 40° C. When the programmehas ended the machine ...
Page 36 - Programme chart
Programme chart Cotton (dry load weight: 3.0 kg) - 36 - Load type White articles White articles Coloured articles Coloured articles Quick wash Spin Drain Heavily soiled Normally soiled Normally soiled Normally soiled Lightly soiled A B B C D E L 90 90 60 40 30-40 n. 147 n. 135 n. 135 n. 110 n. 91 n....
Page 38 - Descaling; Maintenance
The cabinet Clean the outside surfaces of the machine using a mild(non-abrasive) household cleaning product. Finish by re-moving remaining traces of the product with a damp cloth. The detergent dispenser In time, residues of detergent and fabric conditioner arelikely to build up inside the detergent...
Page 39 - Detergent and fabric conditioner; Detergent; General washing information; Textile care labelling
- 39 - Detergent and fabric conditioner The type and the quantity of detergent you use both havean impact on the results you achieve with your washingmachine. Using too much detergent is unnecessary andincreases overall impact on the environment quite needlessly.Even biodegradable detergents contain...
Page 40 - If the machine is not working
■ Symptom ❏ Check If the machine is not working - 40 - ■ The machine will not start. ■ The machine is not filling withwater. ■ The machine is discharging waterat the same time as filling. ■ The machine will not empty orspin. ■ The machine is leaking oroverflowing. ■ The machine is vibrating or noisy...
Page 41 - Service and spare parts; Service
- 41 - Service and spare parts If a problem arises, first work through the check-list If themachine is not working to make sure that the cause is notsomething which you can put right yourself. Servicing and repairs must be carried out by a servicecompany authorised by the supplier. Before contact wi...
Page 42 - Installation
Levelling the machine The machine must be installed on a sound and firmsurface, and must not be touching walls or furniture.Adjust the feet to level the machine. Make sure themachine is standing on all four feet. After levellingthe machine, secure the feet by tightening the ringnuts (Fig. 1). Some v...
Page 43 - Water discharge; Power supply
Water discharge These three alternatives are possible for the dis-charge hose: Over the top edge of a washtub: Use this option only if you can be sure that the hose will notmove when the machine is emptying. The hose can be fixedto the wall on a hook or tied to a tap with string (Fig. 1). Directly i...