Electrolux ERHC1238S - Manuals
User Manual Electrolux ERHC1238S


Summary
3 WarnIng! accessible parts may become hot when used with cooking appliances. electrical connection Check that the mains voltage matches with the voltage on the data plate inside the canopy cooker hood. Check that the installation complies with standards of local building, gas and electrical authori...
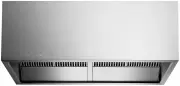
4 TECHNICAL SPECIFICATION • Power supply: 240 Volts 50 Hz. Connects to 10A power point • ERHC938S - 275 Watts, ERHC1238S - 510 Watts • Lights:• 4 x 20 watt, 12 volts halogen (ERHC1238S)• 3 x 20 watt, 12 volts halogen (ERHC938S) AddITIONAL ITEmS REqUIREd FOR INSTALLATION • Fixings required to attach ...
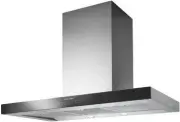
5 dimensions INSTALLATION model Width A Height B Depth C Weight ERHC938S 900mm 415mm 580mm 31kg ERHC1238S 1200mm 415mm 580mm 48kg Cooker type maximum output minimum height* maximum height* ErHC9385 ErHC12385 Electric hob 10.5 kW 14 kW 600 mm 1200mm Gas hob 37 mJ 50 mJ 650 mm 1200mm Gas BBq open gril...
Electrolux Range Hoods Manuals
-
 Electrolux Collo150
User Manual
Electrolux Collo150
User Manual
-
 Electrolux EFC226B
User Manual
Electrolux EFC226B
User Manual
-
 Electrolux EFC226C
User Manual
Electrolux EFC226C
User Manual
-
 Electrolux EFC226R
User Manual
Electrolux EFC226R
User Manual
-
 Electrolux EFC226V
User Manual
Electrolux EFC226V
User Manual
-
 Electrolux EFC60441OC
User Manual
Electrolux EFC60441OC
User Manual
-
 Electrolux EFC60441OR
User Manual
Electrolux EFC60441OR
User Manual
-
 Electrolux EFC60441OV
User Manual
Electrolux EFC60441OV
User Manual
-
 Electrolux EFG50250S
User Manual
Electrolux EFG50250S
User Manual
-
 Electrolux EFP6500XA
User Manual
Electrolux EFP6500XA
User Manual
-
 Electrolux EFP9500XA
User Manual
Electrolux EFP9500XA
User Manual
-
 Electrolux EFU9216W
User Manual
Electrolux EFU9216W
User Manual
-
 Electrolux EFV516K
User Manual
Electrolux EFV516K
User Manual
-
 Electrolux EFV516W
User Manual
Electrolux EFV516W
User Manual
-
 Electrolux ERC925DSD
User Manual
Electrolux ERC925DSD
User Manual
-
 Electrolux ERC926BA
User Manual
Electrolux ERC926BA
User Manual
-
 Electrolux ERC928GA
User Manual
Electrolux ERC928GA
User Manual
-
 Electrolux ERC930SA
User Manual
Electrolux ERC930SA
User Manual
-
 Electrolux ERCE9025BA
User Manual
Electrolux ERCE9025BA
User Manual
-
 Electrolux ERCE9025BK
User Manual
Electrolux ERCE9025BK
User Manual