Page 2 - ©2019 Electrolux Major Appliances; Electrolux model number; READ ALL INSTRUCTIONS BEFORE OPERATING THIS DRYER.; SAVE THESE INSTRUCTIONS FOR FUTURE REFERENCE.; Canada; NOTE; NOTE; Use
2 IMPORTANT SAFETY INFORMATION ©2019 Electrolux Major Appliances All rights reserved. Electrolux model number Electrolux serial number Purchase date Keep a record for quick reference Table of Contents Important Safety Information ........................... 2 Features ..................................
Page 3 - WARNING
3 IMPORTANT SAFETY INFORMATION Important safety instructions - gas dryer WARNING FIRE or explosion hazard Failure to follow safety warning exactly could result in serious injury, death, or property damage. DO NOT store or use gasoline or other flammable vapors and liquids in the vicinity of this or ...
Page 4 - IMPORTANT SAFETY INFORMATION; RISK OF FIRE; cleaning your exhaust system will increase the RISK of FIRE.; of any mesh size is allowed to cover the outdoor exhaust opening.
4 IMPORTANT SAFETY INFORMATION WARNING RISK OF FIRE • Ensure the entire dryer exhaust system is clean and free of lint and debris prior to the installation of your new dryer. The entire exhaust system should be inspected and cleaned a minimum of every 18 months with normal usage. Failure to comply w...
Page 5 - See Care and Cleaning.
5 Prevent fire • DO NOT dry items that have been previously cleaned in, soaked in, or spotted with gasoline, cleaning solvents, kerosene, waxes, or other flammable or explosive substances. DO NOT store these items on or near the dryer. These substances give off vapors that could ignite or explode. I...
Page 6 - installation sections; Contact a qualified
6 IMPORTANT SAFETY INFORMATION • DO NOT use fabric softeners or products to eliminate static unless recommended by the manufacturer of the fabric softener or product. Before you throw away your old washer or dryer: • Remove doors• Remove the electric power cord• Secure all hoses and drain pipes to p...
Page 7 - Power cord; FIRE/ELECTRICAL SHOCK HAZARD
7 IMPORTANT SAFETY INFORMATION 208V/240 v Electric Dryer 120 v Gas Dryer UL-approved service cord must be installed on electric dryers (not provided with unit except those manufactured for sale in Canada). Do not, under any circumstances, cut, remove, or bypass the grounding prong. Power cord with 3...
Page 8 - FEATURES; Serial Number and Model Number
8 FEATURES Anti Static Perfect Steam W rinkle Release Extended T umble Drum Light Delay T ime Contr ol Lock Sanitize Eco Dry Fast Dry 300 Series no no yes yes no yes yes no yes 20 min 400 Series no yes yes yes yes yes yes yes yes 18 min 500 Series yes yes yes yes yes yes yes yes yes 15 min 600 Serie...
Page 10 - DO NOT; PRE-INSTALLATION REQUIREMENTS; FIRE HAZARD
10 Electrical system requirements Electrical requirements for electric dryer: CIRCUIT - Individual 30 amp. branch circuit fused with 30 amp. time delay fuses or circuit breakers. Use separately fused circuits for washer and dryer. DO NOT operate washer and dryer on same circuit. POWER SUPPLY - 3-wir...
Page 11 - -wire power supply cord; Grounding type wall receptacle; or bypass the; Gas supply requirements; EXPLOSION HAZARD
11 1. The gas service to the dryer must conform with local codes and ordinances and the latest edition of the National Fuel Gas Code ANSI Z223.1/ PRE-INSTALLATION REQUIREMENTS 3-wire power supply cord (not supplied) OUTLET RECEPTACLE - NEMA 14-30R receptacle to be located so the power supply cord is...
Page 12 - Correct; The following are specific requirements for
12 PRE-INSTALLATION REQUIREMENTS Exhaust system requirements Correct Incorrect Correct Incorrect The following are specific requirements for proper and safe operation of your dryer. 1. NFPA 54, or in Canada, the Natural Gas and Propane Installation Code, CSA B149.1. 2. The gas supply line should be ...
Page 13 - Exhaust direction; Max
13 PRE-INSTALLATION REQUIREMENTS Exhaust direction Directional exhausting can be accomplished by installing a quick-turn 90° dryer vent elbow directly to exhaust outlet of dryer. Dryer vent elbows are available through your local parts distributor or hardware store. Max . Number o f 90° turns MAXIMU...
Page 14 - Manufactured or mobile
14 PRE-INSTALLATION REQUIREMENTS In installations where the exhaust system is not described in the charts, the following method must be used to determine if the exhaust system is acceptable: Correct Incorrect Install male fittings in correct direction: 1. Connect an inclined or digital manometer bet...
Page 15 - NOT; Solid Door with Wall; IMPORTANT; DO NOT INSTALL YOUR DRYER:
15 PRE-INSTALLATION REQUIREMENTS Clearance requirements Installation in a recess or closet 1. A dryer installed in a recess or closet, MUST be exhausted outdoors. 2. No other fuel burning appliance shall be installed in the same recess or closet as a gas dryer. 3. Your dryer needs space around it fo...
Page 16 - Louvered Door; MIN INSTALLATION CLEARANCES -; Bi-Fold louvered doors with
16 PRE-INSTALLATION REQUIREMENTS Louvered Door 120 sq. Inches min. Louvered Opening MIN INSTALLATION CLEARANCES - Inches (cm) Sides Rear Top Front Alcove/ recess 0" (0 cm) 0" (0 cm) 0" (0 cm) Open Closet with door vent 0" (0 cm) 0" (0 cm) 0" (0 cm) 1" (2.5 cm) Closet with...
Page 17 - Drain hose length on washer approximately 59 inches (150 cm).
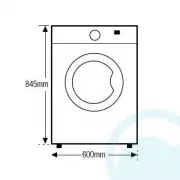
17 PRE-INSTALLATION REQUIREMENTS Dryer dimensions * Connection of water inlet hose on steam dryer adds 3/4 in. (2 cm) to installation depth. 1 Power supply cord length on gas dryer or electric Canadian dryer approximately 60 inches (152.5 cm). 2 Drain hose length on washer approximately 59 inches (1...
Page 18 - INSTALLATION; ELECTRICAL SHOCK HAZARD
18 Connecting the electrical system The following are specific requirements for proper and safe electrical installation of your dryer. Failure to follow these instructions can create electrical shock and/or a fire hazard. Grounding requirements - electric dryer (USA) For a grounded, cord-connected d...
Page 19 - Grounding requirements -
19 INSTALLATION Grounding requirements - electric dryer (Canada) Grounding requirements - gas dryer For a grounded, cord-connected dryer: 1. The dryer MUST be grounded. In the event of a malfunction or breakdown, grounding will reduce the risk of electrical shock by providing a path of least resista...
Page 20 - Neutral; remove; ELECTRICAL HAZARD
20 Electrical connection (non-Canada) - 3 wire cord 1. Turn off power supply to outlet. 2. Remove the screw securing the terminal block access cover in the lower corner on the back of the dryer. 3. Install a UL-approved strain relief according to the power cord/strain relief manufacturer’s instructi...
Page 21 - Electrical connection
21 INSTALLATION Electrical connection (non-Canada) - 4 wire cord Access Cover Screw Terminal Block Line 2 (BRASS Terminal) Neutral (SILVER Terminal)Line 1 (BRASS Terminal) Internal Ground (GREEN Screw) Install UL-Approved Strain Relief HereTerminal Screw Recovery Slot 4-wire receptacle (NEMA type 14...
Page 22 - Connecting the gas; Connecting the water
22 Connecting the gas 1. Remove the shipping cap from gas pipe at the rear of the dryer. 2. Connect a 1/2 inch (1.27 cm) I.D. semi- rigid or approved pipe from gas supply line to the 3/8 inch (0.96 cm) pipe located on the back of the dryer. Use a 1/2 inch to 3/8 inch (1.27 cm to 0.96 cm) reducer for...
Page 25 - Removing latch and hole plugs; Tools needed for reversal:; Reversing the door; BEFORE YOU REVERSE YOUR DRYER DOOR:
25 Screwdriver with #2 square bit INSTALLATION Removing latch and hole plugs 1. Open the door.2. Remove plastic hole plugs and save to reinstall later. You may have to use a non-scratching plastic knife if you are unable to dislodge the plugs manually. 3. Remove both screws from door latch. Save lat...
Page 26 - Reinstalling door assembly
26 INSTALLATION Reinstalling door assembly 1. Rotate the door and hang the upper hook on the back of the hinge in the upper hole of the front panel. Reinstalling latch and hole plugs 1. Install door latch with screws removed earlier. Verify reversed door operation 1. Test door for free, smooth swing...
Page 27 - Universal Appliance Wrench; ACCESSORIES AND REPLACEMENT PARTS
27 Accessories MATCHING STORAGE PEDESTAL* White Pedestal - P/N EPWD257UIW Titanium Pedestal - P/N EPWD257UTT A storage pedestal accessory, specifically designed for this dryer may be used to elevate the dryer for ease of use. This pedestal will add about 15” (38 cm) to the height of your unit. *Othe...
Page 28 - 00 SERIES GAS/ELECTRIC
28 CONTROLS AND SETTINGS Model series 1 POWER 2 Cycle Selector 3 Cycle LED Display 4 Temp Selector 5 DRY LEVEL 6 DRY TIME 7 Options 8 SELECT/DE-SELECT 9 CANCEL 10 START/PAUSE 11 DRY BOOST This manual covers many models and not all cycles, options, or features listed are available on every model. Con...
Page 29 - CONTROLS AND SETTINGS; DRYNESS; Setting chart - 300 series dryer; CYCLE SELECTIONS
29 CONTROLS AND SETTINGS These temperature, dryness levels and options are available with the following cycles: BULK Y HE AV Y DUTY NORMAL 20 MIN FA ST D RY DELICA TES TO WEL S TIME DR Y TEMPERATURE (temp) High Normal Low Eco Dry DRYNESS High Normal Low ...
Page 30 - Setting chart - 400 series dryer
30 These temperature, dryness levels and options are available with the following cycles: BULK Y H EAV Y DUTY NORMAL 18 MIN FA ST D RY DELICA TES TIME DR Y INS TANT REFRESH TEMPERATURE (temp) Sanitize High Normal Low Eco Dry DRYNESS Max High Normal Low...
Page 31 - Setting chart - 500 series dryer; Sanitize
31 CONTROLS AND SETTINGS P R E D I C T I V E D R Y L U X C A R E D R Y POWER HOLD ‘SELECT’ 3s TO MUTE/UNMUTE PERFECT STEAMWRINKLE RELEASEEXTENDED TUMBLE ANTI-STATIC CONTROL LOCK DELAY TIME DRUM LIGHT TEMP HIGH SANITIZE NORMAL LOW ECO DRY HIGH MAX NORMAL LOW DAMP AUTO 75 MIN 60 MIN 45 MIN 30 MIN OPTI...
Page 32 - Setting chart - 600 series dryer
32 CONTROLS AND SETTINGS PERFECT STEAMWRINKLE RELEASEEXTENDED TUMBLE ANTI-STATIC CONTROL LOCK DELAY TIME DRUM LIGHT B A L A N C E D D R Y L U X C A R E D R Y POWER TEMP HIGH SANITIZE NORMAL LOW ECO DRY HIGH MAX NORMAL LOW DAMP AUTO 75 MIN 60 MIN 45 MIN 30 MIN OPTIONS SELECT DE-SELECT TIME DRY LEVEL ...
Page 33 - Auto dry cycles; Selecting the right cycle to save energy; Cycle selection; Timed dry cycles
33 Press the power button to turn on the unit. Turn the cycle selector in either direction or repeatedly press the cycles button (depending on your model) to scroll to the desired cycle. The indicator light for the cycle selected will be illuminated and the estimated drying time for Auto Dry cycles ...
Page 34 - Cycle settings; LOAD; Cycles
34 Cycle settings To set or change the drying temperature, dryness level, or drying time press the temp , dryness or time dry buttons to scroll to the desired settings. The indicator light for each setting will be illuminated when selected. To protect your fabrics, not all temperatures or dryness le...
Page 35 - Cycle options; select; To return to factory settings,; dryness; and; options; buttons at the same time and hold
35 sanitize (on select models) Recommended for durable fabrics and towels. Use this selection to remove harmful bacteria from your clothing or other items where sanitization is desired. This option will kill 99.9% of bacteria using a higher temperature required to kill bacteria. Please check fabric ...
Page 36 - Other features; hold ‘select’ 3 s to mute/unmute
36 anti-static (on select models) The anti-static option injects steam into the clothing just before cycle completion to reduce static. dry boost This option increases the drying effectiveness for difficult loads. In conjunction with Automatic moisture sensors and the dry boost option may slightly d...
Page 37 - installation
37 LuxCare TM Lint Shield filter The dryer is equipped with a clamshell style LuxCare TM Lint Shield filter. NOTE For step-by-step instructions on door reversal, refer to the installation sections of this manual. NOTE For step-by-step instructions cleaning the lint filter, refer to Cleaning the ...
Page 38 - STEPS; TIPS; Operating the dryer; OPERATING INSTRUCTIONS
38 STEPS TIPS IMPORTANT 1. Prepare load for drying. • Dry items of similar fabric, weight and construction in the same load. • Separate dark items from light-colored items. Separate items that shed lint from those that attract lint. • Check for stains which may not have been removed in washing. Repe...
Page 39 - dry level; buttons at the same time
39 OPERATING INSTRUCTIONS STEPS TIPS IMPORTANT 1. Select the appropriate cycle and settings for each load. • See Cycle Selection and Cycle Settings for detailed descriptions of cycle controls. • See Cycle Setting Charts to determine which settings are available for each cycle. • To provide the best ...
Page 40 - SUSPENSION ROLLERS; Before operating your dryer
40 NORMAL OPERATING SOUNDS Normal operating sounds B C D E A You may or may not hear the following sounds from your new dryer: 1. WATER VALVE (Steam models only.) The flow of water is controlled by electric solenoids. During operation there may be a clicking sound as the valve opens and closes to co...
Page 42 - installation instructions
42 CARE AND CLEANING Rubber Washers Must Be Present USE ONLY NEW HOSES 1. Turn off the water supply to dryer (steam models only) to avoid water leaks due to water pressure surges and unforeseen occurrences in the water supply. 2. Disconnect or unplug the electrical power to the dryer. 1. Review the ...
Page 43 - suggestions provided by The Soap and Detergent Association.; PROBLEM POSSIBLE
43 TROUBLESHOOTING Common drying inquiries Many drying problems involve poor cleaning results, poor soil and stain removal, residues of lint and scum, and fabric damage. For satisfactory drying results, follow these suggestions provided by The Soap and Detergent Association. PROBLEM POSSIBLE CAUSES ...
Page 44 - PROBLEM
44 TROUBLESHOOTING Before calling Before calling for service, review this list. It may save both time and expense. The list includes common occurrences that are not the result of defective workmanship or materials in this dryer. PROBLEM POSSIBLE CAUSES SOLUTIONS Dryer does not start. • Electrical po...
Page 45 - TROUBLESHOOTING
45 TROUBLESHOOTING PROBLEM POSSIBLE CAUSES SOLUTIONS Drying cycle takes too long, outside of the dryer feels too hot or smells hot. • Lint filter is clogged with lint. • Exhaust duct requirements have not been met. • Electric dryer is connected to a 208 volt circuit. • Drying procedures have not bee...
Page 46 - LIMITED WARRANTY; USA; North America; Electrolux Canada Corp.; Exclusions; This warranty does not cover the following:; DISCLAIMER OF IMPLIED WARRANTIES LIMITATION OF REMEDIES; CLAIMS BASED ON IMPLIED WARRANTIES, INCLUDING; If You Need Service
46 LIMITED WARRANTY USA 1-877-435-3287 Electrolux Home Products, Inc., North America 10200 David Taylor Drive Charlotte, NC 28262 Canada 1-800-265-8352 Electrolux Canada Corp. 5855 Terry Fox Way Mississauga, Ontario, Canada L5V 3E4 For the applicable warranty period as set forth below, as measured f...
Page 48 - electroluxappliances.com


 Electrolux EDC2075GDW
User Manual
Electrolux EDC2075GDW
User Manual
 Electrolux EDC2086GDW
User Manual
Electrolux EDC2086GDW
User Manual
 Electrolux EDC804BEWA
User Manual
Electrolux EDC804BEWA
User Manual
 Electrolux EDH3284PDW
User Manual
Electrolux EDH3284PDW
User Manual
 Electrolux EDH3586GDW
User Manual
Electrolux EDH3586GDW
User Manual
 Electrolux EDH3786GDW
User Manual
Electrolux EDH3786GDW
User Manual
 Electrolux EDH3896GDW
User Manual
Electrolux EDH3896GDW
User Manual
 Electrolux EDH803BEWA
User Manual
Electrolux EDH803BEWA
User Manual
 Electrolux EDH803BEWN
User Manual
Electrolux EDH803BEWN
User Manual
 Electrolux EDH803CEWA
User Manual
Electrolux EDH803CEWA
User Manual
 Electrolux EDH803R7WB
User Manual
Electrolux EDH803R7WB
User Manual
 Electrolux EDH803R9WB
User Manual
Electrolux EDH803R9WB
User Manual
 Electrolux EDH804U5WB
User Manual
Electrolux EDH804U5WB
User Manual
 Electrolux EDH903BEWA
User Manual
Electrolux EDH903BEWA
User Manual
 Electrolux EDH903R9WB
User Manual
Electrolux EDH903R9WB
User Manual
 Electrolux EDS6051
User Manual
Electrolux EDS6051
User Manual
 Electrolux EDV505
User Manual
Electrolux EDV505
User Manual
 Electrolux EDV5051
User Manual
Electrolux EDV5051
User Manual
 Electrolux EDV5552
User Manual
Electrolux EDV5552
User Manual
 Electrolux EDV6051
User Manual
Electrolux EDV6051
User Manual