Page 5 - Описание изделия
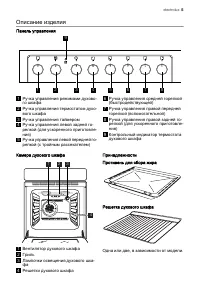
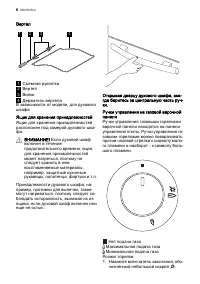
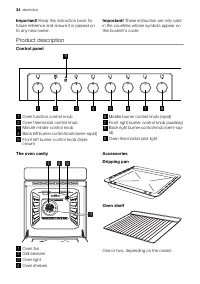
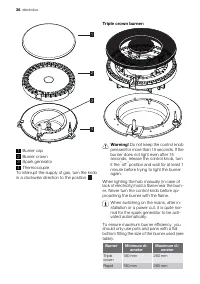
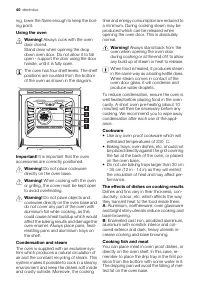
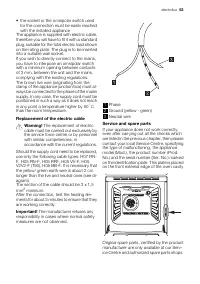
Описание изделия Панель управления 1 2 3 4 5 6 7 9 8 1 Ручка управления режимами духово‐ го шкафа 2 Ручка управления термостатом духо‐ вого шкафа 3 Ручка управления таймером 4 Ручка управления левой задней го‐ релкой (для ускоренного приготовле‐ ния) 5 Ручка управления левой передней го‐ релкой (с т...
Page 10 - Описание работы
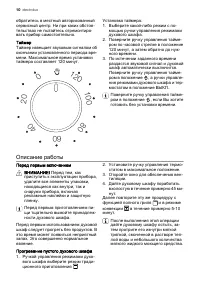
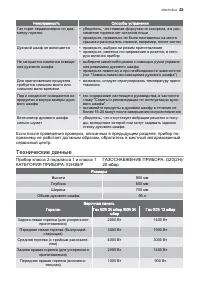
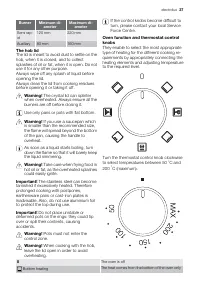
обратитесь в местный авторизованный сервисный центр. Ни при каких обстоя‐ тельствах не пытайтесь отремонтиро‐ вать прибор самостоятельно.ТаймерТаймер извещает звуковым сигналом об окончании установленного периода вре‐ мени. Максимальное время установки таймера составляет 120 минут. 0 20 40 60 80 100...
Page 11 - Полезные советы
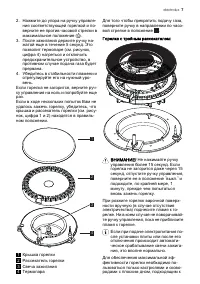
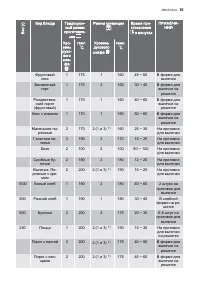
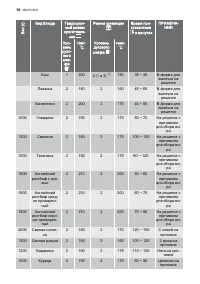
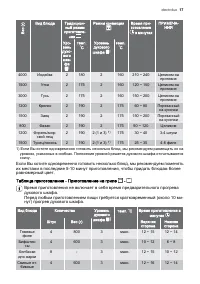
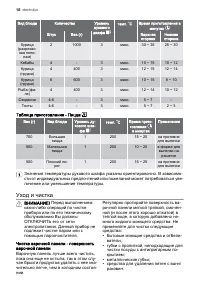
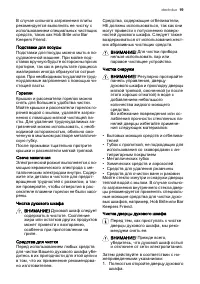
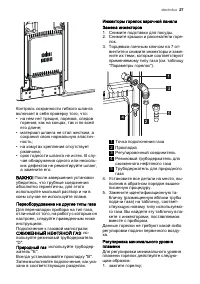
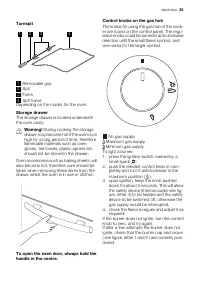
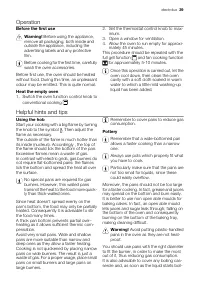
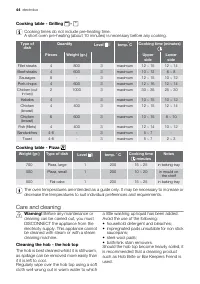
Полезные советы Эксплуатация варочной панелиНачинайте приготовление на большом пламени, повернув ручку управления на символ . Затем отрегулируйте величину пламени, как Вам нужно. Наружная сторона пламени имеет гораз‐ до более высокую температуру, чем его внутренняя часть (центр). Соответствен‐ но, в...
Page 18 - Уход и чистка
Вид блюда Количество Уровень духового шкафа темп. ° C Время приготовления в минутах Штук Вес (г) Верхняя сторона Нижняя сторона Курица (разрезан‐ ная попо‐ лам) 2 1000 3 макс. 30 ~ 35 25 ~ 30 Кебабы 4 - 3 макс. 10 ~ 15 10 ~ 12 Курица (грудка) 4 400 3 макс. 12 ~ 15 12 ~ 14 Курица (грудка) 6 600 3 мак...
Page 23 - Технические данные; Прибор класса 2 подкласса 1 и класса 1
Неисправность Способы устранения Газ горит неравномерно по диа‐ метру горелки • убедитесь, что главная форсунка не засорена, а в рас‐ секателе горелки нет остатков пищи • проверьте, правильно ли были поставлены на место крышка и рассекатель горелки, например, после чистки Духовой шкаф не включается ...
Page 25 - Установка
Диаметр обводного клапана Горелка Ø обводного клапана в 1/100 мм. Вспомогательная 28 Для ускоренного приготовления 32 С тройным рассекателем 56 Быстродействующая 42 Установка ВНИМАНИЕ! Этот прибор нельзя устанавливать на подставке. Следующие указания предназначены для квалифицированного специалиста ...
Page 32 - Installation
Electrolux. Thinking of you. Share more of our thinking at www.electrolux.com Contents Safety information 32 Product description 34 Operation 39 Helpful hints and tips 39 Care and cleaning 44 What to do if… 48 Technical data 48 Installation 50 European Guarantee 54 Subject to change without notice S...
Page 34 - Product description; Control panel
Important! Keep this instruction book for future reference and ensure it is passed onto any new owner. Important! These instruction are only valid in the countries whose symbols appear onthis booklet’s cover. Product description Control panel 1 2 3 4 5 6 7 9 8 1 Oven function control knob 2 Oven the...
Page 37 - The hob lid
Burner Minimum di- ameter Maximum di- ameter Semi rap-id 120 mm 220 mm Auxiliary 80 mm 160 mm The hob lid The lid is meant to avoid dust to settle on thehob, when it is closed, and to collectsplashes of oil or fat, when it is open. Do notuse it for any other purpose.Always wipe off any splash of liq...
Page 38 - When cooking with the oven; Oven thermostat pilot light; the oven function control knob
Pizza The bottom heating element, and the inner grill areon and the fan ensures air is circulated to cook thepizza toppings or pie fillings Full grill The full grill element will be on. Recommended forlarge quantities Grill turnspit The turnspit can be used for either spit roastingmeat or for kebabs...
Page 39 - Operation; Before the first use; Helpful hints and tips; Using the hob
Operation Before the first use Warning! Before using the appliance, remove all packaging, both inside andoutside the appliance, including theadvertising labels and any protectivefilm. Before cooking for the first time, carefullywash the oven accessories. Before first use, the oven should be heatedwi...
Page 41 - C and; Baking; Insert the spit frame on the second guide; Cooking times
White meat, poultry and fish in general, needto be cooked at a medium temperature (be-tween 150 ° C and 175 ° C). If you need to cook red meat (slightly browned on the out-side and more gently cooked in the inside), ahigher temperature (between 200 ° C and 230 ° C) for a short time is recommended. B...
Page 43 - ight
W e ight (gr.) Type of dish Conventional Cooking Fan cooking Cooking time mi- nutes NOTES Level temp. ° C Level temp. ° C Quiches 1 200 2 (1 and 3) 1) 180 35 ~ 45 In mould on the shelf Lasagne 2 180 2 160 45 ~ 65 In mould on the shelf Cannelloni 2 200 2 175 40 ~ 55 In mould on the shelf 1000 Beef 2 ...
Page 44 - Care and cleaning; Before any maintenance or; Cleaning the hob - the hob top
Cooking table - Grilling - Cooking times do not include pre-heating time.A short oven pre-heating (about 10 minutes) is necessary before any cooking. Type of dish Quantity Level temp. ° C Cooking time (minutes) Pieces Weight (gr.) Upper side Lower side Fillet steaks 4 800 3 maximum 12 ~ 15 12 ~ 14 B...
Page 46 - Models in stainless steel or aluminium; Before proceeding ensure the; Oven lamp replacement; Disconnect the appliance
4. handle the door by its left- and right-hand sides, then slowly turn it towards the ovenuntil it is half closed 5. gently pull the oven door off its site6. place it on a steady plan. Important! Clean the oven door glass with warm soapy water and a soft cloth only.Never use harsh abrasive. Once the...
Page 47 - Remove the faulty bulb and replace it with; Mounting the splashback; in a plastic bag you will find the two
3. Remove the faulty bulb and replace it with the new one. 4. Refit the glass cover.5. Reconnect to the electrical supply. Mounting the splashback The appliance is fitted with a metal back-guard which should be fitted to the rear of thecooktop. You will find the backguard insertedon top of the polys...
Page 48 - What to do if...; Symptoms; Technical data; Dimensions
What to do if… If the appliance is not working correctly, please carry out the following checks, before con-tacting your local Service Centre. Symptoms Solutions There is no spark when lighting thegas • check that the unit is plugged in and the electrical supply is switched on • check the mains fuse...
Page 49 - Total appliance electric rating
Oven Bottom heating element 1000 W Oven elements (Top + Bottom ) 1800 W Inner Grill Element 1650 W Full Grill Element 2450 W Pizza 2675 W Fan cooking 1825 W Grill turnspit 1654 W Convection fan 25 W Oven light 25 W Total rating 2700 W Supply voltage (50 Hz) 230 V Total appliance electric rating 2700...
Page 50 - This appliance cannot be; Positioning; This unit can be installed and
Installation Warning! This appliance cannot be positioned on a base. The following instructions are meant for aqualified installer, in order that the operationsof installation, regulation, and service areexecuted according to the existing regula-tions.Whenever changes are mode involving thedisconnec...
Page 51 - Our responsibility will not be; Combustion products discharge; • it can be easily inspected in order to check
Important! Our responsibility will not be involved in case of accidents caused by adefective or non existent earth connection. Combustion products discharge Gas cooking units must discharge combus-tion products through hoods directly con-nected to flues or outside. Connection using a rigid pipe or a...
Page 54 - European Guarantee; • The appliance guarantee is for the same
European Guarantee This appliance is guaranteed by Electrolux ineach of the countries listed at the back of thisuser manual, for the period specified in theappliance guarantee or otherwise by law. Ifyou move from one of these countries to an-other of the countries listed, the applianceguarantee will...