Page 2 - Visit our website for:; CUSTOMER CARE AND SERVICE
CONTENTS 1. SAFETY INFORMATION . . . . . . . . . . . . . . . . . . . . . . . . . . . . . . . . . . . . . . . . . . . . . . . . . . . 3 2. SAFETY INSTRUCTIONS . . . . . . . . . . . . . . . . . . . . . . . . . . . . . . . . . . . . . . . . . . . . . . . . . . 4 3. PRODUCT DESCRIPTION . . . . . . . . ....
Page 4 - SAFETY INSTRUCTIONS; Installation
• Never try to extinguish a fire with water, but switch off the appliance and then cover flame e.g. with a lid or afire blanket. • Do not store items on the cooking surfaces.• Do not use a steam cleaner to clean the appliance.• Metallic objects such as knives, forks, spoons and lids should not be pl...
Page 7 - PRODUCT DESCRIPTION; General overview
• Do not clean the catalytic enamel (if ap- plicable) with any kind of detergent. • Do not clean the burners in the dish- washer. 2.4 Internal light • The type of light bulb or halogen lamp used for this appliance, is only forhousehold appliances. Do not use it forhouse lighting. WARNING! Risk of el...
Page 8 - Oven shelf; Deep roasting pan; BEFORE FIRST USE; Initial Cleaning
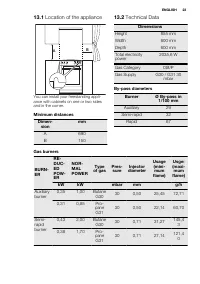
3.2 Cooking surface layout 1 4 2 3 1 Semi-rapid burner (63 mm) 2 Semi-rapid burner (63 mm) 3 Auxiliary burner (47 mm) 4 Triple Crown burner (126 mm) 3.3 Accessories • Oven shelf For cookware, cake tins, roasts. • Flat aluminized baking tray For cakes and biscuits. • Deep roasting pan To bake and roa...
Page 9 - Ignition of the burner
hot than usually. When you pre-heat theappliance for the first time, the appliancecan make an odour and smoke. This is the usual effect. Make sure the airflow issufficient. 5. HOB - DAILY USE WARNING! Refer to "Safety information"chapter. 5.1 Ignition of the burner WARNING! Be very careful w...
Page 10 - Turning the burner off; HOB - HELPFUL HINTS AND TIPS; Energy savings; Burner; Triple Crown; HOB - CARE AND CLEANING; are not
5.2 Turning the burner off To put the flame out, turn the knob to thesymbol . WARNING! Always turn the flame down orswitch it off before you remove thepans from the burner. 6. HOB - HELPFUL HINTS AND TIPS 6.1 Energy savings • If possible, always put the lids on the pans. • When the liquid starts to ...
Page 11 - Oven function; Timer - Minute minder
8.1 Activating and deactivating the appliance 1. Turn the oven functions control knobto an oven function. 2. Turn the temperature control knob toa temperature.The temperature indicator comes onwhile the temperature in the applianceincreases. 3. To deactivate the appliance, turn theoven functions con...
Page 12 - OVEN - USING THE ACCESSORIES; Inserting the baking tray
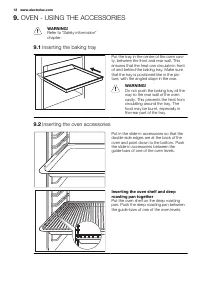
9. OVEN - USING THE ACCESSORIES WARNING! Refer to "Safety information"chapter. 9.1 Inserting the baking tray Put the tray in the centre of the oven cavi-ty, between the front and rear wall. Thisensures that the heat can circulate in frontof and behind the baking tray. Make surethat the tray ...
Page 13 - OVEN - HELPFUL HINTS AND TIPS; Baking cakes
10. OVEN - HELPFUL HINTS AND TIPS CAUTION! Use a deep baking tray for verymoist cakes. Fruit juices cancause permanent stains on theenamel. • The appliance has four shelf levels. Count the shelf levels from the bottomof the appliance floor. • You can cook different dishes on two levels at the same t...
Page 15 - Fan cooking
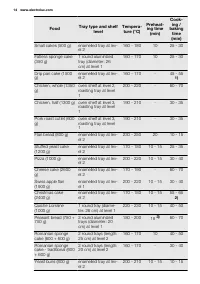
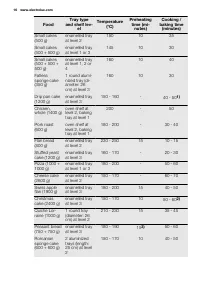
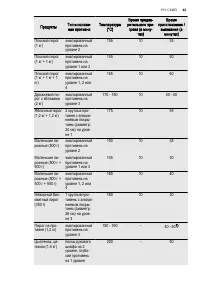
Food Tray type and shelf level Tempera- ture (°C) Preheat- ing time (min) Cook- ing / baking time (min) Swiss roll (500 g) enamelled tray at lev-el 1 150 - 170 10 15 - 20 Meringue (400 g) enamelled tray at lev-el 2 100 - 120 - 40 - 50 Crumble cake (1500g) enamelled tray at lev-el 3 180 - 190 10 - 15...
Page 17 - Top heat with fan
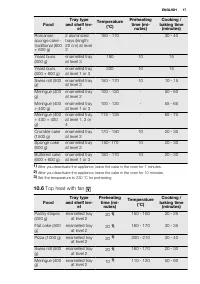
Food Tray type and shelf lev- el Temperature (°C) Preheating time (mi- nutes) Cooking / baking time (minutes) Romaniansponge cake -traditional (600+ 600 g) 2 aluminizedtrays (length:20 cm) at level2 160 - 170 - 30 - 40 Yeast buns(800 g) enamelled trayat level 3 190 10 15 Yeast buns(800 + 800 g) enam...
Page 18 - Information on acrylamides; OVEN - CARE AND CLEANING; Removing the shelf supports
Food Tray type and shelf lev- el Preheating time (mi- nutes) Temperature (°C) Cooking / baking time (minutes) Sponge cake(600 g) enamelled tray at level 2 20 1) 160 - 170 25 - 30 Buttered cake(600 g) enamelled tray at level 2 20 1) 160 - 170 25 - 30 Chicken,whole (1200 g) enamelled tray at level 2 -...
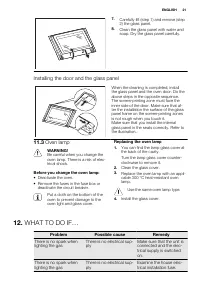
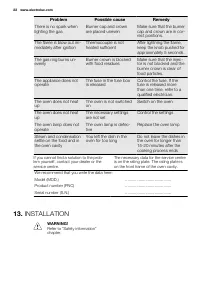
Page 21 - Before you change the oven lamp:; Replacing the oven lamp; WHAT TO DO IF...; Problem
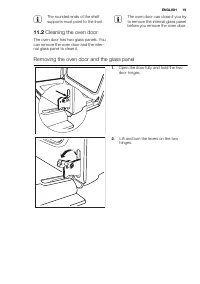
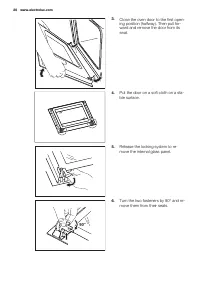
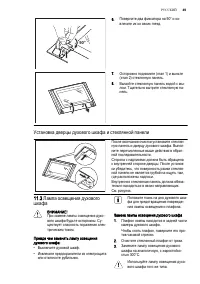
1 2 7. Carefully lift (step 1) and remove (step2) the glass panel. 8. Clean the glass panel with water andsoap. Dry the glass panel carefully. Installing the door and the glass panel When the cleaning is completed, installthe glass panel and the oven door. Do theabove steps in the opposite sequence....
Page 22 - Switch on the oven; INSTALLATION
Problem Possible cause Remedy There is no spark whenlighting the gas Burner cap and crownare placed uneven Make sure that the burnercap and crown are in cor-rect positions. The flame is blow out im-mediately after ignition Thermocouple is notheated sufficient After lightning the flame,keep the knob ...
Page 24 - Gas Connection
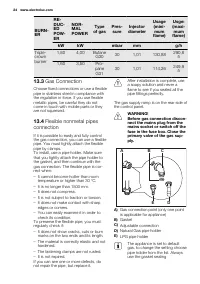
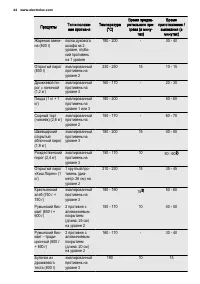
BURN-ER RE-DUC-EDPOW-ER NOR-MALPOWER Type of gas Pres- sure Injector diameter Usage (mini- mum flame) Usge: (maxi- mum flame) kW kW mbar mm g/h Triple-crownburner 1,80 4,00 Butane G30 30 1,01 130,88 290,8 5 1,60 3,50 Pro- pane G31 30 1,01 114,26 249,9 5 13.3 Gas Connection Choose fixed connections o...
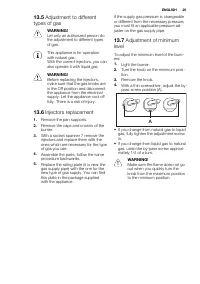
Page 25 - Adjustment of minimum
13.5 Adjustment to different types of gas WARNING! Let only an authorized person dothe adjustment to different typesof gas. This appliance is for operationwith natural gas.With the correct injectors, you canalso operate it with liquid gas. WARNING! Before replacing the injectors,make sure that the g...
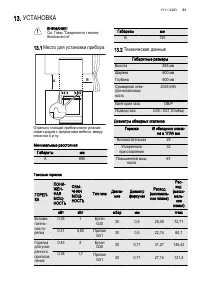
Page 26 - Levelling
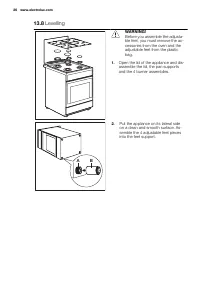
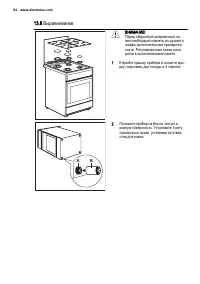
13.8 Levelling WARNING! Before you assemble the adjusta-ble feet, you must remove the ac-cessories from the oven and theadjustable feet from the plasticbag. 1. Open the lid of the appliance and dis-assemble the lid, the pan supportsand the 4 burner assemblies. A B 2. Put the appliance on its lateral...
Page 27 - Electrical installation; ENVIRONMENT CONCERNS
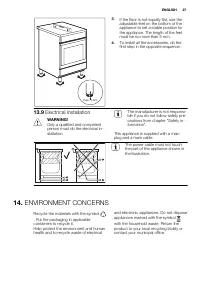
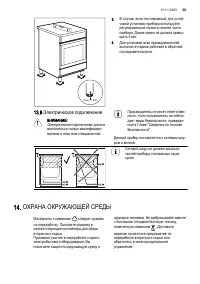
max. 5 mm 3. If the floor is not equally flat, use theadjustable feet on the bottom of theappliance to set a stable position forthe appliance. The length of the feetmust be no more than 5 mm. 4. To install all the accessories, do thefirst step in the opposite sequence. 13.9 Electrical installation W...
Page 28 - ПОДДЕРЖКА ПОТРЕБИТЕЛЕЙ И СЕРВИСНОЕ ОБСЛУЖИВАНИЕ
СОДЕРЖАНИЕ 1. СВЕДЕНИЯ ПО ТЕХНИКЕ БЕЗОПАСНОСТИ . . . . . . . . . . . . . . . . . . . . . . . . . . . . . . . . . . . . . . . . . . . . . . 292. УКАЗАНИЯ ПО БЕЗОПАСНОСТИ . . . . . . . . . . . . . . . . . . . . . . . . . . . . . . . . . . . . . . . . . . . . . . . . . . . . . . . 303. ОПИСАНИЕ ИЗДЕЛИЯ...
Page 30 - УКАЗАНИЯ ПО БЕЗОПАСНОСТИ
• Не эксплуатируйте данный прибор с помощью внешнего таймера или отдельной системы дистанционного управле‐ ния. • Оставление на варочной панели продуктов, готовящихся на жире или масле, может представлять опасность и привести к пожару. • Ни в коем случае не пытайтесь залить пламя водой; вместо этого...
Page 34 - Функциональные элементы варочной панели
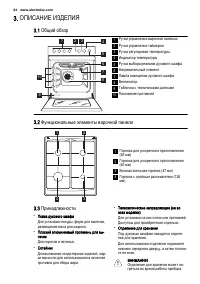
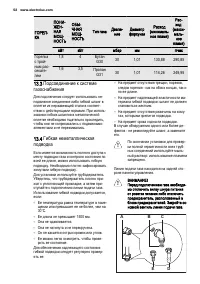
3. ОПИСАНИЕ ИЗДЕЛИЯ 3.1 Общий обзор 10 1 2 3 5 4 6 7 8 1 2 3 4 9 1 Ручки управления варочной панелью 2 Ручка управления таймером 3 Ручка регулировки температуры 4 Индикатор температуры 5 Ручка выбора режимов духового шкафа 6 Нагревательный элемент 7 Лампа освещения духового шкафа 8 Вентилятор 9 Табл...
Page 35 - ПЕРЕД ПЕРВЫМ ИСПОЛЬЗОВАНИЕМ; Предварительная чистка; ВАРОЧНАЯ ПАНЕЛЬ - ЕЖЕДНЕВНОЕ ИСПОЛЬЗОВАНИЕ
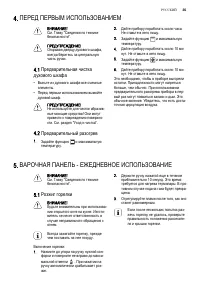
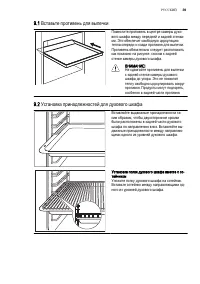
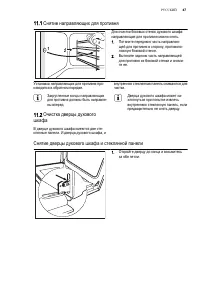
4. ПЕРЕД ПЕРВЫМ ИСПОЛЬЗОВАНИЕМ ВНИМАНИЕ! См. Главу "Сведения по технике безопасности". ПРЕДУПРЕЖДЕНИЕ! Открывая дверцу духового шкафа, всегда беритесь за центральную часть ручки. 4.1 Предварительная чистка духового шкафа • Выньте из духового шкафа все съемные элементы. • Перед первым использ...
Page 36 - Выключение горелки; Горелка
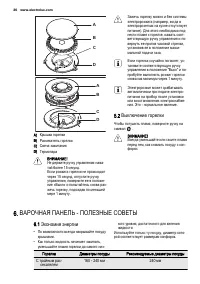
A B C D A B CD A) Крышка горелки B) Рассекатель горелки C) Свеча зажигания D) Термопара ВНИМАНИЕ! Не держите ручку управления нажа‐ той более 15 секунд. Если розжига горелки не происходит через 15 секунд, отпустите ручку управления, поверните ее в положе‐ ние «Выкл» и попытайтесь снова раз‐ жечь гор...
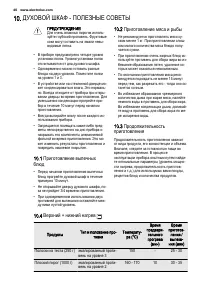
Page 37 - ДУХОВОЙ ШКАФ - ЕЖЕДНЕВНОЕ ИСПОЛЬЗОВАНИЕ; Включение и выключение
Горелка Диаметры посуды Рекомендуемые диаметры посуды Ускоренного приготовления 140 - 240 мм 240 мм Вспомогатель‐ ная 120 - 180 мм 180 мм Следует использовать посуду с как можно бо‐ лее толстым и плоским дном. 7. ВАРОЧНАЯ ПАНЕЛЬ - УХОД И ЧИСТКА ВНИМАНИЕ! См. Главу "Сведения по технике безопаснос...
Page 38 - Режимы духового шкафа; ДУХОВОЙ ШКАФ - ИСПОЛЬЗОВАНИЕ ДОПОЛНИТЕЛЬНЫХ
8.3 Режимы духового шкафа Режим духового шкафа Применение Положение «Выкл» Прибор выключен. Верхний + нижний нагрев Нагрев с помощью верхнего и нижнего нагревательных эле‐ ментов. Выпекание и жарка на одном уровне духового шка‐ фа. Нижний нагрева‐ тельный элемент Тепло поступает только снизу духовог...
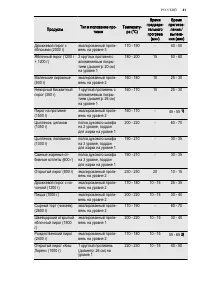
Page 42 - Режим конвекции
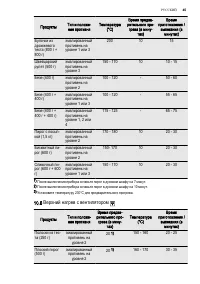
Продукты Тип и положение про‐ тивня Температу‐ ра (°C) Время предвари‐ тельного прогрева (мин) Время приготов‐ ления / выпека‐ ния (мин) Крестьянский хлеб (750 г + 750 г) 2 круглых противня с алюминиевым покры‐ тием (диаметр: 20 см) на уровне 1 180 - 200 18 3) 60 - 70 Румынский бисквит (600 г + 600 ...
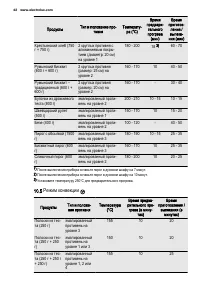
Page 45 - Верхний нагрев с вентилятором
Продукты Тип и положе‐ ние противня Температура (°C) Время предва‐ рительного про‐ грева (в мину‐ тах) Время приготовления / выпекания (в минутах) Булочки из дрожжевого теста (800 г + 800 г) эмалированный противень на уровне 1 или 3 200 10 15 Швейцарский рулет (500 г) эмалированный противень на уров...
Page 46 - Информация об акриламидах
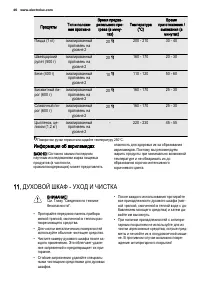
Продукты Тип и положе‐ ние противня Время предва‐ рительного про‐ грева (в мину‐ тах) Температура (°C) Время приготовления / выпекания (в минутах) Пицца (1 кг) эмалированный противень на уровне 2 20 1) 200 - 210 30 - 40 Швейцарский рулет (500 г) эмалированный противень на уровне 2 20 1) 160 - 170 20...
Page 51 - Место для установки прибора; Технические данные
13. УСТАНОВКА ВНИМАНИЕ! См. Главу "Сведения по технике безопасности". 13.1 Место для установки прибора B A Отдельно стоящий прибор можно устанав‐ ливать рядом с предметами мебели, между ними или в углу. Минимальные расстояния Габариты мм A 690 Габариты мм B 150 13.2 Технические данные Габари...
Page 55 - Электрическое подключение; ОХРАНА ОКРУЖАЮЩЕЙ СРЕДЫ
max. 5 mm 3. В случае, если пол неровный, для устой‐ чивой установки прибора используйте регулировочные ножки в нижней части прибора. Длина ножки не должна превы‐ шать 5 мм. 4. Для установки всех принадлежностей выполните первое действие в обратной последовательности. 13.9 Электрическое подключение ...


 Electrolux EKG 603101 W (X)
User Manual
Electrolux EKG 603101 W (X)
User Manual
 Electrolux EKG 603102 W (X)
User Manual
Electrolux EKG 603102 W (X)
User Manual
 Electrolux EKG 603300 W (X)
User Manual
Electrolux EKG 603300 W (X)
User Manual
 Electrolux EKG 603301 W (X)
User Manual
Electrolux EKG 603301 W (X)
User Manual
 Electrolux EKG 603303 W (X)
User Manual
Electrolux EKG 603303 W (X)
User Manual
 Electrolux EKK 61500 OW
User Manual
Electrolux EKK 61500 OW
User Manual
 Electrolux EKM 60150 X
User Manual
Electrolux EKM 60150 X
User Manual
 Electrolux EKM 70150 X
User Manual
Electrolux EKM 70150 X
User Manual