Page 3 - Welcome to the world of Electrolux
Welcome to the world of Electrolux Thank you for choosing a first class product from Electrolux, which hopefully will provide you with lots of pleasure in the future. The Electrolux ambition is to offer a wide variety of quality products that make your life more comfortable. You find some examples o...
Page 4 - Guide to Use the instructions; Contents; For the user
4 electrolux Guide to Use the instructions The following symbols will be found in the text to guide you throughout theInstructions: Safety Instructions ) Step by step instructions for an operation Hints and Tips Environmental information This appliance complies with the following E.E.C. Directives :...
Page 5 - Important safety information; Installation; E N G L I S H
electrolux 5 Important safety information These warnings have been given for the safety of you and others. Wetherefore ask you to carefully read the procedures of installing and usingthis cooker. Installation • The work of installation must be carried out by competent and qualifiedinstallers accordi...
Page 6 - During Operation; Do not use for other purposes.
6 electrolux supervision or instruction by aresponsible person to ensure thatthey can use the appliance safely. During Operation • This product is intended for the cooking of food and must not be usedfor other purposes. • It is dangerous to modify, or attempt to modify, the characteristics of thisap...
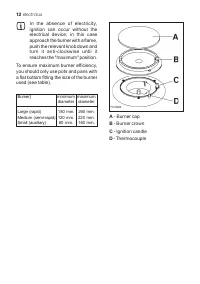
Page 7 - • To facilitate ignition, light the; Service
electrolux 7 • The appliance is heavy, move it carefully. • Before maintenance and cleaning disconnect the appliance and allow tocool. • To facilitate ignition, light the burners before placing pans onthe grid. After having lit the burners check that the flame is regular. • Always lower the flame or...
Page 9 - Control Panel
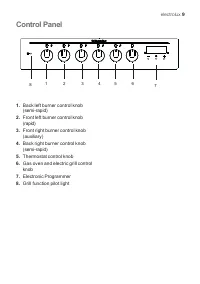
electrolux 9 C ° 1. Back left burner control knob(semi-rapid) 2. Front left burner control knob(rapid) 3. Front right burner control knob(auxiliary) 4. Back right burner control knob(semi-rapid) 5. Thermostat control knob 6. Gas oven and electric grill controlknob 7. Electronic Programmer 8. Grill f...
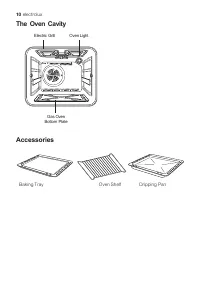
Page 10 - The Oven Cavity; Accessories
10 electrolux The Oven Cavity Electric Grill Oven Light Gas Oven Bottom Plate Accessories Baking Tray Oven Shelf Dripping Pan
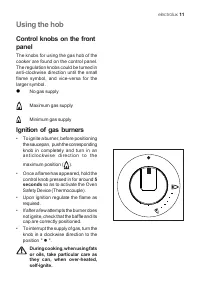
Page 11 - Ignition of gas burners; seconds; Using the hob
electrolux 11 Control knobs on the frontpanel The knobs for using the gas hob of thecooker are found on the control panel.The regulation knobs could be turned inanti-clockwise direction until the smallflame symbol, and vice-versa for thelarger symbol. z No gas supply Maximum gas supply Minimum gas s...
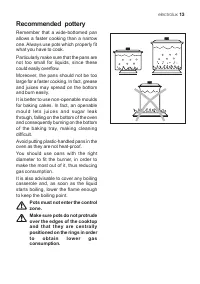
Page 13 - Recommended pottery
electrolux 13 Recommended pottery Remember that a wide-bottomed panallows a faster cooking than a narrowone. Always use pots which properly fitwhat you have to cook.Particularly make sure that the pans arenot too small for liquids, since thesecould easily overflow.Moreover, the pans should not be to...
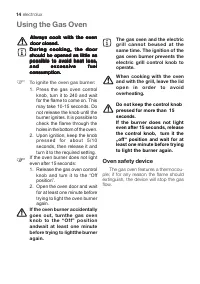
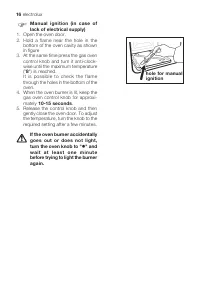
Page 14 - Using the Gas Oven; Oven safety device; To ignite the oven gas burner:; Do not keep the control knob
14 electrolux Using the Gas Oven Oven safety device The gas oven features a thermocou- ple; if for any reason the flame shouldextinguish, the device will stop the gasflow. Always cook with the oven Always cook with the oven Always cook with the oven Always cook with the oven Always cook with the ove...
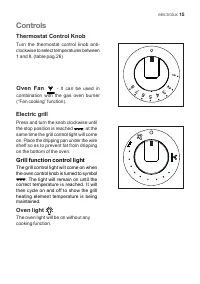
Page 15 - Electric grill; Oven light; Controls
electrolux 15 Electric grill Press and turn the knob clockwise untilthe stop position is reached , at the same time the grill control light will comeon. Place the dripping pan under the wireshelf so as to prevent fat from drippingon the bottom of the oven. Grill function control light The grill cont...
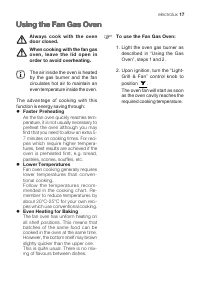
Page 17 - Using the Fan Gas Oven; Faster Preheating
electrolux 17 Using the Fan Gas Oven Using the Fan Gas Oven Using the Fan Gas Oven Using the Fan Gas Oven Using the Fan Gas Oven The air inside the oven is heatedby the gas burner and the fancirculates hot air to maintain aneven temperature inside the oven. The advantage of cooking with thisfunction...
Page 18 - normal
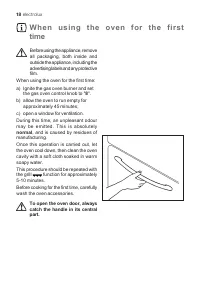
18 electrolux W h e n u s i n g t h e o v e n f o r t h e f i r s ttime Before using the appliance, removeall packaging, both inside andoutside the appliance, including theadvertising labels and any protectivefilm. When using the oven for the first time:a) Ignite the gas oven burner and set the gas ...
Page 19 - The electronic minute minder; To set the countdown
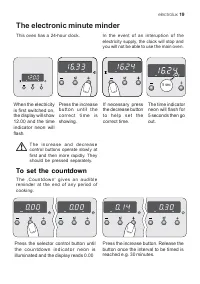
electrolux 19 When the electricityis first switched on,the display will show12.00 and the timeindicator neon willflash. The electronic minute minder Press the increaseb u t t o n u n t i l t h ec o r r e c t t i m e i sshowing. If necessary pressthe decrease buttont o h e l p s e t t h ecorrect time...
Page 20 - To cancel the countdown
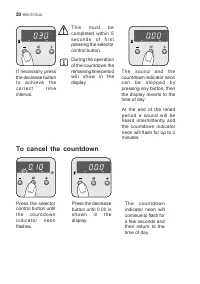
20 electrolux If necessary pressthe decrease buttont o a c h i e v e t h ec o r r e c t t i m einterval. T h i s m u s t b ecompleted within 5s e c o n d s o f f i r s tpressing the selectorcontrol button. To cancel the countdown T h e s o u n d a n d t h ecountdown indicator neonc a n b e s t o p p...
Page 21 - Switching on the time display; Energy save mode; Switching off the time display
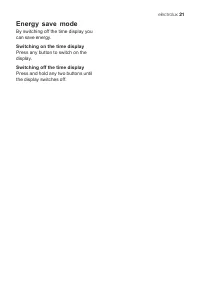
electrolux 21 Switching on the time display Press any button to switch on thedisplay. Energy save mode By switching off the time display youcan save energy. Switching off the time display Press and hold any two buttons untilthe display switches off.
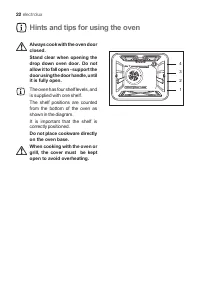
Page 22 - Hints and tips for using the oven
22 electrolux Always cook with the oven doorclosed.Stand clear when opening thedrop down oven door. Do notallow it to fall open - support thedoor using the door handle, untilit is fully open. The oven has four shelf levels, andis supplied with one shelf.The shelf positions are countedfrom the bottom...
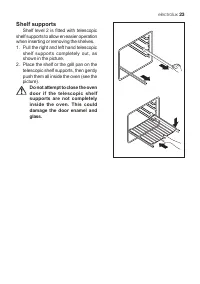
Page 23 - Shelf supports
electrolux 23 Shelf supports Shelf level 2 is fitted with telescopic shelf supports to allow en easier operationwhen inserting or removing the shelves.1. Pull the right and left hand telescopic shelf supports completely out, asshown in the picture. 2. Place the shelf or the grill pan on the telescop...
Page 24 - Condensation and Steam
24 electrolux Condensation and Steam The oven is supplied with an exclusives y s t e m w h i c h p r o d u c e s a n a t u r a lcirculation of air and the constantrecycling of steam. This system makesi t p o s s i b l e t o c o o k i n a s t e a m yenvironment and keep the dishes softinside and crus...
Page 25 - For the cooking of cakes
electrolux 25 For the cooking of cakes Pre-heat the oven, unless indicateddifferently, for at least 10 minutes beforeuse. Do not open the oven door whencooking dishes which must raise (e.g.raised pastries and soufflés); the jet ofcold air would block the raising process.To check if cakes are cooked,...
Page 26 - Grilling
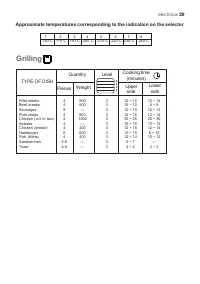
26 electrolux Grilling The following types of meat are suitablefor grilling. Mostly meat or offal cut inslices or pieces of various sizes, but notusually very thick, poultry cut in half andflattened, fish, some vegetables (e.g.courgettes, aubergines, tomatoes, etc.),skewers of meat or fish and seafo...
Page 27 - Suggestions for gas burners
electrolux 27 Suggestions for gas burners Start your cooking with a big flame byturning the knob to the symbol . Thenadjust the flame as necessary.The outside of the flame is much hotterthan its inside (nucleus). Accordingly ,the top of the flame should lick thebottom of the pan. Excessive flamesmea...
Page 28 - Cooking table; A short oven pre-heating
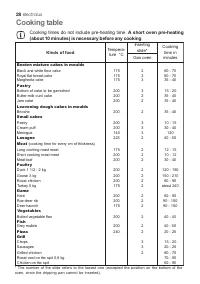
28 electrolux Cooking table Cooking times do not include pre-heating time. A short oven pre-heating (about 10 minutes) is necessary before any cooking * The number of the slide refers to the lowest one (excepted the position on the bottom of theoven, since the dripping pan cannot be inserted). d o o...
Page 30 - Cleaning and maintenance; Cleaning the cooker
30 electrolux Cleaning and maintenance Before each operation,disconnect the appliance.This appliance cannot becleaned with steam or with asteam cleaning machine.The oven should be kept cleanat all times. A build-up of fats orother foodstuffs could result in afire, especially in the grill pan. Cleani...
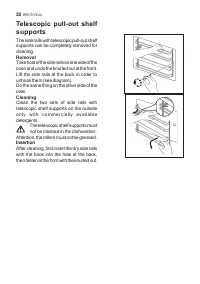
Page 32 - Removal; Insertion
32 electrolux Telescopic pull-out shelfsupports The side rails with telescopic pull-out shelfsupports can be completely removed forcleaning. Removal Take hold of the side rails on one side of theoven and undo the knurled nut at the front.Lift the side rails at the back in order tounhook them (see di...
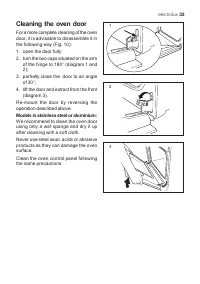
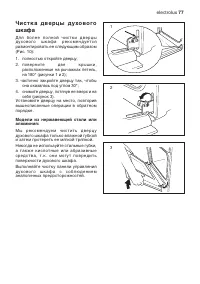
Page 33 - Cleaning the oven door; Models in stainless steel or aluminium:
electrolux 33 Cleaning the oven door For a more complete cleaning of the ovendoor, it is advisable to disassemble it inthe following way (Fig. 10):1. open the door fully;2. turn the two caps situated on the arm of the hinge to 180° (diagram 1 and2); 3. partially close the door to an angle of 30°; 4....
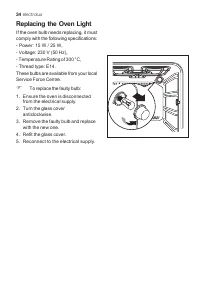
Page 34 - Replacing the Oven Light
34 electrolux Replacing the Oven Light If the oven bulb needs replacing, it mustcomply with the following specifications:- Power: 15 W / 25 W,- Voltage: 230 V (50 Hz),- Temperature Rating of 300 °C,- Thread type: E14.These bulbs are available from your localService Force Centre. ) To replace the fau...
Page 35 - Something not working
electrolux 35 Something not working If the appliance doesn't work properly check the following points before asking forservice: l a m r o n b a s m e e s s a g f o w o lf e h T • :t a h t e r u s e k a M ; d e t c u r t s b o t o n e r a s e l o h r e d a e p s e m a lf e h t •• ; g n i k r o w s i ...
Page 36 - Technical data; Hob
36 electrolux Technical data Technical DataOven Electric Grill 1650 W Gas Oven burner2700 W (G20 20 mbar-G30 30 mbar) -2400 W (G20 13 mbar)Oven light 15 W Total Electric Rating 1675 W Supply voltage (50 Hz) 230 V Hob Rear left burner (semi-rapid) 2000 W (G20 20 mbar/G30 30 mbar)-1400 W (G20 13 mbar)...
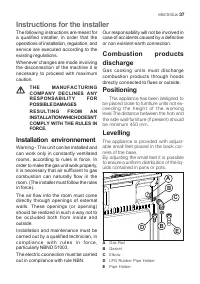
Page 37 - Installation environnement; Instructions for the installer; Positioning; Levelling
electrolux 37 The following instructions are meant fora qualified installer, in order that theoperations of installation, regulation, andservice are executed according to theexisting regulations.Whenever changes are mode involvingthe disconnection of the machine it isnecessary to proceed with maximu...
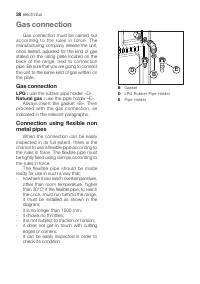
Page 38 - Gas connection
38 electrolux Gas connection Gas connection must be carried out according to the rules in force. Themanufacturing company release the unit,once tested, adjusted for the kind of gasstated on the rating plate located on theback of the range, next to connectionpipe. Be sure that you are going to connec...
Page 39 - IMPORTANT; YES
electrolux 39 The control of preservation of the flexible pipe consists in checking that:- it doesn't show cracks, cuts, marks ofburnings both on the end parts and onits full extent; - the material is not hardened, but showsits normal elasticity; - the fastening clamps are not rusted; - expiry term ...
Page 41 - Replacement of gas oven
electrolux 41 Replacement of gas oven burner nozzleTo replace the gas oven nozzle, follow this procedure: 1. Remove the bottom plate of the ovencavity (“A”) ; 2. Undo the two fixing screws (“C”) which keep the oven gas burner inplace 3 . Gently slide the oven gas burner offthe injector support (“D”)...
Page 43 - Burner characteristics
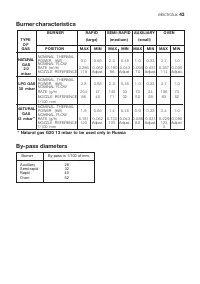
electrolux 43 Burner characteristics BURNER RAPID SEMI-RAPID AUXILIARY OVEN (large) (medium) (small) POSITION MAX MIN MAX MIN MAX MIN MAX MIN NOMINAL THERMALPOWER (kW) 3 . 0 0.65 2 . 0 0.45 1 . 0 0.33 2.7 1 . 0 NOMINAL FLOW RATE (m 3 /h) 0.286 0 . 0 6 2 0 . 1 9 0 0 . 0 4 3 0 . 0 9 5 0 . 0 3 1 0.257 ...
Page 44 - Electrical connection
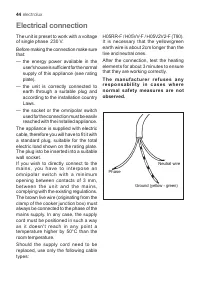
44 electrolux Electrical connection The unit is preset to work with a voltageof single phase 230 V.Before making the connection make surethat:— the energy power available in the user's house is sufficient for the normalsupply of this appliance (see ratingplate). — the unit is correctly connected to ...
Page 45 - Service and spare parts
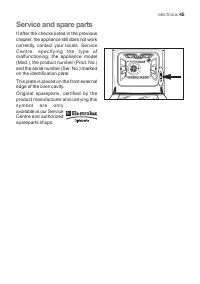
electrolux 45 Service and spare parts If after the checks listed in the previouschapter, the appliance still does not workcorrectly, contact your locals ServiceC e n t r e , s p e c i f y i n g t h e t y p e o fmalfunctioning, the appliance model(Mod.), the product number (Prod. No.)and the serial n...
Page 46 - European Guarantee
46 electrolux This appliance is guaranteed by Electrolux in each of the countries listed at the back of this user manual, for the period specified in the appliance guarantee orotherwise by law. If you move from one of these countries to another of the countrieslisted below the appliance guarantee wi...
Page 49 - Пояснение к пользованию настоящей инструкцией; Оглавление; Инструкции для пользователя Инструкции для установщика
electrolux 49 Пояснение к пользованию настоящей инструкцией В т е к с т е В а м в с т р е т я т с я с л е д у ю щ и е с и м в о л ы , к о т о р ы е п о м о г у т В а мориентироваться в положениях настоящей инструкции: Указания по безопасности ) Указания по пошаговому выполнению той или иной операции...
Page 50 - Важные указания по безопасности; Установка; РУССКИЙ
50 electrolux Важные указания по безопасности Данные предупреждения представлены в целях Вашей безопасности иб е з о п а с н о с т и о к р у ж а ю щ и х . П о э т о м у м ы п р о с и м В а с в н и м а т е л ь н оознакомиться с правилами установки и эксплуатации данной плиты. Установка • Р а б о т ы ...
Page 51 - При эксплуатации
electrolux 51 • вследствие недостатка опыта илиз н а н и й н е м о г у т б е з о п а с н оэ к с п л у а т и р о в а т ь и з д е л и е б е зп р и с м о т р а о т в е ч а ю щ е г о з а и хбезопасность лица или получения отнего соответствующих инструкций,п о з в о л я ю щ и х и м б е з о п а с н оэкспл...
Page 52 - Техническое обслуживание
52 electrolux • Газовый духовой шкаф нагревается засчет циркуляции воздуха. Отверстия,имеющиеся на дне духового шкафа, нив к о е м с л у ч а е н е д о л ж н ы б ы т ьзагорожены. Не покрывайте боковыестороны духового шкафа алюминиевойфольгой, в частности, нижнюю частьдверцы. • Прибор обладает значите...
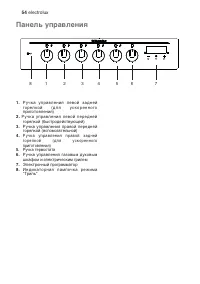
Page 54 - Панель управления
54 electrolux C ° 1. Р у ч к а у п р а в л е н и я л е в о й з а д н е йг о р е л к о й ( д л я у с к о р е н н о г о приготовления) 2 . Ручка управления левой передней горелкой (быстродействующей) 3. Ручка управления правой переднейгорелкой (вспомогательной) 4. Р у ч к а у п р а в л е н и я п р а в...
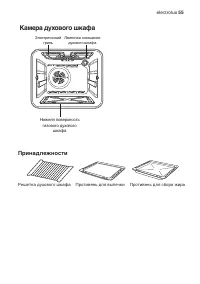
Page 55 - Камера духового шкафа; Принадлежности
electrolux 55 Камера духового шкафа Электрический гриль Лампочка освещения духового шкафа Нижняя поверхность газового духового шкафа Принадлежности Решетка духового шкафа Противень для выпечки Противень для сбора жира
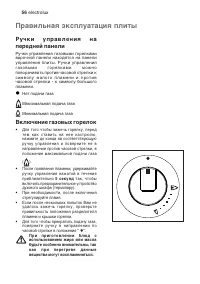
Page 56 - Включение газовых горелок; Правильная эксплуатация плиты
56 electrolux Р у ч к и у п р а в л е н и я н апередней панели Ручки управления газовыми горелкамиварочной панели находятся на панелиуправления плиты. Ручки управленияг а з о в ы м и г о р е л к а м и м о ж н оповорачивать против часовой стрелки кс и м в о л у м а л о г о п л а м е н и и п р о т и в...
Page 58 - Рекомендуемая посуда
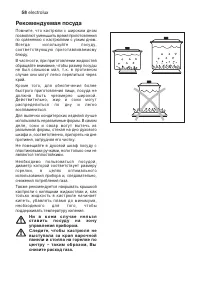
58 electrolux Рекомендуемая посуда Помните, что кастрюли с широким дномпозволяют уменьшить время приготовленияпо сравнению с кастрюлями с узким дном.В с е г д а и с п о л ь з у й т е п о с у д у ,с о о т в е т с т в у ю щ у ю п р и г о т а в л и в а е м о м ублюду. В частности, при приготовлении жид...
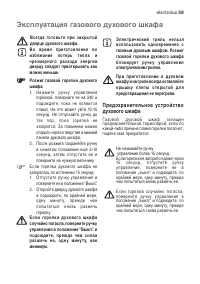
Page 59 - Эксплуатация газового духового шкафа
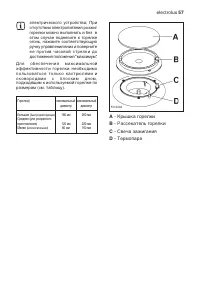
electrolux 59 Эксплуатация газового духового шкафа Предохранительное устройстводухового шкафа Г а з о в о й д у х о в о й ш к а ф о с н а щ е нпредохранительной термопарой; если покакой-либо причине пламя горелки погаснет,подача газа прекратится. В с е гд а го т о в ь т е п р и з а к р ы т о йдверце...
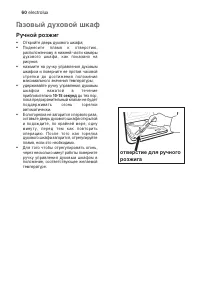
Page 60 - Ручной розжиг; Газовый духовой шкаф
60 electrolux Ручной розжиг • Откройте дверь духового шкафа; • П о д н е с и т е п л а м я к о т в е р с т и ю ,расположенному в нижней части камерыд у х о в о г о ш к а ф а , к а к п о к а з а н о н арисунке. • нажмите на ручку управления духовымшкафом и поверните ее против часовойс т р е л к и д о...
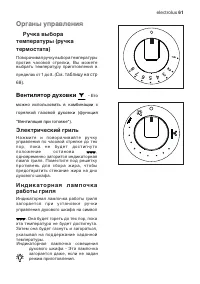
Page 61 - Электрический гриль; Вентилятор духовки; Органы управления
electrolux 61 Электрический гриль Н а ж м и т е и п о в о р а ч и в а й т е р у ч к ууправления по часовой стрелке до техп о р , п о к а н е б у д е т д о с т и г н у т оп о л о ж е н и е о с т а н о в а , одновременно загорится индикаторнаялампа гриля. Поместите под решеткуп р о т и в е н ь д л я с...
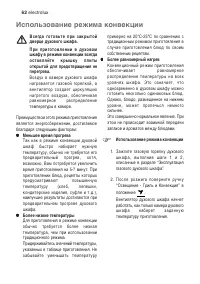
Page 62 - Использование режима конвекции; Меньшее время прогрева; Более равномерный нагрев
62 electrolux Использование режима конвекции Воздух в камере духового шкафан а г р е в а е т с я га з о в о й го р е л ко й , ав е н т и л я т о р с о з д а е т ц и р к у л я ц и юн а г р е т о го в о з д у ха , о б е с п е ч и в а яра в н о м е р н о е ра с п р ед е л е н и етемпературы в камере. П...
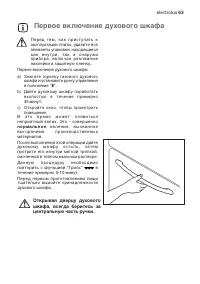
Page 63 - Первое включение духового шкафа
electrolux 63 Первое включение духового шкафа П е р ед т е м , к а к п р и с т у п ат ь кэксплуатации плиты, удалите всеэлементы упаковки, находящиесяк а к в н у т р и , та к и с н а р у ж ип р и б о ра , в к л ю ч а я р е к л а м н ы енаклейки и защитную пленку.. Первое включение духового шкафа: a)...
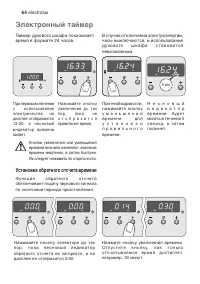
Page 64 - Электронный таймер; Установка обратного отсчета времени
64 electrolux При первом включениис и с п ол ь з о в а н и еэ л е к т р и ч е с т в а н адисплее отображается12 . 0 0 , а н е о н о в ы йи н д и к ат о р в р е м е н имигает. Электронный таймер Н а ж и м а й т е к н о п к уу в е л и ч е н и я д о т ехп о р , п о к а н ео т о б р а з и т с яправильно...
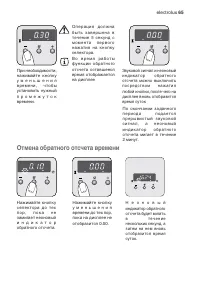
Page 65 - Отмена обратного отсчета времени
electrolux 65 При необходимости,нажимайте кнопкуу м е н ь ш е н и яв р е м е н и , ч т о б ыустановить нужныйп р о м е ж у т о квремени. О п е р а ц и я д о л ж н аб ы т ь з а в е р ш е н а втечение 5 секунд см о м е н та п е р в о г онажатия на кнопкуселектора. Отмена обратного отсчета времени Звук...
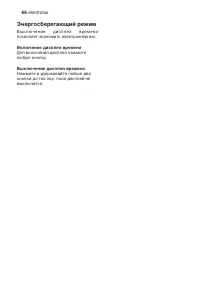
Page 66 - Энергосберегающий режим
66 electrolux Включение дисплея времени Для включения дисплея нажмителюбую кнопку. Энергосберегающий режим В ы к л ю ч е н и е д и с п л е я в р е м е н ипозволяет экономить электроэнергию. Выключение дисплея времени Нажмите и удерживайте любые двекнопки до тех пор, пока дисплей невыключится.
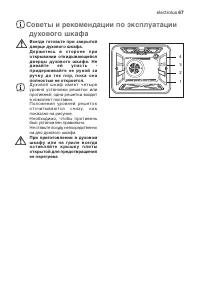
Page 67 - Советы и рекомендации по эксплуатации
electrolux 67 Всегда готовьте при закрытойдверце духового шкафа.Д е рж и т е с ь в с т о р о н е п р иоткрывании откидывающейсядверцы духового шкаф а. Нед а в а й т е е й у п а с т ь -п р и д е рж и в а й т е е е р у ко й з ару ч к у д о т е х п о р , п о к а о н аполностью не откроется. Д у хо в о ...
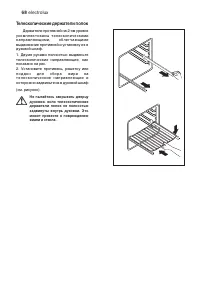
Page 68 - Телескопические держатели полок
68 electrolux Телескопические держатели полок Держатели противней на 2-ом уровне у ко м п л е к т о в а н ы т е л е с ко п и ч е с к и м ин а п ра в л я ю щ и м и , о б л е г ч а ю щ и м ивыдвижение противней и установку их вдуховой шкаф. 1. Двумя руками полностью выдвиньтетелескопические направляющ...
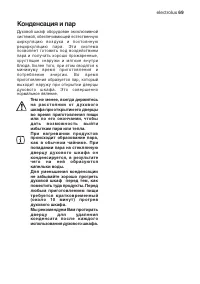
Page 69 - Конденсация и пар
electrolux 69 Конденсация и пар Духовой шкаф оборудован эксклюзивнойсистемой, обеспечивающей естественнуюц и р к у л я ц и ю в о з д у х а и п о с т о я н н у юр е ц и р к у л я ц и ю п а р а . Э т а с и с т е м апозволяет готовить под воздействиемпара и получать хорошо прожаренные,х р у с т я щ и е...
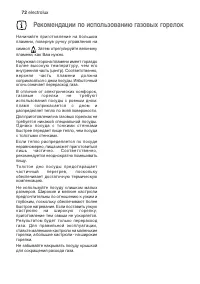
Page 72 - Рекомендации по использованию газовых горелок
72 electrolux Рекомендации по использованию газовых горелок Начинайте приготовление на большомпламени, повернув ручку управления на символ . Затем отрегулируйте величину пламени, как Вам нужно. Наружная сторона пламени имеет гораздоб о л е е в ы с о к у ю т е м п е р а т у р у , ч е м е г овнутрення...
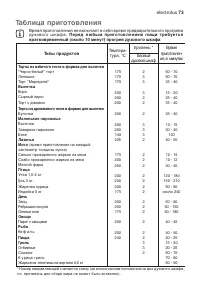
Page 73 - Таблица приготовления
electrolux 73 Таблица приготовления Время приготовления не включает в себя время предварительного прогревад у хо в о го ш к а ф а . П е р е д л ю б ы м п р и го т о в л е н и е м п и щ и т р е б уе т с я кратковременный (около 10 минут) прогрев духового шкафа * Номер направляющей считается снизу (за...
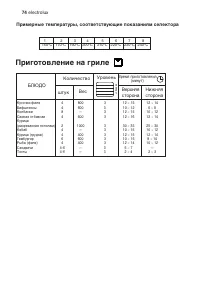
Page 74 - Примерные температуры, соответствующие показаниям селектора
74 electrolux Кусочки филе 4 800 3 12 ~ 15 12 ~ 14 Бифштексы 4 600 3 10 ~ 12 6 ~ 8 Колбаски 8 — 3 12 ~ 15 10 ~ 12 Свиная отбивная 4 600 3 12 ~ 16 12 ~ 14 Курица(разрезанная пополам) 2 1000 3 30 ~ 35 25 ~ 30 Кебаб 4 — 3 10 ~ 15 10 ~ 12 Курица (грудка) 4 400 3 12 ~ 15 12 ~ 14 Гамбургер 6 600 3 10 ~ 15...
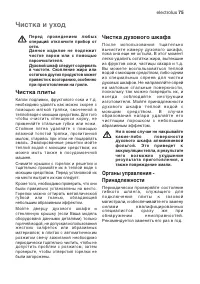
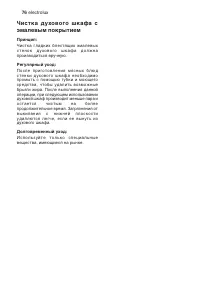
Page 75 - Чистка и уход; Чистка плиты
electrolux 75 Чистка и уход П е р е д п р о в е д е н и е м л ю б ы хопераций отключите прибор отсети.Д а н н о е и з д е л и е н е п од л е ж и тч и с т к е п а р о м и л и с п о м о щ ь юпароочистителя.Духовой шкаф следует содержатьв чистоте. Скопление жира илиостатков других продуктов можетпривес...
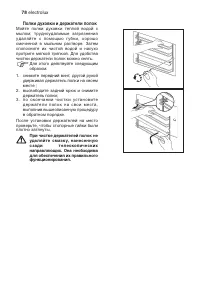
Page 78 - Полки духовки и держатели полок
78 electrolux Полки духовки и держатели полок Мойте полки духовки теплой водой смылом; трудноудалимые загрязненияудаляйте с помощью губки, хорошосмоченной в мыльном растворе. Затемсполосните их чистой водой и насухопротрите мягкой тряпкой. Для удобствачистки держатели полок можно снять. Для этого де...
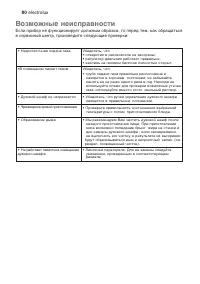
Page 80 - Возможные неисправности
80 electrolux Возможные неисправности Если прибор не функционирует должным образом, то перед тем, как обращатьсяв сервисный центр, произведите следующие проверки: . а з а г а ч а д о п я а н ч о т а т с о д е Н • : о т ч , ь с е т и д е б У ; ы н е р о с а з е н е л е т а к е с с а р в я и т с р е в...
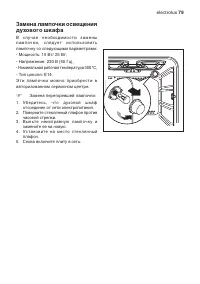
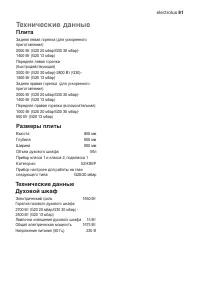
Page 81 - Технические данные; Плита
electrolux 81 Технические данные Технические данныеДуховой шкаф Электрический гриль 1650 Вт Горелка газового духового шкафа2700 Вт (G20 20 мбар/G30 30 мбар) -2400 Вт (G20 13 мбар)Лампочка освещения духового шкафа 15 Вт Общая электрическая мощность 1675 Вт Напряжение питания (50 Гц) 230 В Плита Задня...
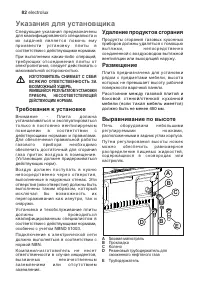
Page 82 - Требования к установке; Указания для установщика; Удаление продуктов сгорания; Выравнивание по высоте
82 electrolux Следующие указания предназначеныдля квалифицированного специалиста ии х з а д а ч е й я в л я е т с я п о м о ч ь е м уп р о и з в е с т и у с т а н о в к у п л и т ы всоответствии с действующими нормами. При выполнении каких-либо операций,т р е б у ю щ и х о т с о е д и н е н и я п л ...
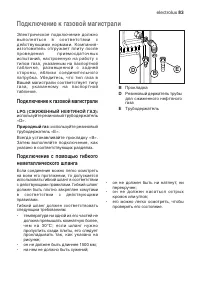
Page 83 - Подключение к газовой магистрали
electrolux 83 Подключение к газовой магистрали Электрическое подключение должнов ы п о л н я т ь с я в с о о т в е т с т в и и сд е й с т в у ю щ и м и н о р м а м и . К о м п а н и я -изготовитель отгружает плиту послеп р о в е д е н и я п р и е м о с д а т о ч н ы хиспытаний, настроенную на работу...
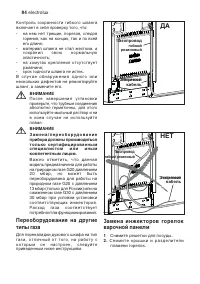
Page 84 - НЕТ; ДА
84 electrolux Контроль сохранности гибкого шлангавключает в себя проверку того, что:- на нем нет трещин, порезов, следовгорения, как на концах, так и по всейего длине; - материал шланга не стал жестким, ас о х р а н и л с в о ю н о р м а л ь н у юэластичность; - на хомутах крепления отсутствуетржавч...
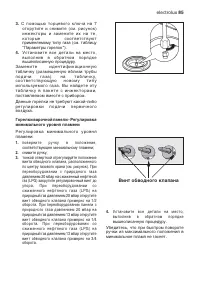
Page 85 - Винт обводного клапана
electrolux 85 3 . С п о м о щ ь ю т о р ц е в о г о к л ю ч а н а 7 открутите и снимите (см. рисунок)и н ж е к т о р ы и з а м е н и т е и х н а т е ,к о т о р ы е с о о т в е т с т в у ю тприменяемому типу газа (см. таблицу“Параметры горелок”). 4. У с т а н о в и т е в с е д е т а л и н а м е с т о...
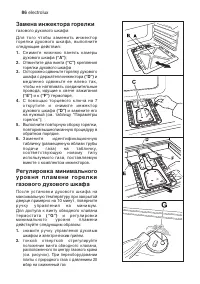
Page 86 - Замена инжектора горелки
86 electrolux Замена инжектора горелки газового духового шкафа Д л я т о г о ч т о б ы з а м е н и т ь и н ж е к т о ргорелки духового шкафа, выполнитеследующие действия: 1. С н и м и т е н и ж н ю ю п а н е л ь к а м е р ыдухового шкафа (“A”) ; 2. Отвинтите два винта (“C”) крепления горелки духовог...
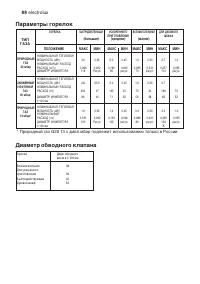
Page 88 - Параметры горелок
88 electrolux Параметры горелок ГОРЕЛКА БЫСТРОДЕЙСТВУЮЩАЯ УСКОРЕННОГО ВСПОМОГАТЕЛЬНАЯ ДЛЯ ДУХОВОГО ПРИГОТОВЛЕНИЯ ШКАФА (большая) (средняя) (малая) ПОЛОЖЕНИЕ МАКС МИН МАКС МИН МАКС МИН МАКС МИН НОМИНАЛЬНАЯ ТЕПЛОВАЯМОЩНОСТЬ (кВт) 3,0 0,65 2,0 0,45 1,0 0,33 2,7 1,0 НОМИНАЛЬНЫЙ РАСХОДРАСХОД (м 3 /ч) 0,2...
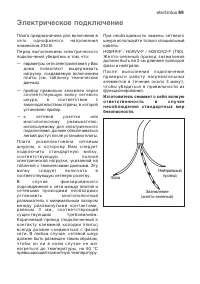
Page 89 - Электрическое подключение
electrolux 89 Электрическое подключение Плита предназначена для включения вс е т ь о д н о ф а з н о г о н а п р я ж е н и яноминалом 230 В.Перед выполнением электрическогоподключения убедитесь в том, что: — параметры сети электропитания у Вас д о м а п о з в о л я ю т в ы д е р ж и в а т ьнагрузку,...
Page 91 - Гарантия/сервисная служба; ЕВРОПЕЙСКАЯ ГАРАНТИЯ
electrolux 91 Гарантия/сервисная служба Сервисное обслуживание и запасные части В случае необходимости ремонта прибора, или если Вы хотите приобрести запасныечасти, обращайтесь в наш ближайший авторизованный сервисный центр (списоксервисных центров прилагается). Если у вас возникли вопросы по исполь...


 Electrolux EKG 603101 W (X)
User Manual
Electrolux EKG 603101 W (X)
User Manual
 Electrolux EKG 603102 W (X)
User Manual
Electrolux EKG 603102 W (X)
User Manual
 Electrolux EKG 603300 W (X)
User Manual
Electrolux EKG 603300 W (X)
User Manual
 Electrolux EKG 603303 W (X)
User Manual
Electrolux EKG 603303 W (X)
User Manual
 Electrolux EKK 61500 OW
User Manual
Electrolux EKK 61500 OW
User Manual
 Electrolux EKK 61500 OX
User Manual
Electrolux EKK 61500 OX
User Manual
 Electrolux EKM 60150 X
User Manual
Electrolux EKM 60150 X
User Manual
 Electrolux EKM 70150 X
User Manual
Electrolux EKM 70150 X
User Manual