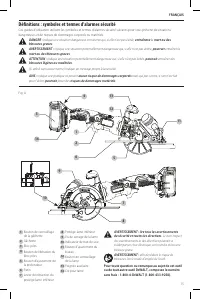
Page 3 - Definitions: Safety Alert Symbols and Words; WALT
English 1 English (original instructions) Definitions: Safety Alert Symbols and Words This instruction manual uses the following safety alert symbols and words to alert you to hazardous situations and your risk of personal injury or property damage. DANGER: Indicates an imminently hazardous situatio...
Page 4 - GENERAL POWER TOOL SAFETY WARNINGS; SAVE ALL WARNINGS; ) Electrical Safety
English 2 GENERAL POWER TOOL SAFETY WARNINGS WARNING: Read all safety warnings, instructions, illustrations and specifications provided with this power tool. Failure to follow all instructions listed below may result in electric shock, fire and/or serious injury. SAVE ALL WARNINGS AND INSTRUCTIONS F...
Page 5 - ) Battery Tool Use and Care; Safety Instructions for All Saws; Cutting Procedures; Further Safety Instructions for all Saws; Kickback Causes and Related Warnings
English 3 work to be performed. Use of the power tool for operations different from those intended could result in a hazardous situation. h ) Keep handles and grasping surfaces dry, clean and free from oil and grease. Slippery handles and grasping surfaces do not allow for safe handling and control ...
Page 6 - Lower Guard Function; Additional Safety Information
English 4 c ) When restarting a saw in the workpiece, center the saw blade in the kerf so that the saw teeth are not engaged into the material. If a saw blade binds, it may walk up or kickback from the workpiece as the saw is restarted. d ) Support large panels to minimize the risk of blade pinching...
Page 7 - BATTERIES AND CHARGERS; READ ALL INSTRUCTIONS; Transportation
English 5 ...................... earthing terminal ..................... safety alert symbol ..................... visible radiation ..................... wear respiratory protection ..................... wear eye protection ..................... wear hearing protection ..................... read al...
Page 8 - The RBRC® Seal
English 6 fuel gauge will not illuminate and the battery will need to be recharged. Fig. B nOTE: The fuel gauge is only an indication of the charge left on the battery pack. It does not indicate tool functionality and is subject to variation based on product components, temperature and end-user appl...
Page 9 - Charger Operation; Electronic Protection System; Wall Mounting
English 7 use it on any other voltage. This does not apply to the vehicular charger. WARNING: Shock hazard. Do not allow any liquid to get inside the charger. Electric shock may result. WARNING: Burn hazard. Do not submerge the battery pack in any liquid or allow any liquid to enter the battery pack...
Page 10 - Charger Cleaning Instructions; Important Charging Notes; SAVE THESE INSTRUCTIONS FOR; Intended Use; DO nOT; ASSEMBLY AND ADJUSTMENTS
English 8 screw exposed. Align the slots on the back of the charger with the exposed screws and fully engage them in the slots. Charger Cleaning Instructions WARNING: Shock hazard. Disconnect the charger from the AC outlet before cleaning. Dirt and grease may be removed from the exterior of the char...
Page 11 - Blades
English 9 3. Place outer clamp washer 16 on saw spindle with the large flat surface against the blade with beveled side facing out. 4. Thread blade clamping screw 9 into saw spindle by hand (screw has left-hand threads and must be turned counterclockwise to tighten). 5. Depress the blade lock ...
Page 12 - To Set the Saw for a Bevel Cut; OPERATION
English 10 For the most efficient cutting action, set the depth adjustment so that one-half tooth of the blade will project below the material to be cut. This distance is from the tip of the tooth to the bottom of the gullet in front of it. This keeps blade friction at a minimum, removes sawdust fro...
Page 13 - Lower Blade Guard
English 11 WARNING: To reduce the risk of serious personal injury, ALWAYS hold securely in anticipation of a sudden reaction. Proper hand position requires one hand on the main handle 18 or, if the auxiliary handle is attached, one hand on the main handle 18 and one hand on the auxiliary handle 13 ...
Page 14 - To avoid kickback
English 12 guard using the lower guard blade retracting lever then releasing it from the fully open position. If the guard does not operate smoothly, close quickly or completely then do not use the saw and contact your D e WALT service center for repairs. If the lower blade guard is missing or not w...
Page 15 - Ripping; MAINTENANCE; Repairs
English 13 is exposed until this occurs. Never reach under the work for any reason. When you have to retract the lower blade guard manually (as is necessary for starting pocket cuts), always use the retracting lever. WARNING: When cutting thin strips, be careful to ensure that small cutoff pieces do...
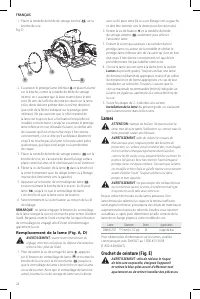
Page 17 - FRAnçAis; Définitions : symboles et termes d'alarmes sécurité
FRAnçAis 15 Définitions : symboles et termes d'alarmes sécurité Ces guides d'utilisation utilisent les symboles et termes d'alarmes sécurité suivants pour vous prévenir de situations dangereuses et de risques de dommages corporels ou matériels. DANGER : indique une situation dangereuse imminente qui...
Page 19 - ) Utilisation et entretien du bloc-piles; Procédures de coupe
FRAnçAis 17 de façon plus sûre et à la vitesse pour laquelle il a été conçu. b ) Ne pas utiliser un outil électrique dont l’interrupteur est défectueux. Tout outil électrique dont l’interrupteur est défectueux est dangereux et doit être réparé. c ) Débranchez la fiche de la prise électrique et, si a...
Page 21 - Consigne de sécurité supplémentaire; BLOCS-PILES ET CHARGEURS; LIRE TOUTES LES CONSIGNES
FRAnçAis 19 c ) Le protège-lame inférieur doit être rétracté à la main uniquement à l’occasion de coupes spéciales telles que les « coupes en plongée » ou les « coupes composées ». Soulevez le protège-lame inférieur à l’aide la poignée rétractable et relâchez-le dès que la lame pénètre dans le matér...
Page 22 - Transport
FRAnçAis 20 Consignes importantes de sécurité les blocs-piles AVERTISSEMENT : lire toutes les instructions et toutes les consignes de sécurité propres au bloc-piles, au chargeur et à l’outil électrique. Tout manquement aux avertissements et instructions pose des risques de décharges électriques, d’i...
Page 23 - Le sceau SRPRC
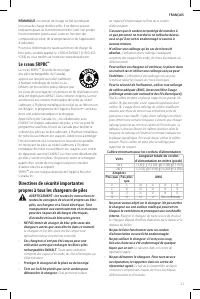
FRAnçAis 21 REMARQUE : le témoin de charge ne fait qu’indiquer le niveau de charge du bloc-piles. Il ne donne aucune indication quant au fonctionnement de l’outil. Son propre fonctionnement pourra aussi varier en fonction des composants produit, de la température et de l’application d’utilisation.Po...
Page 24 - Utilisation du chargeur
FRAnçAis 22 • Débrancher le chargeur du secteur avant tout entretien. Cela réduira tout risque de chocs électriques. Le fait de retirer le bloc-piles ne réduira pas ces risques. • NE JAMAIS tenter de connecter 2 chargeurs ensemble. • Le chargeur a été conçu pour être alimenté en courant électrique d...
Page 25 - Installation murale; Recommandations de stockage; CONSERVER CES CONSIGNES POUR; Usage prévu; nE PAs; ASSEMBLAGE ET AJUSTEMENTS
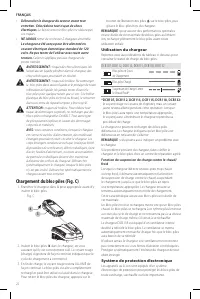
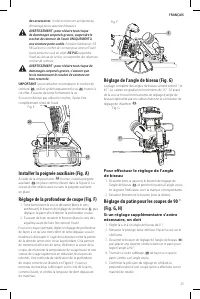
FRAnçAis 23 L’appareil s’arrêtera automatiquement dès que le système électronique de protection sera activé. Si c’était le cas, placez le bloc-piles au lithium-ion sur son chargeur jusqu’à ce qu’il soit complètement rechargé. Installation murale DCB107, DCB112, DCB113, DCB115, DCB118, DCB132 Ces cha...
Page 26 - Lames
FRAnçAis 24 1. Placer la rondelle de bride de serrage interne 15 sur la broche de scie. Fig. D 16 9 15 8 2. Escamoter le protège-lame inférieur 8 et placer la lame sur la broche, contre la rondelle de bride de serrage interne, en s’assurant que la lame tourne dans le bon sens (le sens de la fl...
Page 28 - UTILISATION
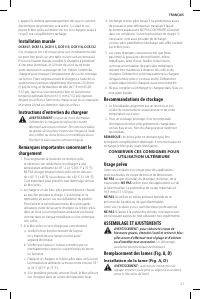
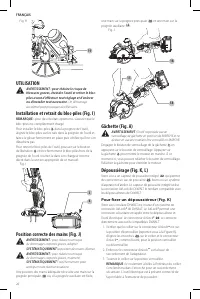
FRAnçAis 26 19 Fig. H UTILISATION AVERTISSEMENT : pour réduire le risque de blessures graves, éteindre l’outil et retirer le bloc-piles avant d’effectuer tout réglage et d’enlever ou d’installer tout accessoire. Un démarrage accidentel peut provoquer des blessures. Installation et retrait du bloc-pi...
Page 29 - Protège-lame inférieur
FRAnçAis 27 Fig. K 23 24 24 Pour fixer le sac de poussière (Fig. L) 1. Pendant que vous tenez la scie, ajustez le collier du sac de poussière 26 sur le capteur de poussière 22 comme illustré dans la Figure L. 2. Tournez le collier 26 dans le sens des aiguilles d’une montre pour verrouiller le ...
Page 30 - Coupes en long
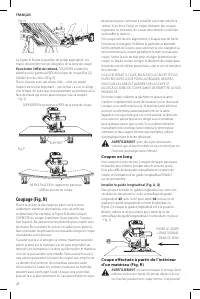
FRAnçAis 28 Fig. N La Figure N illustre la position de sciage appropriée. Les mains doivent être tenues éloignées de la zone de coupe. Pour éviter l’effet de rebond, TOUJOURS soutenir la planche ou le panneau PRÈS de la ligne de coupe (Fig. O), JAMAIS loin de celle ci (Fig. P).Placez l’œuvre avec so...
Page 31 - RÉPARATiOns sOUs gARAnTiE:
FRAnçAis 29 faire sortir la scie de la surface de travail et poser des risques de dommages corporels. Fig. R On effectue une coupe interne dans un plancher, un mur ou toute autre surface plane. 1. Régler le patin afin d’obtenir la profondeur de coupe oulue. 2. Pencher la scie vers l’avant et appuyer...
Page 32 - COnTRAT D’EnTRETiEn gRATUiT D’Un An; COnTRAT D’EnTRETiEn gRATUiT DE DEUX Ans sUR; gARAnTiE DE REMBOURsEMEnT DE 90 JOURs
FRAnçAis 30 PARTICULIÈRES, ET EXCLUT TOUT DOMMAGE ACCESSOIRE OU INDIRECT. Certains états n’autorisent aucune limitation quant à la durée d’une garantie implicite ni aucune exclusion ou limitation de garantie contre tout préjudice accessoire ou indirect, aussi il se peut que ces exclusions ne vous so...
Page 33 - Definiciones: Símbolos y Palabras de Alerta de Seguridad
EsPAñOl 31 Español (traducido de las instrucciones originales) ADVERTENCIA: Lea todas las advertencias de seguridad e instrucciones. El incumplimiento de las advertencias e instrucciones puede provocar descargas eléctricas, incendios o lesiones graves. ADVERTENCIA: Para reducir el riesgo de lesiones...
Page 34 - EsPAñOl
EsPAñOl 32 ADVERTENCIAS GENERALES DE SEGURIDAD PARA HERRAMIENTAS ELÉCTRICAS ADVERTENCIA: Lea todas las advertencias de seguridad, instrucciones, ilustraciones y especificaciones incluidas con esta herramienta eléctrica. La falla en seguir todas las instrucciones siguientes puede resultar en descarga...
Page 35 - ) Uso y Mantenimiento de la
EsPAñOl 33 4) Uso y Mantenimiento de la Herramienta Eléctrica a ) No fuerce la herramienta eléctrica. Utilice la herramienta eléctrica correcta para el trabajo que realizará. Si se la utiliza a la velocidad para la que fue diseñada, la herramienta eléctrica correcta permite trabajar mejor y de maner...
Page 37 - Instrucción Adicional de Seguridad; BATERÍAS Y CARGADORES
EsPAñOl 35 hacer servicio de ajustes y reparaciones antes de la utilización. El protector inferior podría funcionar con dificultad debido a que haya piezas dañadas, depósitos gomosos o una acumulación de residuos. c ) El protector inferior se debe retraer manualmente sólo para realizar cortes especi...
Page 38 - LEA TODAS LAS INSTRUCCIONES; Transporte
EsPAñOl 36 Consulte la tabla al final de este manual para información sobre compatibilidad entre cargadores y baterías. LEA TODAS LAS INSTRUCCIONES Instrucciones de Seguridad Importantes Para Todas las Unidades de Batería ADVERTENCIA: Lea todas las advertencias de seguridad y todas las instrucciones...
Page 39 - El sello RBRC®
EsPAñOl 37 las tres luces LED verdes, que indicará el nivel de carga que queda. Cuando el nivel de carga está por debajo del nivel útil, el indicador no se iluminará, y la batería deberá recargarse. Fig. B nOTA: El indicador de carga es sólo eso: un indicador de la carga de la unidad de batería. No ...
Page 40 - Funcionamiento del Cargador; Retraso por Batería Caliente/Fría
EsPAñOl 38 • No opere el cargador si su cable o enchufe están dañados . • No opere el cargador si ha recibido un golpe agudo, si se ha caído o si ha sido dañado de alguna otra forma. Llévelo a un centro de servicio autorizado. • No desarme el cargador; llévelo a un centro de servicio autorizado cuan...
Page 41 - Montaje en la Pared; Notas importantes Sobre la Carga; GUARDE ESTAS INSTRUCCIONES PARA; Uso Debido
EsPAñOl 39 de carga de la batería. Esta función garantiza la máxima duración de la batería.Una batería fría se carga más lentamente que una batería caliente. La batería se cargará a ese ritmo más lento durante todo el ciclo de carga y no volverá a cargarse a la velocidad de carga máxima incluso si l...
Page 42 - MONTAJE Y AJUSTES; Hojas
EsPAñOl 40 nO utilice la herramienta en condiciones de humedad o en presencia de líquidos o gases inflamables.Esta sierra circular es una herramienta eléctrica profesional. nO permita que los niños toquen la herramienta. Si el operador no tiene experiencia operando esta herramienta, su uso deberá se...
Page 44 - Si se Necesita Hacer Ajustes Adicionales; OPERACIÓN
EsPAñOl 42 Ajuste a la Base para Cortes de 90° (Fig. G, H) Si se Necesita Hacer Ajustes Adicionales 1. Ajuste la sierra a un bisel de 0°.2. Retracte el protector inferior de la hoja. Coloque la sierra en el lado de la hoja. 3. Afloje el botón de ajuste del bisel 11 . Coloque una escuadra contra l...
Page 45 - Protector Inferior de la Hoja
EsPAñOl 43 Extracción de Polvo (Fig. K, L) Su sierra tiene un puerto de polvo incorporado 22 que permite que se conecte la bolsa de polvo suministrada 25 o el sistema de aspiradora del taller. El puerto de polvo integrado utiliza la conexión AirLock D e WALT haciéndola compatible con los extracto...
Page 46 - Para
EsPAñOl 44 hacia la derecha conforme sea necesario. Apriete el tornillo cuando termine de ajustar el indicador. 28 10 Fig. M Soporte de la Pieza de Trabajo (Fig. J, N–P) ADVERTENCIA: Es importante soportar bien la pieza de trabajo y sostener firmemente la sierra para evitar que se pierda el control ...
Page 47 - Cortes Longitudinales; MANTENIMIENTO; Reparaciones
EsPAñOl 45 queden colgando del interior del protector inferior de la hoja. Cortes Longitudinales Se utiliza un corte longitudinal para cortar tablas anchas en tablas más angostas, cortando al hilo. La guía manual de la sierra es más difícil cuando se utiliza este tipo de sierra y se recomienda el us...
Page 48 - Póliza de Garantía; Excepciones; Registro en Línea
EsPAñOl 46 y el cambio de las escobillas, cuando proceda) deben ser realizados en un centro de mantenimiento en la fábrica D e WALT u en un centro de mantenimiento autorizado D e WALT . Utilice siempre piezas de repuesto idénticas. Para reparación y servicio de sus herramientas eléctricas, favor de ...
Page 49 - EsPECiFiCACiOnEs
EsPAñOl 47 terceros. ESTA GARANTÍA LIMITADA SE OTORGA EN VEZ DE TODAS LAS DEMÁS, INCLUIDA LA GARANTÍA IMPLÍCITA DE COMERCIABILIDAD Y APTITUD PARA UN FIN PARTICULAR, Y EXCLUYE TODOS LOS DAÑOS INCIDENTALES O CONSECUENTES. Algunos estados no permiten limitaciones sobre la duración de una garantía implí...
Page 52 - cargadores compatibles; ion
D e WALT Industrial Tool Co., 701 East Joppa Road, Towson, MD 21286 (MAR19) Part No. N664267 DCS571 Copyright © 2019 D e WALT The following are trademarks for one or more D e WALT power tools: the yellow and black color scheme, the “D” shaped air intake grill, the array of pyramids on the handgrip, ...


 Dewalt DCB2052CKW391B
User Manual
Dewalt DCB2052CKW391B
User Manual
 Dewalt DCB346-3WCS565B
User Manual
Dewalt DCB346-3WCS565B
User Manual
 Dewalt DCS373B
User Manual
Dewalt DCS373B
User Manual
 Dewalt DCS373P2
User Manual
Dewalt DCS373P2
User Manual
 Dewalt DCS391B
User Manual
Dewalt DCS391B
User Manual
 Dewalt DCS391BW203
User Manual
Dewalt DCS391BW203
User Manual
 Dewalt DCS391BW205CK
User Manual
Dewalt DCS391BW205CK
User Manual
 Dewalt DCS391BW2203c
User Manual
Dewalt DCS391BW2203c
User Manual
 Dewalt DCS391BW230
User Manual
Dewalt DCS391BW230
User Manual
 Dewalt DCS391BW246CK
User Manual
Dewalt DCS391BW246CK
User Manual
 Dewalt DCS391BW334204
User Manual
Dewalt DCS391BW334204
User Manual
 Dewalt DCS391BW334205
User Manual
Dewalt DCS391BW334205
User Manual
 Dewalt DCS391BWCB200-4
User Manual
Dewalt DCS391BWCB200-4
User Manual
 Dewalt DCS391BWCBP034C
User Manual
Dewalt DCS391BWCBP034C
User Manual
 Dewalt DCS391BWDCB230C
User Manual
Dewalt DCS391BWDCB230C
User Manual
 Dewalt DCS391P1
User Manual
Dewalt DCS391P1
User Manual
 Dewalt DCS520ST1W606
User Manual
Dewalt DCS520ST1W606
User Manual
 Dewalt DCS565B
User Manual
Dewalt DCS565B
User Manual
 Dewalt DCS565BDCB246CK
User Manual
Dewalt DCS565BDCB246CK
User Manual
 Dewalt DCS565BW204
User Manual
Dewalt DCS565BW204
User Manual