Page 3 - Definitions: Safety Alert Symbols and Words; WALT
English 1 English (original instructions) Definitions: Safety Alert Symbols and Words This instruction manual uses the following safety alert symbols and words to alert you to hazardous situations and your risk of personal injury or property damage. DANGER: Indicates an imminently hazardous situatio...
Page 4 - GENERAL POWER TOOL SAFETY WARNINGS; SAVE ALL WARNINGS AND; ) Electrical Safety
English 2 GENERAL POWER TOOL SAFETY WARNINGS WARNING! Read all safety warnings and all instructions. Failure to follow the warnings and instructions may result in electric shock, fire and/or serious injury. SAVE ALL WARNINGS AND INSTRUCTIONS FOR FUTURE REFERENCE The term “power tool” in the warnings...
Page 5 - ) Battery Tool Use and Care; Nailer Safety Warnings; Additional Nailer Safety Warnings; Repairs
English 3 into account the working conditions and the work to be performed. Use of the power tool for operations different from those intended could result in a hazardous situation. 5) Battery Tool Use and Care a ) Recharge only with the charger specified by the manufacturer. A charger that is suita...
Page 6 - Bump/Sequential Selector Switch; Additional Safety Information
English 4 lose control. When tool is not in use, it should be locked in a safe place, out of the reach of children. • Always use trigger lock-off when tool is not in immediate use. Using the trigger lock-off will prevent accidental discharge. • Do not overreach. Maintain proper footing and balance a...
Page 7 - BATTERIES AND CHARGERS; READ ALL INSTRUCTIONS
English 5 of California to cause cancer, birth defects or other reproductive harm. Some examples of these chemicals are:• lead from lead-based paints,• crystalline silica from bricks and cement and other masonry products, and • arsenic and chromium from chemically- treated lumber. Your risk from the...
Page 8 - Transportation; shipping the; The RBRC® Seal
English 6 WARNING: Burn hazard. Battery liquid may be flammable if exposed to spark or flame. WARNING: Fire hazard. Never attempt to open the battery pack for any reason. If the battery pack case is cracked or damaged, do not insert into the charger. Do not crush, drop or damage the battery pack. Do...
Page 10 - Charger Operation; Electronic Protection System; Wall Mounting; Important Charging Notes
English 8 12 25 Fig. C 2. Insert the battery pack 12 into the charger, making sure the battery pack is fully seated in the charger. The red (charging) light will blink continuously indicating that the charging process has started. 3. The completion of charge will be indicated by the red light rem...
Page 11 - Storage Recommendations; SAVE THESE INSTRUCTIONS FOR; Intended Use; DO nOT; TOOL SPECIFICATIONS; OPERATION
English 9 b. Check to see if receptacle is connected to a light switch which turns power off when you turn out the lights; c. Move the charger and battery pack to a location where the surrounding air temperature is approximately 65 °F – 75 °F (18 ° – 24 °C); d. If charging problems persist, take the...
Page 12 - Sequential Action; To Operate the nailer in sequential Action Mode; Bump Action; To Operate the Tool Using the Place Actuation Method
English 10 Proper Hand Position (Fig. E) WARNING: To reduce the risk of serious personal injury, ALWAYS use proper hand position as shown. WARNING: To reduce the risk of serious personal injury, ALWAYS hold securely in anticipation of a sudden reaction. Proper hand position requires one hand on the ...
Page 13 - Preparing the Tool
English 11 Speed Selection (Fig. A, H) This nailer is equipped with a dual speed selection switch 13 located on the foot. • For shorter nails, select speed 1 by setting the switch to the left most position. • For longer nails and more rigorous applications, select speed 2 by setting the switch to...
Page 14 - Unloading the Tool; Dry Fire Lock Out
English 12 Fig. J 8 4. Keeping fingers clear of the track, close the magazine by releasing the pusher latch. Carefully allow the latch to slide forward and engage the nail strip. Unloading the Tool WARNING: The trigger lock-off should always be locked off whenever any adjustments are made or when to...
Page 15 - Cold Weather Operation; MAINTENANCE
English 13 Fig. M 5 Clearing a Jammed Nail (Fig. A, N) WARNING: To reduce the risk of serious personal injury, disconnect battery pack from tool before making any adjustments, changing accessories, servicing, or moving the tool. Such preventative safety measures reduce the risk of starting the tool ...
Page 16 - DAILY MAINTENANCE CHART; Cleaning; Replacing the Return Springs and Profile
English 14 DAILY MAINTENANCE CHART ACTION Clean magazine, pusher, and contact trip mechanism. WHY Permits smooth operation of magazine, reduces wear, and prevents jams. HOW Blowing off the tool with compressed air is the most effective way to clean the tool. The use of oils, lubricants periodically ...
Page 17 - To Change a Broken or Worn Profile
English 15 Fig. R 19 20 21 Fig. S 19 21 22 23 5. Mount the new return spring and washer on to the spring rail 20 . While compressing the spring with the washer near the opposite end of the rail, twist on the new spring bumper until it is past the groove for the spring rail clip. 6. Mount the new ...
Page 18 - Register Online
English 16 3. In the same orientation as the old profile, slide the new profile onto the rails. 4. Refer to DCN6901 Return Spring Replacement Kit Steps 5–9 to complete the service. Repairs The charger and battery pack are not serviceable. WARNING: To assure product SAFETY and RELIABILITY, repairs, m...
Page 19 - TROUBLESHOOTING GUIDE; sYMPTOM
English 17 TROUBLESHOOTING GUIDE MANY COMMON PROBLEMS CAN BE SOLVED EASILY BY UTILIZING THE CHART BELOW. FOR MORE SERIOUS OR PERSISTENT PROBLEMS, CONTACT A D e WALT SERVICE CENTER OR CALL 1-(800)-4- D e WALT . WARNING: To reduce the risk of serious personal injury, ALWAYS disconnect battery pack fro...
Page 21 - FRAnçAis; Définitions : symboles et termes d'alarmes sécurité
FRAnçAis 19 Définitions : symboles et termes d'alarmes sécurité Ces guides d'utilisation utilisent les symboles et termes d'alarmes sécurité suivants pour vous prévenir de situations dangereuses et de risques de dommages corporels ou matériels. DANGER : indique une situation dangereuse imminente qui...
Page 23 - ) Utilisation et entretien du bloc-piles
FRAnçAis 21 b ) Ne pas utiliser un outil électrique dont l’interrupteur est défectueux. Tout outil électrique dont l’interrupteur est défectueux est dangereux et doit être réparé. c ) Débrancher la fiche de la source d’alimentation et/ou du bloc-piles de l’outil électrique avant de faire tout réglag...
Page 25 - Sélecteur de mode choc/séquentiel; Consigne de sécurité supplémentaire
FRAnçAis 23 • Sélectionnez toujours un système d’activation qui est approprié pour l’application de la fixation et la formation de l’utilisateur. • Redoublez de prudence lorsque vous manipulez, chargez ou déchargez des fixations. Les fixations ont des pointes effilées qui pourraient causer une bless...
Page 26 - BLOCS-PILES ET CHARGEURS; LIRE TOUTES LES CONSIGNES; Transport
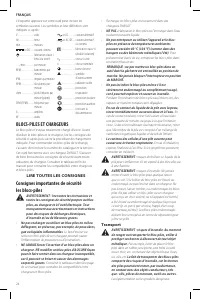
FRAnçAis 24 L’étiquette apposée sur votre outil peut inclure les symboles suivants. Les symboles et leur définition sont indiqués ci-après : V ......................... voltsHz ....................... hertzmin ..................... minutes or DC ...... courant continu ...................... fabricat...
Page 27 - Utilisation et Expédition.; Le sceau SRPRC®
FRAnçAis 25 (Hazardous Material Regulations) du département américain des transports interdit, en fait, le transport des blocs-piles dans les commerces ou dans les avions dans les bagages de cabine, À MOINS qu’ils ne soient correctement protégés de tout court-circuit. Aussi lors du transport individ...
Page 29 - Utilisation du chargeur; Installation murale
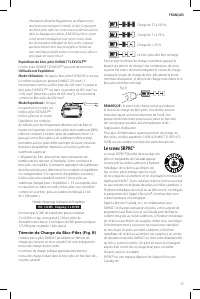
FRAnçAis 27 d’acier, feuilles d’aluminium, ou toute accumulation de particules métalliques doivent être maintenus à distance des orifices du chargeur. Débrancher systématiquement le chargeur lorsque le bloc-piles n’y est pas inséré. Débrancher systématiquement le chargeur avant tout entretien. Charg...
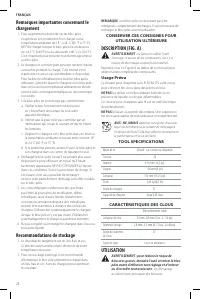
Page 30 - Recommandations de stockage; CONSERVER CES CONSIGNES POUR; Usage Prévu; nE PAs; UTILISATION
FRAnçAis 28 Remarques importantes concernant le chargement 1. Pour augmenter la durée de vie du bloc-piles et optimiser son rendement, le recharger à une température ambiante de 18 ° à 24 °C (65 °F à 75 °F). NE PAS charger lorsque le bloc-piles est en dessous de +4,5 °C (+40°F) ou au-dessus de +40 °...
Page 31 - Tir séquentiel; Pour utiliser le cloueur en mode à tir séquentiel; Actionnement par choc
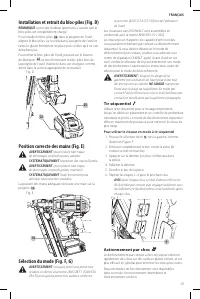
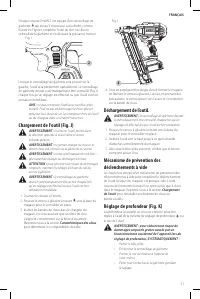
FRAnçAis 29 Installation et retrait du bloc-piles (Fig. D) REMARQUE : pour des résultats optimums, s’assurer que le bloc-piles est complètement chargé.Pour installer le bloc-piles 12 dans la poignée de l’outil, alignez le bloc-piles sur les rails dans la poignée de l’outil et faites-le glisser fe...
Page 32 - Préparation de l’outil
FRAnçAis 30 Poussez le sélecteur de tir 9 vers la droite, comme illustré en Figure G. Fig. G 9 Fonctionnement intermittent de l’outil : AVERTISSEMENT : l’outil enfonce un clou chaque fois que la détente est enfoncée pourvu que le déclencheur demeure enfoncé. 1. Presser le déclencheur contre la surf...
Page 33 - Déchargement de l’outiL
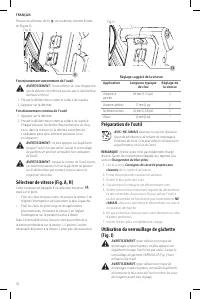
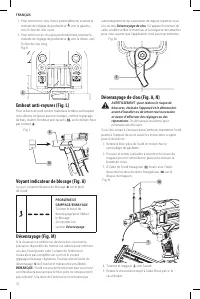
FRAnçAis 31 Chaque cloueur D e WALT est équipé d’un verrouillage de gâchette 2 qui lorsqu’il est poussé sur la droite, comme illustré en Figure I, empêche l’outil de tirer un clou en verrouillant la gâchette et en dérivant la puissance moteur. Fig. I 2 Lorsque le verrouillage de gâchette sera pou...
Page 35 - Utilisation par temps froids; TABLEAU DE MAINTENANCE; Nettoyage
FRAnçAis 33 6. Si la lame de l’enfonceur est en position inférieure, tournez le levier de désenrayage sur le dessus du cloueur. REMARQUE : si la lame de l’enfonceur ne se réinitialise pas après avoir fait tourner le levier de désenrayage, il pourra s’avérer nécessaire de réinitialiser manuellement l...
Page 36 - Accessoires
FRAnçAis 34 chimiques peuvent affaiblir les matériaux de plastique utilisés dans ces pièces. Utiliser un chiffon humecté uniquement d’eau et de savon doux. Ne jamais laisser de liquide pénétrer dans l’outil et n’immerger aucune partie de l’outil dans un liquide. Accessoires AVERTISSEMENT : puisque l...
Page 37 - Pour remplacer un chariot brisé ou usé; Réparations
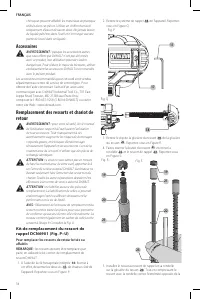
FRAnçAis 35 glissière, tournez la nouvelle butée du ressort au-delà de la rainurev du clip de la glissière du ressort. 6. Installez soigneusement le nouveau clip de la glissière du ressort et positionnez la butée contre le clip. 7. Pour le deuxième ressort, répéter les étapes 3–6. REMARQUE : vérifie...
Page 39 - GUIDE DE DÉPANNAGE; sYMPTÔME
FRAnçAis 37 GUIDE DE DÉPANNAGE DE NOMBREUX PROBLÈMES COURANTS PEUVENT ÊTRE RÉSOLUS FACILEMENT À L’AIDE DU TABLEAU CI-DESSOUS. POUR DES PROBLÈMES PLUS SÉRIEUX OU PERSISTANTS, VEUILLEZ CONTACTER UN CENTRE DE RÉPARATION D e WALT OU APPELER LE 1-(800)-4- D e WALT . AVERTISSEMENT : pour réduire tout risq...
Page 41 - Definiciones: Símbolos y Palabras de Alerta de Seguridad
EsPAñOl 39 Español (traducido de las instrucciones originales) ¡ADVERTENCIA! Lea todas las advertencias de seguridad e instrucciones. El incumplimiento de las advertencias e instrucciones puede provocar descargas eléctricas, incendios o lesiones graves. ADVERTENCIA: Para reducir el riesgo de lesione...
Page 42 - EsPAñOl
EsPAñOl 40 ADVERTENCIAS GENERALES DE SEGURIDAD PARA HERRAMIENTAS ELÉCTRICAS ¡ADVERTENCIA! Lea todas las advertencias de seguridad e instrucciones. El incumplimiento de las advertencias e instrucciones puede provocar descargas eléctricas, incendios o lesiones graves. CONSERVE TODAS LAS ADVERTENCIAS E...
Page 43 - ) Uso y Mantenimiento de la; Advertencias de Seguridad de la Clavadora
EsPAñOl 41 herramienta eléctrica que no pueda ser controlada mediante el interruptor es peligrosa y debe repararse. c ) Desconecte el enchufe de la fuente de energía o el paquete de baterías de la herramienta eléctrica antes de realizar ajustes, cambiar accesorios o almacenar la herramienta eléctric...
Page 44 - Mantenimiento
EsPAñOl 42 que el sujetador pueda tener contacto con cableado oculto. El contacto con un cable con corriente eléctrica hará que las partes expuestas de la herramienta tengan corriente y que el operador reciba una descarga eléctrica. • La herramienta en funcionamiento puede generar residuos volátiles...
Page 45 - Interruptor Selector Secuencial/de Tope; Instrucción Adicional de Seguridad
EsPAñOl 43 contacto vuelva a estar en contacto con la superficie de trabajo antes de que sea liberado el gatillo se disparará un clavo no deseado. • La elección del método de disparo es importante. Verifique las opciones de disparo en el manual. • Seleccione siempre un sistema de actuación que sea a...
Page 46 - BATERÍAS Y CARGADORES; LEA TODAS LAS INSTRUCCIONES; Transporte
EsPAñOl 44 colocarse paradas sobre el paquete de baterías, pero pueden caerse fácilmente. • Los orificios de ventilación suelen cubrir piezas en movimiento, por lo que también se deben evitar. Las piezas en movimiento pueden atrapar prendas de vestir sueltas, joyas o el cabello largo. La etiqueta de...
Page 47 - TRAnsPORTE DE lA BATERÍA FlEXVOlTTM DE; El sello RBRC®
EsPAñOl 45 transporte de baterías puede causar incendios si sus terminales inadvertidamente entran en contacto con materiales conductores como llaves, monedas, herramientas manuales y otros por el estilo. El Reglamento sobre Materiales Peligrosos (HMR) del Departamento de Transporte de EE.UU. prohíb...
Page 49 - Funcionamiento del Cargador; Retraso por Batería Caliente/Fría; Sistema de Protección Electrónica; Montaje en la Pared
EsPAñOl 47 las placas de metal, la lana de acero, el papel de aluminio y otros, o cualquier acumulación de partículas metálicas deberían mantenerse alejados de las cavidades del cargador. Desenchufe siempre el cargador cuando no haya una unidad de batería en su cavidad. Desenchufe el cargador antes ...
Page 50 - Instrucciones de Limpieza del Cargador; Notas Importantes Sobre la Carga
EsPAñOl 48 Instrucciones de Limpieza del Cargador ADVERTENCIA: Riesgo de descarga eléctrica. Desconecte el cargador del tomacorriente de CA antes de limpiarlo. Para limpiar la suciedad y grasa del exterior del cargador puede usarse un paño o cepillo suave no metálico. No use agua ni soluciones limpi...
Page 51 - OPERACIÓN; Acción Secuencial; Para Utilizar la Clavadora en Modo secuencial
EsPAñOl 49 OPERACIÓN ADVERTENCIA: Para reducir el riesgo de lesiones personales graves, apague la herramienta y retire el paquete de baterías antes de realizar ajustes o de retirar/instalar dispositivos o accesorios. Un arranque accidental podría causar lesiones. Cómo Instalar y Retirar la Unidad de...
Page 52 - Acción de Tope; Preparación de la Herramienta
EsPAñOl 50 el activador por contacto como el disparador para cada clavo. 9 Fig. F Acción de Tope El funcionamiento por tope está indicado para clavar rápidamente en superficies planas y estacionarias y generalmente es más eficaz para aplicaciones en las que se clavan clavos más cortos.Al utilizar es...
Page 53 - Descarga de la Herramienta
EsPAñOl 51 6. Mantenga la herramienta apuntada al lado opuesto de su cuerpo y otras personas. 7. Inserte el paquete de batería completamente cargado. Uso del Botón de Bloqueo del Gatillo (Fig. I) ADVERTENCIA: Para reducir el riesgo de lesiones corporales graves, no mantenga presionado el gatillo cua...
Page 55 - Funcionamiento en Climas Fríos; MANTENIMIENTO; TABLA DE MANTENIMIENTO DIARIO; Limpieza
EsPAñOl 53 nOTA: Si la hoja de la guía no se reajusta después de girar la palanca de liberación de parada, puede ser necesario ajustar la hoja manualmente con un destornillador largo. 7. Vuelva a girar el cargador hasta su posición bajo la tobera de la herramienta y apriete los pernos hexagonales. 8...
Page 56 - Accesorios
EsPAñOl 54 Accesorios ADVERTENCIA: Debido a que no se han probado con este producto otros accesorios que no sean los que ofrece D e WALT ., el uso de dichos accesorios con esta herramienta podría ser peligroso. Para reducir el riesgo de lesiones, con este producto deben usarse sólo los accesorios re...
Page 57 - Para Cambiar un Perfil Roto o Desgastado; Reparaciones
EsPAñOl 55 6. Monte bien el gancho del riel del muelle nuevo y coloque el tope contra el gancho. 7. Repita los pasos 3–6 para reemplazar el segundo resorte. nOTA: Compruebe el retorno del perfil deslizando el perfil hacia arriba del riel del muelle y soltándolo. Debería regresar debido a la fuerza d...
Page 58 - Póliza de Garantía; Excepciones; Registro en Línea
EsPAñOl 56 Para reparación y servicio de sus herramientas eléctricas, favor de dirigirse al Centro de servicio más cercano CUliACAn, sin Blvd. Emiliano Zapata 5400-1 Poniente Col. San Rafael (667) 717 89 99 gUADAlAJARA, JAl Av. La Paz #1779 - Col. Americana Sector Juárez (33) 3825 6978 MEXiCO, D.F. ...
Page 59 - EsPECiFiCACiOnEs
EsPAñOl 57 estas limitaciones pueden no aplicarse a usted. Esta garantía le otorga derechos legales específicos, además de los cuales usted puede tener otros derechos dependiendo del estado o la provincia en que se encuentre.Además de la garantía, las herramientas D e WALT están cubiertas por: 1 AñO...
Page 60 - GUÍA DE SOLUCIÓN DE PROBLEMAS; sÍnTOMA
EsPAñOl 58 GUÍA DE SOLUCIÓN DE PROBLEMAS MUCHOS PROBLEMAS COMUNES PUEDEN RESOLVERSE FÁCILMENTE UTILIZANDO LA SIGUIENTE TABLA. PARA PROBLEMAS MÁS GRAVES O PERSISTENTES, CONTACTE CON UN CENTRO DE SERVICIO D e WALT O LLAME AL 1-(800)-4- D e WALT . ADVERTENCIA: Para reducir el riesgo de lesiones corpora...
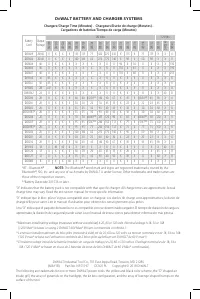
Page 64 - WALT BATTERY AND CHARGER SYSTEMS
D e WALT Industrial Tool Co., 701 East Joppa Road, Towson, MD 21286 (MAY18) Part No. N553197 DCN21PL Copyright © 2018 D e WALT The following are trademarks for one or more D e WALT power tools: the yellow and black color scheme, the “D” shaped air intake grill, the array of pyramids on the handgrip,...


 Dewalt DCN21PLB
User Manual
Dewalt DCN21PLB
User Manual
 Dewalt DCN21PLBW205CK
User Manual
Dewalt DCN21PLBW205CK
User Manual
 Dewalt DCN21PLBW565B
User Manual
Dewalt DCN21PLBW565B
User Manual
 Dewalt DCN21PLBW999B
User Manual
Dewalt DCN21PLBW999B
User Manual
 Dewalt DCN21PLM1
User Manual
Dewalt DCN21PLM1
User Manual
 Dewalt DCN21PLM1DCB204
User Manual
Dewalt DCN21PLM1DCB204
User Manual
 Dewalt DCN21PLM1W0D131
User Manual
Dewalt DCN21PLM1W0D131
User Manual
 Dewalt DCN45RND1
User Manual
Dewalt DCN45RND1
User Manual
 Dewalt DCN45RND1W204
User Manual
Dewalt DCN45RND1W204
User Manual
 Dewalt DCN45RND1WCR3D
User Manual
Dewalt DCN45RND1WCR3D
User Manual
 Dewalt DCN623B
User Manual
Dewalt DCN623B
User Manual
 Dewalt DCN623B660B240
User Manual
Dewalt DCN623B660B240
User Manual
 Dewalt DCN623BW034C
User Manual
Dewalt DCN623BW034C
User Manual
 Dewalt DCN623BW23150
User Manual
Dewalt DCN623BW23150
User Manual
 Dewalt DCN623D1
User Manual
Dewalt DCN623D1
User Manual
 Dewalt DCN623D1W23150
User Manual
Dewalt DCN623D1W23150
User Manual
 Dewalt DCN650B
User Manual
Dewalt DCN650B
User Manual
 Dewalt DCN650B203
User Manual
Dewalt DCN650B203
User Manual
 Dewalt DCN650B680B
User Manual
Dewalt DCN650B680B
User Manual
 Dewalt DCN650BW15200-2
User Manual
Dewalt DCN650BW15200-2
User Manual