Page 3 - Contents
1 Getting Started Important Safety Instructions 2 Grounding Instructions 3 Description of the Vacuum 4 Assembling the Vacuum 5-6 Operation Reclining the Handle 7 On/Off Switch 7 Edge Cleaning 7 Automatic Carpet Height Adjustment 7 Bare Floor Cleaning 7 Maintenance and Care Power Cord Care 8 Vacuumin...
Page 4 - IMPORTANT SAFETY INSTRUCTIONS; READ ALL INSTRUCTIONS BEFORE; To reduce the risk of fire, electric shock or injury:; SAVE THESE INSTRUCTIONS.
IMPORTANT SAFETY INSTRUCTIONS When using an electrical appliance, basic precautions should always be followed, including the following: READ ALL INSTRUCTIONS BEFORE USING THIS APPLIANCE The manufacturer cannot accept responsibility for damage caused when the appliance is not used according to the in...
Page 5 - Grounding Instructions
3 Grounding Instructions This vacuum cleaner must be grounded. If it should malfunction or break down, grounding provides a path of least resistance for electric current to reduce the risk of electric shock. This vacuum cleaner is equipped with a cord having an equipment-grounding conductor and grou...
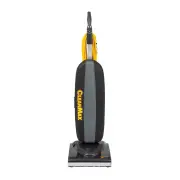
Page 6 - Description of the Vacuum
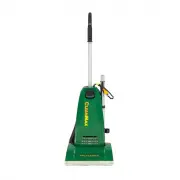
4 Description of the Vacuum 1 Ergonomic Handle 2 On/Off Power Switch, Two Speed 3 Bag Compartment 4 Vacuum Nozzle 5 Furniture Guard 6 Brushroll Jam Indicator (Model ZM-700) 7 Circuit Breaker Reset Button 8 Handle Release Pedal 9 Quick Release Cord Hook 10 Upper Cord Hook 11 Cord Restraint 4 3 1 2 5 ...
Page 7 - Assembling the Vacuum; Attaching the Handle to the Vacuum
5 Assembling the Vacuum Attaching the Handle to the Vacuum NOTE: Do not plug in the vacuum until it is completely assembled.The vacuum cleaner and the handle are packed separately and require assembly. • Thread the cord through the lower and upper cord guides on the back of the vacuum bag (Fig. 1). ...
Page 8 - Unwinding the Power Cord
6 Assembling the Vacuum Attaching the Extension Power Cord to the Cord Lock • Connect the extension power cord to the pigtail cord on the vacuum. • Snap the extension power cord into the slot on the end of the cord lock. • Turn the knob on the bottom of the cord lock to tighten the lock and prevent ...
Page 9 - Operation; Reclining the Handle
7 Operation Reclining the Handle • Press the handle release pedal located on the back of the vacuum with your foot to recline the handle (Fig. 1). On/Off Switch, Two Speed • The power switch located on the vacuum handle, is a three-way switch (Fig. 2). The middle position is the “Off” setting, the r...
Page 10 - Maintenance and Care
8 Fig. 2 Power Cord Care • If the cord or plug has any apparent damage, refrain from using the vacuum. Please visit an Authorized CleanMax Distributor for a new cord or plug. • When the vacuum is in use, hold the cord to keep from running over it. • Avoid obstructions and do not pull the cord around...
Page 11 - Replacing the Vacuum Bag
9 Replacing the Vacuum Bag NOTE: Unplug the vacuum cleaner from the electrical outlet before changing the bag. • Unzip the bag compartment. • Remove the used vacuum bag by pulling the green bag collar tab away from the vacuum (Fig. 1). Slide the used bag out of the bag holder which automatically sea...
Page 12 - Removing and Reinstalling the Bottom Plate
10 Maintenance and Care MATERIAL DRAWN ISSUED SCALE FINISH DATE DATE DO NOT SCALE UNLESS OTHERWISE SPECIFIED DESCRIPTION DRAWING SIZE:D PART NUMBER SHEET 1 OF 1 X.X ± .02 IN RADII X.X ± .02 X.XX ± .01 IN X,XX ± .01 X.XXX ± .005 IN MACHINE SURFACE X.XXXX ± .0005 IN BREAK SHARP CORNERS TO .010 MAX ± 0...
Page 13 - Replacing the Agitator Belt; Lifetime Belt Protection Warranty
11 Fig. 1 Fig. 2 Maintenance and Care Replacing the Agitator Belt (Model ZM-500) WARNING! To reduce the risk of electrical shock or injury from moving parts, unplug before servicing or cleaning. NOTE: To ensure maximum cleaning efficiency, the belt should be checked regularly to be sure it is in goo...
Page 14 - Brushroll Jam Indicator
12 Brushroll Jam Indicator (Model ZM-700) If an object, such as a throw rug or article of clothing, is ever picked up into your vacuum, the vacuum will sense this “jammed brushroll” condition and turn off the brushroll. When this happens, the Brushroll Jam Indicator light on the top of the nozzle wi...
Page 15 - Resetting the Circuit Breaker; Replacing the Squeegee
13 Resetting the Circuit Breaker WARNING! To reduce the risk of electrical shock or injury from moving parts, unplug before servicing or cleaning. Your vacuum features a circuit breaker to protect the machine against damage due to a surge in the electrical current. Electrical surging can be a result...
Page 17 - Warranty; How Long Coverage Lasts:; What CleanMax Will Do:; How State Law Applies:
15 Warranty What is Covered: This warranty covers any defects in material and workmanship in your new CleanMax vacuum. How Long Coverage Lasts: Warranty coverage for your CleanMax vacuum lasts one year. What is Not Covered: • Damage to the vacuum which occurs from neglect, abuse, alterations, accide...
Page 18 - OWNER’S WARRANTY INFORMATION; Register your new vacuum today at CleanMaxVacuums.com; keep this for your records...
16 OWNER’S WARRANTY INFORMATION Date of purchase Serial number Model number Purchased from: Store name Address City, State, Zip Telephone Register your new vacuum today at CleanMaxVacuums.com keep this for your records…
Page 20 - CleanMax Vacuum Cleaners
CleanMax Vacuum Cleaners PO Box 730 Fenton, MO 63026 B503-3600D