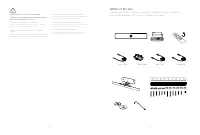
Page 3 - What’s in the box; Descripción general de los pasos / Conteúdo da caixa
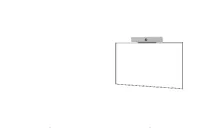
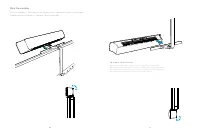
4 5 WARNING Do not to cover the mediabar To prevent overheating, the mediabar should not be covered or placed in a niche. ATTENTION à ne pas couvrir la mediabar Pour éviter toute surchauffe, la mediabar ne doit pas être couverte ou placée dans une alcôve. WARNUNG: Die Medienleiste darf nicht verdeck...
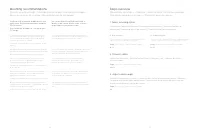
Page 4 - Steps overview; Descripción general de los pasos / Descrição geral dos passos; Ligue os cabos; Adjust camera angle; Ajuste do ângulo de inclinação da câmara; Mounting recommendations; Recomendaciones de montaje / Recomendações de montagem
6 7 Steps overview Présentation des étapes / Überblick – Arbeitsschritte / Procedura generale / Descripción general de los pasos / Descrição geral dos passos 1. Select mounting option Sélectionnez l’option de montage / Montageoption auswählen / Seleziona l’opzione di montaggio / Seleccionar opción d...
Page 5 - Fije el soporte de montaje en pared. / Apertar o suporte de parede.
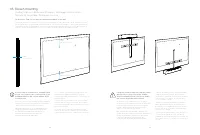
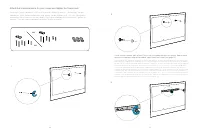
8 9 1 A. Wall mounting Fixation murale / Wandhalterung / Montaggio a parete / Montaje en pared / Montagem na parede Due to the size and mass of this product, it is important that the wall-mounted system is safely installed according to these installation instructions. The wall and mounting hardware ...
Page 6 - Adjust the position and tighten the screw on the top.
10 11 Adjust the position and tighten the screw on the top. Ajustez la position et serrez la vis du dessus. / Passen Sie die Position an und ziehen Sie die Schraube oben fest. / Regolare la posizione e serrare la vite nella parte superiore. / Ajuste la posición y apriete el tornillo de la parte supe...
Page 7 - Soporte de la pantalla / Montagem no ecrã
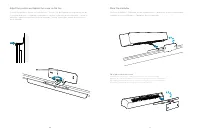
12 13 Max 7 cm / 2.75 in Max 40 cm / 15.75 in Max 40 cm / 15.75 in 1 B. Screen mounting Fixation à l’écran / Bildschirm-Montage / Montaggio dello schermo / Soporte de la pantalla / Montagem no ecrã Go directly to Step 2 if you have mounted the mediabar on the wall. Passez directement à l’étape 2 si ...
Page 8 - tuercas. / Instale a peça horizontal no ecrã e aperte as porcas.; ii
14 15 M6 M8 Attach the horizontal piece to your screen and tighten the thumb nuts. Attachez la pièce horizontal à l’écran et serrez les écrous à ailettes. / Befestigen Sie das horizontale Stück auf den Bildschirm und ziehen Sie die Muttern fest. / Fissare l’elemento orizzontale allo schermo e serrar...
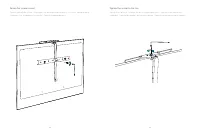
Page 9 - Place the vertical part on the screen and adjust the position.; peça vertical no ecrã e ajuste a posição.
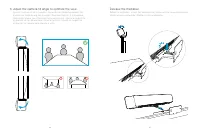
16 17 Remove the mediabar support from the wall mount bracket and mount it on the screen mount. Enlevez le support de la mediabar de la fixation murale et montez le sur la fixation à l’écran. / Entfernen Sie die Stütze für die Medienleiste aus der Wandhalterung und montieren Sie sie auf die Bildschi...
Page 12 - power; Connectez la mediabar à l’écran,
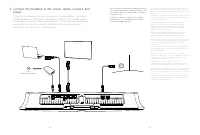
22 23 Power (100-240 VAC, 50/60 Hz) adapter 2. Connect the mediabar to the screen, laptop, network, and power Connectez la mediabar à l’écran, au réseau et à l’alimentation / Verbinden der Medienleiste mit Bildschirm, Netzwerk und Strom / Connettere la barra multimediale a schermo, rete e alimentazi...
Page 13 - Adjust the camera tilt angle to optimize the view; inclinação da câmara para otimizar a vista; Release the mediabar; Retire la barra multimedia / Retirar a barra multimédia
24 25 9 3. Adjust the camera tilt angle to optimize the view Ajustez l’inclinaison de la caméra / Anpassen des Neigungswinkels der Kamera zur Optimierung der Anzeige / Regolare l’angolo di inclinazione della videocamera per ottimizzare la visualizzazione / Ajuste el ángulo de inclinación de la cámar...
Page 14 - Privacy cover; Cubierta de privacidad / Cobertura de privacidade; Instale a placa magnética autoadesiva.; Place the magnetic privacy cover.
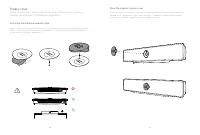
26 27 Privacy cover Cache d’obstruction / Datenschutz-Abdeckung / Copertura per la privacy / Cubierta de privacidad / Cobertura de privacidade Attach the self-adhesive magnetic plate. Attachez la plaque magnétique autocollante. / Befestigen Sie die selbstklebende magnetische Platte. / Attaccare la p...
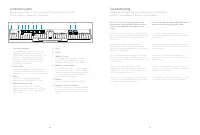
Page 15 - Connector panel; Panneau de connexion / Anschlussfeld / Pannello del connettore /; Troubleshooting; Solución de problemas / Solução de problemas
28 29 Power (100-240 VAC, 50/60 Hz) adapter 1 2 3 4 5 6 7 8 9 10 1. Factory reset pinhole Trou d’épingle pour la réinitialisation aux paramètres par défaut / Stiftloch zum Zurücksetzen auf Werkseinstellungen / Foro di ripristino delle impostazioni di fabbrica / Botón de restablecimiento de los valor...