Page 2 - Braukmann GmbH
2 Braukmann GmbH Raiffeisenstraße 9 D-59757 Arnsberg Service-Hotline International: Tel.: +49 (0) 29 32 / 80 55 4 – 99 Fax: +49 (0) 29 32 / 80 55 4 – 77 eMail: [email protected] Sie finden die aktuellste Version der Bedienungsanleitung auch auf unserer Homepage: www.caso-germany.de Dokument-Nr.: 152...
Page 4 - Störungsursachen und
4 9.1 Sicherheitshinweise ................................................................................................ 23 9.2 Störungsursachen und –behebung ....................................................................... 23 10 Entsorgung des Altgerätes ......................................
Page 6 - Rangement de votre appareil
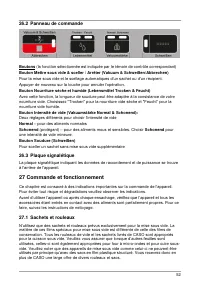
6 26.2 Panneau de commande .......................................................................................... 52 26.3 Plaque signalétique ................................................................................................. 52 27 Commande et fonctionnement ..........................
Page 10 - Informationen zu dieser Anleitung
10 1 Bedienungsanleitung 2 Allgemeines Lesen Sie die hier enthaltenen Informationen, damit Sie mit Ihrem Gerät schnell vertraut werden und seine Funktionen in vollem Umfang nutzen können. Sachgerechte Behandlung und Pflege wirken sich positv auf seine Lebensdauer aus. Wir wünschen Ihnen viel Freude ...
Page 11 - Haftungsbeschränkung; Sicherheit; Bestimmungsgemäße Verwendung; Gefahr durch nicht bestimmungsgemäße Verwendung!
11 2.3 Haftungsbeschränkung Alle in dieser Anleitung enthaltenen technischen Informationen, Daten und Hinweise für die Installation, Betrieb und Pflege entsprechen dem letzten Stand bei Drucklegung und erfolgen unter Berücksichtigung unserer bisherigen Erfahrungen und Erkenntnisse nach bestem Wissen...
Page 12 - Allgemeine Sicherheitshinweise
12 3.2 Allgemeine Sicherheitshinweise Beachten Sie für einen sicheren Umgang mit dem Gerät die folgenden allgemeinen Sicherheitshinweise: ► Kontrollieren Sie das Gerät vor der Verwendung auf äußere sichtbare Schäden. Nehmen Sie ein beschädigtes Gerät nicht in Betrieb. ► Bei Beschädigung der Anschlus...
Page 13 - Gefahrenquellen
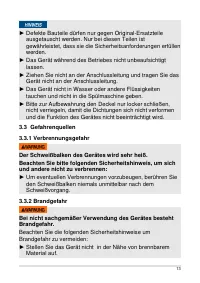
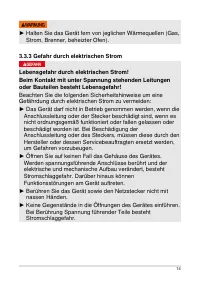
13 ► Defekte Bauteile dürfen nur gegen Original-Ersatzteile ausgetauscht werden. Nur bei diesen Teilen ist gewährleistet, dass sie die Sicherheitsanforderungen erfüllen werden. ► Das Gerät während des Betriebes nicht unbeaufsichtigt lassen. ► Ziehen Sie nicht an der Anschlussleitung und tragen Sie d...
Page 15 - Sicherheitshinweise zur Aufbewahrung von Lebensmitteln; Inbetriebnahme; Sicherheitshinweise
15 4 Sicherheitshinweise zur Aufbewahrung von Lebensmitteln Befolgen Sie bitte bestimmte Vorgehensweisen beim Vakuum-verschweißen; so können Sie die Qualität und die Sicherheit Ihrer vakuumierten / eingeschweißten Lebensmittel garantieren. Beachten Sie für einen sicheren Umgang mit dem Gerät die fol...
Page 16 - Entsorgung der Verpackung; Anforderungen an den Aufstellort
16 5.3 Einsatzbereich Die mit diesem Gerät vakuum-verpackten Lebensmittel bleiben bis zu achtmal länger frisch: Besserer Geschmack – weniger Kosten durch verdorbene Lebensmittel. • Verpacken Sie Lebensmittel, wie z.B. Fleisch, Fisch, Geflügel, Fisch und Meeresfrüchte und Gemüse zum Einfrieren oder f...
Page 17 - Elektrischer Anschluss; Aufbau und Funktion
17 • Die Steckdose muss leicht zugänglich sein, so dass das Stromkabel notfalls leicht abgezogen werden kann. • Der Aufstellung des Gerätes an nichtstationären Aufstellungsorten (z. B. Schiffen) darf nur von Fachbetrieben/Fachleuten durchgeführt werden, wenn sie die Voraussetzungen für den sicherhei...
Page 18 - Gesamtübersicht
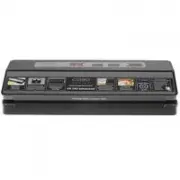
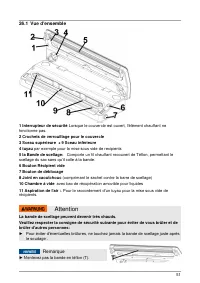
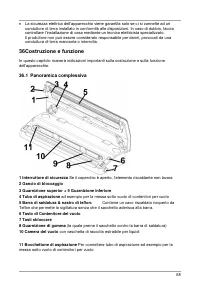
18 6.1 Gesamtübersicht 1 Sicherheitsschalter Wenn der Deckel geöffnet ist, dann arbeitet das Heizelement nicht 2 Verriegelungshaken 3 obere Dichtung + 9 untere Dichtung 4 Vakuumierschlauch zum Vakuumieren von Behältern 5 Schweißbalken & Teflonband: Enthält einen teflonbeschichteten Heizdraht; di...
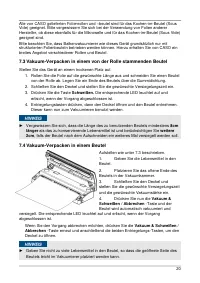
Page 19 - Bedienung und Betrieb; Beutel und Rollen
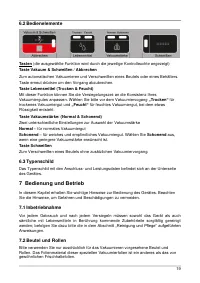
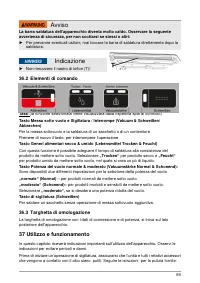
19 6.2 Bedienelemente Tasten (die ausgewählte Funktion wird durch die jeweilige Kontrolleuchte angezeigt) Taste Vakuum & Schweißen / Abbrechen Zum automatischen Vakuumieren und Verschweißen eines Beutels oder eines Behälters. Taste erneut drücken um den Vorgang abzubrechen. Taste Lebensmittel (T...
Page 20 - Vakuum-Verpacken in einem von der Rolle stammenden Beutel; länger
20 Alle von CASO gelieferten Folienrollen und –beutel sind für das Kochen-im-Beutel (Sous Vide) geeignet. Bitte vergewissern Sie sich bei der Verwendung von Folien anderer Hersteller, ob diese ebenfalls für die Mikrowelle und für das Kochen-im-Beutel (Sous Vide) geeignet sind. Bitte beachten Sie, da...
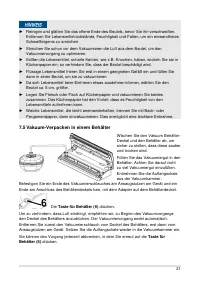
Page 21 - Taste für
21 ► Reinigen und glätten Sie das offene Ende des Beutels, bevor Sie ihn verschweißen. Entfernen Sie Lebensmittelrückstände, Feuchtigkeit und Falten, um ein einwandfreies Schweißergenis zu erreichen. ► Streichen Sie schon vor dem Vakuumieren die Luft aus dem Beutel, um den Vakuumiervorgang zu optimi...
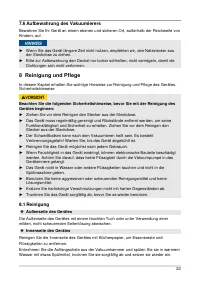
Page 22 - Aufbewahrung des Vakuumierers; Reinigung und Pflege; Außenseite des Gerätes
22 7.6 Aufbewahrung des Vakuumierers Bewahren Sie Ihr Gerät an einem ebenen und sicheren Ort, außerhalb der Reichweite von Kindern, auf. ► Wenn Sie das Gerät längere Zeit nicht nutzen, empfehlen wir, den Netzstecker aus der Steckdose zu ziehen. ► Bitte zur Aufbewahrung den Deckel nur locker schließe...
Page 23 - Störungsbehebung; Sicherheitshinweise; Fehler
23 ◆ Vakuumierbeutel Sie können die Vakuumierbeutel mehrfach verwenden. Waschen Sie den Beutel in warmem Spülwasser aus und lassen Sie ihn anschließend sorgfältig trocknen, bevor Sie ihn wieder benutzen. ► Beutel, die zur Aufbewahrung von rohem Fleisch, Fisch oder fettigen Lebensmitteln benutzt wurd...
Page 24 - Entsorgung des Altgerätes
24 Das abgeschnittene Rollenstück wird nicht korrekt verschweißt Rollenstück nicht korrekt positioniert Befolgen Sie die Schritte im Kapitel „Vakuum-Verpacken in einem von der Rolle stammenden Beutel” Es wird kein vollständiges Vakuum im Beutel erzeugt Das offene Ende des Beutels befindet sich nicht...
Page 26 - Instruction Manual; Vacuum Sealer System
26 Instruction Manual Vacuum Sealer System VR 390 advanced Item No. 1522
Page 27 - Information on this manual; DANGER
27 13 Instruction Manual 13.1 General Please read the information contained herein so that you can become familiar with your device quickly and take advantage of the full scope of its functions. Your vacuum sealer system will serve you for many years if you handle it and care for it properly. We wis...
Page 28 - Limitation of liability
28 ATTENTION A warning notice of this level of danger indicates a possible dangerous situation. If the dangerous situation is not avoided, this can lead to slight or moderate injuries. ► Observe the instructions in this warning notice in order to avoid the personal injuries. PLEASE NOTE A notice of ...
Page 29 - Safety; Warning; Danger due to unintended use!; General Safety information; Please note
29 14 Safety This chapter provides you with important safety notices when handling the device. The device corresponds with the required safety regulations. Improper use can result in personal or property damages. 14.1 Intended use This device is only intended for use in households in enclosed spaces...
Page 30 - Sources of danger; Please observe the following
30 Please note ► The device may be used by individuals with reduced physical, sensory or mental capabilities or a lack of experience and / or knowledge of their use if they are supervised or have been instructed at to the safe use of the device and have understood the resulting hazards. ► Only custo...
Page 31 - Observe the following safety notices; Food storage safety information
31 14.3.2 Danger of fire Warning There is a danger of fire due to the event the device is not used properly. Observe the following safety notices to avoid dangers of fire: ► Do not set up the device near flammable material. ► Keep this appliance away from sources of heat (gas, electric, burner, heat...
Page 32 - Getting Started; Packaging safety information; WARNING; Delivery scope and transport inspection; PLEASE NOTE
32 Please note ► Before vacuum sealing, it’s necessary to clean your hands, and all utensils and surfaces to be used for cutting and vacuum sealing foods. ► Refrigerate or freeze the perishable foods immediately, if you have vacuum-sealed them, and do not leave them sitting at room temperature. ► Th...
Page 33 - Disposal of the packaging; Setup location requirements:; Electrical connection
33 15.4 Unpacking Carefully remove the packaging material and unit from the carton. 15.5 Disposal of the packaging Caso believes in the importance of recycling and has selected packaging materials that not only protect your unit from damage during transit, but can be recycled to minimize any ecologi...
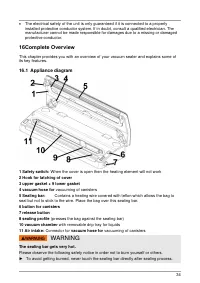
Page 34 - Complete Overview; Appliance diagram
34 • The electrical safety of the unit is only guaranteed if it is connected to a properly installed protective conductor system. If in doubt, consult a qualified electrician. The manufacturer cannot be made responsible for damages due to a missing or damaged protective conductor. 16 Complete Overvi...
Page 35 - Buttons; Operation; Basics of sealing; Chapter Cleaning and Maintenance
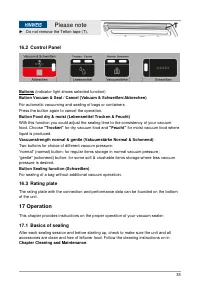
35 Please note ► Do not remove the Teflon tape (T). 16.2 Control Panel Buttons (indicator light shows selected function) Button Vacuum & Seal / Cancel (Vakuum & Schweißen/Abbrechen) For automatic vacuuming and sealing of bags or containers Press the button again to cancel the operation. Butt...
Page 36 - Vacuum packaging with a bag
36 17.2 Bags and rolls Please only use specified bags and rolls designed for vacuum sealing. Do not use other materials such as plastic wrap. All vacuum rolls and bags delivered by CASO are appropriate for cooking under vacuum (sous vide). Please make sure when vacuum rolls and bags of other produce...
Page 37 - Vacuum package in a Canister; button for canisters (6
37 PLEASE NOTE ► Press the bag to expel excess air before vacuuming it. Too much air inside the bag may result in a poor vacuum. ► If the food you’re sealing has sharp edges (such as bones or shells) pack the edges with kitchen paper to avoid tearing the bag ► When vacuum sealing liquid-based foods ...
Page 38 - Cleaning and Maintenance; Safety information; Outside of the unit; Inside of the unit; Cleaning bags for reuse; Attention
38 18 Cleaning and Maintenance This chapter provides important information on properly cleaning and maintaining your vacuum sealer. 18.1 Safety information Attention Please observe the following safety notices, before cleaning the unit to avoid damage to the unit or personal injury: ► Unplug the dev...
Page 39 - Sealing profile (which presses the bag against the sealing bar); Troubleshooting; Safety notices; Troubleshooting table
39 ◆ Sealing profile (which presses the bag against the sealing bar) Remove the sealing profile and clean it in warm soapy water. PLEASE NOTE ► The sealing profile should be cleaned thoroughly before installing it again. ► Be careful during re-installation, so that nothing will be damaged and sealin...
Page 40 - Disposal of the Old Device; Guarantee
40 PLEASE NOTE ► If you are unable to solve the problem with the steps shown above, please contact Customer Service. 20 Disposal of the Old Device To protect the environment, it’s important to dispose of old electronic devices properly. Do not place your old unit in the non-recyclable waste under an...
Page 41 - Technical Data
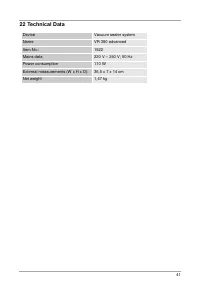
41 22 Technical Data Device Vacuum sealer system Name VR 390 advanced Item No.: 1522 Mains data 220 V – 240 V; 50 Hz Power consumption 110 W External measurements (W x H x D): 36,5 x 7 x 14 cm Net weight 1,47 kg
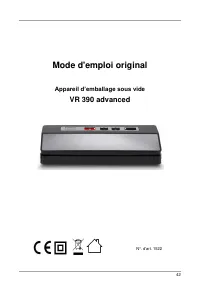
Page 42 - Mode d'emploi original; Appareil d’emballage sous vide
42 Mode d'emploi original Appareil d’emballage sous vide VR 390 advanced N°. d'art. 1522
Page 43 - Mode d ́emploi; Informations relatives à ce manuel; Avertissements de danger; Danger; Prudence
43 23 Mode d´emploi 23.1 Généralités Veuillez lire les indications de ce manuel afin de vous familiariser rapidement avec l'appareil et afin de pouvoir utiliser l'ensemble de ses fonctions. Votre l´apparail d´emballage sous vide vous sera fidèle de nombreuses années si vous l'utilisez et l'entretene...
Page 44 - Remarque; Limite de responsabilités; Sécurité
44 Remarque Cette indication est accompagnée d'informations complémentaires pour faciliter l'utilisation de l'appareil. 23.4 Limite de responsabilités Tous les renseignements techniques, données et instructions d'installation, de fonctionnement et d'entretien contenus dans ce manuel sont parfaitemen...
Page 45 - Utilisation conforme; Danger en cas d'utilisation non conforme !; Consignes de sécurités générales
45 24.1 Utilisation conforme Cet appareil est conçu uniquement pour une utilisation ménagère à l'intérieur de locaux, afin de scellager uniquement ou de vider des sacs et récipient à vide pour conserver d´aliments sous vide. Toute autre utilisation est considérée comme non conforme. Attention Danger...
Page 46 - Sources de danger
46 Remarque ► Les réparations doivent être effectuées uniquement par un service après-vente agréé par le constructeur, sinon en cas de dommages le recours en garantie est supprimé. Des réparations incorrectes peuvent entraîner de graves dangers pour l'utilisateur. ► Les pièces défectueuses doivent ê...
Page 47 - ► Ne disposez pas l'appareil à proximité de matériaux; Danger de mort par électrocution !; ► L'appareil ne doit pas être mis en marche si le câble
47 24.3.2 Danger d'incendie Attention En cas d'utilisation non conforme de l'appareil cela peut provoquer un incendie par inflammation du contenu. Pour éviter tout risque d'incendie veuillez observer les consignes de sécurité suivantes : ► Ne disposez pas l'appareil à proximité de matériaux inflamma...
Page 48 - Règles générales relatives à la sécurité alimentaire; Mise en service; Consignes de sécurité; Inventaire et contrôle de transport
48 24.4 Informations relatives à la sécurité de stockage des aliments Veuillez suivre certaines procédures de mise sous vide pour garantir la qualité et la sécurité de vos produits alimentaires scellés sous vide. Remarque Règles générales relatives à la sécurité alimentaire ► Consommez immédiatement...
Page 49 - Elimination des emballages; Exigences pour l'emplacement d'utilisation
49 25.3 Fonctions La principale fonction de cet appareil est de prolonger le stockage d’une grande variété d’aliments sans en altérer ni la fraîcheur ni le goût et de vous faire bénéficier d’une plus grande commodité. En général, les emballages sous vide permettent de conserver la fraîcheur des alim...
Page 50 - Raccordement électrique; Structure et fonctionnement
50 • Ne disposez pas l'appareil dans un environnement chaud, mouillé ou très humide ou à proximité de matériaux inflammables. • Ne déplacez pas l’appareil d’emballage sous vide en cours d’utilisation. • Pour un fonctionnement correct l'appareil nécessite un flux d'air suffisant. Laissez un espace de...
Page 52 - Panneau de commande; Boutons; Plaque signalétique; Commande et fonctionnement; Sachets et rouleaux
52 26.2 Panneau de commande Boutons (la fonction sélectionnée est indiquée par le témoin de contrôle correspondant) Bouton Mettre sous vide & sceller / Arrêter (Vakuum & Schweißen/Abbrechen) Pour la mise sous vide et le scellage automatiques d'un sachet ou d'un récipient. Appuyer de nouveau ...
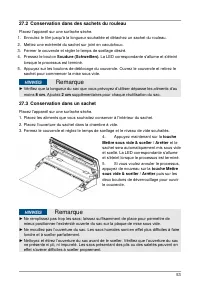
Page 53 - Conservation dans des sachets du rouleau; Conservation dans un sachet; touche
53 27.2 Conservation dans des sachets du rouleau Placez l'appareil sur une surfache sèche. 1. Enroulez le film jusqu'à la longueur souhaitée et détachez un sachet du rouleau. 2. Mettez une extrémité du sachet sur joint en caoutchouc. 3. Fermer le couvercle et régler le temps de scellage désiré. 4. P...
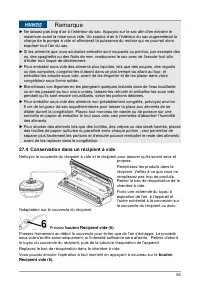
Page 54 - Conservation dans un récipient à vide; bouton
54 Remarque ► Ne laissez pas trop d’air à l’intérieur du sac. Appuyez sur le sac afin d’en extraire le maximum avant la mise sous vide. Un surplus d’air à l’intérieur du sac augmenterait la charge de la pompe à vide et affecterait la puissance du moteur qui ne pourrait alors expulser tout l’air du s...
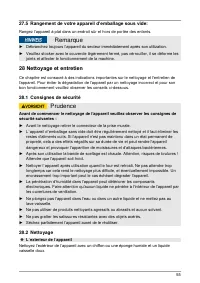
Page 55 - Rangement de votre appareil d’emballage sous vide:; Nettoyage et entretien; Consignes de sécurité; L ́exterieur de l ́appareil
55 27.5 Rangement de votre appareil d’emballage sous vide: Rangez l’appareil à plat dans un endroit sûr et hors de portée des enfants. Remarque ► Débranchez toujours l’appareil du secteur immédiatement après son utilization. ► Veuillez stocker avec le couvercle légèrement fermé, pas vérrouiller, il ...
Page 56 - Réparation des pannes; Consignes de sécurité; Origine et remède des incidents; Erreur
56 ◆ L´interieur de l´appareil Nettoyez l’intérieur de l’appareil en essuyant tout reste d’aliment ou de liquide avec une serviette en papier. Retirer le bac de récupération de la chambre à vide et rincer à l'eau tiède avec un peu de détergent, sécher soigneusement et remplacer. ◆ Sacs de conservati...
Page 57 - Elimination des appareils usés
57 Le premier soudage sur la section de rouleau découpée n'est pas mis en œuvre. Le rouleau n’est pas placé correctement. Suivez les étapes dans le chapitre « Emballer sous vide dans un sac sur rouleau ». Aucun vide complet dans le sac n'est produit. L’extrémité ouverte du sac ne se trouve pas compl...
Page 59 - Sistema di sigillatura sottovuoto
59 Istruzioni d’uso originali Sistema di sigillatura sottovuoto VR 390 advanced Articolo-N. 1522
Page 60 - Istruzione d ́uso; Informazioni su queste istruzioni; Pericolo
60 33 Istruzione d´uso 33.1 In generale Legga le informazioni qui contenute, affinché acquisti rapidamente familiarità con il suo apparecchio e affinché possa utilizzare appieno le sue funzioni. Il Suo VR 390 advanced le renderà un buon servizio per molti anni, se lo tratterà e lo curerà in modo ade...
Page 61 - Limitazione della responsabilità
61 Attenzione Un’indicazione d'avvertimento di questo livello di pericolo contrassegna una situazione di pericolo potenziale. Se tale situazione pericolosa non viene evitata, le conseguenze potranno essere lesioni leggere o di media entità. ► Osservare le indicazioni in queste avvertenze, per evitar...
Page 62 - Sicurezza; Utilizzo conforme alle disposizioni; Avviso; Pericolo per un utilizzo non conforme alle disposizioni!; Indicazioni generali di sicurezza; Indicazione; ► Controlli prima dell'utilizzo, che l’apparecchio non presenti
62 34 Sicurezza In questo capitolo riceverà importanti indicazioni sulla sicurezza nell’utilizzo dell’apparecchio. Questo apparecchio corrisponde alle disposizioni di sicurezza prescritte. Un utilizzo inadeguato può però provocare danni a persone e cose. 34.1 Utilizzo conforme alle disposizioni Ques...
Page 64 - Fonti di pericolo; La barra saldatura dell'apparecchio diventa molto caldo.; Pericolo dovuto a corrente elettrica; Pericolo di vita dovuto a corrente elettrica!
64 34.3 Fonti di pericolo 34.3.1 Pericolo di ustioni Avviso La barra saldatura dell'apparecchio diventa molto caldo. Osservare la seguente avvertenza di sicurezza, per non scottarsi se stessi o altri: ► Per prevenire eventuali ustioni, mai toccare la barra di saldatura direttamente dopo la saldatura...
Page 65 - ► Non aprire in nessun caso la scatola dell’apparecchio. Se si; Informazioni di sicurezza per la conservazione del cibo.
65 Pericolo ► Non aprire in nessun caso la scatola dell’apparecchio. Se si toccano connessioni sotto tensione e se viene modificata la struttura elettrica e meccanica, sussiste il pericolo di scossa elettrica. Inoltre possono verificarsi malfunzionamenti dell’apparecchio. ► Prima di connettere l’app...
Page 66 - Messa in funzione; Indicazioni di sicurezza; Insieme della fornitura ed ispezione trasporto; Disimballaggio
66 35 Messa in funzione In questo capitolo riceverà indicazioni importanti sulla messa in funzione dell’apparecchio. Osservi le indicazioni per evitare pericoli e danni. 35.1 Indicazioni di sicurezza Avviso ► Materiali d’imballaggio non dovranno essere utilizzati come giocattoli. Sussiste il pericol...
Page 67 - Posizionamento; Requisiti del luogo di posizionamento; Connessione elettrica
67 Ricondurre l’imballaggio nel circuito materiali permette di risparmiare sulle materie prime e riduce la produzione di rifiuti. Smaltisca i materiali per l'imballaggio, che non sono più necessari, nei punti di raccolta presso le “aree ecologiche” per il sistema di riciclo. Indicazione ► Conservi, ...
Page 68 - Costruzione e funzione; Panoramica complessiva
68 • La sicurezza elettrica dell’apparecchio viene garantita solo se ci si connette ad un conduttore di terra installato in conformità alle disposizioni. In caso di dubbio, faccia controllare l’installazione di casa mediante un tecnico elettricista specializzato. Il produttore non può essere conside...
Page 69 - Elementi di comando; Tasti; „Feucht“; Targhetta di omologazione; Utilizzo e funzionamento
69 Avviso La barra saldatura dell'apparecchio diventa molto caldo. Osservare la seguente avvertenza di sicurezza, per non scottarsi se stessi o altri: ► Per prevenire eventuali ustioni, mai toccare la barra di saldatura direttamente dopo la saldatura. Indicazione ► Non rimuovere il nastro di teflon ...
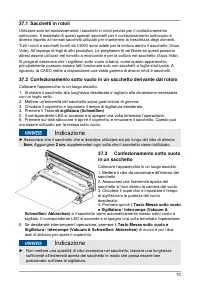
Page 70 - Sacchetti in rotoli; Confezionamento sotto vuoto; Tasto Messa sotto vuoto
70 37.1 Sacchetti in rotoli Utilizzare solo ed esclusivamente i sacchetti in rotoli previsti per il confezionamento sottovuoto. Il materiale di questi speciali sacchetti per il confezionamento sottovuoto è diverso rispetto ai normali sacchetti utilizzati per mantenere la freschezza degli alimenti. T...
Page 71 - Confezionamento sotto vuoto in un contenitore del vuoto
71 Indicazione ► Non inumidire l’estremità aperta. Questo può rendere più difficile la chiusura ermetica del sacchetto. ► Esistono diversi usi non alimentari per sacchetti sotto vuoto. Tenere gli articoli per il campeggio come fiammiferi, cassette di pronto soccorso e indumenti, puliti ed asciutti. ...
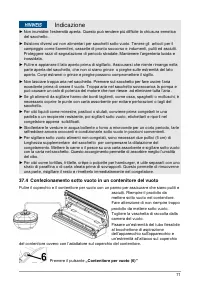
Page 72 - Tasto; Conservazione del sistema di sigillamento sottovuoto:; Pulizia e cura; Indicazioni di sicurezza; Attenzione
72 All'inizio della procedura di messa sotto vuoto premere il coperchio saldamente, per evitare che possa fuoriuscire dell'aria. La procedura di messa sotto vuoto termina automaticamente, non appena è stata raggiunta una potenza sufficiente del vuoto. Rimuovere dapprima il tubo flessibile per sottov...
Page 73 - l ́esterno; Eliminazione malfunzionamenti; Indicazioni di sicurezza
73 Attenzione ► Non utilizzi detersivi aggressivi o abrasivi e non utilizzi solventi. ► Non utilizzi oggetti duri per grattare via i residui incrostati. ► Lasciare asciugare completamente prima di utilizzare di nuovo. 38.2 La pulizia ◆ l´esterno Strofinare l’esterno con un panno umido o una spugna e...
Page 74 - Cause malfunzionamenti e risoluzione; Malfunzionamento; Smaltimento dell’apparecchio obsoleto
74 39.2 Cause malfunzionamenti e risoluzione La seguente tabella aiuta a localizzare e a risolvere malfunzionamenti più lievi. Malfunzionamento Possibile causa Risoluzione La macchina sottovuoto non funziona Non è stata inserita la spina Inserire la spina Il cavo elettrico o la spina sono difettosi ...
Page 75 - Garanzia
75 Indicazione ► Si serva dell'area ecologica realizzata nel suo comune di residenza, per la consegna ed il riciclo di apparecchi elettrici o elettronici obsoleti. Si informi eventualmente presso il Suo comune, il Suo servizio di nettezza urbana o presso il suo rivenditore. ► Si assicuri, che il suo...
Page 76 - Manual del usuario; Envasadora al vacío
76 Manual del usuario Envasadora al vacío VR 390 advanced Ref. 1522
Page 77 - Información acerca de este manual; Peligro; Advertencia
77 43 Manual del usuario 43.1 Generalidades Lea atentamente la información contenida en este manual para familiarizarse rápidamente con el aparato y poder utilizar sus funciones en toda su capacidad. Su VR 390 advanced le servirá durante muchos años si lo trata y conserva adecuadamente. Le deseamos ...
Page 78 - Nota; Limitación de responsabilidad; Seguridad
78 Nota Esta indicación proporciona información adicional que facilitará el manejo de la máquina. 43.4 Limitación de responsabilidad La información técnica contenida, datos e indicaciones contenidos en el presente manual para la instalación, operación y conservación se corresponden con los últimos a...
Page 79 - Peligro ante el uso no conforme a lo previsto.; Instrucciones generales de seguridad
79 44.1 Uso previsto Este aparato se ha concebido para hacer vacío en bolsas y recipientes así como el sellado de láminas de manera doméstica en salas cerradas. Cualquier otro uso distinto al aquí previsto se considera un uso indebido del aparato. Advertencia Peligro ante el uso no conforme a lo pre...
Page 81 - ► Para evitar posibles quemaduras, nunca toque la barra; Peligro de fuego; ► No coloque potas vacías sobre los fogones.; Peligro de muerte por electrocución
81 44.3 Fuentes de peligro 44.3.1 Peligro de quemaduras Advertencia La barra selladora puede estar muy caliente. Tenga presente la siguiente indicación de seguridad para no quemarse a sí mismo ni quemar a otras personas: ► Para evitar posibles quemaduras, nunca toque la barra selladora justo después...
Page 82 - ► Nunca abra la carcasa del aparato. Si toca cualquier; Puesta en marcha
82 Peligro ► Nunca abra la carcasa del aparato. Si toca cualquier conexión energizada y cambia la disposición del cableado eléctrico o el diseño mecánico existe peligro de electrocución. Además, pueden producirse fallos de funcionamiento en el aparato. ► No toque el aparato ni el enchufe de alimenta...
Page 83 - Instrucciones de seguridad; Ámbito de suministro e inspección de transporte; Eliminación del embalaje
83 46.1 Instrucciones de seguridad Advertencia ► Los materiales de embalaje no deben utilizarse como juguetes. Peligro de asfixia. 46.2 Ámbito de suministro e inspección de transporte El aparato se entrega con los siguientes componentes: • VR 390 advanced 10 bolsas profesionales en vacío (20 x 30 ...
Page 84 - Requisitos que debe reunir el lugar de montaje; Conexión eléctrica
84 Nota ► Si fuera posible, conserve el embalaje original durante el período de garantía para poder embalar el aparato adecuadamente en caso de que requiera hacer uso de la garantía. 46.6 Colocación 46.6.1 Requisitos que debe reunir el lugar de montaje Para garantizar el funcionamiento seguro y corr...
Page 85 - Estructura y funciones; Descripción general
85 • La conexión del aparato a la red eléctrica debe realizarse mediante un cable alargador arrollado, de 3 metros de longitud como máximo y una sección recta de 1,5 mm². El uso de regletas de conexiones o ladrones con varias tomas está prohibido, por el peligro de incendio. • La toma de alimentació...
Page 86 - La barra selladora puede estar muy caliente.; Elementos de operación; Teclas; Placa de especificaciones
86 11 aspirazione aria : attacco del tubo flessibile per vuoto: per il collegamento di un tubo flessibile per vuoto per la messa sotto vuoto di contenitori. Advertencia La barra selladora puede estar muy caliente. Tenga presente la siguiente indicación de seguridad para no quemarse a sí mismo ni que...
Page 87 - Operación y funcionamiento; Puesta en servicio; cm mayor; cm adicionales
87 48 Operación y funcionamiento Este capítulo incluye algunos consejos importantes acerca de la operación y el funcionamiento del aparato. Observe dichos consejos para evitar peligros y daños. 48.1 Puesta en servicio Limpie cuidadosamente el aparato y los accesorios que hayan estado en contacto con...
Page 88 - Envasar al vacío en una bolsa; botón vacío
88 48.4 Envasar al vacío en una bolsa Coloque el aparato en un lugar seco. 1. Introduzca en la bolsa los alimentos que quiera almacenar. 2. Asegúrese de que el extremo abierto de la bolsa se encuentra dentro de la cámara de vacío. 3. Cierre la tapa y ajuste el tiempo de sellado y la intensidad de va...
Page 89 - Envasar al vacío en un recipiente de vacío; tecla; Almacenamiento de la envasadora; Limpieza y conservación
89 Nota ► Para envasar alimentos como tortillas, crepes, hamburguesas o empanadillas, sepárelos con papel encerado o de pergamino, así se pueden apilar mejor. Después podrá coger una parte de los alimentos fácilmente y volver a envasar y congelar el resto. 48.5 Envasar al vacío en un recipiente de v...
Page 90 - Instrucciones de seguridad; Superficie externa del aparato; Precaución; Junta de goma (que presiona la bolsa contra la barra selladora)
90 49.1 Instrucciones de seguridad Precaución Tenga presentes las siguientes instrucciones de seguridad antes de comenzar a limpiar el aparato: ► Antes de limpiar desconectarlo de la toma de alimentación eléctrica. ► El aparato debe limpiarse periódicamente para eliminar los restos de alimentos coci...
Page 91 - Resolución de fallas; Instrucciones de seguridad; Problema
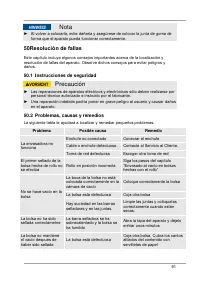
91 Nota ► Al volver a colocarla, evite dañarla y asegúrese de colocar la junta de goma de forma que el aparato pueda funcionar correctamente. 50 Resolución de fallas Este capítulo incluye algunos consejos importantes acerca de la localización y resolución de fallas del aparato. Observe dichos consej...
Page 92 - Eliminación del aparato usado; Garantía
92 Hay fugas debido a arrugas, migas, grasa o líquidos en la costura de sellado. Vuelva a abrir la bolsa; limpie la parte interior de la boca de la bolsa; limpie la posible suciedad de la barra selladora. Vuelva a sellar la bolsa. Nota ► Si con los pasos que se indica más arriba no consigue solucion...
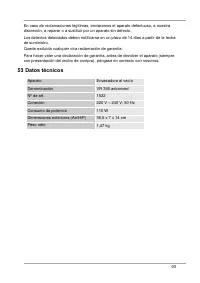
Page 93 - Datos técnicos
93 En caso de reclamaciones legítimas, enviaremos el aparato defectuoso, a nuestra discreción, a reparar o a sustituir por un aparato sin defecto. Los defectos detectados deben notificarse en un plazo de 14 días a partir de la fecha de suministro. Queda excluida cualquier otra reclamación de garantí...
Page 94 - Руководство по эксплуатации; Вакуумный упаковщик
94 Руководство по эксплуатации Вакуумный упаковщик VR 390 advanced Артикул 1522
Page 95 - Информация о данной инструкции; Опасность
95 54 Руководство по эксплуатации 55 Общие сведения Прочтите содержащуюся здесь информацию, чтобы быстро ознакомиться со своим прибором и в полной мере использовать все его функции. Надлежащее обращение и уход положительно влияют на срок службы устройства. Желаем приятного пользования. 55.1 Информац...
Page 96 - Примечание; Ограничение ответственности; Безопасность; Надлежащее использование
96 Примечание Примечание обозначает дополнительную информацию, облегчающую обращение с прибором. 55.3 Ограничение ответственности Все содержащиеся в данном Руководстве по использованию технические сведения, данные и указания по установке, использованию и уходу за прибором актуальны на момент печати ...
Page 97 - Предостережение; Общие требования техники безопасности; ► Перед использованием проверяйте прибор на
97 Предостережение Опасность из-за ненадлежащего использования! При использовании не по назначению и/или использовании, отличном от указанного в Руководстве по использованию, прибор может являться источником опасностей. ► Используйте прибор только по назначению. ► Соблюдайте порядок действий, описан...
Page 99 - ► В целях предотвращения возможных ожогов ни в; Опасность возгорания; ► Не ставьте прибор поблизости от горючих; Опасность, связанная с электрическим
99 56.3 Источники опасности 56.3.1 Опасность ожога Предостережение Сварная планка прибора очень сильно нагревается. Соблюдайте следующие правила безопасности, чтобы не обжечь себя и других: ► В целях предотвращения возможных ожогов ни в коем случае не прикасайтесь к сваривающей планке непосредственн...
Page 100 - ► Прибор нельзя использовать, если его
100 Опасность ► Прибор нельзя использовать, если его соединительный провод или штекер повреждены, если прибор работает со сбоями, упал или получил повреждения. Во избежание опасности в случае повреждения соединительного провода или штекера прибора его замена должна осуществляться производителем или ...
Page 101 - Правила техники безопасности; Комплектация и осмотр после транспортировки; Область применения
101 Примечание ► Охлаждайте или замораживайте скоропортящиеся продукты сразу после их вакуумной упаковки. Не храните их при комнатной температуре. ► Храните продукты с высоким содержанием жира по возможности в прохладном и темном месте, чтобы не допустить появления неприятного запаха и горького вкус...
Page 102 - Установка; Требования к месту установки
102 • Используйте свой вакууматор для непищевых целей: инвентарь для кемпинга, такой как, например, спички, аптечка и одежда, остается чистым и сухим, серебро и антиквариат не покрываются налетом. 58.4 Распаковка Для распаковки прибора выньте его из коробки и удалите упаковочный материал. 58.5 Утили...
Page 103 - Подключение к электросети; Конструкция и назначение
103 58.7 Подключение к электросети Для обеспечения безопасной и бесперебойной работы прибора при подключении к сети необходимо соблюдать нижеперечисленные указания: • Перед подключением прибора к сети сравните технические параметры подключения (напряжение и частоту) на заводской табличке прибора с т...
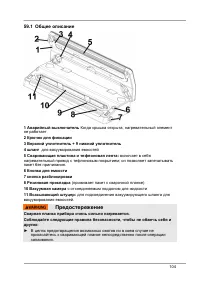
Page 104 - Общее описание; Аварийный выключатель
104 59.1 Общее описание 1 Аварийный выключатель Когда крышка открыта, нагревательный элемент не работает 2 Крючок для фиксации 3 Верхний уплотнитель + 9 нижний уплотнитель 4 шланг для вакуумирования емкостей 5 Сваривающая пластина и тефлоновая лента: включает в себя нагревательный провод с тефлоновы...
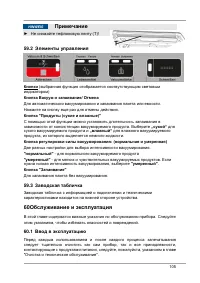
Page 105 - Элементы управления; Кнопки; „сухой“; Заводская табличка; Обслуживание и эксплуатация; Ввод в эксплуатацию
105 Примечание ► Не снимайте тефлоновую ленту (Т)! 59.2 Элементы управления Кнопки (выбранная функция отображается соотвутствующим световым индикатором) Кнопка Вакуум и запаивание/ Отмена Для автоматического вакуумирования и запаивания пакета или емкости. Нажмите на кнопку еще раз для отмены действи...
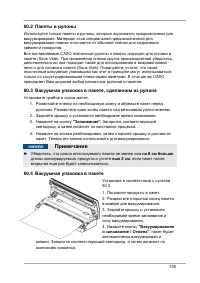
Page 106 - на 8 см больше; Вакуумная упаковка в пакете
106 60.2 Пакеты и рулоны Используйте только пакеты и рулоны, которые однозначно предназначены для вакуумирования. Материал этой специальной предназначенной для вакуумирования пленки отличается от обычной пленки для сохранения свежести продуктов. Все поставляемые CASO пленочные рулоны и пакеты подход...
Page 107 - Вакуумная упаковка в вакуумную емкость
107 Если Вы хотите прервать процесс, нажмите на кнопку "Вакуумирование и запаивание / Отмена" еще раз, а затем на обе кнопки разблокировки, чтобы открыть крышку. Примечание ► Не кладите в пакет слишком много продуктов; оставляйте достаточно места, чтобы открытая сторона пакета легко размещал...
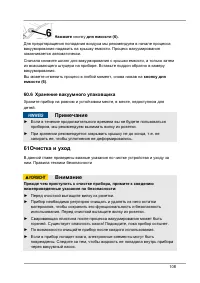
Page 108 - Нажмите; кнопку для; Хранение вакуумного упаковщика; Очистка и уход
108 Нажмите кнопку для емкости (6). Для предотвращения попадания воздуха мы рекомендуем в начале процесса вакуумирования надавить на крышку емкости. Процесс вакуумирования заканчивается автоматически. Сначала снимите шланг для вакуумирования с крышки емкости, а только затем из всасывающего штуцера н...
Page 109 - Очистка; Наружная сторона прибора; Внимание
109 Внимание ► Прибор нельзя погружать в воду и другие жидкости, а также помещать в посудомоечную машину. ► Не используйте агрессивные или абразивные чистящие средства и растворители. ► Не пытайтесь удалить стойкие загрязнения с помощью жестких предметов. ► Тщательно высушите прибор, прежде чем его ...
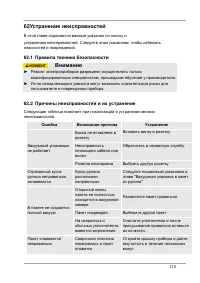
Page 110 - Устранение неисправностей; Причины неисправностей и их устранение; Ошибка
110 62 Устранение неисправностей В этой главе содержатся важные указания по поиску и устранению неисправностей. Следуйте этим указаниям, чтобы избежать опасностей и повреждений. 62.1 Правила техники безопасности Внимание ► Ремонт электроприборов разрешено осуществлять только квалифицированным специа...
Page 111 - Утилизация отслужившего устройства; Гарантия
111 После запечатывания пакет не держит вакуум Пакет поврежден Выберите другой пакет, при необходимости обмотайте острые края содержимого бумажными салфетками Имеются утечки из-за наличия складок, крошек, жира и жидкостей на поверхности вдоль шва спайки. Снова откройте пакет, очистите верхнюю внутре...
Page 112 - Технические характеристики
112 Кроме того, гарантийные требования не распространяются на быстроизнашивающиеся детали, повреждения при транспортировке, если мы не несем за них ответственность, а также повреждения, которые появились вследствие ремонтных работ, выполненных не нами. Прибор предназначен для частного использования ...