Page 2 - AVVERTENZE GENERALI; La griglia semplice; La griglia porta-piatto
Vi ringraziamo per aver scelto uno dei nostri prodotti, per ottenere da questo elettrodomestico le migliori prestazioni consigliamo di:• Leggere attentamente le avvertenze contenute nel presente libretto.• Conservare con cura questo libretto per ogni ulteriore consultazione.D u r a n t e l ’ u s o i...
Page 3 - CONSIGLI UTILI; LA COTTURA AL GRILL; La leccarda; GRIGLIE FORNO - SISTEMA DI ARRESTO; SECONDO MODELLO; Vantaggi del sistema
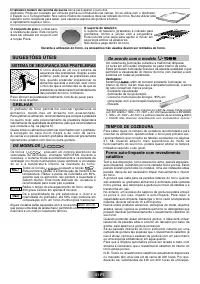
2 IT CONSIGLI UTILI LA COTTURA AL GRILL Questo tipo di cottura consente la doratura rapida dei ci bi.A questo scopo consigliamo di inserire la griglia generalmente nel3° o 4° ripiano, secondo le dimensioni dei cibi (Fig. pag. 8 ).Quasi tutte le carni possono essere cotte al grill, fanno eccezionea l...
Page 4 - SERVIZIO ASSISTENZA CLIENTI
3 IT Questo elettrodomestico è marcato conformementealla D irettiva Europea 2002/96/CE su i rifiuti daapparecchiature elettriche ed elettroniche (WEEE).Assicurandovi che questo prodotto sia sm altitoc o r r e tt a m e n te , a iu t e r e t e a d e v i ta r e p o s s i b il iconseguenze negative all’...
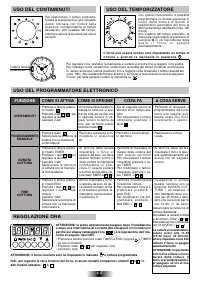
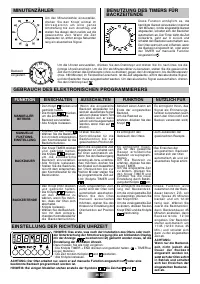
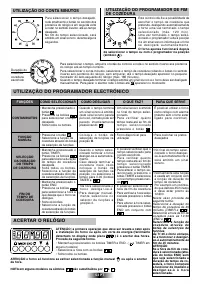
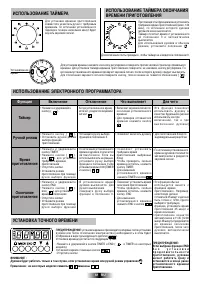
Page 5 - USO DEL PROGRAMMATORE ELETTRONICO; FUNZIONE; ATTENZIONE: il forno funziona solo se impostato in manuale; REGOLAZIONE ORA
• Premere tasto• Selezionare la funzione di cottura con la manopolacommutatore ATTENZIONE: la prima operazione da eseguire dopo l’installazioneo dopo una interruzione di corrente (tali situazioni si riconosconoperchè sul dispay lampeggia l’ora ) è la regolazione dell’ora,come di seguito descritto. •...
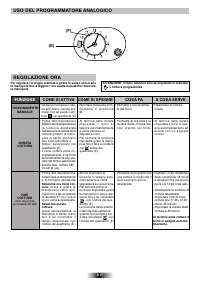
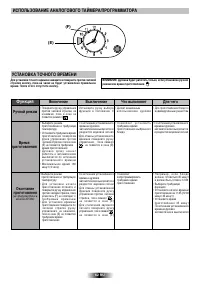
Page 6 - USO DEL PROGRAMMATORE ANALOGICO
ATTENZIONE: il forno funziona solo se impostato in manuale o cottura programmata USO DEL PROGRAMMATORE ANALOGICO (F) (E) REGOLAZIONE ORA Per regolare l’orologio premere e girare in senso anti-orariola manopola fino a leggere l’ora esatta dopodiché rilasciarela manopola FUNZIONE COME SI ATTIVA COME S...
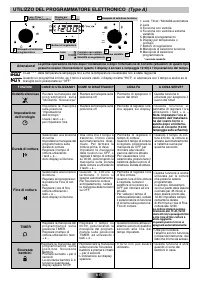
Page 7 - UTILIZZO DEL PROGRAMMATORE ELETTRONICO; FUNZIONI
UTILIZZO DEL PROGRAMMATORE ELETTRONICO (Type A) 6 IT • Q u e s t a f u n z i o n e v i permette di regolare l’oraut iliz za nd o i ta sti + e – Nota: impostare l’ora almomento dell'installazio-ne del vostro forno osubito dopo un’interru-zione di corrente (12:00lampeggia sullo schermo). • Impo sta re...
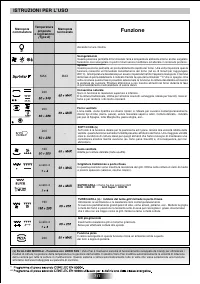
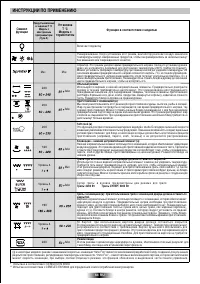
Page 8 - ISTRUZIONI PER L’USO; Funzione
Sprinter Questa posizione permette un preriscaldamento rapido del forno. Una volta impostata questafunzi one consent e un'immedi ato riscal dam ento del forno (ad es. 8 minut i per raggi ungere200°C), la temperatura desiderata puó essere impostata tramite l'apposita manopola. Il terminedella fase di...
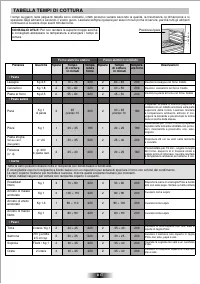
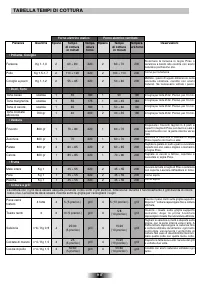
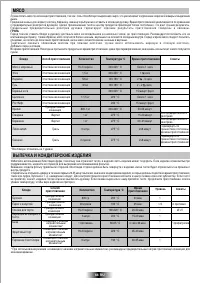
Page 9 - TABELLA TEMPI DI COTTURA
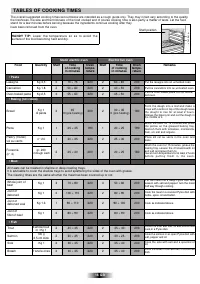
TABELLA TEMPI DI COTTURA I tempi suggeriti nelle seguenti tabelle sono indicativi, infatti possono variare seco ndo la qualità, la freschez za, la dimensione e lospessore degli alimenti e secondo il vostro gusto. Lasciare sempre riposare per alcuni minuti prima di servire, perché tutti gli alimentic...
Page 10 - • Verdura; • Cottura a grill
Pietanza Quantità Ripiano Tempera- tura forno Tempo di cottura in minuti Ripiano Tempe- ratura forno Tempo di cottura in minuti Osservazioni Forno elettrico statico Forno elettrico ventilato Faraona Kg 1-1,3 2 60 ÷ 80 220 2 60 ÷ 70 200 • Pollame, Coniglio Si stemare la f ar ao na in teglia Pi rex oc...
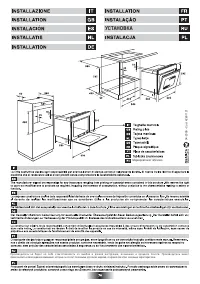
Page 11 - GENERAL WARNINGS; IMPORTANT; The oven must be properl y; The tray holder shelf; DECLARATION OF COMPLIANCE; INSTALLATION
Thank you for choosing one of our products. To get the most out of your oven we recommend that you:• Read the notes in this manual carefully: they contain impor tant instructions on how to install, use and service this oven safely.• Keep this booklet in a safe place for easy, future reference.All ac...
Page 12 - USEFUL TIPS; The
SELF-CLEANING OVEN WITH CATALYTIC Special self-cleaning panels covered in a micro-porous coatingare available as optional extras for all models. If they are fitted,the oven no longer needs to be cleaned by hand.The fat that is splattered onto the sides of the oven during roastingis eliminated by the...
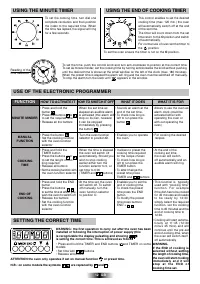
Page 13 - is setting the correct time. This is achieved as follows; USE OF THE ELECTRONIC PROGRAMMER; FUNCTION; HOW TO ACTIVATE IT HOW TO SWITCH IT OFF; ATTENTION the oven only operates if set on manual function; SETTING THE CORRECT TIME
WARNING : the first operation to carry out after the oven has beeninstalled or following the interruption of power supply (thisis recognizable the display pulsating and showing ) is setting the correct time. This is achieved as follows • Press and hold the TIMER and END buttons ( and TIMER on somemo...
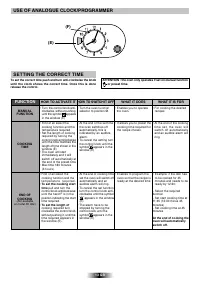
Page 14 - USE OF ANALOGUE CLOCK/PROGRAMMER; To set the length of
USE OF ANALOGUE CLOCK/PROGRAMMER (F) (E) 13 G B FUNCTION HOW TO ACTIVATE IT HOW TO SWITCH IT OFF WHAT IT DOES WHAT IT IS FOR • At the end of the set time the oven switches off automatically, this isindicated by an audiblealarm. • To cancel the setting turn the control knob until thesymbol appears in...
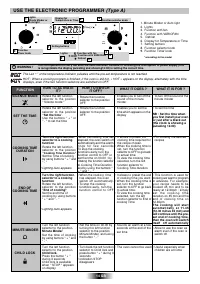
Page 15 - USE THE ELECTRONIC PROGRAMMER; “Set the time; Minute Minder
Display forTemperature or Time Lights:Minute Minder orAuto light FunctionTimer knob Lights: Function with fan Function with VARIOFANDefrost Setting buttons * / Function selector knob 1 2 3 4 6 7 9 8 USE THE ELECTRONIC PROGRAMMER (Type A) 14 G B • To set the time NB : Set the time whenyou first insta...
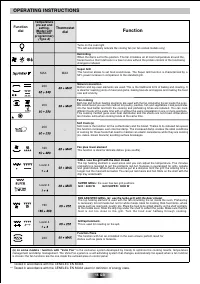
Page 16 - OPERATING INSTRUCTIONS; Function; Thermostat; Temperature
15 G B OPERATING INSTRUCTIONS * Tested in accordance with the CENELEC EN 50304.** Tested in accordance with the CENELEC EN 50304 used for definition of energy class. Natural convection Bottom and top oven elements are used. This is the traditional form of baking and roasting. Itis ideal for roasting...
Page 17 - TABLES OF COOKING TIMES; Static electric oven; • Meat; • Fish
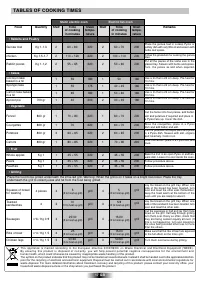
TABLES OF COOKING TIMES The overall suggested cooking times set out below are intended as a rough guide only. They may in fact vary according to the quality,the freshness, the size and the thickness of the food cooked and of course cooking time is also partly a matter of taste. Let the foodstand for...
Page 19 - INSTRUCCIONES GENERALES; I m p o r t a n t e :
Le agradecemos que haya elegido uno de nuestros productos. Para obtener de este electrodoméstico las mejores prestacionesaconsejamos:• Leer atentamente las advertencias contenidas en el presente manual.• Conservar con cuidado este manual para cualquier consulta posterior.Cuando el aparato està en fu...
Page 20 - CONSEJOS ÚTILES; llamar al Servicio de; El Set para P iz za; Los modelos
LIMPIEZA Y MANTENIMIENTO No utilice productos abrasivos, estropajo u objetos dentados paralimpiar los cristales de la puerta del horno.No utilice vapor o pulverizadores de alta presión para limpiar elaparato.Limpiar las superficies de acero inox y esmaltadas con aguatemplada y jabón, o con productos...
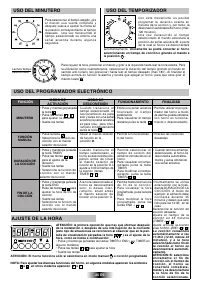
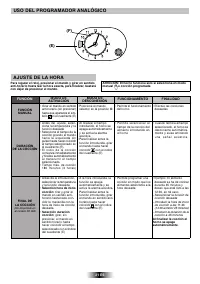
Page 21 - USO DEL PROGRAMADOR ELECTRÓNICO; FUNCIÓN; ATENCIÓN: El horno funciona sólo si selecciona en modo manual; AJUSTE DE LA HORA; Únicamente se podrá conectar el horno
• Emite una señal acústica f i n a l i z a d o e l t i e m p oestablecido • Para visualizar el tiempo restante pulse la tecla • Pulse y mantenga pulsada la tecla • Pulse las teclas o para ajustar la duración • Suelte las teclas • C u a n d o t r a n s c u r r e e l tiem po seleccionado, elfuncionami...
Page 22 - USO DEL PROGRAMADOR ANALÓGICO; o cocción programada
• Girar el mando en sentido anti-horario (sin presionar)hasta que aparezca el sim-bolo en el cuadrante (E) USO DEL PROGRAMADOR ANALÓGICO FUNCIÓN MODO DE ACTIVACIÓN MODO DE DESCONEXIÓN FUNCIONAMIENTO FINALIDAD • Ejemplo: El alimento deseado se ha de cocinardurante 45 minutos y deseo que está listo a ...
Page 23 - USO DEL PROGRAMADOR ELECTRONICO
22 ES Display paratemperatura o tiempo LuzMinutero/Auto Función temporizador Luz: Función con ventiladorFunción con VARIOFANDescongelación Teclas para pulsar * / Selección de función 1 2 3 4 6 7 9 8 USO DEL PROGRAMADOR ELECTRONICO (Type A) • Poner en hora NB: ponga la hora una vezqu e insta le e l h...
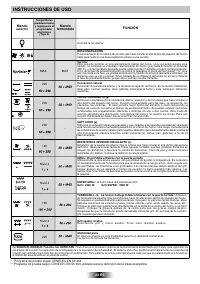
Page 24 - INSTRUCCIONES DE USO; selector; Mando
23 ES INSTRUCCIONES DE USO * Programa de prueba según CENELEC EN 50 304** Programa de prueba según CENELEC EN 50 304 utilizado para la definición de la clase energética Convección natural Funcionan la resistencia inferior y la resistencia superior del horno. Es la cocción tradicional,ideal para coci...
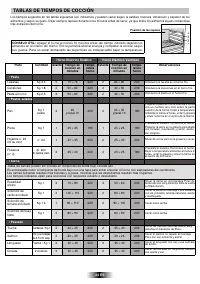
Page 25 - TABLAS DE TIEMPOS DE COCCIÓN
TABLAS DE TIEMPOS DE COCCIÓN Los tiempos sugeridos en las tablas siguientes son indicativos y pueden variar según la calidad, frescura, dimensión y espesor de losalimentos y según su gusto. Dejar siempre reposar durante unos minutos antes de servir, ya que todos los alimentos siguen cociéndosetras e...
Page 27 - ALGEMENE AANWIJZINGEN; Het eenvoudige rooster
26 NL Lees deze handleiding aandachtig. Hierin treff u betangrijke gegevens aan omtrent installatie, gebruik en onderhoud. Bewaar dezehandleiding voor eventuele toekomstige raadpleging.De eerste keer dat de oven in werking wordt gesteld, kan er een stinkende walm vrijkomen. Dit is te wijten aan de e...
Page 28 - NUTTIGE TIPS; Afhankelijk van model:; Modellen
De Lekbak is bestemd voor het opvangen van de jus bij het grillen. Deze wordt slechts gebruikt in de modus Grillen, Draaispit of Turbogrill,afhankelijk van het model. Voor alle andere bakwijzen moet u deze uit de oven halen. De lekbak nooit alsbakschaa l gebruiken, er kan zich rookon twikkeling, vet...
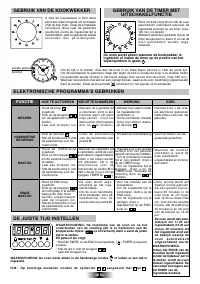
Page 29 - op het scherm) dient u eerst de juiste; ELEKTRONISCHE PROGRAMMA'S GEBRUIKEN; FUNCTIE; HOE TE ACTIVEREN HOE UIT TE SCHAKELEN; HANDMATIGE; WAARSCHUWING: De oven werkt alleen in de handmatige modus; DE JUISTE TIJD INSTELLEN; g e l u i d s s i g n a a l .; GEBRUIK VAN DE TIMER MET
Om de tijd in te stellen, druk dan de knop in en draai tegen de klok in naar de jui ste tijd.Om de kookwekker te gebruiken, draai dan tegen de klok in zonder de knop in te drukken totdathet gewenste aantal minuten in het kleine display links van de klok verschijnt. (max 180 min).Wanneer de kooktijd ...
Page 30 - of indien er een tijd is ingesteld.
• A a n h e t e i n d v a n d e ingestelde kooktijd zal deoven automatisch uitscha-kelen.Een geluidssignaalzal te horen zijn. • O m d e in s t e l li n g e n t e annuleren draai de knoptotdat het symbool in het venster (E) verschijnt. • Draai de knop zonder hem in te drukken tegen de klokin totdat i...
Page 31 - GEBRUIK VAN HET ELECTRONISCHE PROGRAMMA
GEBRUIK VAN HET ELECTRONISCHE PROGRAMMA (Type A) 30 NL • Om de tijd in te stellen.Tip. Stel altijd eerst de tijdin als de oven isgeinstallee rd of na eenstroomstoring( k n i p p e r e n d e 1 2 : 0 0 ) • Draai de linker keuze knopop de positie "tijd instellen" • gebruik de "+" en �...
Page 32 - INSTRUCTIES VOOR HET GEBRUIK VAN DE OVEN; Functie
* Testprogramma volgens norm CENELEC EN 50304.** Testprogramma volgens norm CENELEC EN 50304 ter bepaling van de energie efficiency klasse 31 NL Sprinter Deze positie versnelt de opwarmtijd van de oven. Als het is geselecteerd zal de oven meteengaan ver warm en (het duurt 8 min om 200°C te berei ken...
Page 33 - BAKTIJDEN EN-TEMPERATUREN VOOR STATISCHE OVEN
32 NL Gerecht Hoeveelheid Niveau rooster Baktijd Oven °C van onderaf GebakLicht deeg: Soezen 175 1° Niveau 40-50 Taart 170 1° Niveau 30 Zandtaartdeeg: Vruchtentaart 180-190 1° Niveau 20-30 Gistdeeg: Taart 160 1° Niveau 40-45 Tulband 160 1° Niveau 40-45 Chocoladetaart 160 1° Niveau 25-35 Bladerdeeg: ...
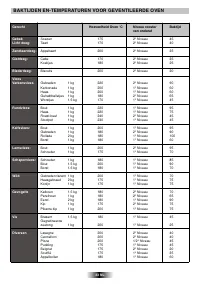
Page 34 - BAKTIJDEN EN-TEMPERATUREN VOOR GEVENTILEERDE OVEN
Gerecht Hoeveelheid Oven °C Niveau rooster Baktijd van onderaf Gebak Soezen 175 2° Niveau 45 Licht deeg: Taart 170 2° Niveau 40 Zandtaartdeeg: Appeltaart 200 2° Niveau 35 Gistdeeg: Cake 170 2° Niveau 35 Koekjes 180 2° Niveau 25 Bladerdeeg: Biscuits 200 2° Niveau 20 VleesVarkensvlees Gebraden 1 kg 22...
Page 35 - ALLGEMEINE HINWEISE; ELEKTRISCHER ANSCHLUß
Herzlichen Glückwunsch! Sie haben ein hochwertiges Qualitätsprodukt erworben. Damit Ihr Gerät stets zu Ihrer Zufriedenheit arbeitet,raten wir Ihnen folgendes:• L e s e n S i e d ie s e s H e f t a u f m e rk s a m d u rc h : e s e n th ä l t w ic h t ig e H i n w e is e z u r ko r r e k te n B e n u...
Page 36 - EINIGE NÜTZLICHE HINWEISE; Modelle; Beleuchtungssystem
REINIGUNG UND WARTUNG DICHTUNG DER OFENTÜRWenn es notwendig ist, sie zu reinigen, benutzen Sie dabei einenfeuchten Schwam m, de n Sie vorher in heiße S eifenlösungeingetaucht haben. Spülen Sie die Dichtungen mit klarem Wasserund trocknen Sie sie. Der Grillrost ist vorrangig zum Ablegen vonGrillstück...
Page 37 - GEBRAUCH DES ELEKTRONISCHEN PROGRAMMIERERS; FUNKTION; EINSTELLUNG DER RICHTIGEN UHRZEIT
• We n n d ie ei n ge s te l lte Backzei t abgelaufen ist,wird ein akustisches Signalaktiviert (dieser Alarm hörtvon alleine auf, er kannjedoch sofort ausgeschaltetwerden, wenn man aufdrückt). ACHTUNG: Der Ofen arbeitet nur, wenn er auf manuelle Funktion eingestellt ist oder eine bestimmte Backzeit ...
Page 38 - GEBRAUCH DER ANALOGEN UHR/ PROGRAMMIERER; MANUELLE; o de r ein e b es timmte B ac kz eit
GEBRAUCH DER ANALOGEN UHR/ PROGRAMMIERER FUNKTION EINSCHALTEN AUSSCHALTEN FUNKTION NÜTZLICH FÜR • B e i s p i e l : I h r e S p e i s e muss 45 Minuten garen.S ie m öc h te n, d a ss sieu m 12 : 3 0 fe r tig is t. Indiesem Fall müssen Sie: - die gewünschte Backbe- triebsart einstellen - d i e K o c ...
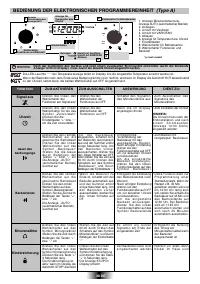
Page 39 - BEDIENUNG DER ELEKTRONISCHEN PROGRAMMIEREINHEIT
32 DE BEDIENUNG DER ELEKTRONISCHEN PROGRAMMIEREINHEIT (Type A) 38 DE • Zum Einstellen der Uhrzeit HINWEIS: Die Uhrzeit muss nach derErst installation und nache i n e m S t r o m a u s f a l l ( A n z e i g e 1 2 : 0 0 b l i n k t )eingestellt werden • D reh en S ie de n lin ke nWahlschalter für die ...
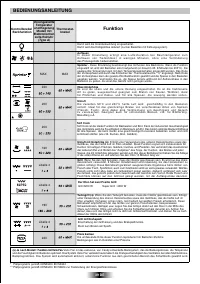
Page 40 - BEDIENUNGSANLEITUNG; Funktion
39 DE BEDIENUNGSANLEITUNG * Prüfprogramm gemäß CENELEC EN 50304** Prüfprogramm gemäß CENELEC EN 50304 zur Feststellung der Energieeffzienzklasse Damit wird die Innenbeleuchtung eingeschaltet.Damit wird das Kühlgebläse aktiviert (nur bei Backöfen mit Kühlungssystem) Ober-/Unterhitze E s si nd die ob ...
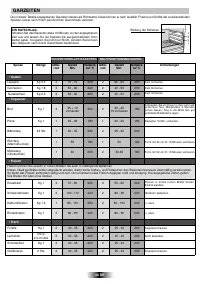
Page 41 - GARZEITEN; • Nudeln
GARZEITEN Die in dieser Tabelle angegebenen Garzeiten dienen als Richtwerte. Diese können je nach Qualität, Frische und Größe der zuzubereitendenSpeisen sowie nach Ihrem persönlichen Geschmack variieren. Stellung der Schienen Speise Menge Gltter- rost Tempera- tur °C Garzeit Min. Anmerkungen MULTIFU...
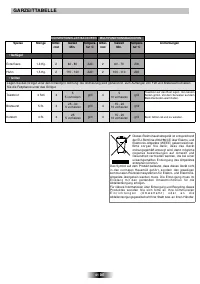
Page 42 - GARZEITTABELLE; • Geflügel
Speise Menge Gltter- rost Tempera- tur °C Garzeit Min. Anmerkungen Gltter- rost Tempera- tur °C Garzeit Min. GARZEITTABELLE Ente/Gans 1,3 Kg. 2 60 - 80 220 2 60 - 70 200 • Geflügel Huhn 1,5 Kg. 2 110 - 120 220 2 100 - 110 200 • Grillen Legen Sie das Grillgut unter den Infrarotgrill. Achtung: die Gri...
Page 43 - ATTENTION; INSTRUCTIONS GENERALES; D E C L A R A T I O N D E C O N F O R M I T É :; EQUIPEMENT DU FOUR; EQUIPEMENT DIFFERENT SELON LE TYPE DE FOUR; La grille simple; Le plat récolte-sauce
— Lire attentivement les instructions contenues dans cette brochure, elles fournissent d’importantes indications sur la sécurité d’installation, l’emploi du four et son entretien. — Conserver soigneusement cette notice d’utilisation pour toutes consultations ultérieures.— Après avoir déballé votre f...
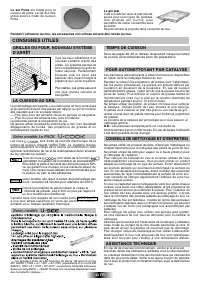
Page 44 - CONSIGNES UTILES; Le set Pizza; Selon modèle Le PACK; Le gril plat
LA CUISSON AU GRIL Le préchauffage est superflu. La cuisson peut se faire porte closeet les aliments doivent être placés par rapport au gril en fonctiondes résultats que l’on souhaite obtenir.— Plus près pour les aliments dorés en surface et saignants.— Plus loin pour les aliments bien cuits à l’int...
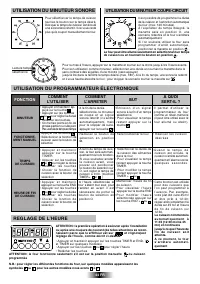
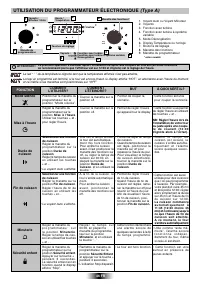
Page 45 - réglage de l’heure, com me décrit ci-dessus; UTILISATION DU PROGRAMMATEUR ÉLECTRONIQUE; FONCTION; ou cuisson; REGLAGE DE L’HEURE
• Appuyer et maintenir ap- puyé sur la touche • Appuyer sur les touches ou pour régler la dureé • Relâcher les touches.• On met les points en fin de phrase partout ou nulle part.Pas une fois de temps en temps ATTENTION: la première opération à exécuter après l’installationou après une coupure de cou...
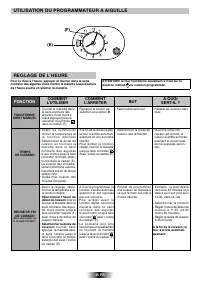
Page 46 - ou cuisson programmée; UTILISATION DU PROGRAMMATEUR A AIGUILLE; MENT MANUEL
ATTENTION: le four fonctionne seulement s’il est sur laposition manuel ou cuisson programmée • A l’heure programmée, la fonction s’arrête automati-quement et est signaléepar une sonnerie. • P o u r a r r ê t e r a v a n t l a fonction réglée, tourner lam a n e t t e d a n s l e s e n sc o n t ra ir ...
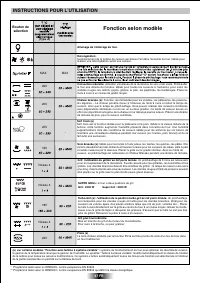
Page 48 - INSTRUCTIONS POUR L’UTILISATION; Fonction selon modèle; Bouton de
INSTRUCTIONS POUR L’UTILISATION 47 FR * Programme testé selon le CENELEC, norme européenne EN 50304** Programme testé selon le CENELEC, norme européenne EN 50304 qui définit la classe énergétique. Allumage de l’éclairage du four. Convection naturelle: utilisation simultanée de la résistance de sole ...
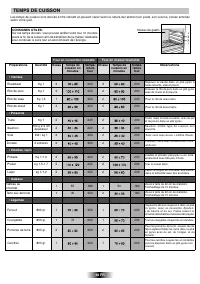
Page 49 - TEMPS DE CUISSON
TEMPS DE CUISSON Les temps de cuisson sont donnés à titre indicatif et peuvent varier selon la nature de l’aliment son poids, son volume, et bien entenduselon votre goût. Niveau de gradin Préparations Quantité Niveau Tempé- rature four Temps de cuisson en minutes Observations Four en convection natu...
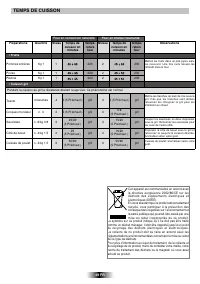
Page 50 - • Fruits
TEMPS DE CUISSON Pommes entières Kg 1 1 220 2 200 • Fruits Mettez les fruits dans un plat pyrex sansles rec ou vri r. Une f ois cui ts l aisse z-l esrefroidir dans le four. Poires Kg 1 1 220 2 200 Pendant la cuisson au gril la résistance devient rouge vive. Ce phénomène est normal. Préparations Quan...
Page 51 - INDICAÇÕES DE CARÁCTER GERAL; O forno terá de ser devidamente ligado à terra.; EQUIPAMENTO DO FORNO; A grelha porta-recipientes
Obrigado por ter optado por um dos nossos produtos. Para tirar o maior proveito possível do seu forno, recomendamos que:Leia atentamente este manual de instruções de utilização; ele contém instruções importantes sobre a instalação, a utilização e amanutenção seguras deste forno.Mantenha este manual ...
Page 52 - SUGESTÕES ÚTEIS; SISTEMA DE SEGURANÇA DAS PRATELEIRAS; O suporte do tabuleiro; OS MODELOS
51 PT Forno auto-limpante com revestimento catalítico Tem à sua disposição, como acessórios extra, painéis especiais,auto-limpantes, revestidos por uma camada micro-porosa. Estespainéis existem para todos os modelos. Uma vez instalados estespainéis, deixa de ser necessár io limpar manualmente o inte...
Page 53 - A Garantia não inclui:
52 PT LIMPEZA E MANUTENÇÃO Sempre que o forno for utilizado, aconselhamos a limpar o vidroda porta com papel absorvente. Se houver demasiados salpicos,pode limpar depois com uma esponja seca e detergente. Nuncau t i l i z a r p r o d u t o s a b r a s i v o s o u o b j e c t o s c o r t a n t e s .N...
Page 54 - Proceda da seguinte forma.; UTILIZAÇÃO DO PROGRAMADOR ELECTRÓNICO; FUNÇÕES; ou após o acertar; ACERTAR O RELÓGIO; UTILIZAÇÃO DO CONTA MINUTOS; O forno apenas funcionará depois
ATENÇÃO: a primeira operação que deve ser levada a cabo apósa instalação do forno ou após um corte de energia (facilmentedetectado no display onde pisca ) é o acertar das horas. Proceda da seguinte forma. • Mantenha pressionado s os botões TIMER e END. ( e TIMER em alguns modelos)• Seleccione a hora...
Page 55 - UTILIZAÇÃO RELÓGIO ANALÓGICO / PROGRAMADOR; ou após o acertar da hora.; FUNÇÃO
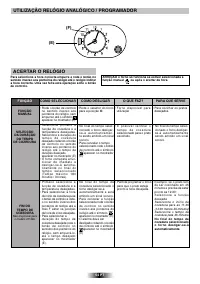
(F) (E) UTILIZAÇÃO RELÓGIO ANALÓGICO / PROGRAMADOR ATENÇÃO o forno só funciona se estiver seleccionada afunção manual ou após o acertar da hora. ACERTAR O RELÓGIO Para seleccione a hora correcta empurre e rode o botão nosentido inverso aos ponteiros do relógio até o relógio indicara hora correcta. U...
Page 56 - MODO
Luzes: contaminutos /automático Botão selector defunções* Luzes: Função com ventilação Função VARIOFANDescongelar * / Botão de selecção 1 2 3 4 6 7 9 8 5 Botões de regulamento Relógio /Temperatura UTILIZAÇÃO DO PROGRAMADOR ELECTRÓNICO (Type A) 12 GB • Acerta a hora NB : P ro grame e horaq u a n d o ...
Page 57 - Botão de; T o C
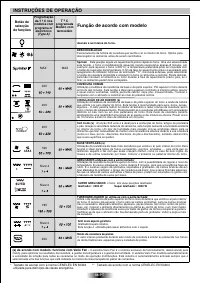
56 PT INSTRUÇÕES DE OPERAÇÃO COZEDURA COMUM Utilização simultânea da resistência da base e da parte superior. Pré-aquecer o forno durantecerca de dez minutos. Esta função é ideal para qualquer cozinhado à maneira antiga, alourare assar carnes vermel has, rosbife, perna de cabrito, caça, pão, massa f...
Page 58 - TABELAS DE TEMPOS DE COZEDURA; Forno eléctrico estático; • Carne
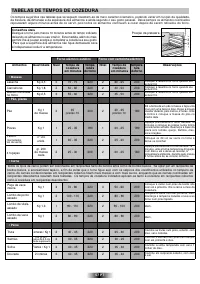
TABELAS DE TEMPOS DE COZEDURA Os tempos sugeridos nas tabelas que se seguem revestem-se de mero carácter orientativo, podendo variar em função da qualidade,da frescura, da dimensão e da espessura dos alimentos e ainda segundo o seu gosto pessoal. Deixe sempre os alimentos cozinhadosrepousarem alguns...
Page 68 - УАОА; аркировочная табличка
УАОА аркировочная табличка 04-2009 • Cod. 42 8 01121 р о и з в о д и т е л ь н е б е р е т н а с е б я от в е т с т в е н н о с т ь з а о ш и б к и в д а н н о й и н с т р у к ц и и , в о з н и к ш и е в п р о ц е с с е п е ч а т и . р о и з в о д и т е л ь и м е е т право вносить в свои изделия изм...