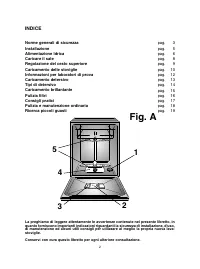
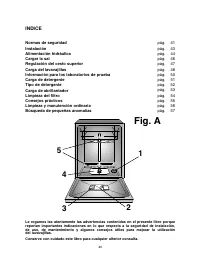
Page 2 - INDICE
2 INDICE Norme generali di sicurezzaInstallazioneAlimentazione IdricaCaricare il saleRegolazione del cesto superioreCaricamento delle stoviglieInformazioni per laboratori di provaCaricamento detersivo Tipi di detersivoCaricamento brillantantePulizia filtriConsigli praticiPulizia e manutenzione ordin...
Page 4 - Prescrizioni di sicurezza
4 ■ Per il numero massimo di copertifare riferimento alla tabella "DATITECNICI". ATTENZIONE! Coltelli ed altri utensili conl’estremità appuntite devonoessere collocati nel cesto conle punte rivolte verso il bassoo in posizione orizzontale. ■ Non lasciare la porta aperta inposizione orizzonta...
Page 5 - e a tutte le successive.
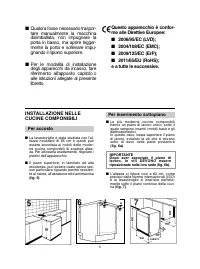
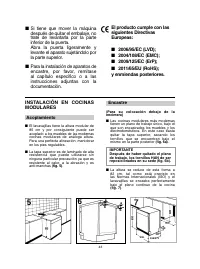
5 7 598 556/573 5 INSTALLAZIONE NELLECUCINE COMPONIBILI Per accosto ■ La lavastoviglie è stata studiata con l'al-tezza modulare di 85 cm e quindi puòessere accostata ai mobili delle moder-ne cucine componibili di analoga altez-za. Per allinearla esattamente, regolare ipiedini dell'apparecchio. ■ Il ...
Page 6 - ALIMENTAZIONE IDRICA
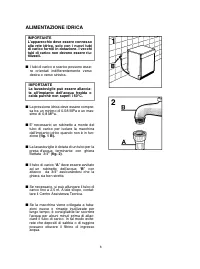
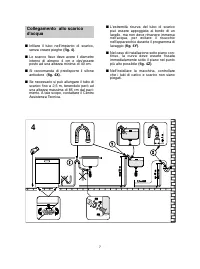
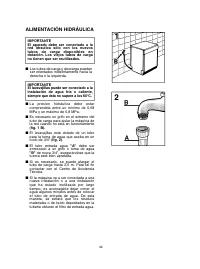
6 ALIMENTAZIONE IDRICA IMPORTANTEL’apparecchio deve essere connessoalla rete idrica, solo con i nuovi tubidi carico forniti in dotazione. I vecchitubi di carico non devono essere riu-tilizzati. ■ I tubi di carico e scarico possono esse-re orientati indifferentemente versodestra o verso sinistra. IMP...
Page 8 - CARICARE IL SALE
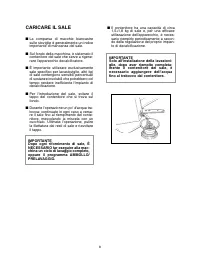
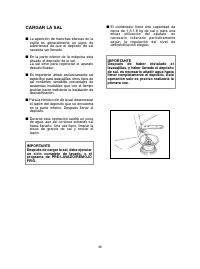
8 CARICARE IL SALE ■ La comparsa di macchie biancastresulle stoviglie è generalmente un indiceimportante di mancanza del sale. ■ Sul fondo della macchina, è sistemato ilcontenitore del sale che serve a rigene-rare l'apparecchio decalcificatore. ■ È importante utilizzare esclusivamentesale specifico ...
Page 9 - Tipo “A”
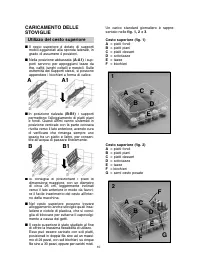
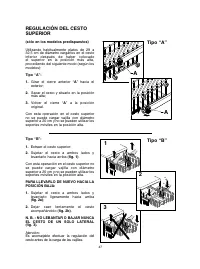
9 A A 1 3 a b a b 2 REGOLAZIONE DELCESTELLO SUPERIORE (solo nei modelli predisposti) Utilizzando abitualmente piatti da 29 cm a32,5 cm di diametro, caricarli nel cesto infe-riore dopo aver spostato quello superiorenella posizione più alta, procedendo nelseguente modo (a seconda dei modelli): Tipo “A...
Page 10 - Utilizzo del cesto superiore
10 CARICAMENTO DELLE STOVIGLIE Utilizzo del cesto superiore ■ Il cesto superiore è dotato di supportimobili agganciati alla sponda laterale, ingrado di assumere 4 posizioni. ■ Nella posizione abbassata (A-A1) i sup-porti servono per appoggiarvi tazze dathe, caffè, lunghi coltelli e mestoli. Sulleest...
Page 11 - Utilizzo del cesto inferiore; e 5) assicurandosi che le posate; A G
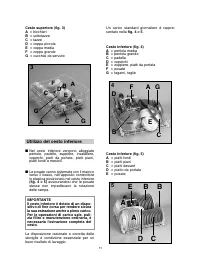
11 Cesto superiore (fig. 3) A = bicchieri B = sottotazze C = tazze D = coppa piccola E = coppa media F = coppa grande G = cucchiai da servizio Utilizzo del cesto inferiore ■ Nel cesto inferiore vengono alloggiatepentole, padelle, zuppiere, insalatiere,coperchi, piatti da portata, piatti piani,piatti...
Page 12 - INFORMAZIONE PER I LABORATORI DI PROVA
12 Cesto posate (fig. 6) Il cesto porta posate è formato da due partidivisibili, così da poter offrire diverse possi-bilità di carico. La divisione in due del cestello avvienefacendo scorrere in senso orizzontale ledue parti l'una rispetto all'altra e viceversaper il riaggancio. La parte superiore d...
Page 13 - CARICAMENTO DETERSIVO; Il detersivo
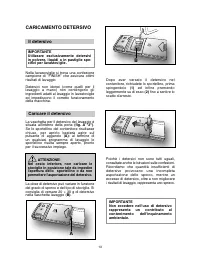
CARICAMENTO DETERSIVO Il detersivo IMPORTANTEUtilizzare esclusivamente detersiviin polvere, liquidi o in pastiglie spe-cifici per lavastoviglie. Nella lavastoviglie si trova una confezionecampione di ”FINISH” che assicura ottimirisultati di lavaggio. Detersivi non idonei (come quelli per illavaggio ...
Page 14 - TIPI DI DETERSIVO; Detersivi in pastiglie
14 TIPI DI DETERSIVO Detersivi in pastiglie I detersivi in pastiglie di differenti produttori si sciolgono a velocità diverse, quindi nei programmi brevi, alcune pastiglie potrebbero non riuscire ad essere pienamente efficaci non essendosi dissolte completamente. Se si utilizzano questi prodotti, si...
Page 15 - CARICAMENTO BRILLANTANTE; Il brillantante; Regolazione del brillantante da 1 a 6
CARICAMENTO BRILLANTANTE Il brillantante Questo additivo, che viene immessoautomaticamente nell'ultima fase di risciacquo,favorisce una rapida asciugatura dellestoviglie evitando il formarsi di macchie esedimenti opachi. Caricare il brillantante Alla sinistra della vaschetta del detersivo, sitrova i...
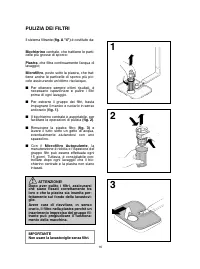
Page 16 - PULIZIA DEI FILTRI; Bicchierino; Piastra
16 1 2 3 PULIZIA DEI FILTRI Il sistema filtrante (fig. A "4") è costituito da: Bicchierino centrale, che trattiene le parti- celle più grosse di sporco; Piastra , che filtra continuamente l'acqua di lavaggio; Microfiltro , posto sotto la piastra, che trat- tiene anche le particelle di sporco...
Page 17 - CONSIGLI PRATICI; Consigli utili per risparmiare
17 CONSIGLI PRATICI Consigli per ottenere ottimirisultati di lavaggio ■ Prima di disporre le stoviglie nella mac-china, asportare i residui di cibo (ossici-ni, lische, avanzi di carne o verdure,residui di caffè, bucce di frutta, ceneredi sigaretta, stuzzicadenti ecc.) per evi-tare di intasare i filt...
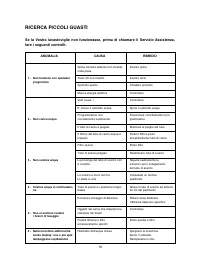
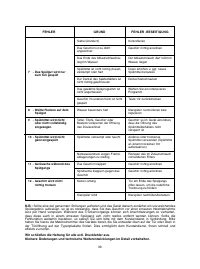
Page 19 - RICERCA PICCOLI GUASTI
19 RICERCA PICCOLI GUASTI Se la Vostra lavastoviglie non funzionasse, prima di chiamare il Servizio Assistenza,fare i seguenti controlli: Inserire spina Inserire tasto Chiudere sportello Controllare Controllare Aprire il rubinetto acqua Posizionare correttamente il pro-grammatore Eliminate le pieghe...
Page 20 - SERVIZIO ASSISTENZA TECNICA
20 NOTA BENE : Qualora un inconveniente sopracitato provocasse un cattivo lavaggio o una insufficiente sciacquatura, è necessario rimuovere manualmente lo sporco dalle stoviglie, in quanto la fase finale diasciugatura provoca l’essicazione dello sporco che un secondo lavaggio in macchina non è in gr...
Page 21 - INHALTSVERZEICHNIS; Bewahren Sie das Heft zu einer späteren Nutzung sorgfältig auf.
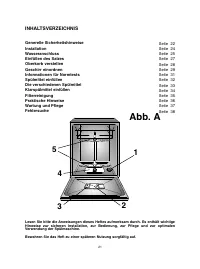
21 INHALTSVERZEICHNIS Generelle Sicherheitshinweise InstallationWasseranschlussEinfüllen des SalzesOberkorb verstellenGeschirr einordnenInformationen für NormtestsSpülmittel einfüllenDie verschiedenen SpülmittelKlarspülmittel einfüllenFilterreinigungPraktische HinweiseWartung und PflegeFehlersuche S...
Page 23 - Sicherheitsanweisungen
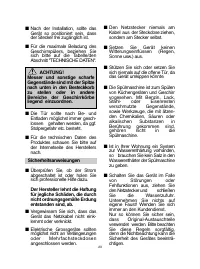
■ Nach der Installation, sollte dasGerät so positioniert sein, dassder Stecker frei zugänglich ist. ■ Für die maximale Beladung desGeschirrspülers, beziehen Siesich bitte auf die Tabelle/denAbschnitt "TECHNISCHE DATEN". ACHTUNG! Messer und sonstige scharfeGegenstände sind mit der Spitzenach ...
Page 25 - WASSERANSCHLUSS
WASSERANSCHLUSS WICHTIGDas Gerät muss an dieWasserversorgung mit neuenSchläuchen angeschlossen werden.Alte Schläuche dürfen nichtwiederverwendet werden. ■ Die Anordunung der Schläuche für denZu- und Ablauf des Wassers kannwahlweise nach rechts oder linkserfolgen. WICHTIG Der Geschirrspüler kann nach...
Page 26 - Anschluss an den Wasserablauf
26 Anschluss an den Wasserablauf ■ Das Schlauchende in dem festen Ablaufbefestigen. Der Schlauch darf nicht geknickt werden,damit der Wasserablauf nicht verhindertwird (Abb. 4). ■ Das Innendurchmesser des Ablaufrohres muß mindestens 4 cm betragen und beieiner Höhe von mindestens 40 cmliegen. ■ Es wi...
Page 27 - EINFÜLLEN DES SALZES
EINFÜLLEN DES SALZES ■ Das Auftreten von weißen Flecken aufGeschirr ist in der Regel einWarnsignal, dass der Salzbehälter neuaufgefüllt werden muss. ■ Auf dem Geräteboden finden Sie dieÖffnung für das Einfüllen desRegeneriersalzes. ■ Bitte verwenden Sie ausschließlich dasspeziell für Geschirrspüler ...
Page 28 - Type “A”
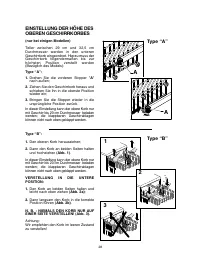
28 A A 1 3 a b a b 2 EINSTELLUNG DER HÖHE DES OBEREN GESCHIRRKORBES (nur bei einigen Modellen) Teller zwischen 29 cm und 32,5 cmDurchmesser werden in den unterenGeschirrkorb eingeordnet. Hierzu muss derGeschirrkorb folgendermaßen bis zurhöchsten Position verstellt werden(Bezüglich des Models): Type ...
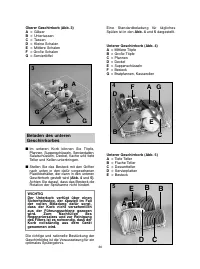
Page 29 - EINORDNEN DES GESCHIRRS
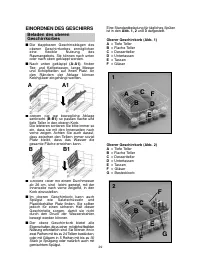
29 EINORDNEN DES GESCHIRRS Beladen des oberenGeschirrkorbes ■ Die klappbaren Geschirrablagen desoberen Geschirrkorbes ermöglicheneine flexible Nutzung desRaumangebots. Sie können nach untenoder nach oben geklappt werden. ■ Nach unten geklappt (A-A1), findenTee- und Kaffeetassen, lange Messerund Schö...
Page 31 - INFORMATIONEN FÜR NORMTESTS
31 Besteckkorb (Abb. 6) Der Besteckkorb besteht aus zwei trennbarenTeilen und bietet somit verschiedeneBeladungsmöglichkeiten. Die beiden Teile lassen sich durchentgegengesetztes Auseinanderschiebentrennen.Durch Ineinanderschieben der beidenHälften wird der Besteckkorb wiederzusammengefügt. Der ober...
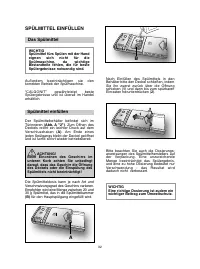
Page 32 - SPÜLMITTEL EINFÜLLEN; Das Spülmittel
SPÜLMITTEL EINFÜLLEN Das Spülmittel WICHTIGSpülmittel fürs Spülen mit der Handeignen sich nicht für dieSpülmaschine, da wichtigeBestandteile fehlen, die für besteSpülergebnisse notwendig sind. Außerdem beeinträchtigen sie denkorrekten Betrieb der Spülmaschine. “CALGONIT” gewährleistet besteSpülergeb...
Page 33 - DIE VERSCHIEDENEN SPÜLMITTEL; Tabs
33 DIE VERSCHIEDENEN SPÜLMITTEL Tabs Spülmittel in Tablettenform von unterschiedlichen Herstellern lösen sich unterschiedlich schnell auf. Als Folge davon könnten manche Tabs bei den Kurzprogrammen ihre Reinigungswirkung eventuell nicht voll entfalten, da sie sich nicht vollständig aufgelöst haben. ...
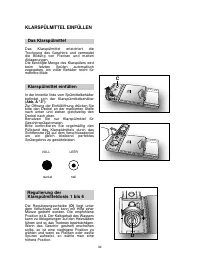
Page 34 - KLARSPÜLMITTEL EINFÜLLEN; Das Klarspülmittel
KLARSPÜLMITTEL EINFÜLLEN Das Klarspülmittel Das Klarspülmittel erleichtert dieTrocknung des Geschirrs und vermeidetdie Bildung von Flecken und mattenAblagerungen.Die benötigte Menge des Klarspülers wirdbeim letzten Spülen automatischzugegeben, ein voller Behälter reicht fürmehrere Male. Klarspülmitt...
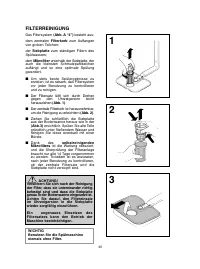
Page 35 - FILTERREINIGUNG
35 1 2 3 FILTERREINIGUNG Das Filtersystem (Abb. A “4”) besteht aus: dem zentralen Filterkorb zum Auffangenvon groben Teilchen; der Siebplatte zum ständigen Filtern desSpülwassers; dem Mikrofilter unterhalb der Siebplatte, derauch die kleinsten Schmutzpartikelchenauffängt und so eine optimale Spülung...
Page 36 - PRAKTISCHE HINWEISE; Hinweise zum Sparen
36 PRAKTISCHE HINWEISE Hinweise zur Optimierung derSpülergebnisse ■ Um optimale Spülresultate zu erhalten,sind erst die gröbsten Speisereste(z.B. Knochen, Gräten, Fleisch- oderGemüsereste, Kaffeesatz, Obstschalenoder -kerne, Zahnstocher, Zigarettenascheusw.) vom Geschirr zu entfernen, da siesich son...
Page 37 - LÄNGERE NICHTBENUTZUNG
37 1 2 1b LÄNGERE NICHTBENUTZUNG Wenn die Spülmaschine längere Zeitunbenutzt bleiben soll, empfehlen wir dasfolgende Vorgehen:1. Um Fettreste zu entfernen, einSpülprogramm ohne Geschirr aber mitSpülmittel laufen lassen. 2. Stecker aus der Steckdose ziehen. 3. Wasserhahn schließen. 4. Klarspülmittelb...
Page 38 - FEHLERSUCHE; Kleine Störungen selbst beheben!
38 FEHLERSUCHE Kleine Störungen selbst beheben! Sollte Ihr Geschirrspüler einmal nicht zu Ihrer Zufriedenheit arbeiten, kontrollieren Siedie folgenden Punkte, bevor Sie den Kundendienst rufen: Stecker in die Steckdose Ein/Aus-Taste betätigen Kontrollieren Kontrollieren Tür schließen Kontrollieren Wa...
Page 41 - NORMAS DE SEGURIDAD; - Las áreas de venta de cocinas
41 NORMAS DE SEGURIDAD ■ Este aparato se ha creado paraser utilizado en tareas domésticasy aplicaciones similares como: - Las áreas de venta de cocinas por parte de personal de lastiendas, oficinas y otros ambientesde trabajo; - Granjas; - Por los clientes en los hoteles, moteles y otros establecimi...
Page 42 - Instrucciones de seguridad
■ Una vez instalado el electrodomé-stico, se debe poder acceder fácil-mente al enchufe. ■ Para carga máxima, por favorconsulte "DATOS TÉCNICOS"tabla/sección. ATENCIÓN! Los cuchillos y otros utensi-lios con punta tienen que sercolocados hacia abajo o enposición horizontal en algunaotra zona d...
Page 43 - y enmiendas posteriores.
43 7 598 556/573 5 INSTALACIÓN EN COCINASMODULARES Acoplamiento ■ El lavavajillas tiene la altura modular de85 cm y por consiguiente puede seracoplado a los muebles de las modernascocinas modulares de análoga altura.Para una perfecta alineación, maniobraren los pies regulables. ■ La tapa superior es...
Page 44 - ALIMENTACIÓN HIDRÁULICA
ALIMENTACIÓN HIDRÁULICA IMPORTANTEEl aparado debe ser conectado a lared idraulica sólo con los nuevostubos de carga disponibles endotación. Los viejos tubos de cargano tienen que ser reutilizados. ■ Los tubos de carga y descarga puedenser orientados indistintamente hacia laderecha o la izquierda. IM...
Page 45 - Instalación salida de agua
45 Instalación salida de agua ■ Colocar el tubo en la instalación de salida,evitando pliegues o arrugas (fig. 4). ■ El tubo de desague fijo debe tener undiámetro interior de al menos 4 cm, ydebe estar colocado a una altura mínimade 40 cm. ■ Se recomienda colocar un sifón contramalos olores (fig. 4X)...
Page 46 - CARGAR LA SAL
CARGAR LA SAL ■ La aparición de manchas blancas en lavajilla es generalmente un signo deadvertencia de que el depósito de salnecesita ser llenado. ■ En la parte inferior de la máquina estasituado el depósito de la sal. La sal sirve para regenerar el aparatodescalcificador. ■ Es importante utilizar e...
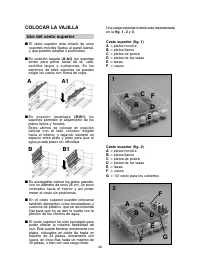
Page 48 - COLOCAR LA VAJILLA; Uso del cesto superior
48 COLOCAR LA VAJILLA Uso del cesto superior ■ El cesto superior esta dotado de unossoportes móviles fijados al panel lateral,y que pueden adoptar 4 posiciones. ■ En posición bajada (A-A1) los soportessirven para poner tazas de té, café,cuchillos largos y cucharones. En losextremos de tales soportes...
Page 49 - Uso del cesto inferior
49 Cesto superior (fig. 3)A = vasos B = platos para tazas C = tazas D = copa pequeña E = copa media F = copa grande G = cucharas de servicio Uso del cesto inferior ■ En el cesto inferior se colocan lascacerolas, sartenes, soperas, ensaladeras,tapas, fuentes, platos planos, platoshondos y cucharones....
Page 50 - INFORMACIÓN PARA LOS LABORATORIOS DE PRUEBA
50 Cesto de cubiertos (fig. 6) El cesto para los cubiertos está compuestode dos partes divisibles, para poder ofrecerdistintas posibilidades de carga. La división en dos del cesto se obtienehaciendo correr en sentido horizontal lasdos partes, una respecto de la otra yviceversa para reengancharlo. La...
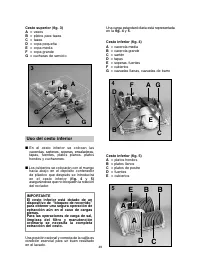
Page 51 - CARGA DE DETERGENTE; El detergente
CARGA DE DETERGENTE El detergente IMPORTANTEEs indispensable utilizar un detergenteespecífico en polvo, líquido o enpastillas para el lavado de vajillas. "CALGONIT" asegura óptimos resultadosde lavado y lo encontrará fácilmente. No deben emplearse detergentes para ellavado de la ropa. Deterg...
Page 52 - TIPO DE DETERGENTE; Detergentes en pastillas; IMPORTANTE; Detergentes concentrados
52 TIPO DE DETERGENTE Detergentes en pastillas Los detergentes en pastillas de diferentes fabricantes, se disuelven a velocidades diversas, por tanto en los programas breves, algunas pastillas pudieran no ser totalmente eficientes al no disolverse completamente. Si se utiliza este tipo de detergente...
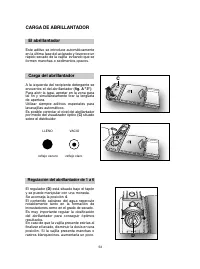
Page 53 - CARGA DE ABRILLANTADOR; El abrillantador; Regulación del abrillantador de 1 a 6
CARGA DE ABRILLANTADOR El abrillantador Este aditivo se introduce automáticamenteen la última fase del aclarado y favorece unrápido secado de la vajilla evitando que seformen manchas o sedimentos opacos. Carga del abrillantador A la izquierda del recipiente detergente seencuentra el del abrillantado...
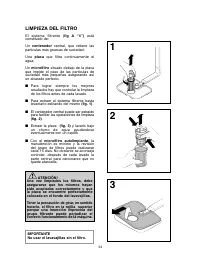
Page 54 - LIMPIEZA DEL FILTRO; Con el microfiltro autolimpiante, la
54 1 2 3 LIMPIEZA DEL FILTRO El sistema filtrante (fig A “4”) estáconstituido de: Un contenedor central, que retiene lasparticulas más gruesas de suciedad; Una placa que filtra continuamente elagua; Un microfiltro situado debajo de la placaque impide el paso de las partículas desuciedad más pequeñas...
Page 55 - CONSEJOS PRÁCTICOS; Qué hacer para ahorrar
55 CONSEJOS PRÁCTICOS Qué hacer para obteneróptimos resultados de lavado ■ Antes de colocar la vajilla en lamáquina, eliminar los residuos decomida más grandes (huesecillos,espinas, residuos de carne o verdura,residuos de café, peladuras de fruta,ceniza de cigarrillos, palillos, etc.) paraevitar que...
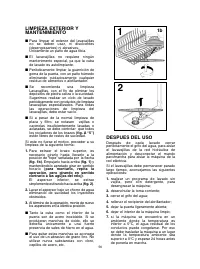
Page 56 - DESPUES DEL USO
56 1 2 1b DESPUES DEL USO Después de cada lavado cerrarperfectamente el grifo del agua, para aislarel lavavajillas de la red hidráulica dealimentación y desconectar el mandoparo/marcha para aislar la máquina de lared eléctrica. Si el lavavajillas debe permanecer paradolargo tiempo, aconsejamos las s...
Page 57 - BÚSQUEDA DE PEQUEÑAS ANOMALÍAS
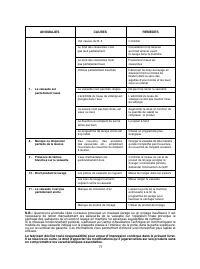
BÚSQUEDA DE PEQUEÑAS ANOMALÍAS Si el lavavajillas no funcionase, antes de llamar al Servicio Asistencia Técnica, realizarlos siguientes controles: 57 ANOMALIA CAUSA REMEDIO 1 - No funciona en ningún programa 2 - No entra agua 3 - No desagua 4 - Desagua continuamente 5 - No se oye ruido del girode la...
Page 58 - SERVICIO POST VENTA
58 NOTA: Si algún inconveniente de los citados provocase un mal lavado o un insuficiente aclarado, es necesario remover manualmente la suciedad de la vajilla, ya que la fase final del secado provocaria eldesecado de la suciedad que, en un segundo lavado, la máquina no tiene la posibilidad de sacar.S...
Page 61 - Consignes de sécurité
■ Pour un chargement maximal,veuillez vous référer à la section"DONNÉES TECHNIQUES". ATTENTION! Les couteaux et autresustensiles avec des partiespointues ou coupantesdoivent être rangés avecles pointes en bas ouhorizontalement. ■ La porte ne doit pas rester enposition ouverte car cela pourra...
Page 62 - IMPORTANT
62 7 598 556/573 5 INSTALLATION DANS UNENSEMBLE DE CUISINEMODERNE Juxtaposition ■ Le lave-vaisselle a été étudié avec unehauteur standard de 85 cm et peut êtreainsi placé entre des meubles de cuisinemoderne d'une même hauteur. Pourobtenir un alignement parfait, agir sur lespieds réglables. ■ Le plan...
Page 64 - Raccordement à la vidange
64 Raccordement à la vidange ■ Pour la vidange, introduire le tuyau dansl'installation de vidange, en prenant soinde ne pas le plier car l'écoulement deseaux s'en trouverait perturbé (fig. 4). ■ Le tuyau de vidange fixe doit avoir aumoins un diamètre intérieur de 4 cm etdoit être placé à une hauteur...
Page 65 - CHARGEMENT DU SEL
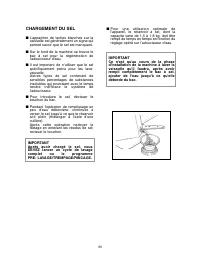
CHARGEMENT DU SEL ■ L’apparition de taches blanches sur lavaisselle est généralement un signe quipermet savoir que le sel est manquant. ■ Sur le fond de la machine se trouve lebac à sel pour la régénération del'adoucisseur d'eau. ■ Il est important de n’utiliser que le selspécifiquement prévu pour l...
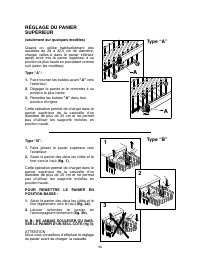
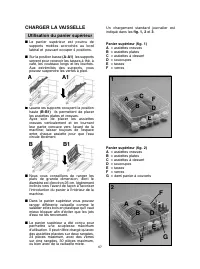
Page 67 - CHARGER LA VAISSELLE; Utilisation du panier supérieur
67 CHARGER LA VAISSELLE Utilisation du panier supérieur ■ Le panier supérieur est pourvu desupports mobiles accrochés au bordlatéral et pouvant occuper 4 positions. ■ Sur la position basse (A-A1) les supportsservent pour recevoir les tasses à thé, àcafé, les couteaux longs et les louches.Aux extrémi...
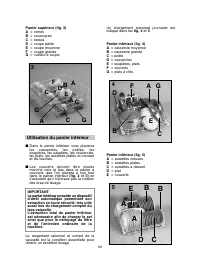
Page 68 - Utilisation du panier inférieur
68 Panier supérieur (fig. 3)A = verres B = soucoupes C = tasses D = coupe petite E = coupe moyenne F = coupe grande G = cuillère à soupe Utilisation du panier inférieur ■ Dans le panier inférieur vous placerez les casseroles, les poêles, les soupières, les saladiers, les couvercles, les plats, les a...
Page 69 - INFORMATION POUR LES ESSAIS EN LABORATOIRE
69 Panier à couverts (fig. 6) Le panier à couverts est formé de deuxparties offrant ainsi différentes possibilitésde chargement . La séparation en deux parties du panierse fait en faisant glisser, dans le senshorizontal, les deux parties l'une parrapport à l'autre et vice versa pour lesré-enclencher...
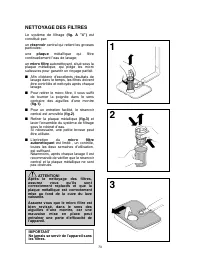
Page 73 - NETTOYAGE DES FILTRES; plaque
73 1 2 3 NETTOYAGE DES FILTRES Le système de filtrage (fig. A ’’4’’) estconstitué par: un réservoir central qui retient les grossesparticules; une plaque métallique qui filtre continuellement l’eau de lavage; un micro filtre autonettoyant, situé sous laplaque métallique, qui piège les microsalissure...
Page 74 - CONSEILS PRATIQUES; Que faire pour economiser
74 CONSEILS PRATIQUES Que faire pour avoir d'excellents résultats de lavage ■ Avant de ranger la vaisselle dansla machine, enlever les résidus denourriture (os, arêtes, restes de viandeou de légumes, résidus de café, épluchures de fruits, cendres de cigarettes,curedents etc...) afin d'éviter d'obstr...
Page 76 - IDENTIFICATION D’ANOMALIES MINEURES
76 IDENTIFICATION D’ANOMALIES MINEURES Si votre lave-vaisselle ne fonctionne pas, avant d’appeler votre revendeur faire lescontrôles suivants: Brancher la prise Appuyer sur la touche Contrôler Fermer la porte Contrôler Ouvrir le robinet Positionner correctement le programmateur Déplier le tuyau Nett...
Page 78 - INHOUD; Bewaar daarom dit boekje zorgvuldig.
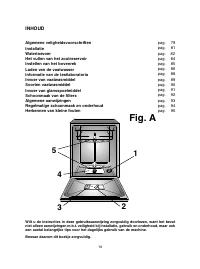
78 INHOUD Algemene veligheidsvoorschriften InstallatieWatertoevoerHet vullen van het zoutreservoirInstellen van het bovenrekLaden van de vaatwasserInformatie van de testlaboratoriaInvoer van vaatwasmiddelSoorten vaatwasmiddelInvoer van glansspoelmiddelSchoonmaak van de filtersAlgemene aanwijzingenRe...
Page 80 - Messen en andere voorwerpen
80 ■ Voor een maximale belading, verwijzen wij naar de "TECHNISCHE GEGEVENS" tabel/sectie. WAARSCHUWING! Messen en andere voorwerpen met scherpe punten dienenmet het scherpe deel naarbeneden of horizontaal teworden geplaatst. ■ Laat de machine niet onnodigopen staan om evt. gevaren(struikele...
Page 81 - en latere wijzigingen.
81 7 598 556/573 5 INSTALLATIE IN EEN INGEBOUWDE KEUKEN Plaatsing tussen keukenmeubilair ■ De hoogte van 85 cm is speciaal ontworpenzodat deze afwasmachine ook in tebouwen is in een bestaande modernekeuken. Met de verstelbare pootjes kande juiste hoogte gerealiseerd worden. ■ Het laminaat bovenblad ...
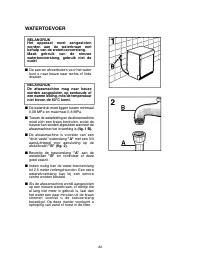
Page 82 - WATERTOEVOER
WATERTOEVOER BELANGRIJKHet apparaat moet aangeslotenworden aan de waterkraan metbehulp van de watertoevoerslang.Maak gebruik van de nieuwewatertoevoerslang, gebruik niet deoude! ■ De aan-en afvoerbuizen voor het waterkunt u naar keuze naar rechts of linksdraaien. BELANGRIJKDe afwasmachine mag naar k...
Page 83 - Aansluiting op de afvoerleiding
83 Aansluiting op de afvoerleiding ■ De afvoerslang moet worden aangeslotenop de ingebouwde, permanente afvoerbuis.Controleer bij deze bevestiging of ergeen knik in de afvoerslang zit (fig. 4). ■ De afvoerbuis mag niet hoger dan 40 cm vanaf het vloerniveau zijn en moet eenminimale doorsnede van 4 cm...
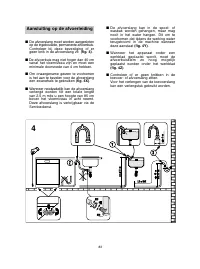
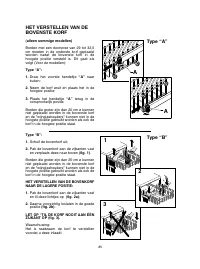
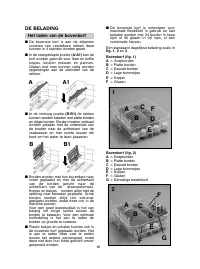
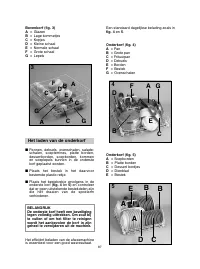
Page 86 - DE BELADING; Het laden van de bovenkorf
86 DE BELADING Het laden van de bovenkorf ■ De bovenste korf is aan de zijkantenvoorzien van verstelbare rekken dezekunnen in 4 standen worden gezet. ■ In de neergeklapte positie (A-A1) kan dekorf worden gebruikt voor thee en koffiekopjes, keuken messen en pannen.Glazen met oren kunnen veilig worden...
Page 87 - Het laden van de onderkorf
87 Bovenkorf (fig. 3)A = Glazen B = Lage kommetjes C = Kopjes D = Kleine schaal E = Normale schaal F = Grote schaal G = Lepels Het laden van de onderkorf ■ Pannen, deksels, ovenschalen, salade-schalen, soepterrines, platte borden,dessertborden, soepborden, kommenen soeplepels kunnen in de ondersteko...
Page 88 - INFORMATIE VAN DE TESTLABORATORIA
88 Bestekkorf (fig. 6) De bestekkorf is uitgerust in twee te scheidendelen, die verschillende beladingen mogelijkmaken. De twee delen kunnen gescheiden wordendoor het linkerdeel van het rechterdeel afte schuiven. De bovenzijde van de bestekkorf kan wordenverwijderd om flexibele vulling van de korfmo...
Page 89 - INVOER VAN AFWASMIDDEL; Afwasmiddel
INVOER VAN AFWASMIDDEL Afwasmiddel BELANGRIJKHet is noodzakelijk een wasmiddelte gebruiken, dat speciaal bestemdis voor afwasmachines ofwel inpoedervorm, vloeibaar of in een tablet. "CALGONIT" geeft een zeer goedafwasresultaat en is overal verkrijgbaar. Niet geschikte afwasmiddelen (zoalsafw...
Page 90 - SOORTEN VAATWASMIDDEL; Vaatwas tabletten
90 SOORTEN VAATWASMIDDEL Vaatwas tabletten Vaatwastabletten van verschillendemerken lossen is verschillende snelhedenop, dat is de reden waarom sommigetabletten niet effectief genoeg zijn en nietvolledig oplossen bij een kort programma .Als u deze tabletten wil gebruiken raden wiju aan om een langer...
Page 91 - INVOER VAN GLANSSPOELMIDDEL; Glansspoelmiddel
INVOER VAN GLANSSPOELMIDDEL Glansspoelmiddel Het glansspoelmiddel dat automatischwordt toegevoegd tijdens de laatstespoeling voorkomt strepen op de vaat enbevordert een snellere droging ervan. Het reservoir voor glansspoelmiddel Het reservoir voor glansspoelmiddel isgeplaatst naast het reservoir voo...
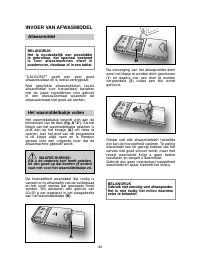
Page 92 - Het zelfreinigende microfilter hoeft
92 1 2 3 SCHOONMAAK VAN DE FILTERS Het filtersysteem (figuur A “4”) bestaat uit: Een centrale houder die de groterevuildeeltjes van de vaat trapsgewijssorteert. Een platte zeef die het spoelwatervoortdurend filtert. Een micro filter onder de platte zeef datde kleinste onzuiverheden uit het waterhaal...
Page 93 - ALGEMENE AANWIJZINGEN; Hoe u kunt besparen
93 ALGEMENE AANWIJZINGEN Hoe goede wasresultaten te verkrijgen ■ Voordat servies in de afwasautomaatwordt geplaatst dienen grove etensresten(bijv. botjes, eierschalen, koffiedik,tandenstokers of fruitschillen) verwijderdte worden om te voorkomen dat defilters, slangen en sproeiarmen verstoptraken. ■...
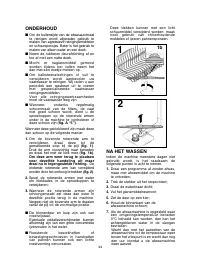
Page 94 - NA HET WASSEN; ONDERHOUD
94 1 2 1b NA HET WASSEN Indien de machine meerdere dagen nietgebruikt wordt, is het raadzaam devolgende punten in acht te nemen. 1. Draai een programma af zonder afwas,maar met afwasmiddel om de machinete ontvetten; 2. Trek de stekker uit het stopcontact; 3. Draai de waterkraan dicht; 4. Vul het gla...
Page 95 - STORINGLIJST; Kleine storingen zelf oplossen.
95 Steek stekker in stopkontakt. Druk knop alsnog in. Sluit de deur goed. Controleer zekering in demeterkast. Controleer Open de kraan. Leg de slang goed, zonderknikken. Reinig zeefje en installeerjuist. Reinig de zeef. Leg de slang goed, zonderknikken.Installeer opnieuw volgensde instrukties. Uitla...
Page 96 - Zijn niet goed
96 N.B. : Indien de situatie zich voordoet dat het apparaat een slechte reiniging veroorzaakt, is het aan te bevelen de meest grove etensresten van de borden te verwijderen alvorens het programma testarten. Tijdens de droging gaan achtergebleven etensresten extra vast aan de borden zitten endeze zij...
Page 97 - ÍNDICE
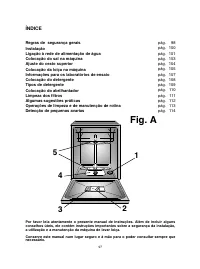
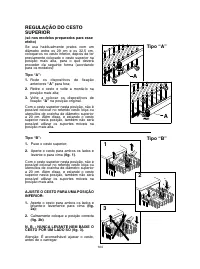
97 ÍNDICE Regras de segurança geraisInstalaçãoLigação à rede de alimentação de àgua Colocação do sal na máquinaAjuste do cesto superiorColocação da loiça na máquinaInformações para os laboratórios de ensaioColocação do detergenteTipos de detergenteColocação do abrilhantadorLimpeza dos filtrosAlgumas...
Page 98 - - Em quartos e alojamento do
98 REGRAS DE SEGURANÇAGERAIS ■ Este aparelho destina-se a serutilizado apenas em contextodoméstico ou semelhnate, tais como: - Áreas de cozinha de lojas, escritórios e outros ambientesde trabalho, que sejam reservadasaos funcionários; - Casas de férias, de praia ou de campo; - Por clientes de hotéis...
Page 99 - Instruções de segurança
99 ■ Após a instalação a máquinadeve estar posicionada de formaa que a ficha fique acessível. ■ Para conseguir a carga máximana máquina, por favor consulte asecção de "DADOS TÉCNICOS". ATENÇÃO ! Facas e outros utensílios comlâminas devem ser colocadosno cesto com as pontas parabaixo ou coloc...
Page 100 - e alterações posteriores.
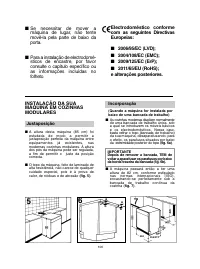
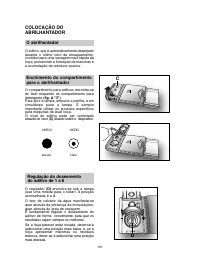
100 7 598 556/573 5 INSTALAÇÃO DA SUAMÁQUINA EM COZINHASMODULARES Justaposição ■ A altura desta máquina (85 cm) foiestudada de modo a permitir ajustaposição perfeita da máquina entreequipamentos já existentes, nasmodernas cozinhas modulares. A alturados pés da máquina pode ser regulada,a fim de perm...
Page 101 - A mangueira de admissão “A” deve ser
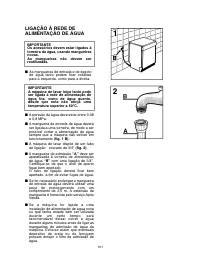
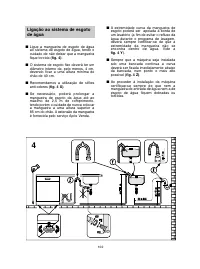
LIGAÇÃO À REDE DE ALIMENTAÇÃO DE ÁGUA IMPORTANTEOs acessórios devem estar ligados àtorneira da água, usando mangueirasnovas. As mangueiras não devem serreutilizadas. ■ As mangueiras de entrada e de esgotode água tanto podem ficar voltadaspara a esquerda, como para a direita. IMPORTANTE A máquina de ...
Page 105 - Como usar o cesto superior
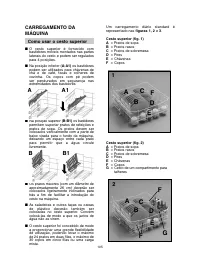
105 CARREGAMENTO DAMÁQUINA Como usar o cesto superior ■ O cesto superior é fornecido combastidores móveis montados nas parteslaterais do cesto e podem ser reguladospara 4 posições. ■ Na posição inferior (A-A1) os bastidorespodem ser utilizados para chávenas dechá e de café, facas e colheres decozinh...
Page 106 - Como usar o cesto inferior
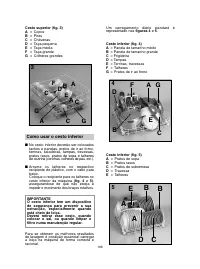
106 Cesto superior (fig. 3)A = Copos B = Pires C = Chávenas D = Taça pequena E = Taça média F = Taça grande G = Colheres grandes Como usar o cesto inferior ■ No cesto inferior deverão ser colocadostachos e panelas, pratos de ir ao forno,terrinas, saladeiras, tampas, travessas,pratos rasos, pratos de...
Page 107 - INFORMAÇÕES PARA OS LABORATÓRIOS DE ENSAIO
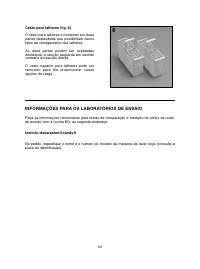
107 Cesto para talheres (fig. 6) O cesto para talheres é composto por duaspartes destacáveis que possibilitam váriostipos de carregamento dos talheres. As duas partes podem ser separadasdeslizando a secção esquerda em sentidocontrário da secção direita. O cesto superior para talheres pode serremovid...
Page 108 - utilização das quantidades
COLOCAÇÃO DO DETERGENTE O detergente IMPORTANTEÉ de grande importância utilizar umdetergente específico paramáquinas de lavar loiça, quer sejaem pó, líquido ou em forma depastilhas. Os detergentes que não são adequadospara as máquinas de lavar loiça (como, porexemplo, os detergentes para a lavagemde...
Page 109 - TIPOS DE DETERGENTE; Detergente em pastilhas
109 TIPOS DE DETERGENTE Detergente em pastilhas Os detergentes em pastilhas produzidospor diferentes fabricantes caracterizam-sepor velocidades de dissolução tambémdiferentes pelo que, durante os programascurtos, alguns detergentes em pastilhaspodem não ser totalmente eficazes por nãose dissolverem ...
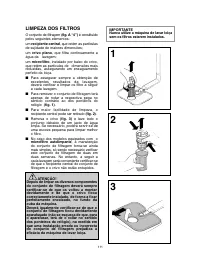
Page 111 - LIMPEZA DOS FILTROS
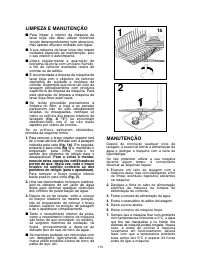
111 1 2 3 LIMPEZA DOS FILTROS O conjunto de filtragem (fig. A “4”) é constituídopelos seguintes elementos: um recipiente central, que retém as partículasde sujidade de maiores dimensões; um crivo plano, que filtra continuamente aágua da lavagem; um microfiltro, instalado por baixo do crivo,que retém...
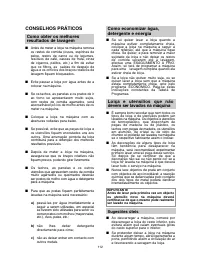
Page 112 - CONSELHOS PRÁTICOS; Sugestões úteis
112 CONSELHOS PRÁTICOS Como obter os melhoresresultados de lavagem ■ Antes de meter a loiça na máquina removaos restos de comida (ossos, espinhas depeixe, restos de carne ou de legumes,resíduos de café, cascas de fruta, cinzade cigarros, palitos, etc.) a fim de evitarque os filtros, as saídas de des...
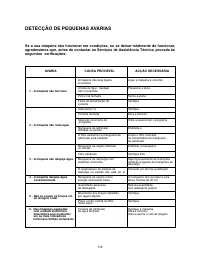
Page 114 - DETECÇÃO DE PEQUENAS AVARIAS
114 DETECÇÃO DE PEQUENAS AVARIAS Se a sua máquina não funcionar em condições, ou se deixar totalmente de funcionar,agradecemos que, antes de contactar os Serviços de Assistência Técnica, proceda àsseguintes verificações: AVARIA CAUSA PROVÁVEL ACÇÃO NECESSÁRIA 1 - A máquina não funciona 2 - A máquina...
Page 116 - CONTENTS; Keep this booklet safe for future reference.
116 CONTENTS General safety rulesInstallationWater connectionLoading the saltAdjusting the upper basketLoading the dishesInformation for test laboratoriesLoading the detergentTypes of detergentLoading the rinse aidCleaning the filtersSome practical hintsRoutine cleaning and maintenanceIdentifying mi...
Page 117 - GENERAL SAFETY RULES
GENERAL SAFETY RULES ■ This appliances is intended to beused in household and similarapplications such as: - staff kitchen areas in shops,offices and other workingenvironments; - farm houses; - by clients in hotels, motelsand other residential typeenvironments; - bed and breakfast typeenvironments. ...
Page 118 - Safety instructions
■ For the maximum place loading,please refer to the "TECHNICALDATA" table/section. WARNING ! Knives and other utensils withsharp points must be loadedin the basket with their pointsdown or placed in a horizontalposition. ■ The door should not be left in theopen position since this could pre-...
Page 119 - and subsequent amendments
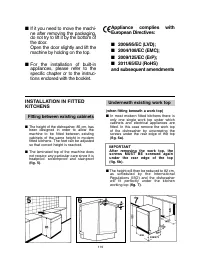
119 7 598 556/573 5 INSTALLATION IN FITTEDKITCHENS Fitting between existing cabinets ■ The height of the dishwasher, 85 cm, hasbeen designed in order to allow themachine to be fitted between existingcabinets of the same height in modernfitted kitchens. The feet can be adjustedso that correct height ...
Page 120 - WATER CONNECTION
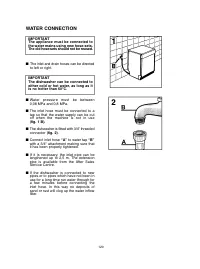
WATER CONNECTION IMPORTANTThe appliance must be connected tothe water mains using new hose-sets.The old hose-sets should not be reused. ■ The inlet and drain hoses can be directedto left or right. IMPORTANTThe dishwasher can be connected toeither cold or hot water, as long as itis no hotter than 60°...
Page 121 - Connecting the outlet hose
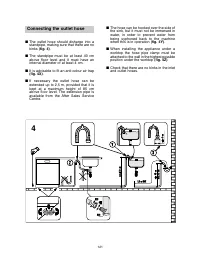
121 Connecting the outlet hose ■ The outlet hose should disharge into astandpipe, making sure that there are nokinks (fig. 4). ■ The standpipe must be at least 40 cmabove floor level and it must have aninternal diameter of at least 4 cm. ■ It is advisable to fit an anti-odour air trap(fig. 4X) . ■ I...
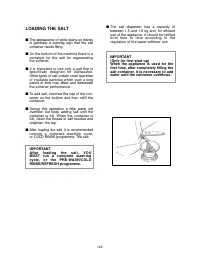
Page 122 - LOADING THE SALT
122 LOADING THE SALT ■ The appearance of white stains on dishesis generally a warning sign that the saltcontainer needs filling. ■ On the bottom of the machine there is acontainer for the salt for regeneratingthe softener. ■ It is important to use only a salt that isspecifically designed for dishwas...
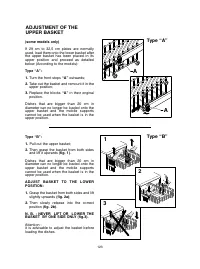
Page 123 - Turn the front stops “A” outwards
123 A A 1 3 a b a b 2 ADJUSTMENT OF THEUPPER BASKET (some models only) If 29 cm to 32,5 cm plates are normallyused, load them onto the lower basket afterthe upper basket has been placed in itsupper position and proceed as detailedbelow (According to the models): Type “A”: 1. Turn the front stops “A”...
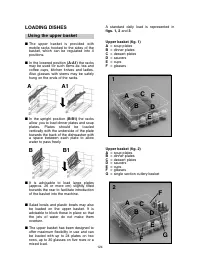
Page 124 - LOADING DISHES; Using the upper basket
124 LOADING DISHES Using the upper basket ■ The upper basket is provided withmobile racks hooked to the sides of thebasket, which can be regulated into 4positions. ■ In the lowered position (A-A1) the racksmay be used for such items as: tea andcoffee cups, kitchen knives and ladles.Also glasses with...
Page 125 - Using the lower basket
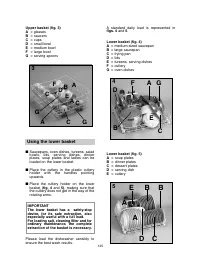
125 Upper basket (fig. 3) A = glasses B = saucers C = cups D = small bowl E = medium bowl F = large bowl G = serving spoons Using the lower basket ■ Saucepans, oven dishes, tureens, saladbowls, lids, serving dishes, dinnerplates, soup plates and ladles can beloaded on the lower basket. ■ Place the c...
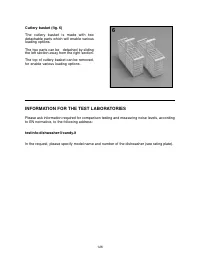
Page 126 - INFORMATION FOR THE TEST LABORATORIES
126 Cutlery basket (fig. 6) The cutlery basket is made with twodetachable parts which will enable variousloading options. The two parts can be detached by slidingthe left section away from the right section. The top of cutlery basket can be removed,for enable various loading options. INFORMATION FOR...
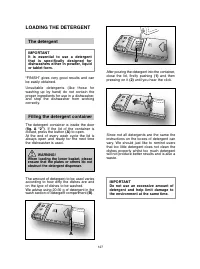
Page 127 - LOADING THE DETERGENT; The detergent
LOADING THE DETERGENT The detergent IMPORTANTIt is essential to use a detergentthat is specifically designed fordishwashers either in powder, liquidor tablet form. “FINISH” gives very good results and canbe easily obtained. Unsuitable detergents (like those forwashing up by hand) do not contain thep...
Page 128 - TYPES OF DETERGENT; Detergent tablets; Concentrated detergents
128 TYPES OF DETERGENT Detergent tablets Detergent tablets of different manufacturers dissolve at different speeds, for this reason, during short programmes, some detergent tablets may be not fully effective, because they are not completely dissolved. If these products are used, is recommended to ch...
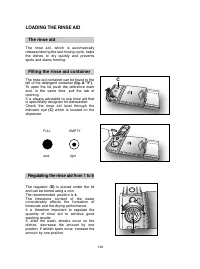
Page 129 - LOADING THE RINSE AID; The rinse aid
LOADING THE RINSE AID The rinse aid The rinse aid, which is automaticallyreleased during the last rinsing cycle, helpsthe dishes to dry quickly and preventsspots and stains forming. Filling the rinse aid container The rinse aid container can be found to theleft of the detergent container (fig. A �...
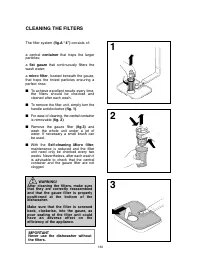
Page 130 - CLEANING THE FILTERS
130 1 2 3 CLEANING THE FILTERS The filter system (fig.A “4”) consists of: a central container that traps the largerparticles; a flat gauze that continuously filters thewash water; a micro filter, located beneath the gauze,that traps the tiniest particles ensuring aperfect rinse. ■ To achieve excelle...
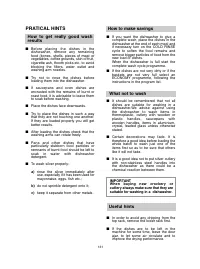
Page 131 - PRATICAL HINTS; How to make savings
131 PRATICAL HINTS How to get really good washresults ■ Before placing the dishes in thedishwasher, remove any remainingfood (bones, shells, pieces of meat orvegetables, coffee grounds, skin of fruit,cigarette ash, thooth picks etc. to avoidblocking the filters, water outlet andwashing arm nozzles. ...
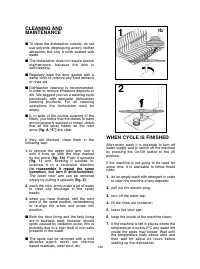
Page 132 - WHEN CYCLE IS FINISHED
132 WHEN CYCLE IS FINISHED After every wash it is essential to turn offwater supply and to switch off the machineby pressing the On/Off button to the offposition. If the machine is not going to be used forsome time, it is advisable to follow theserules: 1. do an empty wash with detergent in orderto ...
Page 133 - IDENTIFYING MINOR FAULTS
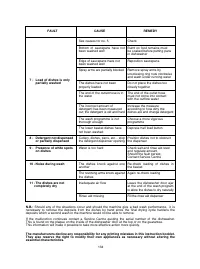
IDENTIFYING MINOR FAULTS Should the dishwasher fail to operate, before contacting the Service Centre, makethe following checks: 133 FAULT CAUSE REMEDY 1 - Machine completely dead 2 - Machine does not draw water 3 - Machine does not discharge water 4 - Machine discharges water continuously 5 - Spray ...