Page 2 - DANGER –; WARNING –
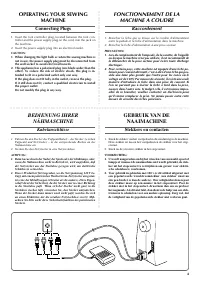
"IMPORTANT SAFETY INSTRUCTIONS" When using the sewing machine, basic safety precautions should always be followed, including the following: "Read all instructions before using." DANGER – To reduce the risk of electric shock: 1. The sewing machine should never be left unattended when ...
Page 3 - “IMPORTANTES CONSIGNES DE SECURITE”; “CONSERVER CES INSTRUCTIONS”
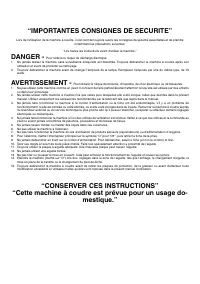
“IMPORTANTES CONSIGNES DE SECURITE” Lors de l’utilisation de la machine à coudre, il convient de toujours suivre les consignes de sécurité essentielles et de prendre notamment les précautions suivantes: “Lire toutes les instructions avant d’utiliser la machine.” DANGER - Pour réduire le risque de dé...
Page 4 - SICHERHEITSBESTIMMUNGEN
SICHERHEITSBESTIMMUNGEN Verwenden Sie nur Sicherungen für max 240 V/15 W.Die Maschine ist gemäß den Vorschriften Amtsblatt Vfg. 242/1991 funkentstör t.
Page 5 - “BELANGRIJKE VEILIGHEIDSINSTRUCTIES”; “BEWAAR DEZE INSTRUCTIES”
“BELANGRIJKE VEILIGHEIDSINSTRUCTIES” Bij het gebruik van de naaimachine moeten altijd enkele fundamentele voorzorgsmaatregelen worden genomen, waaronder: “ Voor gebruik eerst alle instructies doorlezen. ” GEVAARLIJK - Om het risico van elektrische schokken te beperken moet u: 1. De naaimachine nooit...
Page 6 - CONTENTS; Table des matiéres
6 ○○○○○○○○○○○○○○○○○○○○○○○○○○○○○○○○○○○○○○○○○○○○○○○ ○○○○○○○○○○○○○○○○○○○○○○○○○○○○○○○○○○○○○○○○○○○○○○○○○○ CONTENTS Page PRINCIPAL PARTS ................................................................... 1 ACCESSORIES .......................................................................... 3 OPERATING ...
Page 7 - INDICE; ÍNDICE
7 ○○○○○○○○○○○○○○○○○○○○○○○○○○○○○○○○○○○○○○○○○○○○○○○ ○○○○○○○○○○○○○○○○○○○○○○○○○○○○○○○○○○○○○○○○○○○○○○○○○○ INDICE Seite HAUPTBESTANDTEILE ............................................................ 1 ZUBEHÖR ............................................................................... 3 BEDIENUNG IHRER...
Page 8 - HAUPTBESTANDTEILE; BELANGRIJKSTE
○○○○○○○○○○○○○○○○○○○○○○○○○○○○○○○○○○○○○○○○○○○○○○○ ○○○○○○○○○○○○○○○○○○○○○○○○○○○○○○○○○○○○○○○○○○○○○○○○○○ 1 PRINCIPAL PARTS 1 3 4 5 6 2 L O H I J K M N P 7 1 8 9 0 A B C E F D G * The illustrations of the sewing machine on the following pages maydiffer slightly from your machine. PIECES PRINCIPALES * Les i...
Page 9 - BELANGRIJKSTE ONDERDELEN
○○○○○○○○○○○○○○○○○○○○○○○○○○○○○○○○○○○○○○○○○○○○○○○ ○○○○○○○○○○○○○○○○○○○○○○○○○○○○○○○○○○○○○○○○○○○○○○○○○○ 2 PRINCIPAL PARTS 1 Pattern selection dial 2 Buttonhole fine-adjusting screw 3 Thread take-up lever 4 Extension table 5 Upper tension control dial 6 Reverse sewing lever 7 Thread cutter 8 Presser foot ...
Page 10 - ZUBEHÖR; TOEBEHOREN
○○○○○○○○○○○○○○○○○○○○○○○○○○○○○○○○○○○○○○○○○○○○○○○ ○○○○○○○○○○○○○○○○○○○○○○○○○○○○○○○○○○○○○○○○○○○○○○○○○○ 3 ACCESSORIES 1 Buttonhole foot (1 pc.) 2 Zipper foot (1 pc.) 3 Button sewing Foot (1 pc.) 4 Needle pack (regular single needle No. 14) (3 pcs.) 5 Twin needle (1 pc.) 6 Bobbins (3 pcs.) 7 Darning plate...
Page 11 - Connecting Plugs; FONCTIONNEMENT DE LA; Raccordement; BEDIENUNG IHRER; Kabelanschlüsse; GEBRUIK VAN DE; Stekkers en contacten
○○○○○○○○○○○○○○○○○○○○○○○○○○○○○○○○○○○○○○○○○○○○○○○ ○○○○○○○○○○○○○○○○○○○○○○○○○○○○○○○○○○○○○○○○○○○○○○○○○○ 4 OPERATING YOUR SEWING MACHINE Connecting Plugs 1. Insert the foot controller plug, located between the foot con- troller and the power supply plug on the cord, into the jack onthe machine. 2. Insert ...
Page 12 - Main Power and Sewing Light Switches; Foot Controller; Interrupteur principal et de la lampe; Netz- und Nählichtschalter; Fußpedal
○○○○○○○○○○○○○○○○○○○○○○○○○○○○○○○○○○○○○○○○○○○○○○○ ○○○○○○○○○○○○○○○○○○○○○○○○○○○○○○○○○○○○○○○○○○○○○○○○○○ 5 Main Power and Sewing Light Switches This switch turns the main power and sewing light on or off. (See fig. A .) 1 Turn on (toward the “I” mark) 2 Turn off (toward the “O” mark) Foot Controller When ...
Page 13 - Inserting the Needle; Pour mettre l’aiguille en place; Nadel einsetzen; Checking the Needle; Nadel prüfen; De naald erin doen; De naald controleren
○○○○○○○○○○○○○○○○○○○○○○○○○○○○○○○○○○○○○○○○○○○○○○○ ○○○○○○○○○○○○○○○○○○○○○○○○○○○○○○○○○○○○○○○○○○○○○○○○○○ 6 Inserting the Needle 1. Remove the power supply plug from the electrical outlet.2. Raise the needle bar to its highest position.3. Lower the presser foot.4. If a needle is already installed, remove t...
Page 14 - Changing the Presser Foot; Nähfuß wechseln; De persvoet vervangen
○○○○○○○○○○○○○○○○○○○○○○○○○○○○○○○○○○○○○○○○○○○○○○○ ○○○○○○○○○○○○○○○○○○○○○○○○○○○○○○○○○○○○○○○○○○○○○○○○○○ 7 Changing the Presser Foot It may be necessary to change the presser foot according to yoursewing needs. SNAP-ON TYPE 1. Raise the needle to its highest position by turning the balance wheel toward yo...
Page 15 - Converting to Free-Arm Style; Modèle bras libre; Umbau auf Freiarm; Omschakelen naar vrije armmachine; Steadying the Machine; Nivellierung der Maschine; De machine stabiliseren
○○○○○○○○○○○○○○○○○○○○○○○○○○○○○○○○○○○○○○○○○○○○○○○ ○○○○○○○○○○○○○○○○○○○○○○○○○○○○○○○○○○○○○○○○○○○○○○○○○○ 8 Converting to Free-Arm Style Free-Arm sewing is convenient for sewing tubular and hard-to-reach areas on garments. To change your machine to the free-Armstyle, lift up on the extension table and pull...
Page 16 - VARIOUS CONTROLS; Pattern Selection Dial; DESCRIPTIF DES DIFFERENTES; VERSCHIEDENE REGLER; Stichmuster-Drehschalter; BEDIENINGSTOETSEN; Patroonkeuzeknop
○○○○○○○○○○○○○○○○○○○○○○○○○○○○○○○○○○○○○○○○○○○○○○○ ○○○○○○○○○○○○○○○○○○○○○○○○○○○○○○○○○○○○○○○○○○○○○○○○○○ 9 VARIOUS CONTROLS Pattern Selection Dial To select a stitch, simply turn the pattern selection dial in eitherdirection. Stitch widths and lengths are shown on the followingpage. 1 Pattern selection di...
Page 18 - STICHMUSTER UND -NAMEN; PATROONEN EN STEEKNAMEN
○○○○○○○○○○○○○○○○○○○○○○○○○○○○○○○○○○○○○○○○○○○○○○○ ○○○○○○○○○○○○○○○○○○○○○○○○○○○○○○○○○○○○○○○○○○○○○○○○○○ 11 STICHMUSTER UND -NAMEN ○ ○ ○ ○ ○ ○ ○ ○ ○ ○ ○ ○ ○ ○ ○ ○ ○ ○ ○ ○ ○ ○ ○ ○ ○ ○ ○ ○ ○ ○ ○ ○ ○ ○ ○ ○ ○ ○ ○ ○ ○ ○ ○ ○ ○ ○ ○ ○ ○ ○ ○ ○ ○ ○ ○ ○ ○ ○ ○ ○ ○ ○ ○ ○ ○ ○ ○ Patroon Steek Pagina in handleiding a-b-c...
Page 19 - THREADING THE MACHINE; Winding the Bobbin; ENFILAGE DE LA MACHINE; Remplissage de la canette; Rückwärtsnähen; Achteruitnaaiknop
○○○○○○○○○○○○○○○○○○○○○○○○○○○○○○○○○○○○○○○○○○○○○○○ ○○○○○○○○○○○○○○○○○○○○○○○○○○○○○○○○○○○○○○○○○○○○○○○○○○ 12 Reverse Sewing Lever To sew in reverse, press down the reverse sewing lever as far aspossible and hold it in that position while lightly stepping on thefoot controller. To sew forward, release the r...
Page 20 - FADENFÜHRUNG; Aufspulen; DRAAD INRIJGEN; De spoel opwinden
○○○○○○○○○○○○○○○○○○○○○○○○○○○○○○○○○○○○○○○○○○○○○○○ ○○○○○○○○○○○○○○○○○○○○○○○○○○○○○○○○○○○○○○○○○○○○○○○○○○ 13 FADENFÜHRUNG Aufspulen 1. Setzen Sie die Garnrolle auf und fädeln Sie den Faden durch die Aufspul-Spannungsscheibe. 1 Aufspul-Spannungsscheibe 2 Aufspulen 2. Führen Sie das Fadenende von Innen durch...
Page 21 - Unterfadenführung; De onderdraad aanbrengen
○○○○○○○○○○○○○○○○○○○○○○○○○○○○○○○○○○○○○○○○○○○○○○○ ○○○○○○○○○○○○○○○○○○○○○○○○○○○○○○○○○○○○○○○○○○○○○○○○○○ 14 Lower Threading 1. Raise the needle to its highest position by turning the balance wheel toward you (counterclockwise) and raise the presser footlifter. 2. Open the shuttle cover behind the extensio...
Page 22 - Mise en place du fil supérieur; Fadenführung des Oberfadens; De bovendraad inrijgen
○○○○○○○○○○○○○○○○○○○○○○○○○○○○○○○○○○○○○○○○○○○○○○○ ○○○○○○○○○○○○○○○○○○○○○○○○○○○○○○○○○○○○○○○○○○○○○○○○○○ 15 1 2 A B-1 B-2 B-3 C 3 2 4 Upper (Needle) Threading Mise en place du fil supérieur (fil de l’aiguille) ○ ○ ○ ○ ○ ○ ○ ○ ○ ○ ○ ○ ○ ○ ○ ○ ○ ○ ○ ○ ○ ○ ○ ○ ○ ○ ○ ○ ○ ○ ○ ○ ○ ○ ○ ○ ○ ○ ○ ○ ○ ○ ○ ○ ○ ○ ○ ○ ...
Page 24 - Drawing Up Lower Thread; Remontée du fil inférieur; Heraufholen des Unterfadens; Oppakken van de onderdraad
○○○○○○○○○○○○○○○○○○○○○○○○○○○○○○○○○○○○○○○○○○○○○○○ ○○○○○○○○○○○○○○○○○○○○○○○○○○○○○○○○○○○○○○○○○○○○○○○○○○ 17 D E A B C 1 2 3 4 5 6 8 7 7 Drawing Up Lower Thread 1. Raise the presser foot and the needle to their highest positions.2. With your left hand, hold the end of the upper thread. With y o u r r i g h...
Page 25 - Couture avec l’aiguille jumelée; Nähen mit zwei Nadeln; Naaien met een dubbele naald
○○○○○○○○○○○○○○○○○○○○○○○○○○○○○○○○○○○○○○○○○○○○○○○ ○○○○○○○○○○○○○○○○○○○○○○○○○○○○○○○○○○○○○○○○○○○○○○○○○○ 18 Twin-Needle Sewing Your sewing machine is designed for twin-needle sewing whichallows you to sew using two upper threads. You can use the samecolor or two different colors of thread for decorative s...
Page 26 - Thread Tension; Tension des fils; Fadenspannung; Draadspanning
○○○○○○○○○○○○○○○○○○○○○○○○○○○○○○○○○○○○○○○○○○○○○○○ ○○○○○○○○○○○○○○○○○○○○○○○○○○○○○○○○○○○○○○○○○○○○○○○○○○ 19 Thread Tension Thread tension will affect the quality of your stitches. It may needto be adjusted when you change fabric or thread type. NOTE: It is recommended that a test sample be made on a fabri...
Page 28 - RELATIVE CHART OF SEWING FABRICS, NEEDLES AND THREADS; TABLEAU DES COMBINAISONS TISSU/AIGUILLE/FIL
○○○○○○○○○○○○○○○○○○○○○○○○○○○○○○○○○○○○○○○○○○○○○○○ ○○○○○○○○○○○○○○○○○○○○○○○○○○○○○○○○○○○○○○○○○○○○○○○○○○ 21 RELATIVE CHART OF SEWING FABRICS, NEEDLES AND THREADS SEWING FABRICS NEEDLE SIZES THREAD SIZES VERY THIN LIGHTWEIGHT MEDIUM WEIGHT HEAVYWEIGHT KNITS Fine tricot, Fine lace, Thin linen, Silk, Organza...
Page 29 - OVERZICHT VAN MATERIALEN, NAALDEN EN GARENS
○○○○○○○○○○○○○○○○○○○○○○○○○○○○○○○○○○○○○○○○○○○○○○○ ○○○○○○○○○○○○○○○○○○○○○○○○○○○○○○○○○○○○○○○○○○○○○○○○○○ 22 SEHR DÜNN LEICHT MITTEL SCHWER Strickstoffe 9 11 14 (Mit Ihrer Maschine geliefert) 16 Kugelspitze 14 STOFF-, NADEL- & GARNTABELLE STOFF NADELGRÖSSE FADENSTÄRKE ZEER DUN DUN MEDIUM DIK Gebreid ma...
Page 30 - Straight Stitching; Point droit; Gerades Nähen; Rechte steek
○○○○○○○○○○○○○○○○○○○○○○○○○○○○○○○○○○○○○○○○○○○○○○○ ○○○○○○○○○○○○○○○○○○○○○○○○○○○○○○○○○○○○○○○○○○○○○○○○○○ 23 Straight Stitching Pattern 5 (Center needle position) 6 (Left needle position) The Straight Stitch (5 or 6) is used for top stitching and sewinglightweight fabrics. Starting Sewing (fig. A) 1. Set t...
Page 32 - Zigzag Stitching; Points zigzag; Zickzackstich; Zigzagsteek
○○○○○○○○○○○○○○○○○○○○○○○○○○○○○○○○○○○○○○○○○○○○○○○ ○○○○○○○○○○○○○○○○○○○○○○○○○○○○○○○○○○○○○○○○○○○○○○○○○○ 25 Zigzag Stitching Pattern 1 (Zigzag Stitch) 2 (Zigzag Stitch) 3 (Zigzag Stitch) ZIGZAG STITCH Set the pattern selection dial to the appropriate Zigzag Stitch (1, 2or 3) with the desired width.It is r...
Page 33 - Blind Hem Stitching; Point élastique invisible; Blindstich; Blindzoomsteek
○○○○○○○○○○○○○○○○○○○○○○○○○○○○○○○○○○○○○○○○○○○○○○○ ○○○○○○○○○○○○○○○○○○○○○○○○○○○○○○○○○○○○○○○○○○○○○○○○○○ 26 Blind Hem Stitching Pattern 7 (Stretch Blind Stitch) The Stretch Blind Stitch is used to finish the edge of projects madewith stretch fabrics without the stitch showing.1. Set the pattern selection ...
Page 34 - Elastic Stitching; Point élastique; Elastischer Zickzack; Elastische steek
○○○○○○○○○○○○○○○○○○○○○○○○○○○○○○○○○○○○○○○○○○○○○○○ ○○○○○○○○○○○○○○○○○○○○○○○○○○○○○○○○○○○○○○○○○○○○○○○○○○ 27 Elastic Stitching Pattern 9 (Elastic Stitch) The Elastic Stitch can be used in 3 ways: mending, sewing elasticor joining fabric. Each is explained below.Set the pattern selection dial to 9. MENDING ...
Page 35 - Shell Tuck Stitching; Point picot; Dessousstich
○○○○○○○○○○○○○○○○○○○○○○○○○○○○○○○○○○○○○○○○○○○○○○○ ○○○○○○○○○○○○○○○○○○○○○○○○○○○○○○○○○○○○○○○○○○○○○○○○○○ 28 Shell Tuck Stitching Pattern 8 (Shell Tuck Stitch) The Shell Tuck Stitch can be used to sew a picot (lace-like) edgeon a lightweight fabric.1. Set the pattern selection dial to 8.2. Use a tighter th...
Page 36 - Making a Buttonhole; Création d’une boutonnière; Knopfloch nähen; Een knoopsgat maken
○○○○○○○○○○○○○○○○○○○○○○○○○○○○○○○○○○○○○○○○○○○○○○○ ○○○○○○○○○○○○○○○○○○○○○○○○○○○○○○○○○○○○○○○○○○○○○○○○○○ 29 Making a Buttonhole Pattern Foot a b c d Buttonhole foot NOTE: 1. It is recommended to practice making a buttonhole on a scrap piece of fabric before attempting it on the actual garment. 2. When mak...
Page 40 - Buttonhole Fine Adjustment; Equilibrage des boutonnières; Afstelling voor knoopsgaten
○○○○○○○○○○○○○○○○○○○○○○○○○○○○○○○○○○○○○○○○○○○○○○○ ○○○○○○○○○○○○○○○○○○○○○○○○○○○○○○○○○○○○○○○○○○○○○○○○○○ 33 Buttonhole Fine Adjustment If the stitching on the two sides of the buttonhole do not appearuniform, the following adjustments can be made.1. After sewing the left side of the buttonhole, stitch the...
Page 41 - Button Sewing; Pour coudre un bouton; Knöpfe annähen; Knopen aanzetten
○○○○○○○○○○○○○○○○○○○○○○○○○○○○○○○○○○○○○○○○○○○○○○○ ○○○○○○○○○○○○○○○○○○○○○○○○○○○○○○○○○○○○○○○○○○○○○○○○○○ 34 Button Sewing Pattern Foot Other 1, 2 or 3 Button Sewing Foot Darning Plate 1. Measure the distance between the buttonholes and set the pat- tern selection dial to the Zigzag Stitch (1, 2 or 3) with...
Page 42 - Einnähen eines Reißverschlusses; Een rits inzetten
○○○○○○○○○○○○○○○○○○○○○○○○○○○○○○○○○○○○○○○○○○○○○○○ ○○○○○○○○○○○○○○○○○○○○○○○○○○○○○○○○○○○○○○○○○○○○○○○○○○ 35 Zipper Insertion Pattern 5 (Straight Stitch) The zipper foot is used to sew various types of zippers and caneasily be positioned to the right or left side of the needle.When sewing the right side of...
Page 43 - Gathering; Pour froncer un tissu; Reffen; Plooien
○○○○○○○○○○○○○○○○○○○○○○○○○○○○○○○○○○○○○○○○○○○○○○○ ○○○○○○○○○○○○○○○○○○○○○○○○○○○○○○○○○○○○○○○○○○○○○○○○○○ 36 4 A 1 2 3 B 4 Gathering Pattern 5 (Straight Stitch) 1. Set the pattern selection dial to the Straight Stitch (5) with the desired length. 2. Loosen the tension of the upper thread (to about 2) so th...
Page 44 - Stopfen; Stoppen
○○○○○○○○○○○○○○○○○○○○○○○○○○○○○○○○○○○○○○○○○○○○○○○ ○○○○○○○○○○○○○○○○○○○○○○○○○○○○○○○○○○○○○○○○○○○○○○○○○○ 37 Darning Pattern Foot Other 5 (Straight Stitch) None Darning Plate 1. Place the darning plate on the needle plate as shown in fig. A . 2. Set the pattern selection dial to the Straight Stitch (5) wit...
Page 45 - Appliques; Applizieren; Applicaties
○○○○○○○○○○○○○○○○○○○○○○○○○○○○○○○○○○○○○○○○○○○○○○○ ○○○○○○○○○○○○○○○○○○○○○○○○○○○○○○○○○○○○○○○○○○○○○○○○○○ 38 Appliques Pattern 1, 2, 3, 4 (Zigzag Stitch) An applique is created by cutting a contrasting piece of fabric intoa shape to be used as a decoration on a garment or project.1. Baste the cut design to...
Page 46 - Monogramming and Embroidering; Monogrammes et broderies; Monogramme und Stickarbeiten; Monogrammen en borduren
○○○○○○○○○○○○○○○○○○○○○○○○○○○○○○○○○○○○○○○○○○○○○○○ ○○○○○○○○○○○○○○○○○○○○○○○○○○○○○○○○○○○○○○○○○○○○○○○○○○ 39 Monogramming and Embroidering Pattern Foot Other 1, 2, 3, 4 (Zigzag Stitch) None Darning Plate PREPARING FOR MONOGRAMMING AND EMBROIDERING 1. Place the darning plate on the needle plate.2. Set the p...
Page 48 - Changing the Bulb; Remplacement de l’ampoule; Nählichtlampe auswechseln; Het lampje verwisselen
○○○○○○○○○○○○○○○○○○○○○○○○○○○○○○○○○○○○○○○○○○○○○○○ ○○○○○○○○○○○○○○○○○○○○○○○○○○○○○○○○○○○○○○○○○○○○○○○○○○ 41 Changing the Bulb 1. Remove the power supply plug from the electrical outlet.2. Loosen the face plate screw as shown in fig. A . 3. Remove the face plate from the machine as illustrated in fig. B . ...
Page 49 - Ölen; Smeren; Nettoyage; Cleaning
○○○○○○○○○○○○○○○○○○○○○○○○○○○○○○○○○○○○○○○○○○○○○○○ ○○○○○○○○○○○○○○○○○○○○○○○○○○○○○○○○○○○○○○○○○○○○○○○○○○ 42 Oiling 1. Remove the power supply plug from the electrical outlet.2. Put 2 to 3 drops of oil at each of the points indicated in fig. A.3. After oiling, run the machine without thread at a fast speed...
Page 50 - Reinigung; Reiniging
○○○○○○○○○○○○○○○○○○○○○○○○○○○○○○○○○○○○○○○○○○○○○○○ ○○○○○○○○○○○○○○○○○○○○○○○○○○○○○○○○○○○○○○○○○○○○○○○○○○ 43 NOTE: When the needle is lowered, the shuttle hook cannot be removed. Cleaning the Shuttle Race 1. Remove any accumulated lint and thread from the retaining ring, hook, driver and race body with a b...
Page 51 - Performance Checklist; Checkliste; Controlelijst
○○○○○○○○○○○○○○○○○○○○○○○○○○○○○○○○○○○○○○○○○○○○○○○ ○○○○○○○○○○○○○○○○○○○○○○○○○○○○○○○○○○○○○○○○○○○○○○○○○○ 44 Cleaning the Feed Dogs 1. Remove the presser foot holder and the needle.2. Remove the needle plate using a coin or screwdriver to take out the screws. 3. Clean the lint from the upper part of the fe...
Page 60 - Maschine verpacken; De machine opnieuw inpakken; IMPORTANT; WICHTIG
○○○○○○○○○○○○○○○○○○○○○○○○○○○○○○○○○○○○○○○○○○○○○○○ ○○○○○○○○○○○○○○○○○○○○○○○○○○○○○○○○○○○○○○○○○○○○○○○○○○ 53 Repacking the Machine Keep the carton and packing materials for future use. It may be-come necessary to reship the sewing machine. Improper packingor improper packing material could result in damage...
Page 61 - INDEX
○○○○○○○○○○○○○○○○○○○○○○○○○○○○○○○○○○○○○○○○○○○○○○○ ○○○○○○○○○○○○○○○○○○○○○○○○○○○○○○○○○○○○○○○○○○○○○○○○○○ 54 Page A Accessories .............................................................................. 3Applique ................................................................................ 38 B Blin...