Page 2 - IMPORTANT; except Step 3 in; PLANNING DUCTWORK INSTALLATION; TOOLS; TOOLS AND MATERIAL REQUIRED; For ducted installation ONLY:
IMPORTANT For Non-ducted (Duct free) Installation: a) Purchase non-ducted filter separately, part number S97021380. b) Remove and discard damper/duct connector and grille cover plate (See Step 3 in “Preparing the range Hood,” on page 3). c) Follow all steps except steps inside dotted lines. For Duct...
Page 3 - For non-ducted installation only; PREPARING THE RANGE HOOD; DUCTED INSTALLATION ONLY; PREPARING THE INSTALLATION LOCATION; NOTE
1. Unpack hood and check contents. You should have: 1 - Aluminum filter 1 - 3¼” x 10” Damper/duct connector (mounted inside of hood for shipping only) (save the screws) 2. Remove wiring box cover. Under cover find the parts bag containing loose hardware. For non-ducted installation only 3. For non-d...
Page 4 - INSTALLING THE DUCTWORK
NOTE THESE INSTRUCTIONS WILL FOLLOW THE PLANS MADE ON PAGE 1. START AT THE EXTERIOR AND RUN THE DUCT BACK TO THE RANGE HOOD. FOR BEST PERFORMANCE OF YOUR RANGE HOOD, USE THE SHORTEST POSSIBLE DUCT RUN AND A MINIMUM NUMBER OF ELBOWS. NEVER VENT A RANGE HOOD INTO AN ATTIC SPACE BECAUSE A BUILDUP OF GR...
Page 5 - USE AND CARE; WARNING
USE AND CARE FIG. 14 HO0352 - 5 - CONTROL KNOBS Right knob controls light and left knob controls blower. Light: Rotate light knob CLOCKWISE to turn ON the light. Rotate knob COUNTERCLOCKWISE to turn light OFF. Blower: Rotate blower knob CLOCKWISE to turn blower ON to LOW speed. Further CLOCKWISE rot...
Page 6 - SERVICE PARTS; AR1 SERIES RANGE HOOD; Replacement parts can
SERVICE PARTS HL0450 B E AR1 SERIES RANGE HOOD K EY N O . P ART N O . D ESCRIPTION 1 SR740014 3¼" X 10" A DAPTER / DAMPER 2 S99670656 L IGHT S WITCH ( INCLUDING NUT ) 3 S99670657 B LOWER S WITCH ( INCLUDING NUT ) 4 S600348 K NOB , B LACK ( SET OF 2) S600349 K NOB , W HITE ( SET OF 2) 5 S9801...
Page 7 - Limited Warranty; Warranty Period and Exclusions:; (or such longer period as may be required by applicable law).; THE COMPANY DISCLAIMS AND EXCLUDES ALL OTHER EXPRESS; To the extent that applicable law prohibits the; How to Obtain Warranty Service:
Limited Warranty Warranty Period and Exclusions: Broan-NuTone LLC and Venmar Ventilation ULC (either being the “Company”) warrants to the original consumer purchaser of its product (“you”) that the product (the “Product”) will be free from material defects in the Product or its workmanship for a per...
Page 8 - LIRE ET CONSERVER CES INSTRUCTIONS; AVERTISSEMENT; AFIN DE RÉDUIRE LES RISQUES DE FEU DE CUISINIÈRE :; INSTALLATEUR : Laisser ce manuel au propriétaire.
HOTTES DE CUISINIÈRE DE SÉRIE AR1 À 4 CONFIGURATIONS LIRE ET CONSERVER CES INSTRUCTIONS AVERTISSEMENT CONÇUE POUR USAGE DOMESTIQUE SEULEMENT. ! ! AFIN DE RÉDUIRE TOUT RISQUE DE BLESSURES LORS D’UN FEU DE CUISINIÈRE, SUIVEZ CES DIRECTIVES* : 1. ÉTOUFFEZ LES FLAMMES avec un couvercle hermétique, une t...
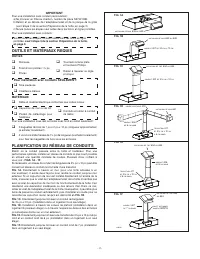
Page 9 - sauf l’étape 3 de la section Préparation de la hotte,; PLANIFICATION DU RÉSEAU DE CONDUITS; OUTILS; OUTILS ET MATÉRIAUX REQUIS; Pour installation avec conduits SEULEMENT :
IMPORTANT Pour une installation sans conduit (recirculation) : a) Se procurer un filtre au charbon, numéro de pièce S97021380. b) Retirer et se défaire de l’adaptateur/volet et de la plaque de la grille (voir l’étape 3 de la section Préparation de la hotte, en page 3). c) Suivre toutes les étapes sa...
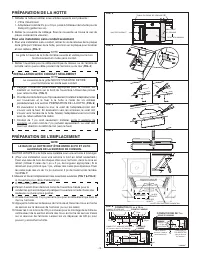
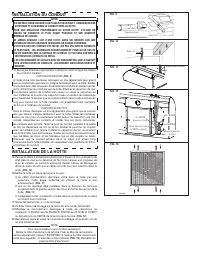
Page 10 - Pour une installation sans conduit seulement; PRÉPARATION DE LA HOTTE; INSTALLATION AVEC CONDUIT SEULEMENT; PRÉPARATION DE L’EMPLACEMENT
1. Déballer la hotte et vérifier si les articles suivants sont présents : 1 - Filtre d’aluminium 1 - Adaptateur/volet de 3¼ po x 10 po (vissé à l’intérieur de la hotte pour le transport) (garder les vis). 2. Retirer le couvercle du câblage. Sous le couvercle se trouve le sac de pièces contenant la v...
Page 11 - INSTALLATION DU CONDUIT
NOTE CES INSTRUCTIONS SUIVRONT LES PLANS FAITS EN PAGE 1. COMMENCER PAR L’EXTÉRIEUR ET ACHEMINER LE CONDUIT VERS LA HOTTE. POUR UNE MEILLEURE PERFORMANCE DE VOTRE HOTTE, UTILISER UN RÉSEAU DE CONDUITS LE PLUS COURT POSSIBLE ET UNE QUANTITÉ MINIMALE DE COUDES. NE JAMAIS ÉVACUER L’AIR D’UNE HOTTE DANS...
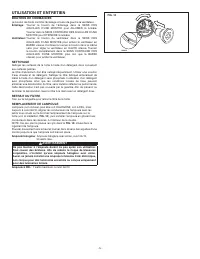
Page 12 - UTILISATION ET ENTRETIEN; BOUTONS DE COMMANDES; Tirer sur la languette pour retirer le filtre de la hotte.; REMPLACEMENT DE L’AMPOULE; ), puis installer l’ampoule en glissant ses; Ampoule halogène; Ampoule halogène avec écran, culot GU10,; Ampoule à DEL
UTILISATION ET ENTRETIEN - 5 - BOUTONS DE COMMANDES Le bouton de droite contrôle l’éclairage et celui de gauche le ventilateur. Éclairage : Tourner le bouton de l’éclairage dans le SENS DES AIGUILLES D’UNE MONTRE pour ALLUMER la lumière. Tourner dans le SENS CONTRAIRE DES AIGUILLES D’UNE MONTRE pour...
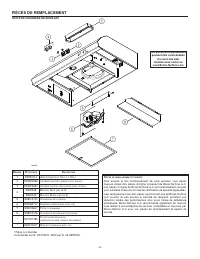
Page 13 - PIÈCES DE REMPLACEMENT; HOTTE DE CUISINIÈRE DE SÉRIE AR1
* Pièce non illustrée.Commander par N° DE PIÈCE, NON par N° de REPÈRE. PIÈCES DE REMPLACEMENT HOTTE DE CUISINIÈRE DE SÉRIE AR1 R EPÈRE No DE PIÈCE D ESCRIPTION 1 SR740014 A DAPTATEUR / VOLET 3¼ PO X 10 PO 2 S99670656 I NTERRUPTEUR D ’ ÉCLAIRAGE ( AVEC ÉCROU ) 3 S99670657 I NTERRUPTEUR DU VENTILATEUR...
Page 14 - Garantie limitée; Période de garantie et exclusions :; garantit au consommateur acheteur; et canadiens autorisés par la Société; Aucune autre garantie :; . Dans la mesure où la loi en vigueur interdit l’exclusion des; Comment bénéfi cier du service de garantie :
Garantie limitée Période de garantie et exclusions : Broan NuTone LLC (la « Société ») ou Venmar Ventilation ULC et/ou son subsidiaire garantit au consommateur acheteur initial (« vous ») de son produit (le « Produit ») que celui-ci est exempt de tout vice de matériau ou de fabrication pour une péri...
Page 15 - LEA Y GUARDE ESTAS INSTRUCCIONES; ADVERTENCIA; INSTALADOR: Deje este manual al propietario.
CAMPANAS DE LA SERIE AR1 CON 4 CONFIGURACIONES LEA Y GUARDE ESTAS INSTRUCCIONES ADVERTENCIA DESTINADAS ÚNICAMENTE PARA COCINAS DOMÉSTICAS. ! ! PA R A R E D U C I R E L R I E S G O D E L E S I O N E S E N CAS O D E I N C E N D I O D E L A C O C I N A , S I GA L AS S I G U I E N T E S INSTRUCCIONES*: ...
Page 16 - IMPORTANTE; excepto la etapa 3 en «Preparación de la; HERRAMIENTAS
IMPORTANTE Para una instalación sin conductos: a) Adquiera aparte un filtro sin conducto, modelo HPFR1. b) Retire y deseche el adaptador/compuerta y la placa de la rejilla (véase la etapa 3 en «Preparación de la campana» en la página 3). c) Siga todas las etapas excepto las que se encuentran entre l...
Page 17 - Instalación sin conducto únicamente; PREPARACIÓN DE LA CAMPANA; INSTALACIÓN CON CONDUCTO ÚNICAMENTE; PREPARACIÓN DEL LUGAR DE LA INSTALACIÓN; NOTA
1. Desembale la campana y compruebe si están los siguientes elementos: 1 - Filtro de aluminio 1 - Adaptador/compuerta de 3¼ ” x 10 ” (situado dentro de la campana sólo para el envío) (conserve los tornillos). 2. Retire la tapa de la caja de cableados. Debajo de la tapa encontrará la bolsa de piezas ...
Page 18 - INSTALACIÓN DEL CONDUCTO
NOTA ESTAS INSTRUCCIONES SEGUIRÁN LOS PLANES EXPUESTOS EN LA PÁGINA 1.COMIENCE EN EL EXTERIOR Y LLEVE EL CONDUCTO HASTA LA CAMPANA. PARA OBTENER MEJOR RENDIMIENTO DE LA CAMPANA, INSTALE UNA RED DE CONDUCTOS LO MÁS CORTA POSIBLE Y CON EL MENOR NÚMERO POSIBLE DE CODOS. NO DESCARGUE NUNCA EL AIRE DE UN...
Page 19 - USO Y CUIDADO; BOTONES DE CONTROL; Gire el botón del ventilador en el SENTIDO DEL GIRO DE; LIMPIEZA; Quite el filtro tirando de su pestaña de plástico.; SUSTITUCIÓN DE LA BOMBILLA; 0 vatios máximo
USO Y CUIDADO - 5 - BOTONES DE CONTROL El botón derecho permite controlar la luz y el izquierdo el ventilador. Luz: Gire el botón de la luz en el SENTIDO DE LAS AGUJAS DEL RELOJ para ENCENDER la luz. Gire el botón de la luz en el SENTIDO CONTRARIO A LAS AGUJAS DEL RELOJ para APAGAR la luz. Ventilado...
Page 20 - PIEZAS DE RECAMBIO; CAMPANA DE SERIE AR1; No; Las piezas de recambio se
* No ilustrado.Encargue piezas de recambio por N.° DE piezas, NO por N° de CLAVE. PIEZAS DE RECAMBIO CAMPANA DE SERIE AR1 C LAVE N .o No DE PIEZA D ESCRIPCIÓN 1 SR740014 A DAPTADOR / COMPUERTA 3¼ ” X 10 ” 2 S99670656 I NTERRUPTOR DE LA LUZ ( CON TUERCA ) 3 S99670657 I NTERRUPTOR DEL VENTILADOR ( CON...
Page 21 - Garantía limitada; Periodo y exclusiones de la garantía:; de serie alterado, removido o mutilado; No hay otras garantías:; La Comp; Cómo obtener el servicio cubierto por la garantía:
- 7 - Garantía limitada Periodo y exclusiones de la garantía: Broan-NuTone LLC o Venmar Ventilation ULC (sea esta la “Comp añía ”) garantiza al consumidor comprador original de su producto (“usted”) que el producto (el “Producto”) estará libre de defectos en materiales o en mano de obra, por un peri...