Page 2 - IMPORTANT; READ AND SAVE THESE INSTRUCTIONS.
2 Disclaimer Climate Technologies reserves the right to make alterations to specifications, quantities, dimensions etc. for production or other reasons, subsequent to publication. While we believe the information is accurate and complete, we make no warranty or representation for any particular purp...
Page 3 - General Safety Information; Complete the unit assembly before attempting to operate.
3 1. General Safety Information Thank you for purchasing a quality Bonaire Evaporative Portable Cooler. We care about your safety and would ask you to spend a few minutes reading these simple instructions before operating this product. Safety! Read carefully prior to attempting to assemble, install,...
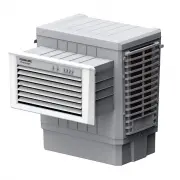
Page 4 - Do not allow children to operate or service this cooler.; Product Description
4 - Do not use the power cord with an adaptor plug that converts the 3-pin plug into a 2-prong connector. - If the power cord is damaged, it should be replaced by a service agent or qualified personnel to avoid risk of bodily injury or property damage. - Remove the plug from the electrical receptacl...
Page 5 - Product Specifications
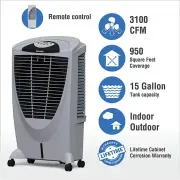
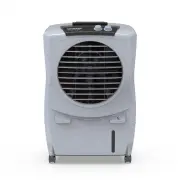
5 3. Unpacking Handle the unit with care. Visually inspect for shipping damage. If any part is damaged, immediately file a claim with the carrier. 4. Product Specifications Model Bonaire Durango 3100 Voltage 120 VAC, 60 Hz, 1 phase Amperage 1.9A Tank Capacity 15 gal (57L) N.W. 28.7 lbs (13kg) Dimens...
Page 7 - Electrical Connection and Installation; Install the cooler on a flat, level surface.; Remote Control; colour at ON position and RED colour at OFF position.; WATER LEVEL
7 5. Electrical Connection and Installation 1. Wheel Installation: Insert all the five small wheels into the round holes at the bottom. 2. Install the cooler on a flat, level surface. 3. Adjustable Up and Down louvre: The Up and Down Louvres can be adjusted using the protruded tab shown on Page 5. 4...
Page 8 - Air Renewal Requirements:; WARNING; Changing the filter pads:
8 short period. During cooling mode, if water depletes and triggers the alarm, add water to tank through “ front water inlet ” , and press COOL button to turn cooling function on again. REMOTE CONTROL (Batteries not included) : Open the battery compartment at the back of the remote control and inser...
Page 10 - Remove and replace the filter pads.
10 3- The filter pads are secured in place with two brackets on top and bottom. Remove the four screws to be able to remove the filter pads. 4- Remove and replace the filter pads. 5- Assemble in reverse order, ensuring the panels are fitted correctly with no gaps or tabs left outside. Remove Screws ...
Page 11 - Troubleshooting
11 8. Wiring Diagram 9. How to change controller batteries 1. Press pad with thumb and slide battery cover off. 2. Remove old batteries and insert new batteries according to orientation shown on controller. 3. Slide cover back into position, while pressing pad. WARNING A. Do not mix old and new batt...
Page 12 - Supplier’s Declaration of Conformity; This device complies with part 15 of the FCC rules.; Warranty; at the nominated phase, voltage and frequency.
12 Problem Reason Solution No air flow 1. Power is not connected. 2. Power is not turned ON. 3. Body damaged. 1.Plug in the power cable properly. 2.Press the Air Speed button to start. 3.Return to Service Center. Abnormal Sound 1.Foreign article inside body of unit. 2.Loose air fan. 3.Motor defect. ...
Page 14 - How to obtain service; the duration of warranty delineated in “Warranty”; Climate Technologies Pty Ltd; Parts replace under warranty are warranted for the balance of; Proof of Purchase
14 p) The benefits conferred by this warranty are in addition to warranties and other rights in respect of the appliance, which the consumer has under State and Federal laws. This warranty must be read subject to that legislation and nothing in this warranty has the effect of excluding, restricting ...
Page 16 - El manual del propietario; Enfriador de aire evaporativo; No vuelvas a la tienda; Para ayuda con la instalación o problemas de garantía; Para obtener piezas, visite nuestro sitio web seguro:; Durango
16 El manual del propietario Enfriador de aire evaporativo Bonaire Durango 3100 No vuelvas a la tienda Para ayuda con la instalación o problemas de garantía Llamada: 800-939-2983 or Visitar: www.bonaire-usa.com Para obtener piezas, visite nuestro sitio web seguro: www.bonairedurango.com Durango
Page 17 - IMPORTANTE; LEA Y GUARDE ESTAS INSTRUCCIONES.
17 Descargo de responsabilidad Climate Technologies se reserva el derecho de realizar modificaciones en las especificaciones, cantidades, dimensiones, etc. por motivos de producción u otros, con posterioridad a la publicación. Si bien creemos que la información es precisa y completa, no ofrecemos ga...
Page 18 - Información general de seguridad; Lea y guarde estas instrucciones. No deseche estas instrucciones; No utilice el enfriador en superficies irregulares o inestables.
18 1. Información general de seguridad Gracias por adquirir un enfriador evaporativo portátil de calidad Bonaire. Nos preocupamos por su seguridad y le pedimos que dedique unos minutos a leer estas sencillas instrucciones antes de utilizar este producto. La seguridad! Lea atentamente antes de intent...
Page 19 - No permita que los niños operen o den servicio a este enfriador.; Descripción del producto
19 - Si el cable de alimentación está dañado, debe ser reemplazado por un agente de servicio o personal calificado para evitar el riesgo de lesiones corporales o daños a la propiedad. - Retire el enchufe del tomacorriente tirando del enchufe y no del cable. - Utilice únicamente electricistas calific...
Page 20 - Especificaciones del producto
20 3. Desembalaje Maneje la unidad con cuidado. Inspeccione visualmente por daños durante el envío. Si alguna pieza está dañada, presente inmediatamente una reclamación al transportista. 4. Especificaciones del producto Modelo Bonaire Durango 3100 voltaje 120 VAC, 60 Hz, 1 phase Amperaje 1.9A Capaci...
Page 22 - Conexión e instalación eléctrica; Panel de control y control remoto
22 5. Conexión e instalación eléctrica 1. Instalación de ruedas: Inserte las cinco ruedas pequeñas en los orificios redondos de la parte inferior. 2. Instale el enfriador en una superficie plana y nivelada. 3. Lama ajustable hacia arriba y hacia abajo: Las lamas hacia arriba y hacia abajo se pueden ...
Page 23 - NIVEL DEL AGUA; : Abra el compartimiento de la batería en la parte; Requisitos de renovación de aire:; ADVERTENCIA; Cambiar las almohadillas de filtro:
23 5. TIMER [ ] : Presione el botón para configurar el temporizador de APAGADO en 1-7 horas en intervalos de 1 hora. El icono del temporizador se iluminará cuando el temporizador esté encendido y los LED brillantes indicarán el tiempo total de apagado configurado. 6. NIVEL DEL AGUA : La luz LED es b...
Page 25 - Retire y reemplace las almohadillas de filtro.
25 3- Las almohadillas de filtro se aseguran en su lugar con dos soportes en la parte superior e inferior. Quite los cuatro tornillos para poder quitar las almohadillas del filtro. 4- Retire y reemplace las almohadillas de filtro. 5- Ensamble en orden inverso, asegurándose de que los paneles estén c...
Page 26 - Diagrama de cableado; Retire las baterías viejas e inserte las baterías nuevas según la
26 8. Diagrama de cableado 9. Cómo cambiar las baterías del controlador 1. Presione la almohadilla con el pulgar y deslice la tapa de la batería hacia afuera. 2. Retire las baterías viejas e inserte las baterías nuevas según la orientación que se muestra en el controlador. 3. Deslice la cubierta nue...
Page 27 - Solución de problemas; Problema; Declaración de conformidad del proveedor; Este dispositivo cumple con la parte 15 de las reglas de la FCC.; Garantía
27 10. Solución de problemas Problema Razón Solución Sin flujo de aire 1. La energía no está conectada. 2. La energía no está encendida. 3. Cuerpo dañado. 1. Enchufe el cable de alimentación correctamente. 2. Presione el botón Air Speed para comenzar. 3. Regrese al Centro de Servicio. Sonido anormal...
Page 29 - Todas las garantías son intransferibles.; Cómo obtener servicio
29 m) No se acepta responsabilidad u obligación por daños al contenido, alfombras, paredes, techos, cimientos o cualquier otra pérdida o daño consecuente de cualquier naturaleza, ya sea directo o indirecto, que resulte de la instalación, operación o mal uso del aparato. n) Las piezas reemplazadas ba...
Page 30 - Información del distribuidor / producto
30 Información del distribuidor / producto Distribuidor / Minorista: La dirección: Número de teléfono: Número de modelo de la unidad: Número de serie: LA ACEPTACIÓN DE LOS REMEDIOS EXCLUSIVOS DE REPARACIÓN Y REEMPLAZO DESCRITOS AQUÍ ES UNA CONDICIÓN DEL CONTRATO PARA LA COMPRA DE CADA PRODUCTO DE RE...