Page 2 - SAFETY GUIDELINES - DEFINITIONS; GENERAL POWER TOOL SAFETY WARNINGS; SAVE THESE INSTRUCTIONS
2 2) ELECTRICAL SAFETY a) Power tool plugs must match the outlet. Never modify the plug in any way. Do not use any adapter plugs with earthed (grounded) power tools. Unmodified plugs and matching outlets will reduce risk of electric shock. b) Avoid body contact with earthed or grounded surfaces such...
Page 3 - Use of any other battery packs may create a risk of; HEDGE TRIMMER SAFETY WARNINGS
all times. This enables better control of the power tool in unexpected situations. f) Dress properly. Do not wear loose clothing or jewelry. Keep your hair, clothing and gloves away from moving parts. Loose clothes, jewelry or long hair can be caught in moving parts. g) If devices are provided for t...
Page 4 - Symbols; reciprocation per minute; IMPORTANT SAFETY INSTRUCTIONS; The charger and battery
4 • Check the hedge for foreign objects, e.g. wire fences. CAUTION: Do not expose to rain. WARNING: Remove plug from the outlet immediately if the extension cord becomes damaged or cut. WARNING: Some dust created by this product contains chemicals known to the State of California to cause cancer, bi...
Page 5 - IMPORTANT SAFETY WARNINGS; the battery pack and charger, read the safety instructions below.; READ ALL INSTRUCTIONS; Burn hazard. Battery liquid may be flammable if
5 center when service or repair is required. Incorrect reassembly may result in a risk of electric shock, electrocution or fire. • Disconnect the charger from the outlet before attempting any cleaning. This will reduce the risk of electric shock. Removing the battery pack will not reduce this risk. ...
Page 6 - COMPONENTS
6 exposed to spark or flame. • Charge the battery packs only in BLACK+DECKER chargers. • DO NOT splash or immerse in water or other liquids. This may cause premature cell failure. • Do not store or use the tool and battery pack in locations where the temperature may reach or exceed 105°F (40˚C) (suc...
Page 7 - CHARGING PROCEDURE; Never attempt to open the battery pack for any
7 CHARGING PROCEDURE BLACK+DECKER chargers are designed to charge BLACK+DECKER battery packs. 1. Plug the charger into an appropriate outlet before inserting the battery pack. 2. Insert the battery pack into the charger. 3. The green LED will flash indicating that the battery is being charged. 4. Th...
Page 8 - INSTALLING / REMOVING BATTERY PACK; Make certain the lock-off button is engaged to; ASSEMBLY INSTRUCTIONS
INSTALLING / REMOVING BATTERY PACK WARNING: Make certain the lock-off button is engaged to prevent switch actuation before removing or installing battery. TO INSTALL BATTERY PACK: Insert battery pack into tool until fully seated and an audible click is heard ( figure 2 ). Make sure battery pack is f...
Page 10 - ACCESSORIES; DO NOT; THE RBRCTM SEAL; SERVICE INFORMATION
10 ACCESSORIES WARNING: DO NOT use the Hedge Trimmer with any type of accessory or attachment. Such usage might be hazardous. THE RBRC™ SEAL The RBRC™ (Rechargeable Battery Recycling Corporation) Seal on the LI-ION battery (or battery pack) indicates that the costs to recycle the battery (or battery...
Page 11 - THREE-YEAR LIMITED WARRANTY
11 THREE-YEAR LIMITED WARRANTY Black & Decker (U.S.) Inc. warranties this product to be free from defects in material or workmanship for a period of three (3) years following the date of purchase, provided that the product is used in a home environment. This limited warranty does not cover failu...
Page 12 - TROUBLESHOOTING; Problem Possible Cause
12 TROUBLESHOOTING Problem Possible Cause Possible Solution • Slow running, noisy or hot blades. • Dry, corroded blades. • Lubricate blades. • Blades or blade support bent. • Straighten blade or blade support. • Bent or damaged teeth. • Straighten teeth. • Loose blade bolts. • Tighten blade bolts. •...
Page 13 - MANUEL D’INSTRUCTIONS; CONSERVER CE MODE D’EMPLOI POUR UN USAGE ULTÉRIEUR.
13 • Utiliser uniquement avec un bloc-piles de 36 V ou de 40 V max* de série LB de B+D. MANUEL D’INSTRUCTIONS TAILLE-HAIE, 40 V MAX.* MERCI D’AVOIR CHOISI BLACK + DECKER! À LIRE AVANT DE RETOURNER CE PRODUIT POUR QUELQUE RAISON QUE CE SOIT: Si des questions ou des problèmes surgissent après l’achat ...
Page 14 - Conserver tous les avertissements et toutes les
14 LIGNES DIRECTRICES EN MATIÈRE DE SÉCURITÉ - DÉFINITIONS Il est important que vous lisiez et compreniez ce mode d’emploi. Les informations qu’il contient concernent VOTRE SÉCURITÉ et visent à ÉVITER TOUT PROBLÈME. Les symboles ci-dessous servent à vous aider à reconnaître cette information. DANGER...
Page 16 - AVERTISSEMENTS DE SÉCURITÉ POUR LE; L’étiquette apposée sur votre outil peut comprendre les; DIRECTIVES DE SÉCURITÉ IMPORTANTES POUR
16 obtenir des soins médicaux. Le liquide qui gicle hors du bloc-piles peut provoquer des irritations ou des brûlures. 6) RÉPARATION a) Faire réparer l’outil électrique par un réparateur professionnel en n’utilisant que des pièces de rechange identiques. Cela permettra de maintenir une utilisation s...
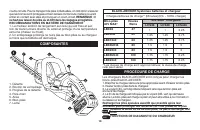
Page 19 - PROCÉDURE DE CHARGE; Recharger les piles épuisées aussitôt que possible après leur; COMPOSANTES
19 PROCÉDURE DE CHARGE Les chargeurs BLACK+DECKER sont conçus pour charger les blocs-piles BLACK+DECKER. 1. Brancher le chargeur dans une prise appropriée avant d’insérer le bloc-piles. 2. Insérer le bloc-piles dans le chargeur. 3. Le voyant DEL vert clignotera indiquant ainsi que le bloc-piles est ...
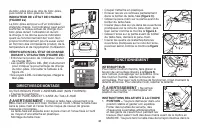
Page 20 - risque de choc électrique.; ne jamais; INSERTION ET RETRAIT DU BLOC-PILES DE L’OUTIL; S’assurer que le bouton de verrouillage est bien; PILE EN MAUVAIS ÉTAT
20 a. vérifier le courant à la prise en branchant une lampe ou un autre appareil électrique; b. vérifier si la prise est reliée à un interrupteur mural qui la met hors tension lorsque la lumière sont éteinte; c. déplacer le chargeur et le bloc-piles dans un endroit où la température ambiante est ent...
Page 22 - ENTRETIEN
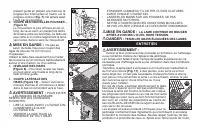
22 présent guide en plaçant une main sur la poignée de l’interrupteur et l’autre, sur la poignée-contour (fig. 7) . Ne jamais saisir l’outil par le protecteur. 2. COUPE DES NOUVELLES POUSSES – ( Figure 8) Le mouvement le plus efficace en est un long, de va-et-vient, en plaçant les dents de la lame e...
Page 23 - ACCESSOIRES; NE PAS; INFORMATION SUR LES RÉPARATIONS
se servir d’un savon doux et d’un chiffon humide pour nettoyer l’outil. Ne jamais laisser un liquide s’infiltrer dans l’outil; ne jamais immerger l’outil. Empêcher les lames de rouiller en les enduisant d’une mince pellicule d’huile légère pour machines après les avoir nettoyées.Cet appareil est con...
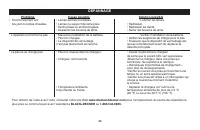
Page 25 - DEPANNAGE; Problème Cause possible
DEPANNAGE Problème Cause possible Solution possible • Fonctionnement lent • Lames sèches/corrodées. • Lubrifier les lames. bruyant ou lames chaudes. • Lames ou support de lame pliés. • Redresser. • Dents pliées ou endommagées. • Redresser les dents. • Desserrer les boulons de lame. • Serrer les boul...
Page 26 - MANUAL DE INSTRUCCIONES; GRACIAS POR ELEGIR
26 MANUAL DE INSTRUCCIONES PODADORA DE SETOS 40 V MÁX.* GRACIAS POR ELEGIR BLACK+DECKER ! LEA EL MANUAL ANTES DE DEVOLVER ESTE PRODUCTO POR CUALQUIER MOTIVO: Si tiene una consulta o algún inconveniente con su producto BLACK+DECKER , visite http://www.blackanddecker.com/instantanswers para obtener re...
Page 27 - PAUTAS DE SEGURIDAD/DEFINICIONES
27 2) Seguridad eléctrica a) Los enchufes de la herramienta eléctrica deben adaptarse al tomacorriente. Nunca modifique el enchufe de ninguna manera. No utilice ningún enchufe adaptador con herramientas eléctricas con conexión a tierra. Los enchufes no modificados y que se adaptan a los tomacorrient...
Page 29 - ADVERTENCIAS DE SEGURIDAD PARA CORTASETOS; superficies de agarre aisladas, ya que la hoja de corte podría; Simbolos; o AC; INSTRUCCIONES DE SEGURIDAD IMPORTANTES
29 busque atención médica. El líquido expulsado de la batería puede provocar irritación o quemaduras. 6) Mantenimiento a) Haga que una persona de reparaciones calificada realice el mantenimiento de su herramienta eléctrica y utilice piezas de repuesto idénticas solamente. Esto garantizará la segurid...
Page 31 - El paquete de baterías incluido en la caja no está completamente; LEA TODAS LAS INSTRUCCIONES; iones de LI-ION no deben colocarse dentro del equipaje registrado.
• NUNCA intente conectar 2 cargadores juntos . • El cargador está diseñado para operar con corriente eléctrica doméstica estándar (120 voltios). No intente utilizarlo con otro voltaje. CONSERVE ESTAS INSTRUCCIONES INSTRUCCIONES DE SEGURIDAD IMPORTANTES PARA LOS PAQUETES DE BATERÍAS ADVERTENCIA: Para...
Page 33 - Riesgo de descarga eléctrica.; Nunca intente abrir el paquete de baterías por ningún motivo. Si la; INSTALACIÓN Y EXTRACCIÓN DEL PAQUETE DE; Asegúrese de que el botón de bloqueo esté; PARA EXTRAER EL PAQUETE DE
33 cargar un paquete de baterías parcialmente usado cuando se desee, sin ningún efecto negativo sobre éstas. 5. Se deben mantener lejos de las cavidades del cargador los materiales extraños de naturaleza conductora, entre los que se incluyen la lana de acero, el papel de aluminio o cualquier acumula...
Page 34 - Figura 4; INSTRUCCIONES DE OPERACIÓN; INTERRUPTOR
34 estado de la carga. Esto se puede utilizar para visualizar el nivel actual de carga de la batería durante el uso y durante la carga. No indica el nivel de funcionalidad de la herramienta y puede variar de acuerdo a las piezas del producto, la temperatura y la aplicación que el usuario le dé. Veri...
Page 35 - MANTENIMIENTO
35 CONSERVE EL MANUAL. • COMPRUEBE SI EXISTEN OBJETOS EXTRAÑOS EN EL SETO COMO CABLES O CERCOS ANTES DE CADA USO. • CONSERVE LAS MANOS EN LOS MANGOS. NO SE SOBRE EXTIENDA. • NO SE UTILICE EN CONDICIONES DE MUCHA HUMEDAD. PRECAUCIÓN: LA CUCHILLA GIRA DESPUES DE APAGAR. PELIGRO: MANTENGA LAS MANOS ALE...
Page 36 - ACCESORIOS; EL SELLO RBRCTM; INFORMACIÓN DE MANTENIMIENTO
36 BLACK+DECKER para que la reparen antes de volverla a utilizar. Los fertilizantes y otros productos químicos para jardinería contienen agentes que aceleran la corrosión en los metales. No guarde la herramienta en lugares adyacentes a fertilizantes u otros productos químicos. Después de quitar la b...
Page 37 - GARANTÍA LIMITADA DE TRES AÑOS
37 los clientes un servicio eficiente y confiable en la reparación de herramientas eléctricas. Si necesita consejo técnico, reparaciones o piezas de repuesto originales de fábrica, póngase en contacto con el centro de servicio de BLACK+DECKER más cercano a su domicilio. Para ubicar su centro de serv...
Page 38 - DETECCION DE PROBLEMAS; Problema
38 DETECCION DE PROBLEMAS Problema Causa posible Solución posible • Funcionamiento lento • Hojas secas/oxidadas. • Lubrique las hojas. y ruidoso u hojas calientes. • Hojas o soporte de la hoja doblados. • Enderécelos. • Dientes doblados o dañados. • Enderece los dientes. • Pernos de la hoja sueltos....
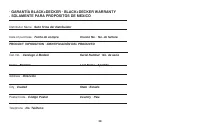
Page 39 - PRODUCT INFOMATION · IDENTIFICACIÓN DEL PRODUCTO
39 · GARANTÍA BLACK+DECKER · BLACK+DECKER WARRANTY . SOLAMENTE PARA PROPOSITOS DE MEXICO Distributor Name · Sello firma del distribuidor Date of purchase · Fecha de compra Invoice No. · No. de factura PRODUCT INFOMATION · IDENTIFICACIÓN DEL PRODUCTO Cat. No. · Catalogo ó Modelo Serial Number · No. d...


 Black & Decker BEHTS300
User Manual
Black & Decker BEHTS300
User Manual
 Black & Decker GSL35
User Manual
Black & Decker GSL35
User Manual
 Black & Decker HH2455
User Manual
Black & Decker HH2455
User Manual
 Black & Decker HT20
User Manual
Black & Decker HT20
User Manual
 Black & Decker LHT218C1
User Manual
Black & Decker LHT218C1
User Manual
 Black & Decker LHT2220
User Manual
Black & Decker LHT2220
User Manual
 Black & Decker LHT2220B
User Manual
Black & Decker LHT2220B
User Manual
 Black & Decker LHT2436B
User Manual
Black & Decker LHT2436B
User Manual
 Black & Decker LHT321
User Manual
Black & Decker LHT321
User Manual
 Black & Decker LHT341
User Manual
Black & Decker LHT341
User Manual
 Black & Decker LPHT120
User Manual
Black & Decker LPHT120
User Manual