Page 2 - CONTENTS; SAFETY INFORMATION
Page 2 ENGLISH CONTENTS PRODUCT REGISTRATION SAFETY INFORMATION Important Safety Instructions ..........................................................................................................................................3-5Important Installation Information .................................
Page 3 - WARNING; CAUTION; IMPORTANT SAFETY INSTRUCTIONS; WARNING; when using electrical appliances, basic safety precautions
Page 3 ENGLISH SAFETY INFORMATION DANGER DANGER - Immediate hazards which WILL result in severe personal injury or death WARNING WARNING - Hazards or unsafe practices which COULD result in severe personal injury or death CAUTION CAUTION - Hazards or unsafe practices which COULD result in minor perso...
Page 5 - SAVE THESE INSTRUCTIONS; HOUSEHOLD USE ONLY
Page 5 ENGLISH 29. This machine shall be repaired only by an authorized service center and only authentic accessories can be used. 30. An appliance shall be clearly and permanently marked with a warning that the appliance is intended for use only with fabrics that have been washed with water as a cl...
Page 6 - IMPORTANT INSTALLATION INFORMATION; WHEN NOT IN USE
Page 6 ENGLISH SET UP & USE IMPORTANT INSTALLATION INFORMATION 1. This unit must be properly installed and located according to the installation instructions before it is used. 2. Store and install the washer where it will not be exposed to temperatures below freezing or exposed to outdoor weath...
Page 7 - QUICK START GUIDE; Before First Use
Page 7 ENGLISH SET UP & USE QUICK START GUIDE Default settings can be changed. See USING THE CONTROL PANEL section for more details. 1. Add HE detergent to the detergent dispenser according to detergent manufacturer’s instructions. HE detergent pods can be added to the wash tub before adding clo...
Page 8 - CONTROL PANEL
Page 8 ENGLISH SET UP & USE CONTROL PANEL On/Off Press once to turn the washing machine on, press again to turn the washing machine off. LED Display Selector Dial Start/Pause Press the button to start or pause the wash cycle. Buzzer Time Save
Page 9 - Wash Program Chart
Page 9 ENGLISH SET UP & USE 1. ON/OFF Press to turn the POWER ON. Press again to turn it OFF. 2. Selector Dial Turn the dial to select the cycle. My cycle This is a setting to save a frequently used program. Select the settings you wish to save. Press and hold SPIN for 3 seconds. The will illumi...
Page 10 - TO CHANGE DEFAULT SETTINGS ON THE LED DISPLAY
Page 10 ENGLISH SET UP & USE TO CHANGE DEFAULT SETTINGS ON THE LED DISPLAY The default settings will be illuminated on the control panel. To change the default temperature, press the Temp button on the control panel repeatedly to scroll through the selections. To change the spin speed, press Spi...
Page 11 - Press START/PAUSE to pause a cycle and to add a garment.; To add a Garment
Page 11 ENGLISH SET UP & USE 6. Temp Press Temp continuously to scroll through the selections: Hot+, Hot, Warm, Eco, Cold. The selected temperature will be illuminated on the LED Display. 7. Spin Press Spin continuously to scroll through the selections: Highest, High, Med, Low, No Spin. The sele...
Page 12 - USING THE WASHER; Detergent
Page 12 ENGLISH NOTE: In case of disruption of power supply while operating the program, Press Start/Pause to resume. USING THE WASHER WARNING: Never insert hands inside washer until drum stops spinning. Do not insert any fabric with gasoline, petroleum, benzene, paint thinner, alcohol or any other ...
Page 13 - Sorting and Loading
Page 13 ENGLISH SET UP & USE Sorting and Loading 1. Before loading your laundry, be sure to take out coins, keys and other hard objects, and fasten all hooks and zippers. 2. Follow manufacturer’s instructions on clothing tag for washing instructions. Sort laundry according to color (light, mediu...
Page 14 - CLEANING AND MAINTENANCE; Cleaning the exterior; CLEANING AND CARE
Page 14 ENGLISH CLEANING AND MAINTENANCE WARNING: Unplug the power cord before cleaning any part of the unit. The washer should be cleaned regularly. Failure to maintain the unit in a clean condition could lead to deterioration of the surface which could adversely affect the life of the appliance. D...
Page 15 - Cleaning the Inlet Filter
Page 15 ENGLISH Cleaning the Inlet Filter Shut off the water supply and disconnect the inlet hose. Pull out the filter with pliers, removing as shown. Clean the filter and reinstall it. Reconnect the inlet hose.Turn on the water supply and make sure there is no water leakage. Drain Pump Filter: The ...
Page 17 - INSTALLATION INSTRUCTIONS; INSTALLATION WARNINGS
Page 17 ENGLISH INSTALLATION INSTRUCTIONS WARNING: 1. Plug the power cord into an AC 120V/60Hz wall socket rated at 15 amps or higher. Use the socket for this washer only. 2. Do not use an extension cord. - Sharing a wall socket with another appliance, using a power strip, or extending the power cor...
Page 19 - GROUNDING INSTRUCTIONS; Electrical grounding is required for this washer.
Page 19 ENGLISH GROUNDING INSTRUCTIONS Consult a qualified electrician or serviceman if: 1) The grounding instructions are not completely understood.2) You are unsure that the appliance is properly grounded.3) You have any questions about the grounding or electrical instructions. Do not modify the p...
Page 20 - USAGE AND
Page 20 ENGLISH INSTALLATION INSTRUCTIONS WARNING: 1. If the appliance is flooded, cut the power immediately and contact your nearest service center. 2. If the appliance emits a strange noise, a burning smell, or smoke, unplug the power plug immediately and contact your nearest service center. - Fai...
Page 24 - to avoid damage to the unit.
Page 24 ENGLISH INSTALLATION INSTRUCTIONS TRANSPORTING THE MACHINE 1. Transport bolts need to be reinstalled to the machine prior to moving to avoid damage to the unit. 2. Accumulated water should be drained out of the machine prior to moving. 3. Handle the machine carefully. The door can not be use...
Page 25 - REMOVING THE TRANSPORT BOLTS
Page 25 ENGLISH REMOVING THE TRANSPORT BOLTS Before using this washing machine, the transport bolts must be removed from the back of this machine. 1. Loosen all bolts with a wrench to remove. 2. Cover the holes with provided transport hole plugs. 3. Keep the transport bolts in a safe place for futur...
Page 27 - TOOLS NEEDED; FLOORING; ELECTRIC
Page 27 ENGLISH TOOLS NEEDED Siphon break kit, additional hoses or other parts could be purchased separately depending on selected drainage method. Please check your local hardware store. Adjustable wrench Channel-lock adjustable pliers Level INSTALLATION INSTRUCTIONS CHOOSE THE PROPER LOCATION FLOO...
Page 28 - WATER SUPPLY; DRAINING
Page 28 ENGLISH WATER SUPPLY To correctly fill your washer in the proper amount of time, water pressure of 20 to 100 psi (100 to 500kPa) is required. Water pressure less than 20psi may cause water valve failure, or may not allow the water valve to shut off completely, or may extend the fill time bey...
Page 29 - CLEARANCE REQUIRED FOR BUILT-IN APPLICATION; Floor Drain
Page 29 ENGLISH CLEARANCE REQUIRED FOR BUILT-IN APPLICATION Location and clearance should be considered for ease of installation and servicing. INSTALLATION CLEARANCES The location must be large enough to allow the washer door to be fully opened. The door opens more than 90° and it is not reversible...
Page 30 - Leveling the Washer; Connecting the Inlet Hoses
Page 30 ENGLISH Leveling the Washer When moving the unit to the final location make sure the leveling legs are positioned close to the washer and not extended to avoid damage to the leveling legs. The leveling legs can be adjusted by turning them to raise or lower the leg with an adjustable wrench (...
Page 31 - TROUBLESHOOTING & WARRANTY; IMPORTANT; DO NOT RETURN THIS PRODUCT TO THE STORE
Page 31 ENGLISH TROUBLESHOOTING & WARRANTY BEFORE YOU CALL FOR SERVICE IF THE UNIT FAILS TO OPERATE: A) Check to make sure that the unit is plugged in securely. If it is not, remove the plug from the outlet, wait 10 seconds and plug it in again securely. B) Check for a blown circuit fuse or a tr...
Page 32 - SYMPTOMS
Page 32 ENGLISH TROUBLESHOOTING & WARRANTY TROUBLESHOOTING Troubleshoot your problem by using the chart below. If the unit still does not work properly, contact W Appliance Co. customer service center or the nearest authorized service center. Customer must never troubleshoot internal components....
Page 35 - LIMITED WARRANTY
Page 35 ENGLISH LIMITED WARRANTY Any repair, replacement, or warranty service, and all questions about this product should be directed to W Appliance Co. at 844-299-0879 from the USA or Puerto Rico. W Appliance Co. warrants to the original purchaser that the product will be free from defects in mate...
Page 36 - Printed in China
BLACK & DECKER, BLACK+DECKER, the BLACK & DECKER and BLACK+DECKER logos and product names and the orange and black color scheme are trademarks of The Black & Decker Corporation, used under license. All rights reserved. Product in this box may differ slightly from that pictured. Does not ...
Page 37 - MANUEL D’INSTRUCTIONS; LAVEUSE À CHARGE; VEUILLEZ LIRE AVANT DE RETOURNER CE PRODUIT POUR
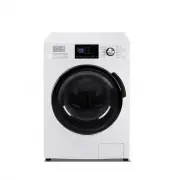
Page 37 MANUEL D’INSTRUCTIONS LAVEUSE À CHARGE FRONTAL 2.7 PI. CU. Merci d’avoir choisi BLACK+DECKER ! VEUILLEZ LIRE AVANT DE RETOURNER CE PRODUIT POUR UNE RAISON QUELCONQUE. Si vous avez une question ou avez un problème avec votre achat BLACK+DECKER, allez sur www.blackanddecker.com/instantanswers....
Page 38 - TABLE DES MATIÈRES; INFORMATION SUR LA SÉCURITÉ
Page 38 FRANÇAIS TABLE DES MATIÈRES ENREGISTREMENT DU PRODUIT INFORMATION SUR LA SÉCURITÉ Consignes de Sécurité Importantes ........................................................................................................................ 39-41Informations Importantes sur l’Installation .........
Page 39 - CONSIGNES DE SÉCURITÉ IMPORTANTES; AVERTISSEMENT; ATTENTION
Page 39 FRANÇAIS INFORMATION SUR LA SÉCURITÉ 1. LISEZ TOUTES LES INSTRUCTIONS AVANT D’UTILISER L’APPAREIL.2. Ne lavez pas les articles qui ont été préalablement nettoyés, lavés, trempés ou tachés d’essence, de solvants de nettoyage à sec ou d’autres substances inflammables ou explosives, car ils dég...
Page 41 - GARDEZ CES INSTRUCTIONS; USAGE MÉNAGER UNIQUEMENT
Page 41 FRANÇAIS 26. Veillez à ce que la tension et la fréquence d’alimentation soient identiques à celles de la laveuse. 27. N’utilisez pas de prise avec un courant nominal inférieur à celui de la laveuse. Ne débranchez jamais la prise d’alimentation avec les mains mouillées. 28. Pour assurer votre...
Page 42 - CONFIGURATION ET UTILISATION; LORSQU’IL N’EST PAS UTILISÉ
Page 42 FRANÇAIS CONFIGURATION ET UTILISATION INFORMATIONS IMPORTANTES SUR L’INSTALLATION 1. Cet appareil doit être correctement installé et placé conformément aux instructions d’installation avant d’être utilisé. 2. Rangez et installez la laveuse à un endroit où elle ne sera pas exposée à des tempé...
Page 43 - Avant la Première Utilisation
Page 43 FRANÇAIS CONFIGURATION ET UTILISATION GUIDE DE DÉMARRAGE RAPIDE Les réglages par défaut peuvent être modifiés. Voir la section UTILISATION DU PANNEAU DE COMMANDE pour plus de détails. 1. Ajoutez du détergent HE dans le distributeur de détergent conformément aux instructions du fabricant du d...
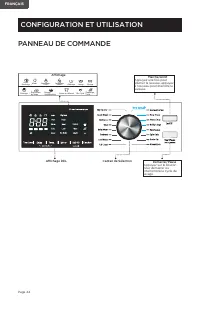
Page 45 - Cadran de Sélection; Tableau des Programmes De Lavage
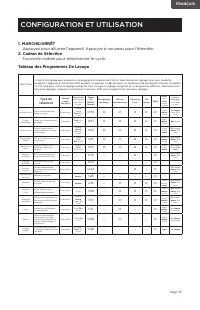
Page 45 FRANÇAIS CONFIGURATION ET UTILISATION 1. MARCHE/ARRÊT Appuyez pour allumer l’appareil. Appuyez à nouveau pour l’éteindre. 2. Cadran de Sélection Tournezle cadran pour sélectionner le cycle. Mon Cycle Il s’agit d’un réglage pour enregistrer un programme fréquemment utilisé. Sélectionnez les r...
Page 46 - POUR CHANGER LES RÉGLAGES PAR DÉFAUT SUR L’ÉCRAN DEL; Affichage du Temps
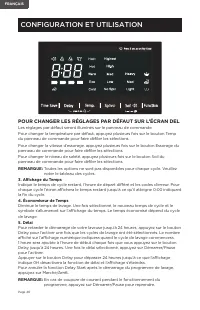
Page 46 FRANÇAIS CONFIGURATION ET UTILISATION POUR CHANGER LES RÉGLAGES PAR DÉFAUT SUR L’ÉCRAN DEL Les réglages par défaut seront illuminés sur le panneau de commande.Pour changer la température par défaut, appuyez plusieurs fois sur le bouton Temp du panneau de commande pour faire défiler les sélec...
Page 47 - Verrouillage Enfant
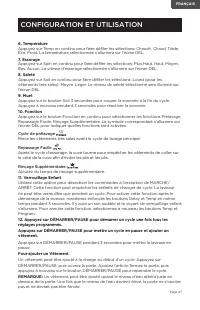
Page 47 FRANÇAIS CONFIGURATION ET UTILISATION 6. Température Appuyez sur Temp en continu pour faire défiler les sélections: Chaud+, Chaud, Tiède, Eco, Froid. La température sélectionnée s’allumera sur l’écran DEL. 7. Essorage Appuyez sur Spin en continu pour faire défiler les sélections: Plus Haut, ...
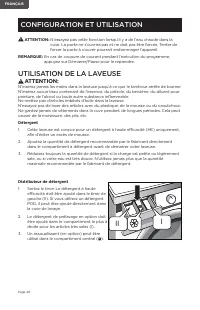
Page 48 - UTILISATION DE LA LAVEUSE; Détergent; Distributeur de détergent; II
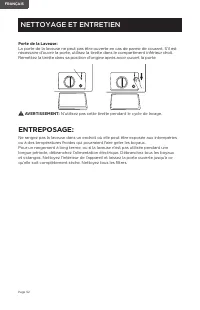
Page 48 FRANÇAIS ATTENTION: N’essayez pas cette fonction lorsqu’il y a de l’eau chaude dans la cuve. La porte ne s’ouvrira pas et ne doit pas être forcée. Tenter de forcer la porte à s’ouvrir pourrait endommager l’appareil. REMARQUE: En cas de coupure de courant pendant l’exécution du programme, app...
Page 49 - Tri et Chargement
Page 49 FRANÇAIS CONFIGURATION ET UTILISATION Tri et Chargement 1. Avant de charger votre linge, assurez-vous d’enlever les pièces de monnaie, les clés et autres objets durs, et attachez tous les crochets et fermetures à glissière. 2. Suivez les instructions du fabricant sur l’étiquette du vêtement ...
Page 50 - NETTOYAGE ET MAINTENANCE; Nettoyer l’extérieur; NETTOYAGE ET ENTRETIEN
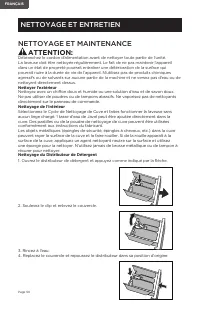
Page 50 FRANÇAIS NETTOYAGE ET MAINTENANCE ATTENTION: Débranchez le cordon d’alimentation avant de nettoyer toute partie de l’unité. La laveuse doit être nettoyée régulièrement. Le fait de ne pas maintenir l’appareil dans un état de propreté pourrait entraîner une détérioration de la surface qui pour...
Page 51 - Nettoyage du Filtre d’Admission; Filtre de la Pompe de Vidange:; Pour accéder au
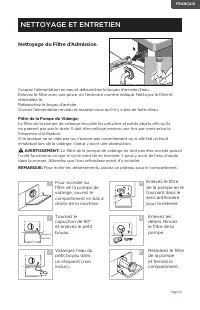
Page 51 FRANÇAIS Nettoyage du Filtre d’Admission Coupez l’alimentation en eau et débranchez le boyau d’arrivée d’eau. Enlevez le filtre avec une pince, en l’enlevant comme indiqué. Nettoyez le filtre et réinstallez-le.Rebranchez le boyau d’arrivée.Ouvrez l’alimentation en eau et assurez-vous qu’il n...
Page 53 - INSTRUCTIONS D’INSTALLATION
Page 53 FRANÇAIS INSTRUCTIONS D’INSTALLATION AVERTISSEMENT: 1. Branchez le cordon d’alimentation dans une prise murale CA 120V/60Hz évaluée à 15 ampères ou plus. Utilisez la prise pour cette laveuse uniquement. 2. N’utilisez pas de rallonge. - Le partage d’une prise murale avec un autre appareil, l’...
Page 55 - INSTRUCTIONS DE MISE À LA TERRE; Une mise à la terre électrique est requise pour cette laveuse.
Page 55 FRANÇAIS INSTRUCTIONS DE MISE À LA TERRE Consultez un électricien ou un technicien qualifié si: 1) Les instructions de mise à la terre ne sont pas complètement comprises. 2) Vous n’êtes pas sûr que l’appareil soit correctement mis à la terre. 3) Vous avez des questions sur la mise à la terre...
Page 60 - déplacement pour éviter d’endommager l’unité.
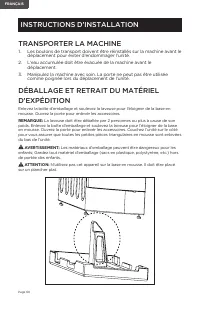
Page 60 FRANÇAIS INSTRUCTIONS D’INSTALLATION TRANSPORTER LA MACHINE 1. Les boulons de transport doivent être réinstallés sur la machine avant le déplacement pour éviter d’endommager l’unité. 2. L’eau accumulée doit être évacuée de la machine avant le déplacement. 3. Manipulez la machine avec soin. L...
Page 61 - ENLEVER LES BOULONS DE TRANSPORT
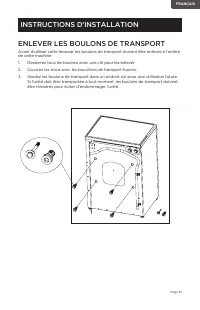
Page 61 FRANÇAIS ENLEVER LES BOULONS DE TRANSPORT Avant d’utiliser cette laveuse, les boulons de transport doivent être enlevés à l’arrière de cette machine. 1. Desserrez tous les boulons avec une clé pour les enlevér. 2. Couvrez les trous avec les bouchons de transport fournis. 3. Gardez les boulon...
Page 63 - OUTILS NÉCESSAIRES; PLANCHER; ÉLECTRIQUE
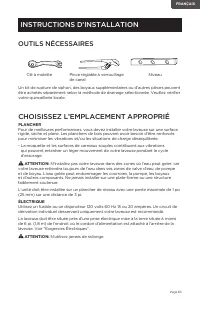
Page 63 FRANÇAIS OUTILS NÉCESSAIRES Un kit de rupture de siphon, des boyaux supplémentaires ou d’autres pièces peuvent être achetés séparément selon la méthode de drainage sélectionnée. Veuillez vérifier votre quincaillerie locale. Clé à molette Pince réglable à verrouillage de canal Niveau INSTRUCT...
Page 64 - APPROVISIONNEMENT EN EAU; VIDANGE
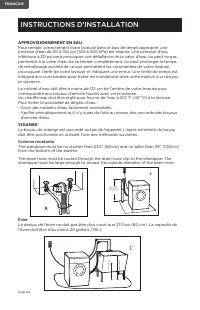
Page 64 FRANÇAIS APPROVISIONNEMENT EN EAU Pour remplir correctement votre laveuse dans le laps de temps approprié, une pression d’eau de 20 à 100 psi (100 à 500 kPa) est requise. Une pression d’eau inférieure à 20 psi peut provoquer une défaillance de la valve d’eau, ou peut ne pas permettre à la va...
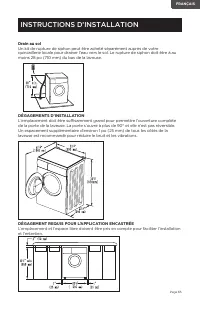
Page 65 - DÉGAGEMENT REQUIS POUR L’APPLICATION ENCASTRÉE; Drain au sol
Page 65 FRANÇAIS DÉGAGEMENT REQUIS POUR L’APPLICATION ENCASTRÉE L’emplacement et l’espace libre doivent être pris en compte pour faciliter l’installation et l’entretien. DÉGAGEMENTS D’INSTALLATION L’emplacement doit être suffisamment grand pour permettre l’ouverture complète de la porte de la laveus...
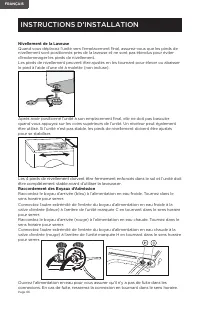
Page 66 - Nivellement de la Laveuse; Raccordement des Boyaux d’Admission
Page 66 FRANÇAIS Nivellement de la Laveuse Quand vous déplacez l’unité vers l’emplacement final, assurez-vous que les pieds de nivellement sont positionnés près de la laveuse et ne sont pas étendus pour éviter d’endommager les pieds de nivellement. Les pieds de nivellement peuvent être ajustés en le...
Page 67 - DÉPANNAGE ET GARANTIE; NE PAS RETOURNER CE PRODUIT AU MAGASIN
Page 67 FRANÇAIS DÉPANNAGE ET GARANTIE AVANT DE FAIRE APPEL AU SERVICE SI L’APPAREIL NE FONCTIONNE PAS:A) Assurez-vous que l’appareil est bien branché. Si ce n’est pas le cas, enlevez la fiche de la prise, attendez 10 secondes et rebranchez-la correctement. B) Recherchez un fusible de circuit grillé...
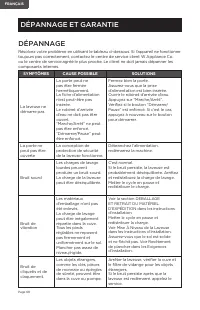
Page 68 - SYMPTÔMES
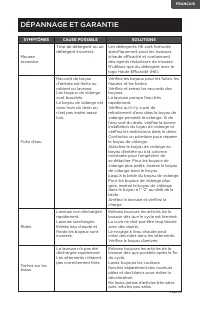
Page 68 FRANÇAIS DÉPANNAGE ET GARANTIE DÉPANNAGE Résolvez votre problème en utilisant le tableau ci-dessous. Si l’appareil ne fonctionne toujours pas correctement, contactez le centre de service client W Appliance Co. ou le centre de service agréé le plus proche. Le client ne doit jamais dépanner le...
Page 71 - GARANTIE LIMITÉE
Page 71 FRANÇAIS GARANTIE LIMITÉE Toute réparation, remplacement ou service de garantie, et toutes les questions concernant ce produit doivent être adressées à W Appliance Co. au 844-299-0879 des États-Unis ou de Porto Rico. Garantit à l’acheteur d’origine que le produit sera exempt de défauts de ma...
Page 72 - Imprimé en Chine
Page 72 BLACK & DECKER, BLACK+DECKER, les logos et noms de produits BLACK & DECKER et BLACK+DECKER et le schéma de couleur orange et noire sont des marques déposées de The Black & Decker Corporation, utilisées sous licence. Tous droits réservés. Le produit dans cette boîte peut différer ...
Page 73 - MANUAL DE INSTRUCCIONES; LAVADORA DE CARGA FRONTAL; POR FAVOR, LEA ANTES DE DEVOLVER ESTE PRODUCTO
Page 73 MANUAL DE INSTRUCCIONES 2.7 CU. FT. LAVADORA DE CARGA FRONTAL ¡Gracias por elegir BLACK+DECKER! POR FAVOR, LEA ANTES DE DEVOLVER ESTE PRODUCTO POR CUALQUIER MOTIVO. Si tiene una pregunta o experimenta un problema con su compra BLACK+DECKER, ingrese a www.blackanddecker.com/instantanswers.Si ...
Page 74 - CONTENIDO; INFORMACIÓN DE SEGURIDAD; SOLUCIÓN DE PROBLEMAS Y GARANTÍA
ESPAÑOL Page 74 CONTENIDO REGISTRO DEL PRODUCTO INFORMACIÓN DE SEGURIDAD Instrucciones importantes de seguridad .............................................................................................................. 75-77Información importante sobre la instalación ...............................
Page 75 - ADVERTENCIA; PRECAUCIÓN; INSTRUCCIONES IMPORTANTES DE SEGURIDAD; ADVERTENCIA
ESPAÑOL Page 75 INFORMACIÓN DE SEGURIDAD PELIGRO PELIGRO - Peligros inmediatos que PROVOCARÁN lesiones personales graves o la muerte ADVERTENCIA ADVERTENCIA - Peligros o prácticas inseguras que PODRÍAN provocar lesiones personales graves o la muerte PRECAUCIÓN PRECAUCIÓN - Peligros o prácticas inseg...
Page 77 - GUARDE ESTAS INSTRUCCIONES; USO DOMÉSTICO SOLAMENTE
ESPAÑOL Page 77 26. Asegúrese de que el voltaje y la frecuencia de alimentación sean idénticos a los de la lavadora. 27. No utilice ningún enchufe con una corriente nominal inferior a la de la lavadora. No extraiga nunca el enchufe con la mano húmeda. 28. Para garantizar su seguridad, el enchufe del...
Page 78 - INSTALACIÓN Y USO; CUANDO NO ESTÉ EN USO
ESPAÑOL Page 78 INSTALACIÓN Y USO INFORMACIÓN IMPORTANTE SOBRE LA INSTALACIÓN 1. Esta unidad debe estar correctamente instalada y ubicada de acuerdo con las instrucciones de instalación antes de ser utilizada. 2. Almacene e instale la lavadora en un lugar donde no esté expuesta a temperaturas bajo c...
Page 79 - Antes del primer uso
ESPAÑOL Page 79 INSTALACIÓN Y USO GUÍA DE INICIO RÁPIDO Los ajustes predeterminados se pueden cambiar. Consulte la sección USO DEL PANEL DE CONTROL para obtener más información. 1. Añada detergente HE en el dispensador de detergente según las instrucciones del fabricante del detergente. Las cápsulas...
Page 80 - CONFIGURACIÓN Y USO
ESPAÑOL Page 80 CONFIGURACIÓN Y USO PANEL DE CONTROL On/Off Pulse una vez para encender la lavadora, pulse de nuevo para apagarla. Pantalla LED Selector de dial Inicio/Pausa Pulse el botón para iniciar o pausar el ciclo de lavado. Sin timbre Centrifugado Retraso Bloqueo de la puerta Lavado Enjuague ...
Page 81 - Tabla de programas de lavado
ESPAÑOL Page 81 CONFIGURACIÓN Y USO 1. ON/OFF Pulse para encender el aparato. Pulse de nuevo para apagarlo. 2. Selector de dial Gire el dial para seleccionar el ciclo My Cycle Este es un ajuste para guardar un programa utilizado con frecuencia. Seleccione los ajustes que desea guardar. Pulse y mante...
Page 82 - PARA CAMBIAR LOS AJUSTES POR DEFECTO EN LA PANTALLA; Pantalla de tiempo
ESPAÑOL Page 82 INSTALACIÓN Y USO PARA CAMBIAR LOS AJUSTES POR DEFECTO EN LA PANTALLA LED Los ajustes por defecto se iluminan en el panel de control. Para cambiar la temperatura predeterminada, pulse el botón Temp del panel de control repetidamente para desplazarse por las selecciones. Para cambiar ...
Page 83 - Bloqueo para niños; Para añadir una prenda
ESPAÑOL Page 83 INSTALACIÓN Y USO 6. Temperatura Pulse continuamente Temp para desplazarse por las selecciones: Caliente+, Caliente, Templado, Eco, Frío. La temperatura seleccionada se iluminará en la pantalla LED. 7. Centrifugado Pulse Spin de forma continua para desplazarse por las selecciones: Má...
Page 84 - USO DE LA LAVADORA; Detergente; Dispensador de detergente
ESPAÑOL Page 84 PRECAUCIÓN: No intente esta función cuando haya agua caliente en el tambor. La puerta no se abrirá y no debe ser forzada. El intento de forzar la puerta para que se abra podría causar daños a la unidad. NOTA: En caso de interrupción del suministro eléctrico durante el funcionamiento ...
Page 85 - Clasificación y carga
ESPAÑOL Page 85 INSTALACIÓN Y USO Clasificación y carga 1. Antes de cargar la ropa, asegúrese de sacar las monedas, las llaves y otros objetos sólidos, y cierre todos los ganchos y cremalleras. 2. Siga las instrucciones del fabricante en la etiqueta de la ropa para conocer las instrucciones de lavad...
Page 86 - LIMPIEZA Y MANTENIMIENTO; Limpieza del exterior; LIMPIEZA Y CUIDADO
ESPAÑOL Page 86 LIMPIEZA Y MANTENIMIENTO ADVERTENCIA: Desenchufe el cable de corriente antes de limpiar cualquier parte de la unidad. La lavadora debe limpiarse regularmente. No mantener la unidad en condiciones de limpieza podría provocar el deterioro de la superficie, lo que podría afectar negativ...
Page 87 - Limpieza del filtro de entrada; Filtro de la bomba de desagüe:; LIMPIEZA Y CUIDADOS
ESPAÑOL Page 87 Limpieza del filtro de entrada Cierre el suministro de agua y desconecte la manguera de entrada. Saque el filtro con unos alicates, extrayéndolo tal y como se muestra. Limpie el filtro y vuelva a instalarlo.Vuelva a conectar la manguera de entrada.Abra el suministro de agua y asegúre...
Page 88 - Puerta de la lavadora:
ESPAÑOL Page 88 Puerta de la lavadora: La puerta de la lavadora no se puede abrir si hay un corte de energía. Si es necesario abrir la puerta, utilice el cordón de tracción situado en el compartimento inferior derecho. Vuelva a colocar el cordón en su posición original después de abrir la puerta. AD...
Page 89 - INSTRUCCIONES DE INSTALACIÓN
ESPAÑOL Page 89 INSTRUCCIONES DE INSTALACIÓN ADVERTENCIA: 1. Enchufe el cable de corriente en un tomacorriente de pared de 120V/60Hz con capacidad de 15 amperios o más. Utilice la toma de corriente sólo para esta lavadora. 2. No utilice un cable de extensión. - Compartir una toma de corriente con ot...
Page 91 - INSTRUCCIONES DE CONEXIÓN A TIERRA; Esta lavadora requiere una conexión a tierra.
ESPAÑOL Page 91 INSTRUCCIONES DE CONEXIÓN A TIERRA Consulte a un electricista o técnico cualificado si:1) No se entienden completamente las instrucciones de conexión a tierra. 2) No está seguro de que el aparato esté correctamente conectado a tierra. 3) Tiene alguna duda sobre la conexión a tierra o...
Page 92 - ADVERTENCIAS DE USO Y
ESPAÑOL Page 92 INSTRUCCIONES DE INSTALACIÓN ADVERTENCIA: 1. En caso de que el aparato se inunde, corte la corriente inmediatamente y póngase en contacto con el servicio técnico más cercano. 2. Si el aparato emite un ruido extraño, un olor a quemado o humo, desconecte el enchufe inmediatamente y pón...
Page 96 - de su traslado para evitar daños en la unidad.
ESPAÑOL Page 96 INSTRUCCIONES DE INSTALACIÓN TRANSPORTE DE LA MÁQUINA 1. Los tornillos de transporte deben ser reinstalados en la máquina antes de su traslado para evitar daños en la unidad. 2. El agua acumulada debe ser drenada de la máquina antes de su traslado. 3. Manipule la máquina con cuidado....
Page 99 - HERRAMIENTAS NECESARIAS; SUELO; ELECTRICIDAD
ESPAÑOL Page 99 HERRAMIENTAS NECESARIAS El kit de rotura de sifón, las mangueras adicionales u otras piezas podrían comprarse por separado dependiendo del método de drenaje seleccionado. Consulte en su ferretería local. Llave inglesa Alicates ajustables con bloqueo de canal Nivel INSTRUCCIONES DE IN...
Page 100 - SUMINISTRO DE AGUA; DRENAJE
ESPAÑOL Page 100 SUMINISTRO DE AGUA Para llenar correctamente su lavadora en el tiempo adecuado, se requiere una presión de agua de 20 a 100 psi (100 a 500kPa). Una presión de agua inferior a 20 psi puede causar un fallo en la válvula de agua, o puede no permitir que la válvula de agua se cierre com...
Page 101 - ESPACIO LIBRE REQUERIDO PARA LA APLICACIÓN EMPOTRADA; Drenaje en el suelo
ESPAÑOL Page 101 ESPACIO LIBRE REQUERIDO PARA LA APLICACIÓN EMPOTRADA La ubicación y el espacio libre deben considerarse para facilitar la instalación y el mantenimiento. ESPACIO LIBRE PARA LA INSTALACIÓN La ubicación debe ser lo suficientemente grande como para permitir que la puerta de la lavadora...
Page 102 - Nivelación de la lavadora; Conexión de las mangueras de entrada
ESPAÑOL Page 102 Nivelación de la lavadora Al trasladar la unidad a su ubicación definitiva, asegúrese que las patas de nivelación estén colocadas cerca de la lavadora y no extendidas para evitar que se dañen las patas de nivelación. Las patas niveladoras pueden ajustarse girándolas para subir o baj...
Page 103 - IMPORTANTE; NO DEVUELVA ESTE PRODUCTO A LA TIENDA
ESPAÑOL Page 103 TROUBLESHOOTING & WARRANTY ANTES DE LLAMAR AL SERVICIO TÉCNICO SI LA UNIDAD NO FUNCIONA: A) Compruebe que la unidad está bien enchufada. Si no lo está, retire el enchufe de la toma de corriente, espere 10 segundos y vuelva a enchufarlo con seguridad. B) Compruebe si se ha fundid...
Page 104 - SÍNTOMAS
ESPAÑOL Page 104 SOLUCIÓN DE PROBLEMAS Y GARANTÍA SOLUCIÓN DE PROBLEMAS Solucione su problema utilizando la siguiente tabla. Si la unidad sigue sin funcionar correctamente, póngase en contacto con el centro de servicio al cliente de W Appliance Co. o con el centro de servicio autorizado más cercano....
Page 105 - SINTOMAS
ESPAÑOL Page 105 SINTOMAS POSIBLE CAUSA SOLUCIONES Exceso de espuma Demasiado detergente o detergente incorrecto. Los detergentes HE están formulados específicamente para lavadoras de alta eficiencia y contienen agentes reductores de espuma. Utilice únicamente detergente con el logotipo de Alta Efic...
Page 107 - GARANTÍA LIMITADA
ESPAÑOL Page 107 GARANTÍA LIMITADA Cualquier reparación, reemplazo o servicio de garantía y todas las preguntas sobre este producto deben dirigirse a W Appliance Co. al 844-299-0879 desde los Estados Unidos o Puerto Rico. Garantiza al comprador original que el producto estará libre de defectos de ma...