Page 3 - CONTENTS; SAFETY INFORMATION
Page 3 ENGLISH CONTENTS PRODUCT REGISTRATION SAFETY INFORMATION Important Safety Instructions ......................................................................................................................................... 4-6 Installation Warnings and Precautions .............................
Page 4 - WARNING; CAUTION; IMPORTANT SAFETY INSTRUCTIONS; WARNING; When using electrical appliances, basic safety precautions
Page 4 ENGLISH SAFETY INFORMATION DANGER DANGER - Immediate hazards which WILL result in severe personal injury or death WARNING WARNING - Hazards or unsafe practices which COULD result in severe personal injury or death CAUTION CAUTION - Hazards or unsafe practices which COULD result in minor perso...
Page 5 - SAVE THESE INSTRUCTIONS; HOUSEHOLD USE ONLY
Page 5 ENGLISH SAFETY INFORMATION 13. Under certain conditions, hydrogen gas may be produced in a hot water system that has not been used for 2 weeks or more. HYDROGEN GAS IS EXPLOSIVE. If the hot water system has not been used for 2 weeks or more, before using a washer or combination washer-dryer, ...
Page 6 - INSTALLATION WARNINGS
Page 6 ENGLISH SAFETY INFORMATION 1. Failure to closely follow these instructions may result in an abnormal vibrating and out-of-balance condition that could result in physical injury, property damage, and/or appliance damage. 2. Plug the power cord into an AC 120V/60Hz wall socket rated at 15amps o...
Page 7 - GROUNDING INSTRUCTIONS
Page 7 ENGLISH SAFETY INFORMATION 15. Do not install this appliance in a location where gas may leak. - This may result in electric shock or fire. 16. If the washer is moved to a new location, have it checked and re-installed by a qualified service technician. - Failing to follow this warning may re...
Page 8 - USAGE AND
Page 8 ENGLISH SAFETY INFORMATION 1. If the appliance is flooded, cut the power immediately and contact your nearest service center. 2. If the appliance emits a strange noise, a burning smell, or smoke, unplug the power plug immediately and contact your nearest service center. - Failing to do so may...
Page 14 - ACCESSORIES; TOOLS NEEDED IN INSTALLATION; Level
Page 14 ENGLISH SET UP & USE ACCESSORIES TOOLS NEEDED IN INSTALLATION KEY DIMENSIONS AND SPECIFICATIONS Quick connection adaptor Bottom cover Drain hose Owner's manual Water supply hose Bottom cover screw (2) Water inlet cap Level Adjustable pliers or spanner wrench Phillip screwdriver 23.7in. 6...
Page 15 - CHOOSE THE PROPER LOCATION; ELECTRIC; GROUNDING
Page 15 ENGLISH SET UP & USE CHOOSE THE PROPER LOCATION FLOORING For best performance, you must install your washer on a solidly constructed floor. Wood floors may need to be reinforced to minimize vibration and/or unbalanced load situations. - Carpeting and soft tile surfaces are contributing f...
Page 16 - WATER; INSTALL YOUR WASHER; Step 1: Move your washer to selected position
Page 16 ENGLISH CHOOSE THE PROPER LOCATION WATER To correctly fill your washer in the proper amount of time, water pressure of 14 to 70psi (100 to 500 kPa) is required. Water pressure less than 14psi may cause water valve failure, or may not allow the water valve to shot off completely, or may exten...
Page 17 - Step 2: Install the Bottom Cover
Page 17 ENGLISH SET UP & USE Step 2: Install the Bottom Cover Slide the bottom cover into the slots on bottom surface of the unit as in the following figure, and fix it with the one screw attached with the unit. Step 3: Connect the water hose TEMPORARY CONNECTION • The Quick Connection Adaptor i...
Page 18 - Step 4: Connect the drain hose
Page 18 ENGLISH PERMANENT CONNECTION • Connect the ends of the water supply hoses to the HOT and COLD faucets. For convenience, use the Quick Connection Adapter for connection to the cold water faucet. See instructions for Quick Connection Adapter use in step 3 (previous page). • Tighten the fitting...
Page 19 - Step 5: Leveling your washer; Step 6: Powering your washer; Step 8: Storing your washer
Page 19 ENGLISH A. Over the edge of a wash basin. Secure the guide to the side of the basin wall with a hook or to the tap with a piece of string to prevent the drain hose from moving. B. In a standpipe The standpipe must be no shorter than 32 in. (81cm) and no longer than 39 in. (100cm). C. In a la...
Page 20 - CONTROL PANEL
Page 20 ENGLISH CONTROL PANEL SET UP & USE 1 2 4 5 6 7 8 9 10 3 1. On/Off Press the On/Off button once to turn ON the power to the washer. Press again to turn OFF the unit. 2. Start/Pause Press Start/Pause button once to start the wash cycle. Press again during operation to PAUSE the cycle. Pres...
Page 21 - WASHING A LOAD OF LAUNDRY
Page 21 ENGLISH SET UP & USE WASHING A LOAD OF LAUNDRY Step 1: Power on your washer Press the ON/OFF button to power your washer on. Step 2: Load your washer Before loading your laundry, be sure to take out coins, keys and other hard objects, and close all zippers to prevent the clothes from dam...
Page 22 - Step 4: Select your desired cycle and options
Page 22 ENGLISH SET UP & USE Step 4: Select your desired cycle and options Select your desired wash program by pressing the program button repeatedly. The indicator light will illuminate as shown next to the selected cycle below. If Normal is selected there will be a steady light. If Quick is se...
Page 24 - CARE AND CLEANING; Cleaning the exterior
Page 24 ENGLISH CARE AND CLEANING CLEANING AND MAINTENANCE WARNING: Turn off and unplug appliance before cleaning or maintenance. Cleaning the exterior Turn off the water faucets after finishing the day’s washing.This will shut off the water supply to your washer and prevent the unlikelypossibility ...
Page 25 - TROUBLESHOOTING & WARRANTY; IMPORTANT; DO NOT RETURN THIS PRODUCT TO THE STORE
Page 25 ENGLISH TROUBLESHOOTING & WARRANTY BEFORE YOU CALL FOR SERVICE IF THE UNIT FAILS TO OPERATE: A) Check to make sure that the unit is plugged in securely. If it is not, remove the plug from the outlet, wait 10 seconds and plug it in again securely. B) Check for a blown circuit fuse or a tr...
Page 26 - SYMPTOMS
Page 26 ENGLISH TROUBLESHOOTING & WARRANTY TROUBLESHOOTING Troubleshoot your problem by using the chart below. If the unit still does not work properly, contact W Appliance Co. customer service center or the nearest authorized service center. Customer must never troubleshoot internal components....
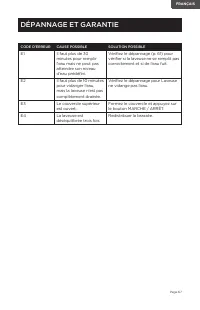
Page 32 - ERROR CODE
Page 32 ENGLISH Page 32 TROUBLESHOOTING & WARRANTY ERROR CODE POSSIBLE CAUSE SOLUTIONS E1 It takes over 30 minutes to fill water but cannot achieve its preset water level. Check troubleshooting (pg 32) for washer not filling properly and water leakage. E2 It takes over 10 minutes to drain the wa...
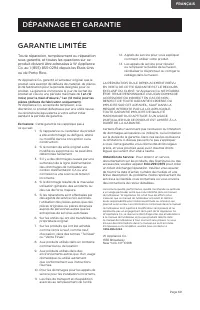
Page 34 - LIMITED WARRANTY
Page 34 ENGLISH LIMITED WARRANTY Any repair, replacement, or warranty service, and all questions about this product should be directed to W Appliance Co. at 844-299-0879 from the USA or Puerto Rico. W Appliance Co. warrants to the original purchaser that the product will be free from defects in mate...
Page 37 - TABLE DES MATIÈRES; INFORMATIONS DE SÉCURITÉ
Page 37 FRANÇAIS TABLE DES MATIÈRES ENREGISTREMENT DU PRODUIT INFORMATIONS DE SÉCURITÉ Consignes De Sécurité Importantes ....................................................................................................................... 38-39 Installation Avertissements Et Précautions d’Installa...
Page 38 - CONSIGNES DE SÉCURITÉ; ATTENTION; AVERTISSEMENT
Page 38 FRANÇAIS INFORMATIONS DE SÉCURITÉ 1. Lire toutes les instructions avant d’utiliser l’appareil. 2. Utilisez cet appareil uniquement pour l’usage prévu décrit dans ce manuel d’utilisation. 3. Avant utilisation, la laveuse doit être correctement installée comme décrit dans ce manuel. 4. TOUJOUR...
Page 39 - SAUVEGARDER CES INSTRUCTIONS; USAGE DOMESTIQUE SEULEMENT
Page 39 FRANÇAIS INFORMATIONS DE SÉCURITÉ 12. N’ajoutez pas d’essence, de solvants de nettoyage à sec ou d’autres substances inflammables ou explosives à l’eau de lavage. Ces substances dégagent des vapeurs qui pourraient s’enflammer ou exploser. 13. Dans certaines conditions, de l’hydrogène peut êt...
Page 40 - AVERTISSEMENTS ET
Page 40 FRANÇAIS INFORMATIONS DE SÉCURITÉ 1. Le non-respect de ces instructions peut entraîner une vibration anormale et un déséquilibre pouvant entraîner des blessures corporelles, des dommages matériels et/ou des dommages à l’appareil. 2. Branchez le cordon d’alimentation dans une prise murale AC ...
Page 41 - INSTRUCTIONS DE MISE À LA TERRE
Page 41 FRANÇAIS INFORMATIONS DE SÉCURITÉ 13. N’installez pas cet appareil à proximité d’un appareil de chauffage ou d’un matériau inflammable. 14. N’installez pas cet appareil dans un endroit humide, huileux ou poussiéreux ou dans un endroit exposé à la lumière directe du soleil ou à l’eau (gouttes...
Page 42 - AVERTISSEMENTS D’UTILISATION
Page 42 FRANÇAIS INFORMATIONS DE SÉCURITÉ 1. Si l’appareil est inondé, couper immédiatement l’alimentation et contacter le centre de service le plus proche. 2. Si l’appareil émet un bruit étrange, une odeur de brûlé ou de la fumée, débranchez la prise d’alimentation immédiatement et contactez le cen...
Page 44 - PRÉCAUTIONS D’UTILISATION
Page 44 FRANÇAIS INFORMATIONS DE SÉCURITÉ 1. Débranchez la prise d’alimentation lorsque l’appareil n’est pas utilisé pendant de longues périodes ou pendant un orage électrique. - Ne pas le faire peut entraîner un choc électrique ou un incendie. 2. Gardez vos mains et tout objet étranger à l’écart du...
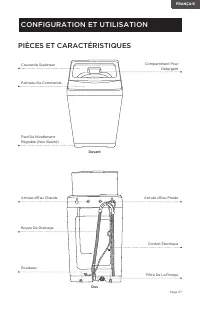
Page 47 - CONFIGURATION ET UTILISATION
Page 47 FRANÇAIS CONFIGURATION ET UTILISATION PIÈCES ET CARACTÉRISTIQUES Couvercle Supérieur Panneau De Commande Pied De Nivellement Réglable (Non Illustré) Arrivée d’Eau Chaude Boyau De Drainage Rouleaux Devant Dos Compartiment Pour Détergent Arrivée d’Eau Froide Cordon Électrique Filtre De La Pomp...
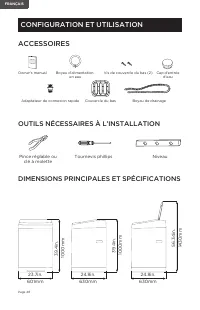
Page 48 - OUTILS NÉCESSAIRES À L’INSTALLATION; Niveau
Page 48 FRANÇAIS CONFIGURATION ET UTILISATION ACCESSOIRES OUTILS NÉCESSAIRES À L’INSTALLATION DIMENSIONS PRINCIPALES ET SPÉCIFICATIONS Adaptateur de connexion rapide Couvercle du bas Boyau de drainage Owner's manual Boyau d'alimentation en eau Vis de couvercle du bas (2) Cap d'entrée d'eau Niveau Pi...
Page 49 - ÉLECTRIQUE
Page 49 FRANÇAIS CONFIGURATION ET UTILISATION CHOISISSEZ LE BON EMPLACEMENT PLANCHER Pour de meilleures performances, vous devez installer votre laveuse sur un plancher solidement construit. Les planchers de bois peuvent devoir être renforcés pour minimiser les vibrations et/ou les situations de cha...
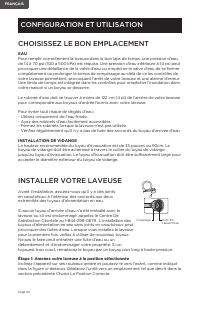
Page 50 - CHOISISSEZ LE BON EMPLACEMENT; EAU; INSTALLER VOTRE LAVEUSE; Étape 1: Amenez votre laveuse à la position sélectionnée
Page 50 FRANÇAIS CHOISISSEZ LE BON EMPLACEMENT EAU Pour remplir correctement la laveuse dans le bon laps de temps, une pression d’eau de 14 à 70 psi (100 à 500 kPa) est requise. Une pression d’eau inférieure à 14 psi peut provoquer une défaillance de la valve d’eau ou empêcher la valve d’eau de se f...
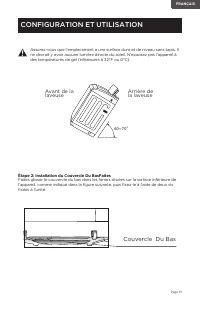
Page 51 - Avant de la; Étape 2: Installation du Couvercle Du BasFaites; Couvercle Du Bas
Page 51 FRANÇAIS O 60~70 Avant de la laveuse Arrière de la laveuse Assurez-vous que l’emplacement a une surface dure et de niveau sans tapis. Il ne devrait y avoir aucune lumière directe du soleil. N’exposez pas l’appareil à des températures de gel (inférieures à 32°F ou 0°C). CONFIGURATION ET UTILI...
Page 53 - Étape 4: Raccordez le tuyau de vidange
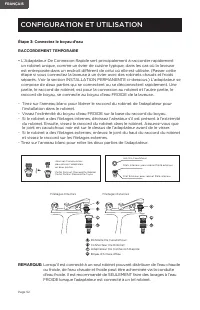
Page 53 FRANÇAIS CONNEXION PERMANENTE • Raccordez les extrémités des tuyaux d’alimentation d’eau aux robinets CHAUD et FROID. Pour plus de commodité, utilisez l’Adaptateur De Connexion Rapide pour le raccordement au robinet d’eau froide. Voir les instructions d’utilisation de l’Adaptateur De Connexi...
Page 54 - Étape 5: Mise à niveau de votre laveuse
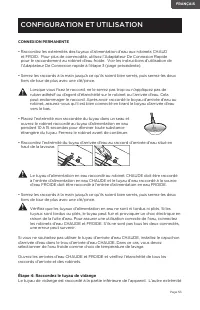
FRANÇAIS du tuyau doit être positionnée selon l’une des méthodes suivantes: A. Sur le bord d’un lavabo. Fixez le guide sur le côté de la paroi du bassin avec un crochet ou sur le robinet avec un bout de ficelle pour empêcher le tuyau de vidange de bouger. B. Dans un tuyau d’évacuation Le tuyau d’éva...
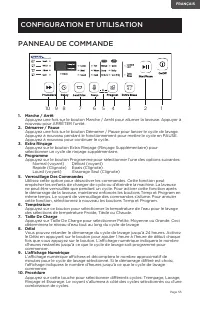
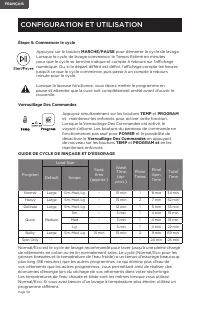
Page 55 - PANNEAU DE COMMANDE; Verrouillage Des Commandes
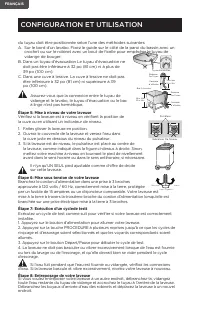
Page 55 FRANÇAIS PANNEAU DE COMMANDE CONFIGURATION ET UTILISATION 1 2 4 5 6 7 8 9 10 3 1. Marche / Arrêt Appuyez une fois sur le bouton Marche / Arrêt pour allumer la laveuse. Appuyer à nouveau pour ARRÊTER l’unité. 2. Démarrer / Pause Appuyez une fois sur le bouton Démarrer / Pause pour lancer le c...
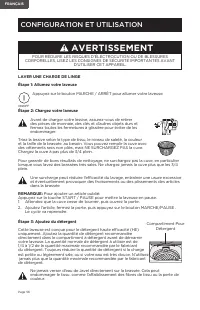
Page 56 - LAVER UNE CHARGE DE LINGE
Page 56 FRANÇAIS CONFIGURATION ET UTILISATION LAVER UNE CHARGE DE LINGE Étape 1: Allumez votre laveuse Appuyez sur le bouton MARCHE / ARRÊT pour allumer votre laveuse. Étape 2: Chargez votre laveuse Avant de charger votre lessive, assurez-vous de retirer des pièces de monnaie, des clés et d’autres o...
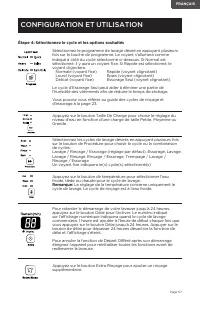
Page 57 - Étape 4: Sélectionnez le cycle et les options souhaités
Page 57 FRANÇAIS CONFIGURATION ET UTILISATION Étape 4: Sélectionnez le cycle et les options souhaités Sélectionnez le programme de lavage désiré en appuyant plusieurs fois sur la touche de programme. Le voyant s’allumera comme indiqué à côté du cycle sélectionné ci-dessous. Si Normal est sélectionné...
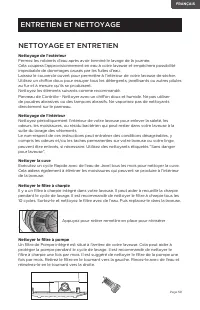
Page 59 - ENTRETIEN ET NETTOYAGE; Nettoyage de l’extérieur
Page 59 FRANÇAIS ENTRETIEN ET NETTOYAGE NETTOYAGE ET ENTRETIEN Nettoyage de l’extérieur Fermez les robinets d’eau après avoir terminé le lavage de la journée.Cela coupera l’approvisionnement en eau à votre laveuse et empêchera possibilité improbable de dommages causés par les fuites d’eau.Laissez le...
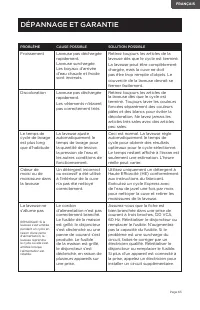
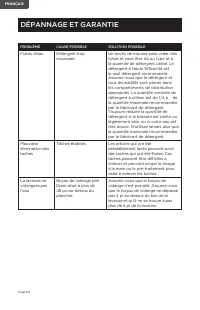
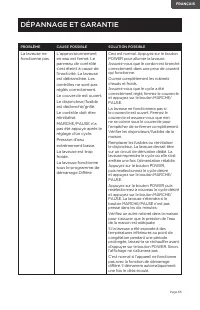
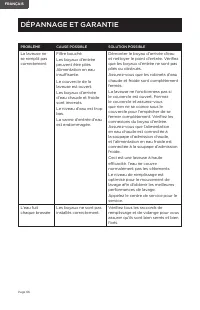
Page 60 - DÉPANNAGE ET GARANTIE; NE PAS RETOURNER CE PRODUIT AU MAGASIN
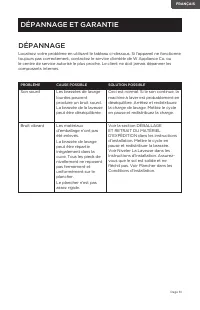
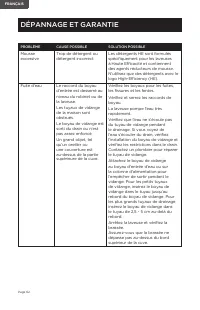
Page 60 FRANÇAIS DÉPANNAGE ET GARANTIE AVANT D’APPELER POUR LE SERVICE SI L’UNITÉ NE FONCTIONNE PAS: A) Assurez-vous que l’appareil est correctement branché. Si ce n’est pas le cas, retirez la fiche de la prise, attendez 10 secondes et branchez-le à nouveau sécuritairement. B) Vérifiez qu’il n’y a p...
Page 71 - ÍNDICE; INFORMACIÓN DE SEGURIDAD
Página 71 ESPAÑOL ÍNDICE REGISTRO DEL PRODUCTO INFORMACIÓN DE SEGURIDAD Instrucciones de seguridad importantes ..............................................................................................................72-73 Advertencias y precauciones de instalación..................................
Page 72 - INSTRUCCIONES IMPORTANTES; ADVERTENCIA; ADVERTENCIA; PRECAUCIÓN
Página 72 ESPAÑOL INFORMACIÓN DE SEGURIDAD PELIGRO PELIGRO - Riesgos inmediatos que RESULTARÁN en lesiones personales severas o la muerte 1. Lea todas las instrucciones antes de usar este electrodoméstico.2. Use este electrodoméstico solo para su propósito previsto como se describe en este manual de...
Page 73 - GUARDE ESTAS; ÚNICAMENTE USO DOMÉSTICO
Página 73 ESPAÑOL INFORMACIÓN DE SEGURIDAD 13. Bajo ciertas condiciones el gas hidrógeno puede ser producido en un sistema de agua caliente que no se ha utilizado durante 2 semanas o más. EL GAS DE HIDRÓGENO ES EXPLOSIVO. Si el sistema de agua caliente no se ha usado durante 2 semanas o más, antes d...
Page 74 - ADVERTENCIAS Y
Página 74 ESPAÑOL INFORMACIÓN DE SEGURIDAD 1. El incumplimiento de estas instrucciones puede resultar en una condición de vibración anormal y desequilibrio que podría resultar en lesiones físicas, daños a la propiedad y / o daños al aparato. 2. Enchufe el cable de alimentación a una toma de corrient...
Page 75 - INSTRUCCIONES DE PUESTA A TIERRA
Página 75 ESPAÑOL INFORMACIÓN DE SEGURIDAD 15. No instale este electrodoméstico en un lugar donde pueda haber fugas de gas. - Puede provocar una descarga eléctrica o un incendio. 16. Si la lavadora se mueve a una nueva ubicación, haga que la revise y reinstale un técnico de servicio calificado. - No...
Page 76 - USO YADVERTENCIAS DE
Página 76 ESPAÑOL INFORMACIÓN DE SEGURIDAD 1. Si el electrodoméstico se desborda o inunda, corte la corriente inmediatamente y comuníquese con su centro de servicio más cercano. 2. Si el aparato emite un ruido extraño, un olor a quemado o humo, desenchufe el cable de alimentación inmediatamente y pó...
Page 78 - USO Y ADVERTENCIAS DE
Página 78 ESPAÑOL INFORMACIÓN DE SEGURIDAD 1. Desenchufe el cable de alimentación cuando el electrodoméstico no se use durante largos períodos de tiempo o durante una tormenta eléctrica. - De lo contrario, puede provocar una descarga eléctrica o un incendio. 2. Mantenga las manos y los objetos extra...
Page 81 - CONFIGURACIÓN Y USO
Página 81 ESPAÑOL CONFIGURACIÓN Y USO PIEZAS Y CARACTERÍSTICAS Tapa superior Panel de control Patas niveladoras (no mostradas) Entrada de agua caliente Manguera de drenaje Ruedas Frente Dorso Compartimiento del detergente Entrada de agua fría Cable de alimentación Filtro de la bomba
Page 82 - DIMENSIONES Y ESPECIFICACIONES CLAVE; Nivel
Página 82 ESPAÑOL CONFIGURACIÓN Y USO ACCESORIOS HERRAMIENTAS NECESARIAS PARA LA INSTALACIÓN DIMENSIONES Y ESPECIFICACIONES CLAVE Adaptador de conexión rápida Cubierta inferior Manguera de drenaje Manual del usuario Manguera de abastecimiento de agua Tornillo de tapa inferior (2) Tapa de la entrada ...
Page 83 - ELÉCTRICA
Página 83 ESPAÑOL CONFIGURACIÓN Y USO ELIJA LA UBICACIÓN ADECUADA PISO Para un mejor rendimiento, debe instalar su lavadora en un piso sólidamente construido. Los pisos de madera pueden necesitar ser reforzados para minimizar la vibración y / o situaciones de carga desequilibrada. - Las alfombras y ...
Page 84 - ELIJA LA UBICACIÓN ADECUADA; AGUA; DRENAJE; INSTALACIÓN DE SU LAVADORA; Paso 1: Mueva la lavadora a la posición deseada.
Página 84 ESPAÑOL ELIJA LA UBICACIÓN ADECUADA AGUA Para llenar correctamente su lavadora en el tiempo adecuado, se requiere una presión de agua de 14 a 70 PSI (100 a 500 kPa). Una presión de agua inferior a 14 psi puede causar fallas en la válvula de agua o no permitir que la válvula de agua se disp...
Page 85 - Paso 2: Instalar la cubierta inferior; CONEXIÓN TEMPORAL
Página 85 ESPAÑOL CONFIGURACIÓN Y USO Paso 2: Instalar la cubierta inferior Deslice la cubierta inferior en las ranuras en la superficie inferior del aparato como se muestra en la siguiente figura, y fíjela con los dos tornillos incluídos. Paso 3: conecte la manguera de suministro de agua CONEXIÓN T...
Page 87 - Paso 4: conecte la manguera de drenaje; Paso 5: Nivelar su lavadora; SÓLO HAY UNA
Página 87 ESPAÑOL Paso 4: conecte la manguera de drenaje La manguera de drenaje se conecta en la parte inferior del aparato. El otro extremo de la manguera debe colocarse usando uno de los métodos siguientes: A. Sobre el borde de un lavabo. Asegure la guía al costado de la pared del lavabo con un ga...
Page 88 - PANEL DE CONTROL; Bloqueo de controles
Página 88 ESPAÑOL PANEL DE CONTROL CONFIGURACIÓN Y USO 1 2 4 5 6 7 8 9 10 3 1. ENCENDIDO/APAGADO Presione el botón ENCENDIDO/APAGADO una vez para encender la lavadora. Presione nuevamente para APAGAR la unidad. 2. Inicio/Pausa Presione el botón Enjuague Adicional para seleccionar un ciclo adicional ...
Page 91 - Paso 4: seleccione el ciclo y opciones deseadas
Página 91 ESPAÑOL CONFIGURACIÓN Y USO Paso 4: seleccione el ciclo y opciones deseadas Seleccione su programa de lavado deseado presionando repetidamente el botón de programa. El indicador luminoso se encenderá junto a los ciclos o la combinación de ciclos seleccionada como se muestra a continuación....
Page 93 - LIMPIEZA Y MANTENIMIENTO; Limpieza del exterior
Página 93 ESPAÑOL LIMPIEZA Y MANTENIMIENTO LIMPIEZA Y MANTENIMIENTO Limpieza del exterior Cierre los grifos de agua después de acabar con los lavados del día.Esto cierra el suministro de agua a su lavadora y previene la posibilidad improbable de que se escape el agua.Deje la puerta abierta para perm...
Page 94 - SOLUCIÓN DE PROBLEMAS Y GARANTÍA; IMPORTANTE; NO DEVUELVA ESTE PRODUCTO A LA TIENDA
Página 94 ESPAÑOL SOLUCIÓN DE PROBLEMAS Y GARANTÍA ANTES DE LLAMAR AL SERVICIO TÉCNICO SI LA UNIDAD FALLA AL OPERAR: A) Verifique para asegurarse de que el electrodoméstico esté enchufado de forma segura. De lo contrario, retire el enchufe de la toma, espere 10 segundos y conéctelo nuevamente de for...
Page 95 - SÍNTOMAS
Página 95 ESPAÑOL SOLUCIÓN DE PROBLEMAS Y GARANTÍA SOLUCIÓN DE PROBLEMAS Intente solucionar su problema mediante el siguiente cuadro. Si el aparato aún no funciona correctamente, contacte al centro de atención al cliente de, o el centro de servicio autorizado de W Appliance Co. más cercano.Los clien...
Page 101 - CÓDIGO DE
Página 101 ESPAÑOL SOLUCIÓN DE PROBLEMAS Y GARANTÍA CÓDIGO DE ERROR CAUSA POSIBLE SOLUCIONES E1 Lleva más de 30 minutos llenar el agua pero no puede alcanzar el nivel de agua preestablecido. Mire la página de resolución de problemas (pág. 95) si la lavadora no se llena correctamente o si hay pérdida...
Page 103 - GARANTÍA LIMITADA
Página 103 ESPAÑOL GARANTÍA LIMITADA Cualquier reparación, recambio, o servicio de garantía, y todas las preguntas sobre este producto deben ser dirigidas a W Appliance Co. al 844-299-0879 desde EE.UU. o Puerto Rico. W Appliance Co. garantiza al comprador original que el producto estará libre de def...
Page 104 - Printed in China
November 2021 Printed in China BLACK & DECKER, BLACK+DECKER, the BLACK & DECKER and BLACK+DECKER logos and product names and the orange and black color scheme are trademarks of The Black & Decker Corporation, used under license. All rights reserved. BLACK & DECKER, BLACK+DECKER, y lo...