Page 2 - must; Care And Cleaning; • Never push objects or spill liquid of any kind into this product.
2 Copyright Copyright © 2016 by BenQ Corporation. All rights reserved. No part of this publication may be reproduced, transmitted, transcribed, stored in a retrieval system or translated into any language or computer language, in any form or by any means, electronic, mechanical, magnetic, optical, c...
Page 3 - for more details on BenQ's environmental commitments and
3 Servicing Do not attempt to service this product yourself, as opening or removing covers may expose you to dangerous voltages or other risks. If any of the above mentioned misuse or other accident such as dropping or mishandling occurs, contact qualified service personnel for servicing. BenQ ecoFA...
Page 4 - Table of Contents
4 Table of Contents Copyright ......................................................................................................................................2Getting started ..........................................................................................................................
Page 6 - Getting started; BenQ LCD Monitor
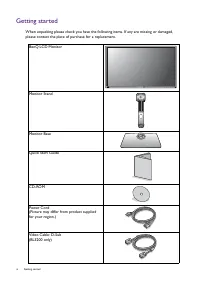
6 Getting started Getting started When unpacking please check you have the following items. If any are missing or damaged, please contact the place of purchase for a replacement. BenQ LCD Monitor Monitor Stand Monitor Base Quick Start Guide CD-ROM Power Cord(Picture may differ from product supplied ...
Page 7 - Audio Cable
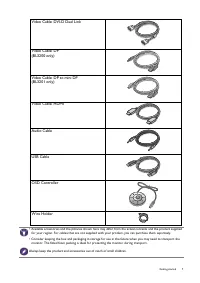
7 Getting started Video Cable: DVI-D Dual Link Video Cable: DP(BL3200 only) Video Cable: DP to mini DP(BL3201 only) Video Cable: HDMI Audio Cable USB Cable OSD Controller Wire Holder • Available accessories and the pictures shown here may differ from the actual contents and the product supplied for ...
Page 8 - Getting to know your monitor; connecting to the PC)
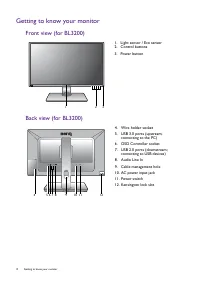
8 Getting to know your monitor Getting to know your monitor Front view (for BL3200) Back view (for BL3200) 1. Light sensor / Eco sensor2. Control buttons3. Power button 1 2 3 4. Wire holder socket5. USB 3.0 ports (upstream; connecting to the PC) 6. OSD Controller socket7. USB 2.0 ports (downstream; ...
Page 9 - connecting to USB devices)
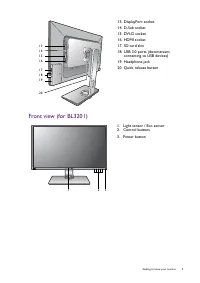
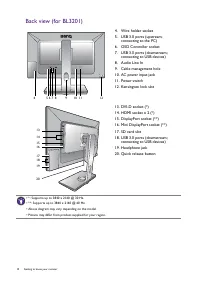
9 Getting to know your monitor Front view (for BL3201) 13. DisplayPort socket14. D-Sub socket15. DVI-D socket16. HDMI socket17. SD card slot18. USB 3.0 ports (downstream; connecting to USB devices) 19. Headphone jack20. Quick release button 13141516 171819 20 1. Light sensor / Eco sensor2. Control b...
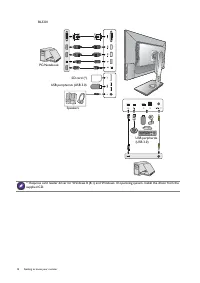
Page 11 - Connection; For detailed connection methods, see page
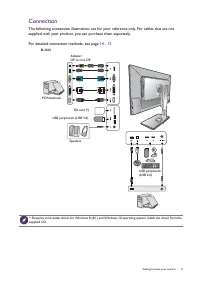
11 Getting to know your monitor Connection The following connection illustrations are for your reference only. For cables that are not supplied with your product, you can purchase them separately. For detailed connection methods, see page 14 - 17 . Speakers PC/Notebook USB peripherals(USB 2.0) SD ca...
Page 13 - How to assemble your monitor hardware
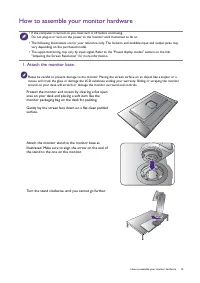
13 How to assemble your monitor hardware How to assemble your monitor hardware • If the computer is turned on you must turn it off before continuing. Do not plug-in or turn-on the power to the monitor until instructed to do so. • The following illustrations are for your reference only. The location ...
Page 14 - Connect the PC video cable
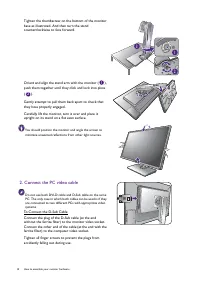
14 How to assemble your monitor hardware Tighten the thumbscrew on the bottom of the monitor base as illustrated. And then turn the stand counterclockwise to face forward. Orient and align the stand arm with the monitor ( ), push them together until they click and lock into place ( ). Gently attempt...
Page 15 - Or
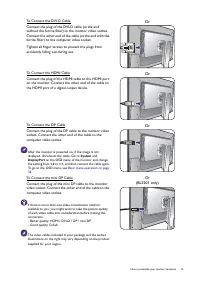
15 How to assemble your monitor hardware To Connect the DVI-D CableConnect the plug of the DVI-D cable (at the end without the ferrite filter) to the monitor video socket. Connect the other end of the cable (at the end with the ferrite filter) to the computer video socket. Tighten all finger screws ...
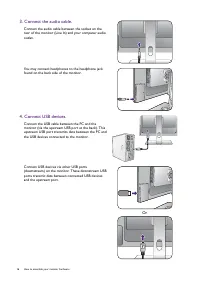
Page 17 - Connect the OSD Controller to the; Connect the power cable to the monitor.
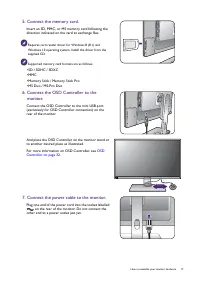
17 How to assemble your monitor hardware 5. Connect the memory card. Insert an SD, MMC, or MS memory card following the direction indicated on the card to exchange files. Requires card reader driver for Windows 8 (8.1) and Windows 10 operating system. Install the driver from the supplied CD. Support...
Page 18 - ON
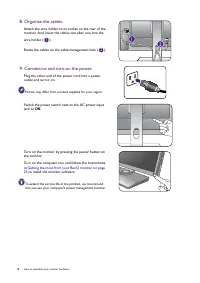
18 How to assemble your monitor hardware 8. Organize the cables. Attach the wire holder to its socket on the rear of the monitor. And insert the cables one after one into the wire holder ( ). Route the cables via the cable management hole ( ). 9. Connect-to and turn-on the power. Plug the other end ...
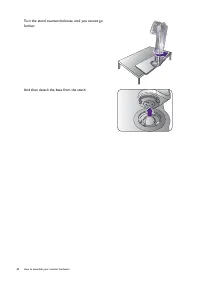
Page 19 - How to detach the stand and the base
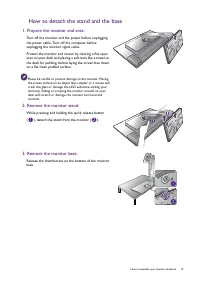
19 How to assemble your monitor hardware How to detach the stand and the base 1. Prepare the monitor and area. Turn off the monitor and the power before unplugging the power cable. Turn off the computer before unplugging the monitor signal cable. Protect the monitor and screen by clearing a flat ope...
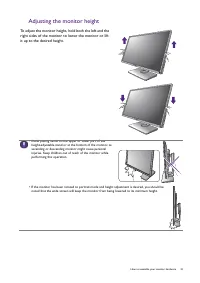
Page 21 - Adjusting the monitor height
21 How to assemble your monitor hardware Adjusting the monitor height To adjust the monitor height, hold both the left and the right sides of the monitor to lower the monitor or lift it up to the desired height. • Avoid placing hands on the upper or lower part of the height-adjustable stand or at th...
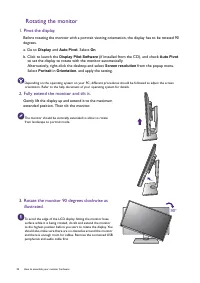
Page 22 - Rotating the monitor; and; Rotate the monitor 90 degrees clockwise as
22 How to assemble your monitor hardware Rotating the monitor 1. Pivot the display. Before rotating the monitor with a portrait viewing orientation, the display has to be rotated 90 degrees. a. Go to Display and Auto Pivot . Select On . b. Click to launch the Display Pilot Software (if installed fro...
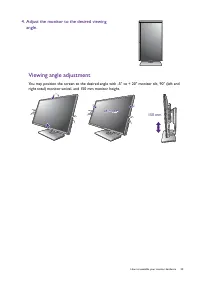
Page 23 - Viewing angle adjustment; Adjust the monitor to the desired viewing
23 How to assemble your monitor hardware Viewing angle adjustment You may position the screen to the desired angle with -5° to + 20° monitor tilt, 90° (left and right total) monitor swivel, and 150 mm monitor height. 4. Adjust the monitor to the desired viewing angle. -45 -45 O O ~ +45 ~ +45 O -45 O...
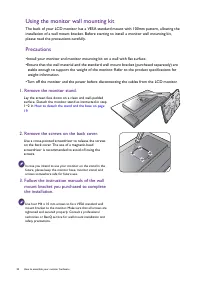
Page 24 - Using the monitor wall mounting kit; Precautions; Follow the instruction manuals of the wall
24 How to assemble your monitor hardware Using the monitor wall mounting kit The back of your LCD monitor has a VESA standard mount with 100mm pattern, allowing the installation of a wall mount bracket. Before starting to install a monitor wall mounting kit, please read the precautions carefully. Pr...
Page 25 - Getting the most from your BenQ monitor; Found New Hardware wizard; How to install the monitor on a new computer on page 26
25 Getting the most from your BenQ monitor Getting the most from your BenQ monitor To gain the most benefit from your new BenQ LCD monitor, you should install the custom BenQ LCD Monitor driver software as provided on the BenQ LCD Monitor CD-ROM. The circumstances under which you connect and install...
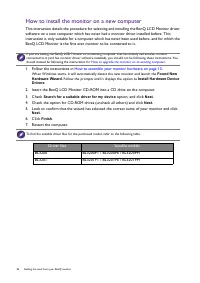
Page 26 - How to install the monitor on a new computer; Follow the instructions in; and click; Driver files
26 Getting the most from your BenQ monitor How to install the monitor on a new computer This instruction details the procedure for selecting and installing the BenQ LCD Monitor driver software on a new computer which has never had a monitor driver installed before. This instruction is only suitable ...
Page 27 - How to install on Windows 10 system on page 28
27 Getting the most from your BenQ monitor How to upgrade the monitor on an existing computer This instruction details the procedure for manually updating the existing monitor driver software on your Microsoft Windows computer. It is currently tested as compatible for Windows 10, Windows 8 (8.1), an...
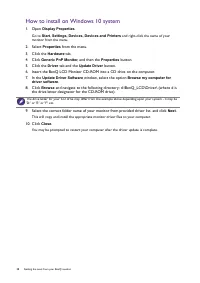
Page 28 - How to install on Windows 10 system; tab and the
28 Getting the most from your BenQ monitor How to install on Windows 10 system 1. Open Display Properties . Go to Start , Settings, Devices, Devices and Printers and right-click the name of your monitor from the menu. 2. Select Properties from the menu. 3. Click the Hardware tab. 4. Click Generic Pn...
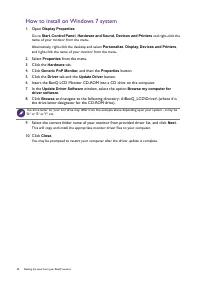
Page 30 - How to install on Windows 7 system
30 Getting the most from your BenQ monitor How to install on Windows 7 system 1. Open Display Properties . Go to Start , Control Panel, Hardware and Sound, Devices and Printers and right-click the name of your monitor from the menu. Alternatively, right-click the desktop and select Personalize , Dis...
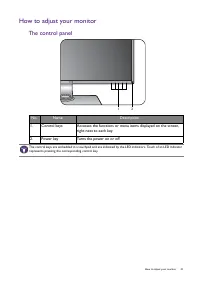
Page 31 - How to adjust your monitor; The control panel; Name
31 How to adjust your monitor How to adjust your monitor The control panel No. Name Description 1. Control keys Accesses the functions or menu items displayed on the screen, right next to each key. 2. Power key Turns the power on or off. 1 2 The control keys are embedded in a touchpad and are indica...
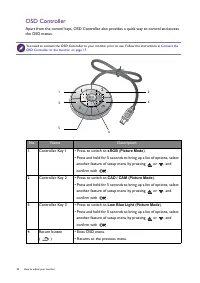
Page 32 - OSD Controller; sRGB
32 How to adjust your monitor OSD Controller Apart from the control keys, OSD Controller also provides a quick way to control and access the OSD menus. You need to connect the OSD Controller to your monitor prior to use. Follow the instructions in Connect the OSD Controller to the monitor. on page 1...
Page 33 - Navigation buttons
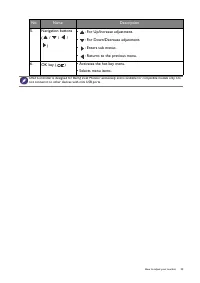
33 How to adjust your monitor 5. Navigation buttons ( / / / ) • : For Up/Increase adjustment. • : For Down/Decrease adjustment. • : Enters sub menus. • : Returns to the previous menu. 6. OK key ( ) • Activates the hot key menu.• Selects menu items. No. Name Description OSD Controller is designed for...
Page 34 - Basic menu operation; key on the OSD Controller.; Menu; Navigating the main menu on page 38; Custom Key 1; • By default, the key is the hot key for; Picture Mode; To change the default settings, see
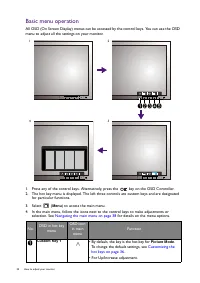
34 How to adjust your monitor Basic menu operation All OSD (On Screen Display) menus can be accessed by the control keys. You can use the OSD menu to adjust all the settings on your monitor. 1. Press any of the control keys. Alternatively, press the key on the OSD Controller. 2. The hot key menu is ...
Page 35 - Controlling the display with Display Pilot; Customizing the hot keys on
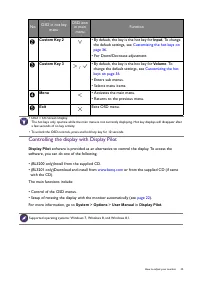
35 How to adjust your monitor Controlling the display with Display Pilot Display Pilot software is provided as an alternative to control the display. To access the software, you can do one of the following. • (BL3200 only)Install from the supplied CD.• (BL3201 only)Download and install from www.benq...
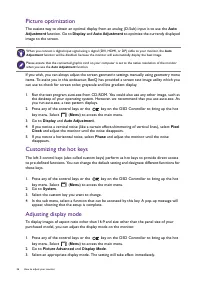
Page 36 - Picture optimization
36 How to adjust your monitor Picture optimization The easiest way to obtain an optimal display from an analog (D-Sub) input is to use the Auto Adjustment function. Go to Display and Auto Adjustment to optimize the currently displayed image to the screen. If you wish, you can always adjust the scree...
Page 37 - Using Smart Scaling; Picture Mode on page 44; Connecting the monitor to your MacBook series product; PIP/PBP source on page 40; Possible second sources
37 How to adjust your monitor Using Smart Scaling You can resize your display by Smart Scaling . 1. Go to Picture Advanced and Smart Scaling . 2. Adjust the value. Choosing an appropriate picture mode Your monitor provides various picture modes that are suitable for different types of images. See Pi...
Page 38 - Navigating the main menu; key on the OSD Controller to bring up the hot key; for
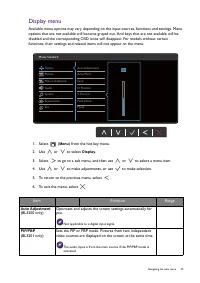
38 Navigating the main menu Navigating the main menu You can use the OSD (On Screen Display) menu to adjust all the settings on your monitor. Press any of the control keys or the key on the OSD Controller to bring up the hot key menu. Select ( Menu ) to access the main menu. See Basic menu operation...
Page 39 - Display menu; Item; Auto Adjustment
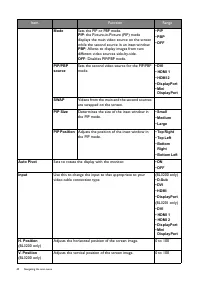
39 Navigating the main menu Display menu Available menu options may vary depending on the input sources, functions and settings. Menu options that are not available will become grayed out. And keys that are not available will be disabled and the corresponding OSD icons will disappear. For models wit...
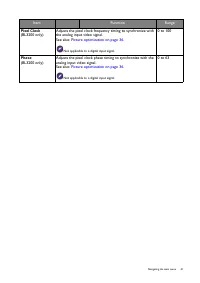
Page 41 - Pixel Clock; Phase; Picture optimization on page 36
41 Navigating the main menu Pixel Clock (BL3200 only) Adjusts the pixel clock frequency timing to synchronize with the analog input video signal. See also: Picture optimization on page 36 . Not applicable to a digital input signal. 0 to 100 Phase (BL3200 only) Adjusts the pixel clock phase timing to...
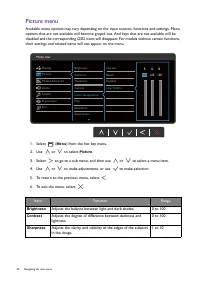
Page 42 - Picture menu; Brightness
42 Navigating the main menu Picture menu Available menu options may vary depending on the input sources, functions and settings. Menu options that are not available will become grayed out. And keys that are not available will be disabled and the corresponding OSD icons will disappear. For models wit...
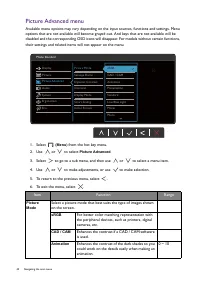
Page 44 - Picture Advanced menu
44 Navigating the main menu Picture Advanced menu Available menu options may vary depending on the input sources, functions and settings. Menu options that are not available will become grayed out. And keys that are not available will be disabled and the corresponding OSD icons will disappear. For m...
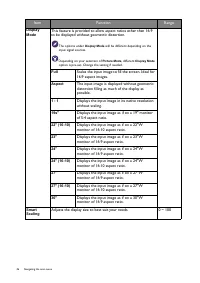
Page 46 - Full; Adjusts the display size to best suit your needs.
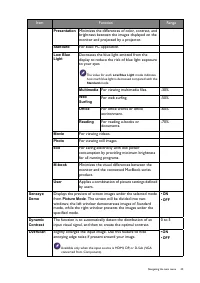
46 Navigating the main menu Display Mode This feature is provided to allow aspect ratios other than 16:9 to be displayed without geometric distortion. The options under Display Mode will be different depending on the input signal sources. Depending on your selection of Picture Mode , different Displ...
Page 47 - Determines the color space (; For
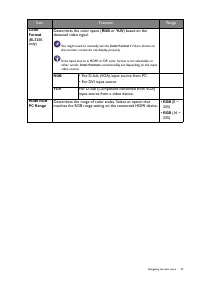
47 Navigating the main menu Color Format (BL3200 only) Determines the color space ( RGB or YUV ) based on the detected video signal. You might need to manually set the Color Format if colors shown on the monitor screen do not display properly. If the input source is HDMI or DP, color format is not s...
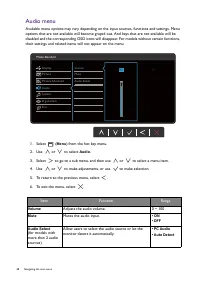
Page 48 - Audio menu
48 Navigating the main menu Audio menu Available menu options may vary depending on the input sources, functions and settings. Menu options that are not available will become grayed out. And keys that are not available will be disabled and the corresponding OSD icons will disappear. For models witho...
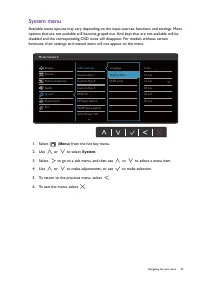
Page 49 - System menu
49 Navigating the main menu System menu Available menu options may vary depending on the input sources, functions and settings. Menu options that are not available will become grayed out. And keys that are not available will be disabled and the corresponding OSD icons will disappear. For models with...
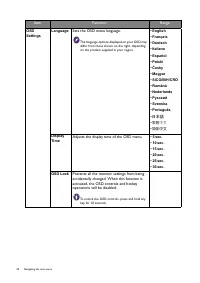
Page 50 - Русский; 日本語; Adjusts the display time of the OSD menu.
50 Navigating the main menu Item Function Range OSD Settings Language Sets the OSD menu language. The language options displayed on your OSD may differ from those shown on the right, depending on the product supplied in your region. • English • Français • Deutsch • Italiano • Español • Polski • Č es...
Page 51 - Sets the function to be accessed by custom key 1.
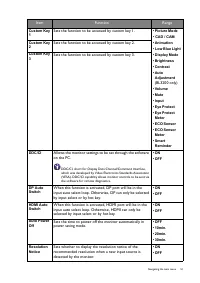
51 Navigating the main menu Custom Key 1 Sets the function to be accessed by custom key 1. • Picture Mode • CAD / CAM • Animation • Low Blue Light • Display Mode • Brightness • Contrast • Auto Adjustment (BL3200 only) • Volume • Mute • Input • Eye Protect • Eye Protect Meter • ECO Sensor • ECO Senso...
Page 52 - Displays the current monitor property settings.
52 Navigating the main menu Information Displays the current monitor property settings. • Input • Current Resolution • Optimum Resolution (best with the monitor) • Model Name DisplayPort Selects an appropriate DP standard for data transmission. • 1.2 • 1.1 Controller Key 1 Sets the feature or setup ...
Page 53 - Ergonomics menu; Eye Protect
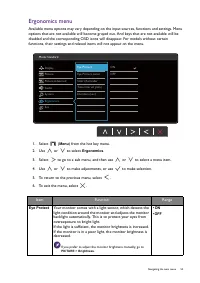
53 Navigating the main menu Ergonomics menu Available menu options may vary depending on the input sources, functions and settings. Menu options that are not available will become grayed out. And keys that are not available will be disabled and the corresponding OSD icons will disappear. For models ...
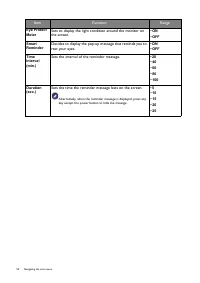
Page 54 - Sets the interval of the reminder message.
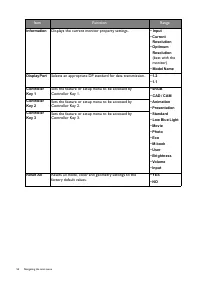
54 Navigating the main menu Eye Protect Meter Sets to display the light condition around the monitor on the screen. • ON • OFF Smart Reminder Decides to display the pop-up message that reminds you to rest your eyes. • ON • OFF Time interval (min.) Sets the interval of the reminder message. • 20 • 40...
Page 55 - Eco menu; ECO Sensor; • ON
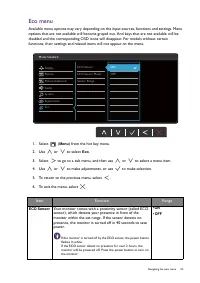
55 Navigating the main menu Eco menu Available menu options may vary depending on the input sources, functions and settings. Menu options that are not available will become grayed out. And keys that are not available will be disabled and the corresponding OSD icons will disappear. For models without...
Page 56 - Sets to display the countdown to turn off the monitor.; Decides how far the sensor can detect.; Near
56 Navigating the main menu ECO Sensor Meter Sets to display the countdown to turn off the monitor. • ON • OFF Sensor Range Decides how far the sensor can detect. • Near • Middle • Far Item Function Range
Page 57 - Troubleshooting
57 Troubleshooting Troubleshooting Frequently asked questions (FAQ) The image is blurred. Read the instructions on the link "Adjusting the Screen Resolution" on the CD, and then select the correct resolution, refresh rate and make adjustments based on these instructions. How do you use a VGA...
Page 58 - Out of Range; Display Mode
58 Troubleshooting The LED indicator is white or orange. • If the LED lights up in solid white, the monitor is powered on.• If the LED is illuminated in white and there is a message Out of Range on the screen, this means you are using a display mode that this monitor does not support, please change ...
Page 59 - Sensor
59 Troubleshooting Need more help? If your problems remain after checking this manual, please contact your place of purchase or visit the local website from www.BenQ.com for more support and local customer service. No sound can be heard from the built-in speakers: • Check whether Line In is properly...