Page 4 - Italiano; AVVERTENZE PER LA SICUREZZA
4 Italiano Leggere attentamente il contenuto del presente libretto in quanto fornisce impor- tanti indicazioni riguardanti la sicurezza di installazione, d’uso e di manutenzione. Conservare il libretto per ogni ulteriore consultazione.Tutte le operazioni relative all’installazione (connessioni elett...
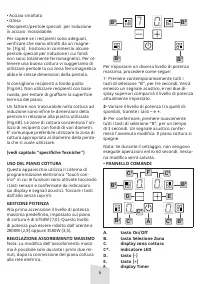
Page 7 - • Accensione dell’apparecchio; Premere il tasto ON/OFF per accendere; • Spegnimento dell’apparecchio; Ogni zona di cottura ad induzione, ha un
7 • Accensione dell’apparecchio Premere il tasto ON/OFF per accendere l’apparecchio.Tutti i display relativi alle zone di cottura si accendono in posizione «0».Il pannello di controllo rimane attivo per 20 secondi. Se entro questo tempo non si effettua alcuna regolazione su una zona di cottura l’app...
Page 11 - English; •RISK OF ELECTRIC SHOCK!
11 English Carefully read the contents of this leaflet since it provides important instructions regarding safety of installation, use and maintenance. Keep the leaflet for possible future consul - tation. All the operations relating to installa- tion (electrical connections) must be carried out by s...
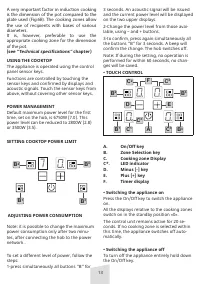
Page 13 - “Technical specifications” chapter); sensor keys and confirmed by displays and; • Switching the appliance on; Press the On/Off key to switch the appliance; • Switching the appliance off
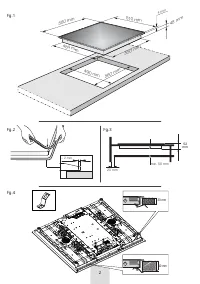
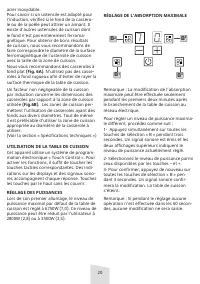
13 A very important factor in induction cooking is the dimension of the pot compared to the plate used (Fig.6B). The cooking zones allow the use of recipients with bases of various diameters. It is, however, preferable to use the appropriate cooking zone for the dimension of the pot. (see “Technical...
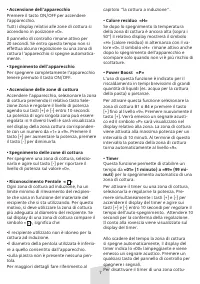
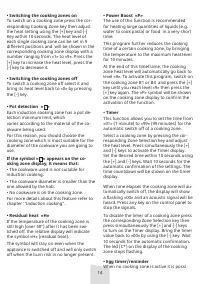
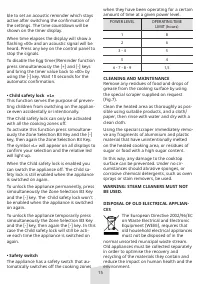
Page 15 - • Child safety lock «L»; confirm your selection and the relative led; • Safety switch; POWER LEVEL; CLEANING AND MAINTENANCE; Old appliances must be collected separately
15 ble to set an acoustic reminder which stays active after switching the confirmation of the settings. The time countdown will be shown on the timer display. When time elapses the display will show a flashing «00» and an acoustic signal will be heard. Press any key on the control panel to stop the ...
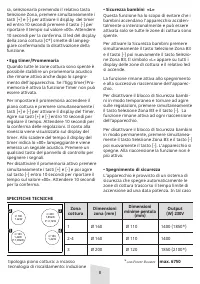
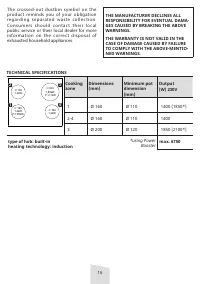
Page 16 - heating technology: induction; Booster
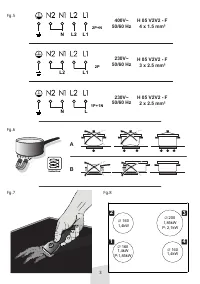
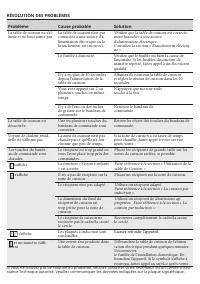
16 TECHNICAL SPECIFICATIONS ∅ 200 1,85kW ∅ 160 1,4kW ∅ 160 1,4kW ∅ 160 1,4kW P:1,85kW P: 2,1kW 1 2 3 4 Cooking zone Dimensions (mm) Minimum pot dimension (mm) Output (W) 230V 1 Ø 160 Ø 110 1400 (1850*) 2-4 Ø 160 Ø 110 1400 3 Ø 200 Ø 120 1850 (2100*) type of hob: built-in heating technology: inductio...
Page 18 - Français; CONSIGNES DE SÉCURITÉ
18 Français Veuillez lire attentivement cette notice car elle contient des instructions très impor- tantes concernant la sécurité d’installation, d’usage et d’entretien. Conservez cette notice pour toute consultation ultérieure. Toutes les opérations d’installation (con- nexions électriques) doivent...
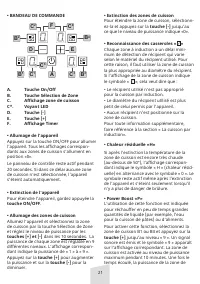
Page 22 - la touche Sélection de Zone B3
22 cuisson passe automatiquement au niveau « 9 ». • Minuterie Cette fonction permet d’établir une durée de « 01 » (1 minute) à « 99 » (99 minutes) pour l’extinction automatique d’une zone de cuisson. Pour activer la minuterie sur une zone de cuisson, sélectionnez-la et réglez la puissance. Puis appu...
Page 23 - Technologie de chauffage : induction
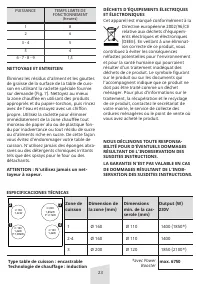
23 PUISSANCE TEMPS LIMITE DE FONCTIONNEMENT (heures) 1 8 2 6 3 - 4 5 5 4 6 - 7 - 8 - 9 1,5 NETTOYAGE ET ENTRETIEN Éliminez les résidus d’aliment et les gouttes de graisse de la surface de la table de cuis- son en utilisant la raclette spéciale fournie sur demande (Fig. 7). Nettoyez au mieux la zone ...
Page 24 - Laissez refroidir l’appareil.
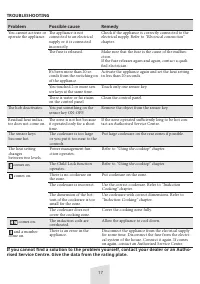
24 RÉSOLUTION DES PROBLÈMES Problème Cause probable Solution La table de cuisson ne s’al- lume et ne fonctionne pas La table de cuisson n’est pas connectée à une source d’a- limentation électrique ou le branchement est incorrect. Vérifiez que la table de cuisson est correcte- ment branchée à une sou...