Page 2 - TABLE OF CONTENTS
2 TABLE OF CONTENTS Appliance Safety 3 Important Safeguides 4 Help Us Help You / If You Need Service 5 Parts, Features, and Accessories 6 Important Safety Instructions 7 Installation Instructions 8 Before Using Your Washer 8 Selecting a Location 8 Connecting the Water Supply Hoses / Sink Faucet Conn...
Page 3 - APPLIANCE SAFETY; Your safety and the safety of others are very important.; Danger means that failure to heed this safety; PROP. 65 WARNING FOR CALIFORNIA RESIDENTS
3 APPLIANCE SAFETY Your safety and the safety of others are very important. We have provided many important safety messages in this manual and on your appliance. Always read and obey all safety messages. This is the Safety Alert Symbol. This symbol alerts you to potential hazards that can kill or in...
Page 4 - WARNING
4 IMPORTANT SAFEGUIDES IMPORTANT SAFETY INSTRUCTIONS SAVE THESE INSTRUCTIONS Before the appliance is used, it must be properly positioned and installed as described in this manual, so read the manual carefully. WARNING - to reduce the risk of fire, electrical shock or injury when using the appliance...
Page 7 - IMPORTANT SAFETY INSTRUCTIONS
7 IMPORTANT SAFETY INSTRUCTIONS ~ WARNING ~ To reduce the risk of fire, electrical shock, or injury when using your washer, follow these basic precautions: • Read all instructions before using the washer. • Do not wash water-resistant or water repellant type clothing. • Do not wash articles that hav...
Page 8 - INSTALLATION INSTRUCTIONS; BEFORE USING YOUR WASHER
8 INSTALLATION INSTRUCTIONS Ø BEFORE USING YOUR WASHER • Remove the exterior and interior packing. • You will need the following tools: • Wrench • Pliers • Screwdrivers (Flat Head and Phillips Head) • Level • Water Inlet Hoses (Not Included with your washer) • Check to be sure you have all of the fo...
Page 9 - CONNECTING THE WATER SUPPLY HOSES (HOSES ARE NOT INCLUDED)
9 Ø CONNECTING THE WATER SUPPLY HOSES (HOSES ARE NOT INCLUDED) The water supply hose must be connected to the washing machine at one end and to the water faucet at the other. Do not stretch the water supply hose. If the hose is too short and you do not wish to move the water faucet, replace the hose...
Page 10 - Turn off the faucet.; POSITIONING THE DRAIN HOSE
10 Ø SINK FAUCET CONNECTION For normal kitchen-sink tap only use the inlet hose with cold water inlet. Connect the inlet hose to the male hose thread adapter by turning it clockwise to be fixed tightly. Make sure to insert the rubber ring enclosed. Then connect tightly to your sink. Note: Some fauce...
Page 11 - Warning
11 Ø Electrical Connection This appliance should be properly grounded for your safety. The power cord of this appliance is equipped with a three-prong plug which mates with standard three prong wall outlets to minimize the possibility of electrical shock. Do not under any circumstances cut or remove...
Page 12 - SURGE PROTECTOR; CONTROL PANEL
12 Ø SURGE PROTECTOR Most electrical appliances use a series of electric control boards to operate. These boards are very susceptible to power surges and could be damaged or destroyed. If the appliance is going to be used in an area or if your city / country is prone to power surges / outages; it is...
Page 13 - OPERATING YOUR WASHER; PREPARATION; Right
13 OPERATING YOUR WASHER PREPARATION 1. Connect the water inlet hose to the water faucet. Don’t switch on the power if the water pressure is lower than 0.05MPa and higher than 0.5MPa. 2. Ensure the drain hose has been installed properly. 3. Insert the plug into the socket. For safety the plug should...
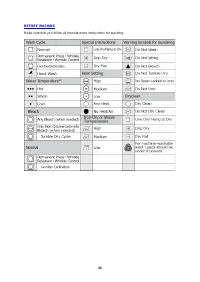
Page 14 - BEFORE WASHING
14 BEFORE WASHING Make sure that you follow all manufacturer instructions for washing:
Page 15 - OPERATING INSTRUCTIONS; AUTOMATIC WASH PROGRAMS; Settings shown in; Bold; are the default settings.
15 OPERATING INSTRUCTIONS 1 Press the power button to turn the washer ON / OFF 2 Add detergent to the appropriate compartment (either liquid, powdered) or add the necessary amount of wash pod to the tub. Add fabric softener to the fabric softener dispenser Add bleach to the bleach dispenser if desir...
Page 17 - Unplug the power cord.; CARE AND MAINTENANCE; CLEANING YOUR WASHER; Clean the surface of your washer regularly with soft fabric.
17 Unplug the power cord. Remove the inlet hose and clean the filter with a brush. Clean the surface of the washing machine with a soft cloth regularly. Clean the inner tub regularly, especially after washing starched or bleached laundry. CARE AND MAINTENANCE Ø CLEANING YOUR WASHER • Clean the surfa...
Page 18 - PROBLEM
18 PROBLEMS WITH YOUR WASHER? You can solve many common washer problems easily, saving you the cost of a possible service call. Try the suggestions below to see if you can solve the problem before calling the servicer. TROUBLESHOOTING GUIDE PROBLEM POSSIBLE CAUSE Washer does not operate. Not plugged...
Page 19 - SERVICE FOR YOUR WASHER; AVANTI PRODUCTS CUSTOMER SERVICES
19 SERVICE FOR YOUR WASHER We are proud of our customer service organization and the network of professional service technicians that provide service on your Avanti washers. With the purchase of your Avanti washer, you can be confident that if you ever need additional information or assistance, the ...
Page 21 - SEGURIDAD DEL APARATO; Su seguridad y la seguridad de los demás son muy importantes.; puede matarlo o lesionarlo a usted y a otras personas.
21 SEGURIDAD DEL APARATO Su seguridad y la seguridad de los demás son muy importantes. Hemos proporcionado muchos mensajes de seguridad importantes en este manual y en su electrodoméstico. Siempre lea y obedezca todos los mensajes de seguridad. Éste es el símbolo de alerta de seguridad. Este símbolo...
Page 24 - PIEZAS Y CARACTERÍSTICAS
24 PIEZAS Y CARACTERÍSTICAS 1 Conjunto de manguera de desagüe 8 Entrada de agua (caliente / fría) trasera 2 Panel de control 9 Salida de la manguera de desagüe - Trasera 3 Tapa superior 10 Compartimento para suavizante de telas 4 Cuerpo de la lavadora 11 Compartimento de lejía 5 Pata niveladora 12 C...
Page 25 - INSTRUCCIONES DE SEGURIDAD IMPORTANTES; ADVERTENCIA; Lea todas las instrucciones antes de usar la lavadora.; PELIGRO o ADVERTENCIA:; Riesgo de atrapamiento de niños.; Antes de desechar su vieja lavadora:; No altere los controles.
25 INSTRUCCIONES DE SEGURIDAD IMPORTANTES ~ ADVERTENCIA ~ Para reducir el riesgo de incendio, descarga eléctrica o lesiones al usar su lavadora, siga estas precauciones básicas: • Lea todas las instrucciones antes de usar la lavadora. • No lave ropa resistente al agua o repelente al agua. • No lave ...
Page 26 - INSTRUCCIONES DE INSTALACIÓN; ANTES DE USAR SU LAVADORA
26 INSTRUCCIONES DE INSTALACIÓN Ø ANTES DE USAR SU LAVADORA • Retire el embalaje exterior e interior. • Necesitará las siguientes herramientas: • Llave inglesa • Alicates • Destornilladores (de cabeza plana y Phillips) • Nivel • Mangueras de entrada de agua (no incluidas con su lavadora) • Asegúrese...
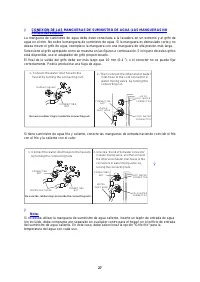
Page 28 - Retire las tuercas de conexión del grifo y la lavadora.; COLOCACIÓN DE LA MANGUERA DE DESAGÜE
28 Ø CONEXIÓN GRIFO FREGADERO Para el grifo normal del fregadero de la cocina, utilice únicamente la manguera de entrada con entrada de agua fría. Conecte la manguera de entrada al adaptador de rosca macho de la manguera girándola en el sentido de las agujas del reloj para fijarlo firmemente. Asegúr...
Page 29 - Advertencia
29 Ø Conexión eléctrica Este electrodoméstico debe estar debidamente conectado a tierra para su seguridad. El cable de alimentación de este electrodoméstico está equipado con un enchufe de tres clavijas que se acopla a los tomacorrientes de pared estándar de tres clavijas para minimizar la posibilid...
Page 30 - PROTECTOR CONTRA SOBRETENSIONES; PANEL DE CONTROL
30 Ø PROTECTOR CONTRA SOBRETENSIONES La mayoría de los aparatos eléctricos utilizan una serie de tableros de control eléctricos para funcionar. Estas placas son muy susceptibles a las sobrecargas de energía y podrían dañarse o destruirse. Si el aparato se va a utilizar en un área o si su ciudad / pa...
Page 31 - FUNCIONAMIENTO DE SU LAVADORA; PREPARACIÓN
31 FUNCIONAMIENTO DE SU LAVADORA PREPARACIÓN 1. Conecte la manguera de entrada de agua al grifo de agua. No encienda la corriente si la presión del agua es inferior a 0,05 MPa y superior a 0,5 MPa. 2. Asegúrese de que la manguera de drenaje se haya instalado correctamente. 3. Inserte el enchufe en l...
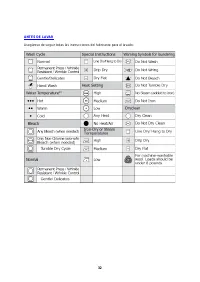
Page 32 - ANTES DE LAVAR
32 ANTES DE LAVAR Asegúrese de seguir todas las instrucciones del fabricante para el lavado:
Page 33 - INSTRUCCIONES DE OPERACIÓN; PROGRAMAS DE LAVADO AUTOMÁTICO; Configuración mostrada en; Negrita; son las configuraciones
33 INSTRUCCIONES DE OPERACIÓN 1 Presione el botón de encendido para encender / apagar la lavadora 2 Agregue detergente al compartimiento apropiado (ya sea líquido, en polvo) o agregue la cantidad necesaria de cápsula de lavado a la tina. Agregue suavizante de telas al dispensador de suavizante de te...
Page 34 - Presione el botón de encendido.; PANEL DE CONTROL - BLOQUEO DE SEGURIDAD PARA NIÑOS
34 Nota: • La ropa que se decolora fácilmente debe lavarse por separado para evitar el teñido entrelazado. • Si desea cambiar un programa seleccionado, presione el botón de encendido primero para apagar la unidad, luego presione el botón de ENCENDIDO nuevamente para volver a encender la unidad, lueg...
Page 35 - CUIDADO Y MANTENIMIENTO; LIMPIEZA DE LA LAVADORA
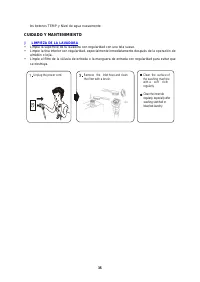
35 Unplug the power cord. Remove the inlet hose and clean the filter with a brush. Clean the surface of the washing machine with a soft cloth regularly. Clean the inner tub regularly, especially after washing starched or bleached laundry. los botones TEMP y Nivel de agua nuevamente. CUIDADO Y MANTEN...
Page 36 - PROBLEMA
36 ¿PROBLEMAS CON SU LAVADORA? Puede resolver fácilmente muchos problemas comunes de la lavadora, lo que le ahorra el costo de una posible llamada de servicio. Pruebe las sugerencias a continuación para ver si puede resolver el problema antes de llamar al técnico. GUÍA PARA RESOLVER PROBLEMAS PROBLE...
Page 37 - SERVICIO PARA SU LAVADORA; SERVICIOS AL CLIENTE DE PRODUCTOS AVANTI
37 SERVICIO PARA SU LAVADORA Estamos orgullosos de nuestra organización de servicio al cliente y de la red de técnicos de servicio profesionales que brindan servicio a sus lavadoras Avanti. Con la compra de su lavadora Avanti, puede estar seguro de que si alguna vez necesita información o asistencia...
Page 39 - SÉCURITÉ DE L'APPAREIL; Votre sécurité et celle des autres sont très importantes.; Danger signifie que le non-respect de cette
39 SÉCURITÉ DE L'APPAREIL Votre sécurité et celle des autres sont très importantes. Nous avons fourni de nombreux messages de sécurité importants dans ce manuel et sur votre appareil. Lisez et respectez toujours tous les messages de sécurité. C'est le symbole d'alerte de sécurité. Ce symbole vous av...
Page 40 - décrit dans ce manuel, alors lisez attentivement le manuel.
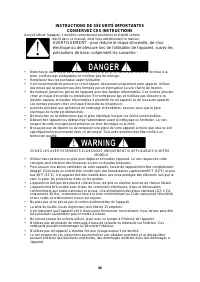
40 INSTRUCTIONS DE SÉCURITÉ IMPORTANTES CONSERVEZ CES INSTRUCTIONS Avant d'utiliser l'appareil, il doit être correctement positionné et installé comme décrit dans ce manuel, alors lisez attentivement le manuel. AVERTISSEMENT - pour réduire le risque d'incendie, de choc électrique ou de blessure lors...
Page 42 - PIÈCES ET CARACTÉRISTIQUES
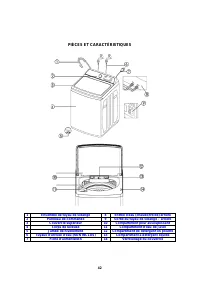
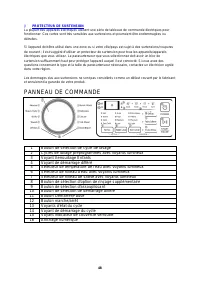
42 PIÈCES ET CARACTÉRISTIQUES 1 Ensemble de tuyau de vidange 8 Entrée d'eau (chaude/froide) arrière 2 Panneau de commande 9 Sortie du tuyau de vidange – arrière 3 Couvercle supérieur 10 Compartiment pour assouplissant 4 Corps de laveuse 11 Compartiment d'eau de Javel 5 Jambe de nivellement 12 Compar...
Page 43 - CONSIGNES DE SÉCURITÉ IMPORTANTES; ATTENTION; Lisez toutes les instructions avant d'utiliser la laveuse.; DANGER ou AVERTISSEMENT :; Risque de piégeage des enfants.; Avant de jeter votre vieille laveuse :; Retirez le couvercle.
43 CONSIGNES DE SÉCURITÉ IMPORTANTES ~ ATTENTION ~ Pour réduire le risque d'incendie, de choc électrique ou de blessure lors de l'utilisation de votre laveuse, suivez ces précautions de base : • Lisez toutes les instructions avant d'utiliser la laveuse. • Ne pas laver les vêtements de type imperméab...
Page 44 - INSTRUCTIONS D'INSTALLATION; AVANT D'UTILISER VOTRE LAVEUSE
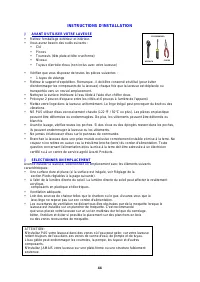
44 INSTRUCTIONS D'INSTALLATION Ø AVANT D'UTILISER VOTRE LAVEUSE • Retirez l'emballage extérieur et intérieur. • Vous aurez besoin des outils suivants : • Clé • Pinces • Tournevis (tête plate et tête cruciforme) • Niveau • Tuyaux d'arrivée d'eau (non inclus avec votre laveuse) • Vérifiez que vous dis...
Page 46 - Si le lave-linge est fréquemment utilisé, il n'est pas nécessaire de; POSITIONNEMENT DU TUYAU DE VIDANGE
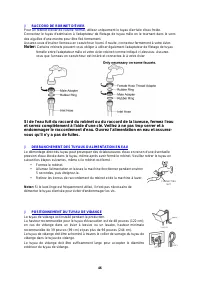
46 Ø RACCORD DE ROBINET D'ÉVIER Pour un robinet d'évier de cuisine normal, utilisez uniquement le tuyau d'arrivée d'eau froide. Connectez le tuyau d'admission à l'adaptateur de filetage de tuyau mâle en le tournant dans le sens des aiguilles d'une montre pour être fixé fermement. Assurez-vous d'insé...
Page 47 - Avertissement
47 Ø Connexion électrique Cet appareil doit être correctement mis à la terre pour votre sécurité. Le cordon d'alimentation de cet appareil est équipé d'une fiche à trois broches qui s'accouple avec des prises murales standard à trois broches pour minimiser la possibilité de choc électrique. Ne coupe...
Page 48 - PROTECTEUR DE SURTENSION; PANNEAU DE COMMANDE
48 Ø PROTECTEUR DE SURTENSION La plupart des appareils électriques utilisent une série de tableaux de commande électriques pour fonctionner. Ces cartes sont très sensibles aux surtensions et pourraient être endommagées ou détruites. Si l'appareil doit être utilisé dans une zone ou si votre ville/pay...
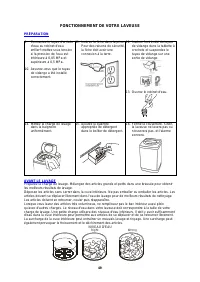
Page 49 - FONCTIONNEMENT DE VOTRE LAVEUSE; PRÉPARATION; Mettez la charge de lavage; AVANT LE LAVAGE
49 FONCTIONNEMENT DE VOTRE LAVEUSE PRÉPARATION 9. Connectez le tuyau d'arrivée d'eau au robinet d'eau. enfiler't mettez sous tension si la pression de l'eau est inférieure à 0,05 MPa et supérieure à 0,5 MPa. 10. Assurez-vous que le tuyau de vidange a été installé correctement. 11. Insérez la fiche d...
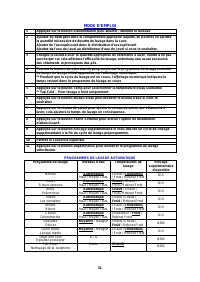
Page 51 - PROGRAMMES DE LAVAGE AUTOMATIQUE
51 MODE D'EMPLOI 1 Appuyez sur le bouton d'alimentation pour allumer / éteindre la laveuse 2 Ajoutez du détergent dans le compartiment approprié (liquide, en poudre) ou ajoutez la quantité nécessaire de dosette de lavage dans la cuve. Ajouter de l'assouplissant dans le distributeur d'assouplissant A...
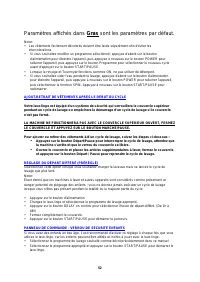
Page 52 - Paramètres affichés dans; Gras; sont les paramètres par défaut.; AJOUT/RETRAIT DE VÊTEMENTS APRÈS LE DÉBUT DU CYCLE; Fermez complètement le couvercle.; PANNEAU DE COMMANDE - VERROU DE SÉCURITÉ ENFANTS
52 Paramètres affichés dans Gras sont les paramètres par défaut. Noter: • Les vêtements facilement décolorés doivent être lavés séparément afin d'éviter les intercolorations. • Si vous souhaitez modifier un programme sélectionné, appuyez d'abord sur le bouton d'alimentation pour éteindre l'appareil,...
Page 53 - NETTOYER VOTRE LAVEUSE
53 Unplug the power cord. Remove the inlet hose and clean the filter with a brush. Clean the surface of the washing machine with a soft cloth regularly. Clean the inner tub regularly, especially after washing starched or bleached laundry. • Appuyez et maintenez enfoncés les boutons TEMP et WATER LEV...
Page 54 - PROBLÈME; La laveuse ne fonctionne pas.
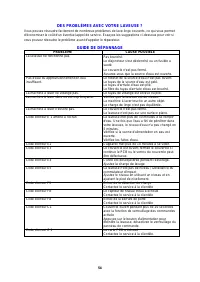
54 DES PROBLÈMES AVEC VOTRE LAVEUSE ? Vous pouvez résoudre facilement de nombreux problèmes de lave-linge courants, ce qui vous permet d'économiser le coût d'un éventuel appel de service. Essayez les suggestions ci-dessous pour voir si vous pouvez résoudre le problème avant d'appeler le réparateur. ...
Page 55 - SERVICE POUR VOTRE LAVEUSE; PRODUITS AVANTI SERVICES CLIENTÈLE
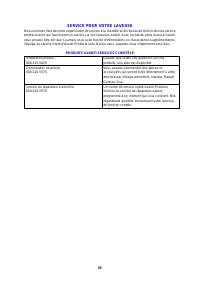
55 SERVICE POUR VOTRE LAVEUSE Nous sommes fiers de notre organisation de service à la clientèle et du réseau de techniciens de service professionnels qui fournissent un service sur vos laveuses Avanti. Avec l'achat de votre laveuse Avanti, vous pouvez être sûr que si jamais vous avez besoin d'inform...
Page 59 - Registration Information; Avanti Products LLC
59 Registration Information Thank you for purchasing this fine Avanti product. Please fill out this form and return it to the following address within 100 days from the date of purchase and receive these important benefits: Avanti Products LLC 3265 Meridian Pkwy # 114 – Weston, Florida 33331 Ø Prote...
Page 60 - PRINTED IN CHINA