Page 2 - TABLE OF CONTENTS
2 TABLE OF CONTENTS Appliance Safety 3 Important Safeguides 4 Help Us Help You / If You Need Service 5 Parts, Features, and Accessories 6 Important Safety Instructions 7 Installation Instructions 8 Before Using Your Portable Washer 8 Selecting a Location / Moving Your Washer 8 Connecting the Water S...
Page 3 - APPLIANCE SAFETY; Your safety and the safety of others are very important.; Danger means that failure to heed this safety; PROP. 65 WARNING FOR CALIFORNIA RESIDENTS
3 APPLIANCE SAFETY Your safety and the safety of others are very important. We have provided many important safety messages in this manual and on your appliance. Always read and obey all safety messages. This is the Safety Alert Symbol. This symbol alerts you to potential hazards that can kill or in...
Page 4 - IMPORTANT SAFEGUIDES; Replace all panels before operating.
4 IMPORTANT SAFEGUIDES Before the appliance is used, it must be properly positioned and installed as described in this manual, so read the manual carefully. To reduce the risk of fire, electrical shock or injury when using the appliance, follow basic precaution, including the following: • Plug into ...
Page 7 - IMPORTANT SAFETY INSTRUCTIONS; WARNING; Read all instructions before using the portable washer.; Before you throw away your old portable washer:; Take off the lid.
7 IMPORTANT SAFETY INSTRUCTIONS ~ WARNING ~ To reduce the risk of fire, electrical shock, or injury when using your portable washer, follow these basic precautions: • Read all instructions before using the portable washer. • Do not wash articles that have been previously cleaned in, washed in, soake...
Page 8 - INSTALLATION INSTRUCTIONS; BEFORE USING YOUR PORTABLE WASHER
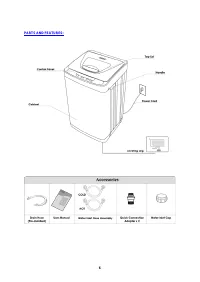
8 INSTALLATION INSTRUCTIONS BEFORE USING YOUR PORTABLE WASHER • Remove the exterior and interior packing. • You will need the following tools: • Wrench • Pliers • Screwdriver • Check to be sure you have all of the following parts: • 2 Inlet Hose • 2 Faucet Adapters • 1 Water Inlet Cover • 1 Drain Ho...
Page 9 - MOVING YOUR WASHER
9 MOVING YOUR WASHER To move your washer, tilt the unit back onto its rear rollers and push it forward as shown in the figure.
Page 11 - Turn off the faucet.; NOTE; : The highest point of the drain hose must be in the height of 2.5 –
11 SINK FAUCET CONNECTION For normal kitchen-sink tap only use the inlet hose with cold water inlet. Connect the inlet hose to the male hose thread adapter by turning it clockwise to be fixed tightly. Make sure to insert the rubber ring enclosed. Then connect tightly to your sink. Note: Some faucets...
Page 12 - Warning
12 Ø ELECTRICAL CONNECTION This appliance should be properly grounded for your safety. The power cord of this appliance is equipped with a three-prong plug which mates with standard three prong wall outlets to minimize the possibility of electrical shock. Do not under any circumstances cut or remove...
Page 14 - CONTROL PANEL; POWER ON / OFF BUTTON
14 CONTROL PANEL 1 POWER ON / OFF BUTTON 2 START / PAUSE BUTTON 3 LOAD SIZE SELECTOR BUTTON WATER TEMPERATURE SELECTION (PRESS AND HOLD FOR APPROXIMATELY 3 SECONDS) 4 PROGRAM SELECTOR BUTTON DELAY START SELECTOR (PRESS AND HOLD FOR APPROXIMATELY 3 SECONDS) DELAY START CAN BE PROGRAMMED FROM 2 – 24 H...
Page 15 - OPERATING YOUR PORTABLE WASHER; PREPARATION; Connect the water inlet hose
15 OPERATING YOUR PORTABLE WASHER PREPARATION 1. Connect the water inlet hose to the water faucet. 2. Ensure the drain hose has been installed properly. 3. Insert the plug into the socket. For safety the plug should have ground connection. 4. Insert the end of drain hose into the hook shelf and hang...
Page 16 - BEFORE WASHING; WATER LEVEL; Right
16 BEFORE WASHING Prepare the wash load. Mix large and small articles in a load to get the best washing results. Drop articles loosely into the inner tub. Do not pack articles in or wrap them. Articles should move freely through the wash water for best cleaning results. Articles should rollover, sin...
Page 17 - OPERATING INSTRUCTIONS; PRESS THE LOAD SIZE BUTTON.
17 OPERATING INSTRUCTIONS PRESS THE POWER BUTTON. PRESS THE LOAD SIZE BUTTON. Choose appropriate water level according to wash load quantity. (In SPEED WASH program, the water level cannot be selected) WATER TEMPERATURE CHOICE. Press and hold the load size button for approximately 3 seconds and, you...
Page 19 - FULLY AUTOMATIC – FUZZY LOGIC PROGRAM.; When the Rinse and Spin functions are ON, do not use detergent.; ADDING / REMOVING CLOTHING AFTER THE CYCLE HAS STARTED
19 PRESS DOWN START/PAUSE BUTTON ONCE AND THE MACHINE WILL BEGIN OPERATION. Please press this button to stop the normal operation, if it continues to work, press it again. Water level can be reset during the normal operation after pressing the PAUSE button. If the higher water level is selected, the...
Page 20 - Clean and rinse it thoroughly.; CARE AND MAINTENANCE; CLEANING YOUR PORTABLE WASHER; Clean the lint filter.
20 Unplug the power cord. Remove the inlet hose and clean the filter with a brush. Clean the surface of the washing machine with a soft cloth regularly. Clean the inner tub regularly, especially after washing starched or bleached laundry. Pull upward to remove the lint filter. Clean and rinse it tho...
Page 22 - PROBLEM; SERVICE FOR YOUR PORTABLE WASHER; AVANTI PRODUCTS CUSTOMER SERVICES
22 PROBLEMS WITH YOUR PORTABLE WASHER? You can solve many common portable washer problems easily, saving you the cost of a possible service call. Try the suggestions below to see if you can solve the problem before calling the servicer. TROUBLESHOOTING GUIDE PROBLEM POSSIBLE CAUSE Washer does not op...
Page 26 - INSTRUCCIONES DE SEGURIDAD IMPORTANTES; ADVERTENCIA; Leer todas las instrucciones antes de usar la lavadora portátil.; PELIGRO o ADVERTENCIA:; Riesgo de atrapamiento de niños.; Antes de deshacerse de su lavadora portátil de edad:; No manipule los controles.
26 INSTRUCCIONES DE SEGURIDAD IMPORTANTES ~ ADVERTENCIA ~ Para reducir el riesgo de incendio, choque eléctrico, o lesiones personales al usar su lavadora portátil, siga estas precauciones básicas: • Leer todas las instrucciones antes de usar la lavadora portátil. • No lavar artículos que han sido pr...
Page 27 - INSTRUCCIONES DE INSTALACIÓN; ANTES DE USAR SU LAVADORA PORTATIL
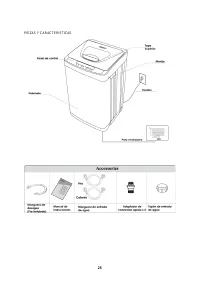
27 INSTRUCCIONES DE INSTALACIÓN ANTES DE USAR SU LAVADORA PORTATIL • Retire la envoltura interna y externa. • Necesitará las siguientes herramientas: • Llave inglesa • Alicates • Destornillador • Compruebe para asegurarse de que tiene todas las siguientes partes: • 2 tubos de entrada • 2 adaptadores...
Page 28 - CONEXIÓN GRIFO DEL FREGADERO
28 CONECTAR LA MANGUERA DE SUMINISTRO DE AGUA FRÍA La manguera de suministro de agua debe estar conectada a la lavadora en un extremo y al grifo de agua en el otro. No estire la manguera de suministro de agua. Si el tubo es demasiado corto y no se desea desplazar el grifo de agua, vuelva a colocar l...
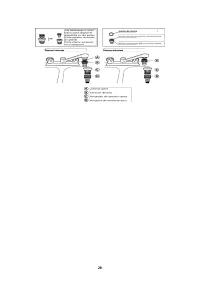
Page 30 - DESCONECTAR LA MANGUERA DE ABASTECIMIENTO DE AGUA; Retire las tuercas de conexión del grifo y lavadora.; POSICIONAMIENTO la manguera de drenaje; : El punto más alto de la manguera de drenaje debe estar en la altura
30 Si hay una fuga de agua de grifo o lavadora, cierre el suministro de agua y apriete completamente con una llave. Tenga cuidado de no apretar demasiado y dañar la conexión de agua. Abra el suministro de agua y asegurarse de que no haya fugas. DESCONECTAR LA MANGUERA DE ABASTECIMIENTO DE AGUA Desmo...
Page 31 - Advertencia
31 Ø CONEXIÓN ELÉCTRICA Este aparato debe estar conectado a tierra adecuadamente para su seguridad. El cable de alimentación de este aparato está equipado con un enchufe de tres clavijas que se acopla con tres enchufes de pared standard para minimizar la posibilidad de choque eléctrico. En ninguna c...
Page 32 - PANEL DE CONTROL
32 PANEL DE CONTROL 1 BOTON DE ENCENDIDO / APAGADO 2 EMPEZAR / PAUSA 3 BOTON PARA SELECCIONAR TAMAÑO DE LAVADO 4 BOTÓN DE SELECCIÓN DE PROGRAMA 5 BOTON PARA SELECCIONAR TAMAÑO DE LAVADO OPCION PARA EMPEZAR ATRASADO OPCION DE BLOQUEO PARA SEGURIDAD DE LOS NIÑOS ACTIVAR: Durante el ciclo de lavado, ma...
Page 33 - PREPARACIÓN
33 PREPARACIÓN 1. Conectar la manguera de entrada de agua al grifo de agua. 2. Asegúrese de que la manguera de drenaje se ha instalado correctamente. 3. Insertar el enchufe en la toma. Por razones de seguridad el enchufe debe tener conexión a tierra. 4. Insertar el extremo de la manguera de drenaje ...
Page 34 - ANTES DE LAVADO; NIVEL DE AGUA
34 ANTES DE LAVADO Prepare la carga de lavado. Mezcle artículos grandes y pequeños en una carga para obtener los mejores resultados de lavado. Suelte los artículos uno a uno dentro del cilindro. No empaque o envuelva artículos. Los artículos deben moverse libremente a través del agua de lavado para ...
Page 35 - INSTRUCCIONES DE OPERACIÓN; PRESIONE EL BOTÓN DE SELECCIÓN DE PROGRAMA.
35 INSTRUCCIONES DE OPERACIÓN PRESIONE EL BOTON DE PODER. PRESIONE EL BOTÓN DE SELECCIÓN DE PROGRAMA. Elige la función deseada y luego el correspondiente parpadeo indicador. 1 NORMAL 5 GIRAR SOLAMENTE 2 ALGODÓN 6 ROPA BLANCA 3 LAVADO SUAVE 7 CARGAS PESADAS Y SUCIAS 4 LAVADO RÁPIDO 8 TINA DE LIMPIEZA...
Page 37 - Presiona el botón de poder.; Añadir o quitar la ropa, según sea necesario.
37 Para seleccionar uno de los ciclos de lavado automáticos preprogramados siga las instrucciones como se muestra a continuación: • Cerrar la tapa. • Presiona el botón de poder. • Presione el botón de programa para seleccionar el programa adecuado hasta que se muestre el número de programa en la ven...
Page 39 - Unplug the power cord.; CUIDADO Y MANTENIMIENTO; COMO LIMPIAR SU LAVADORA PORTÁTIL
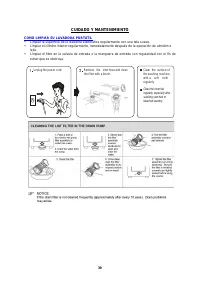
39 Unplug the power cord. Remove the inlet hose and clean the filter with a brush. Clean the surface of the washing machine with a soft cloth regularly. Clean the inner tub regularly, especially after washing starched or bleached laundry. CUIDADO Y MANTENIMIENTO COMO LIMPIAR SU LAVADORA PORTÁTIL • L...
Page 40 - PROBLEMA; Lavadora no funciona.
40 PROBLEMAS CON LA LAVADORA PORTÁTIL? Puede solucionar muchos problemas comunes de lavado portátiles con facilidad, que le ahorra el coste de una posible llamada de servicio. Pruebe las siguientes sugerencias para ver si puede resolver el problema antes de llamar al servicio técnico. GUÍA PARA RESO...
Page 41 - SERVICIO PARA SU lavadora automática
41 SERVICIO PARA SU lavadora automática Estamos orgullosos de nuestra organización de servicio al cliente y la red de técnicos de servicios profesionales que prestan servicio en sus lavadoras portátiles Avanti. Con la compra de la lavadora portátil Avanti, puede estar seguro de que, si alguna vez ne...
Page 43 - SÉCURITÉ DE L'APPAREIL; Votre sécurité et celle des autres sont très importantes.; Symbole ainsi que les mots « DANGER », « AVERTISSEMENT » ou « ATTENTION ».
43 SÉCURITÉ DE L'APPAREIL Votre sécurité et celle des autres sont très importantes. Nous avons fourni de nombreux messages de sécurité importants dans ce manuel et sur votre appareil. Toujours lire et obéir à tous les messages de sécurité. C'est le symbole d'alerte de sécurité. Ce symbole vous signa...
Page 44 - IMPORTANT CONSEILS DE SÉCURITÉ; Remplacer tous les panneaux avant de faire fonctionner.
44 IMPORTANT CONSEILS DE SÉCURITÉ Avant de l'appareil est utilisé, il doit être correctement positionné et installé Décrit dans ce manuel, alors lisez attentivement le manuel. Pour réduire les risques d'incendie, choc électrique ou de blessure lors de l'utilisation de l'appareil, suivez les précauti...
Page 47 - CONSIGNES DE SÉCURITÉ IMPORTANTES; ATTENTION; Risque de piégeage des enfants.; Avant de jeter votre vieux lave-portable:; Enlever le couvercle.
47 CONSIGNES DE SÉCURITÉ IMPORTANTES ~ ATTENTION ~ Pour réduire les risques d'incendie, d'électrocution ou de blessure lors de l'utilisation de votre laveuse portable, suivez ces précautions de base: • Lisez toutes les instructions avant d'utiliser la machine à laver portable. • Ne pas laver des art...
Page 48 - INSTRUCTIONS D'INSTALLATION; AVANT D'UTILISER VOTRE LAVE PORTABLE
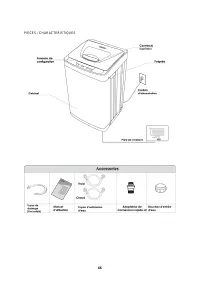
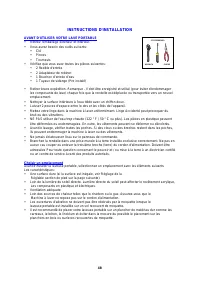
48 INSTRUCTIONS D'INSTALLATION AVANT D'UTILISER VOTRE LAVE PORTABLE • Retirez l'emballage extérieur et intérieur. • Vous aurez besoin des outils suivants: • Clé • Pinces • Tournevis • Vérifiez que vous avez toutes les pièces suivantes: • 2 flexible d'entrée • 2 Adaptateur de robinet • 1 Bouchon d’en...
Page 49 - DÉPLACEMENT LAVE
49 DÉPLACEMENT LAVE Pour déplacer votre lave-linge, inclinez l'unité arrière sur ses rouleaux arrière et le pousser vers l'avant comme indiqué sur la figure.
Page 50 - CONNEXION ROBINET ÉVIER
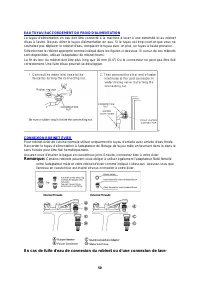
50 EAU TUYAU RACCORDEMENT DU FROID D'ALIMENTATION Le tuyau d'alimentation en eau doit être connecté à la machine à laver à une extrémité et au robinet d'eau à l'autre. Ne pas étirer le tuyau d'alimentation en eau. Si le tuyau est trop court et que vous ne souhaitez pas déplacer le robinet d'eau, rem...
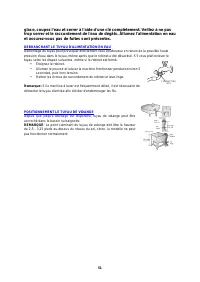
Page 51 - DEBRANCHANT LE TUYAU D'ALIMENTATION EN EAU; Éteignez le robinet.; POSITIONNEMENT LE TUYAU DE VIDANGE; : Le point culminant du tuyau de vidange doit être la hauteur
51 glace, coupez l'eau et serrer à l'aide d'une clé complètement. Veillez à ne pas trop serrer et le raccordement de l'eau de dégâts. Allumez l'alimentation en eau et assurez-vous pas de fuites sont présentes. DEBRANCHANT LE TUYAU D'ALIMENTATION EN EAU Démontage du tuyau peut provoquer directement l...
Page 52 - Attention
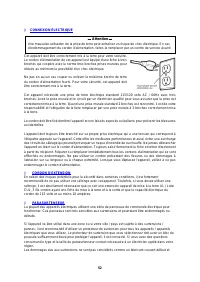
52 Ø CONNEXION ÉLECTRIQUE Cet appareil doit être correctement mis à la terre pour votre sécurité. Le cordon d'alimentation de cet appareil est équipé d'une fiche à trois broches qui coopère avec la norme trois broches prises murales pour réduire au minimum la possibilité d'un choc électrique. Ne pas...
Page 53 - annulera la garantie du produit.; PANNEAU DE CONTRÔLE; MARCHE / ARRÊT BOUTON
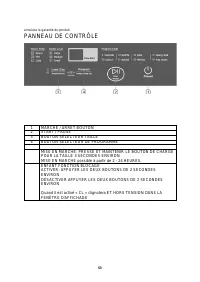
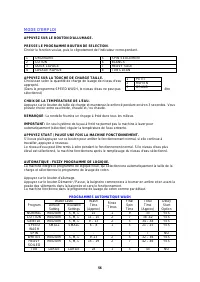
53 annulera la garantie du produit. PANNEAU DE CONTRÔLE 1 MARCHE / ARRÊT BOUTON 2 START / PAUSE 3 BOUTON SÉLECTEUR TAILLE 4 BOUTON SELECTEUR DE PROGRAMME MISE EN MARCHE: PRESSE ET MAINTENIR LE BOUTON DE CHARGE POUR LA TAILLE 3 SECONDES ENVIRON MISE EN MARCHE possible à partir de 2 - 24 HEURES. ENFAN...
Page 54 - UTILISATION DE VOTRE LAVE PORTABLE; PRÉPARATION; Vérifiez que le tuyau de
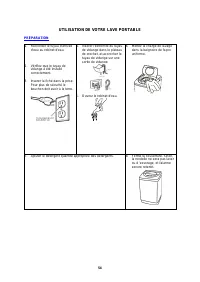
54 UTILISATION DE VOTRE LAVE PORTABLE PRÉPARATION 1. Raccorder le tuyau d'arrivée d'eau au robinet d'eau. 2. Vérifiez que le tuyau de vidange a été installé correctement. 3. Insérer la fiche dans la prise. Pour plus de sécurité le bouchon doit avoir à la terre. 4. Insérer l'extrémité du tuyau de vid...
Page 55 - AVANT LAVAGE
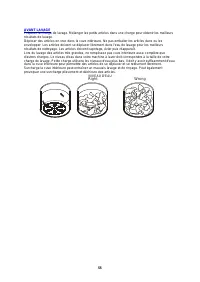
55 AVANT LAVAGE Préparer la charge de lavage. Mélanger les petits articles dans une charge pour obtenir les meilleurs résultats de lavage. Déposer des articles en vrac dans la cuve intérieure. Ne pas emballer les articles dans ou les envelopper. Les articles doivent se déplacer librement dans l'eau ...
Page 57 - AJOUT / DÉPOSE HABILLEMENT APRÈS LE DÉBUT DU PROGRAMME
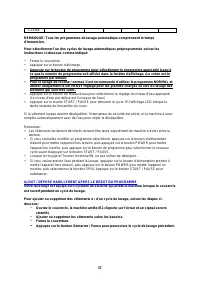
57 CLEAN REMARQUE: Tous les programmes de lavage automatique comprennent le temps d'immersion. Pour sélectionner l'un des cycles de lavage automatiques préprogrammés suivez les instructions ci-dessous comme indiqué: • Ferme la couverture. • Appuyez sur le bouton d'allumage. • Appuyez sur le bouton d...
Page 58 - DÉPART DIFFÉRÉ; ENTRETIEN; NETTOYAGE DE VOTRE LAVE PORTABLE
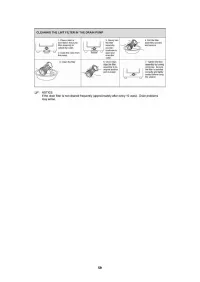
58 Unplug the power cord. Remove the inlet hose and clean the filter with a brush. Clean the surface of the washing machine with a soft cloth regularly. Clean the inner tub regularly, especially after washing starched or bleached laundry. DÉPART DIFFÉRÉ Votre machine peut être programmé pour commenc...
Page 60 - PROBLÈME
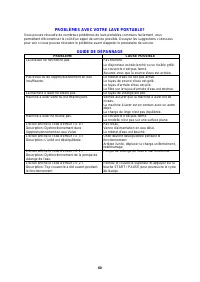
60 PROBLÈMES AVEC VOTRE LAVE PORTABLE? Vous pouvez résoudre de nombreux problèmes de lave-portables communs facilement, vous permettant d'économiser le coût d'un appel de service possible. Essayez les suggestions ci-dessous pour voir si vous pouvez résoudre le problème avant d'appeler le prestataire...
Page 61 - SERVICE POUR VOTRE LAVE PORTABLE; AVANTI PRODUITS SERVICES CLIENTS
61 SERVICE POUR VOTRE LAVE PORTABLE Nous sommes fiers de notre organisation de service à la clientèle et le réseau de techniciens de services professionnels qui offrent des services sur vos portables Avanti rondelles. Avec l'achat de votre machine à laver portable Avanti, vous pouvez être sûr que si...
Page 64 - Registration Information; Avanti Products LLC.
64 Registration Information Thank you for purchasing this fine Avanti product. Please fill out this form and return it to the following address within 100 days from the date of purchase and receive these important benefits: Avanti Products LLC. P.O.Box 520604 – Miami, Florida 33152 Ø Protect your pr...
Page 65 - PRINTED IN CHINA